标签:RoCE 效果 turn 运行时 def image ring 执行方法 name
以下是以项目的的形式就行运行验证五个消息的运行顺序及调用链的原理,里面主要用到了递归调用。
本篇博客先给大家展示代码,后面进行文字及图片讲解执行的顺序
一、创建java项目springAOPModule
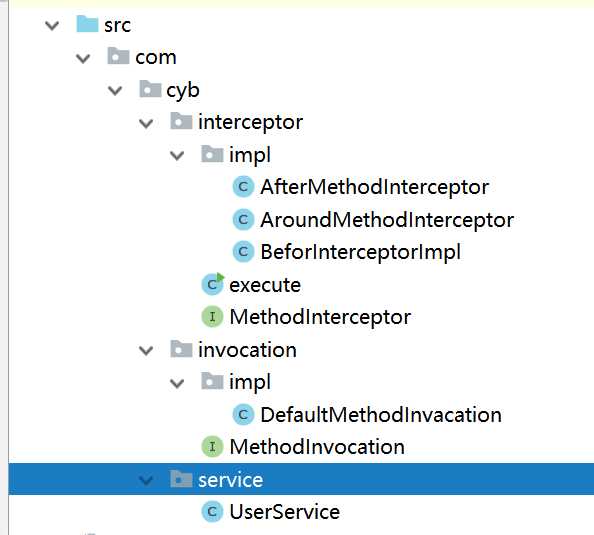
二、创建项目包结构如下:

三、创建目标方法UserService
/**
 * 目标调用类
 */
public class UserService {

    public void login(String userName,Integer age){
        System.out.println("姓名为:"+userName+",年龄为:"+age);
    }
}
四、创建执行接口及方法(MethodInvocation/DefaultMethodInvacation)
1、方法执行接口:MethodInvocation
/**
 * 方法执行接口
 */
public interface MethodInvocation {
    Object process() throws InvocationTargetException, IllegalAccessException;
}
2、方法执行实习类:DefaultMethodInvacation
/**
 * 执行方法实现类
 */
public class DefaultMethodInvacation implements MethodInvocation {
    //5个通知集合
    private List<MethodInterceptor> chian;
    //目标对象
    private Object target;
    private Method method;// 目标方法
    private Object args[];// 目标参数
    int currentChianIndex;// 记录当前拦截器链调用指针

    public DefaultMethodInvacation(List<MethodInterceptor> chian, Object target, Method method, Object[] args) {
        this.chian = chian;
        this.target = target;
        this.method = method;
        this.args = args;
    }

    @Override
    public Object process() throws InvocationTargetException, IllegalAccessException {

        if(currentChianIndex==chian.size()){
            return method.invoke(target,args);
        }
        MethodInterceptor methodInterceptor = chian.get(currentChianIndex++);
        return methodInterceptor.invoke(this);
    }
}
五、创建拦截接口及方法
1、目标方法拦截接口:MethodInterceptor
/**
 * 创建方法拦截接口
 */
public interface MethodInterceptor {
    //执行通知的拦截
    Object invoke(MethodInvocation methodInvocation) throws InvocationTargetException, IllegalAccessException;
}
2、前置通知方法
/**
 * 前置方法
 */
public class BeforInterceptorImpl implements MethodInterceptor {
    @Override
    public Object invoke(MethodInvocation methodInvocation) throws InvocationTargetException, IllegalAccessException {
        System.out.println("进入前置通知");
        return  methodInvocation.process();
    }
}
3、后置通知方法
public class AfterMethodInterceptor implements MethodInterceptor {
    @Override
    public Object invoke(MethodInvocation methodInterceptor) throws InvocationTargetException, IllegalAccessException {
        Object process = methodInterceptor.process();
        System.out.println("后置通知");
        return process;
    }
}
4、环绕通知方法
public class AroundMethodInterceptor implements MethodInterceptor {
    @Override
    public Object invoke(MethodInvocation methodInvocation) throws InvocationTargetException, IllegalAccessException {
        System.out.println("环绕通知之前执行....");
        Object process = methodInvocation.process();
        System.out.println("环绕通知之后执行....");
        return process;
    }
}
六、创建测试方法execute
public class execute {
    public static void main(String[] args) throws NoSuchMethodException, InvocationTargetException, IllegalAccessException {
        ArrayList<MethodInterceptor> list = new ArrayList<>();
        list.add(new BeforInterceptorImpl());
        list.add(new AfterMethodInterceptor());
        list.add(new AroundMethodInterceptor());
        UserService userService = new UserService();
        Method logingMethod = UserService.class.getMethod("login",String.class,Integer.class);
        Object[] objects ={"cyb",25};
        new DefaultMethodInvacation(list,userService,logingMethod,objects).process();
    }
}
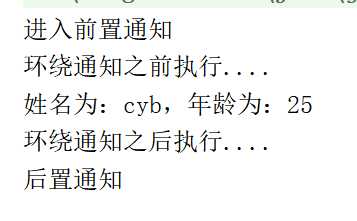
七、运行效果:

八、运行步骤原理解析:
启动运行时,系统运行步骤如下:
1、将前置通知、后置通知、环绕通知3个拦截方法放入集合中
2、获取目标方法
3、创建目标方法中的参数
4、通过有参构造方法将拦截方法集合、目标方法和参数传递到执行方法中并调用process处理方法
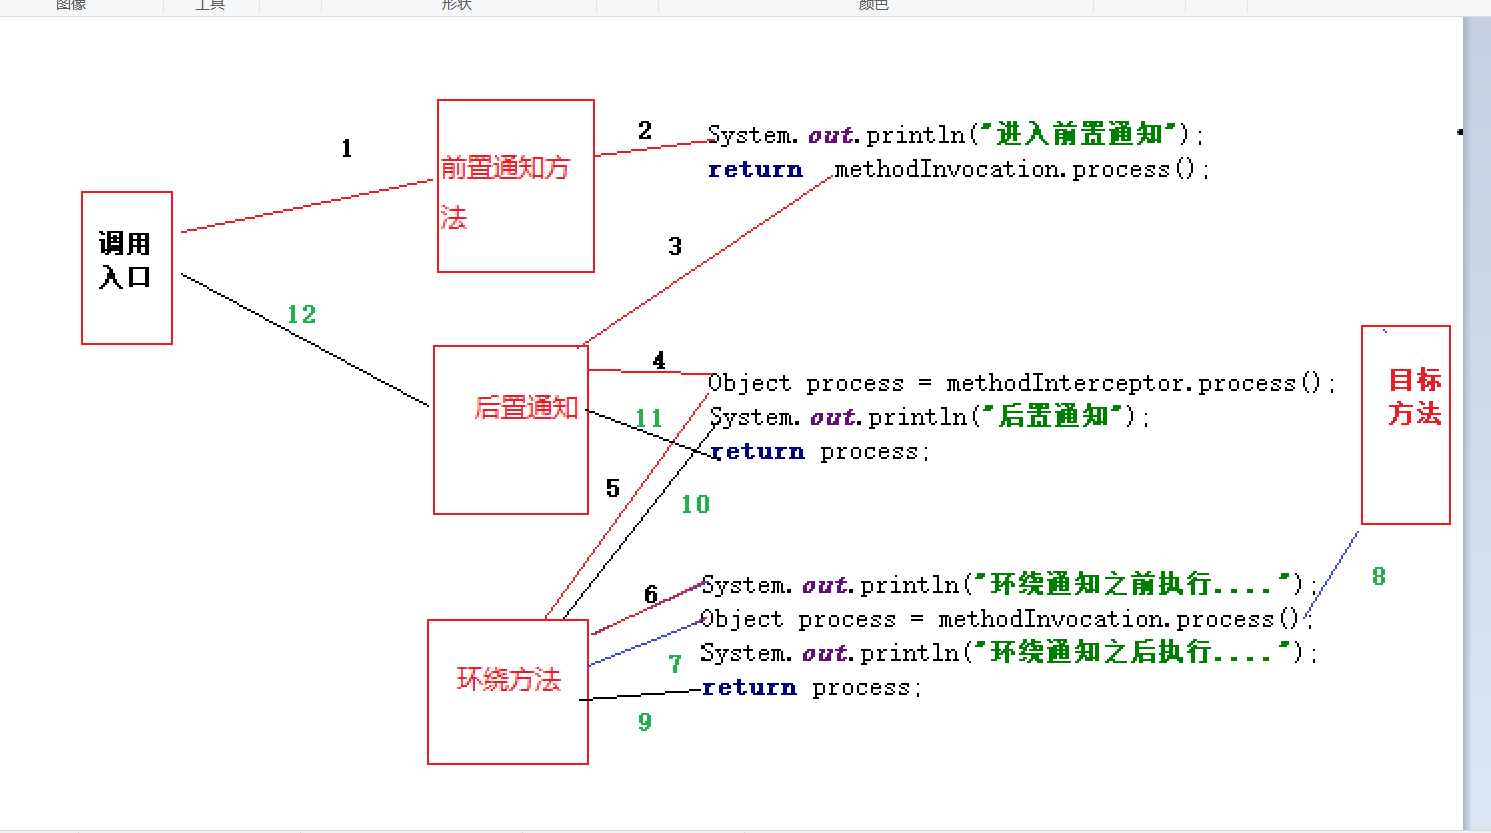
5、在process方法中,第一次获取拦截方法中第一个前置通知,并在里面继续调用process方法,此时index下标为1,获取后置拦截方法,并在该方法中继续调用process,此时又获取的是环绕通知拦截方法,再次进入环绕通知方法,打印”环绕通知之前执行。。。”语句,此时index值为:3,再次调用process方法,此时index等于集合长度,调用模板方法,则打印目标方法语句。调完后继续打印环绕方法的”环绕通知之后执行。。。”,执行完后在方法继续返回到后置方法执行打印“后置通知”语句
九、图形讲解

注意:前置方法的打印要写在方法调用之前,后置方法打印要写在调用方法之后,环绕方法打印则分别写在调用方法前后。
以上是本人对spring aop5个通知调用链原理的讲解,大家理解后可以对这进行更好的优化,若上文有不合适的欢迎各位博友讨论。转发请说明出处,本人博客主页地址为:https://home.cnblogs.com/u/chenyuanbo/
标签:RoCE 效果 turn 运行时 def image ring 执行方法 name
原文地址:https://www.cnblogs.com/chenyuanbo/p/11167459.html