标签:说明 opener 更新 href int 安装python nec codec down
先记录一下 idea安装Python的语言支持插件后的操作:我用的是windows环境、windows环境、windows环境。
首先 下载 Anaconda3 的可执行文件 下载地址

然后安装,安装过程中有一个环节,默认打了一个勾,把上面的配置环境变量也勾上,然后一路next
借图说明下:
安装完成后,打开cms 输入 :conda info --env 查看下环境,默认只有一个base;
下面那个py37是后来建的,创建命令conda create -n py37

删除环境谨慎执行:conda remove -n py37
激活环境:activate base
关闭环境:deactivate base
激活后,就可以起飞了。
惯例:helloworld
#!/usr/bin/python3
print(‘hello world‘)
1,


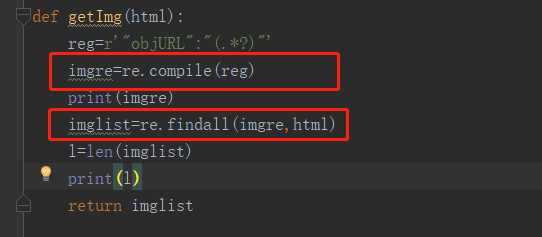
报错原因:
TypeError: can’t use a string pattern on a bytes-like object.
html用decode(‘utf-8’)进行解码,由bytes变成string。
py3的urlopen返回的不是string是bytes。
解决:
html = html.decode(‘utf-8‘)
2.

报错原因:
如果用 urllib.request.urlopen 方式打开一个URL,服务器端只会收到一个单纯的对于该页面访问的请求,但是服务器并不知道发送这个请求使用的浏览器,操作系统,硬件平台等信息,而缺失这些信息的请求往往都是非正常的访问,例如爬虫.
有些网站为了防止这种非正常的访问,会验证请求信息中的UserAgent(它的信息包括硬件平台、系统软件、应用软件和用户个人偏好),如果UserAgent存在异常或者是不存在,那么这次请求将会被拒绝(如上错误信息所示)
所以可以尝试在请求中加入UserAgent的信息
解决:
def getHtml(url):

    u = urllib.request.URLopener() # Python 3: urllib.request.URLOpener
    u.addheaders = []
    u.addheader( ‘Accept‘, ‘*/*‘)
    u.addheader(‘Accept-Language‘,‘en-US,en;q=0.8‘)
    u.addheader( ‘Cache-Control‘, ‘max-age=0‘)
    u.addheader( ‘User-Agent‘, ‘Mozilla/5.0 (X11; Linux x86_64) AppleWebKit/537.36 (KHTML, like Gecko) Chrome/48.0.2564.116 Safari/537.36‘)
    u.addheader( ‘Connection‘, ‘keep-alive‘)
    u.addheader( ‘Referer‘, ‘http://www.baidu.com/‘)

    page=u.open(url)
    html = page.read()
    html = html.decode(‘utf-8‘,"ignore")
    page.close()
    return html
3.在一个py文件中,引入另一个py文件,直接import即可
4.用python3版本,引入request的下载函数 urlretrieve时候,可以这么做,举一反三,可以减少代码量
from urllib.request import urlretrieve
urlretrieve(url,filename)
5.在获取对象Html时,即使加了decode(‘utf-8‘),也仍旧报错:
‘utf-8‘ codec can‘t decode byte 0xd7 in position 309: invalid continuation byte
解决方法:decode(‘utf-8‘,‘ignore‘)
6.int 型变量 index 转 str类型---->str(index)
相反:str类型变量 string 转int类型 -----> int(str) --------10进制下
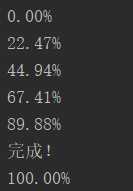
7.显示下载进度
def Schedule(a,b,c):
    per = 100.0 * a * b / c
    if per>100:
        per = 100
        print(‘完成!‘)
    print(‘%.2f%%‘ % per)
urlretrieve(fileUrl,fileName,Schedule)
效果如下:

8记录一个爬网址图片,然后创建文件夹存图片的操作
# coding:utf-8
import requests
from bs4 import BeautifulSoup
import os
# 创建一个文件夹名称
FileName = ‘mm‘
def dd():
    if not os.path.exists(os.path.join(os.getcwd(), FileName)):     # 新建文件夹
        os.mkdir(os.path.join(os.getcwd(),FileName))
        print(u‘建了一个名字叫做‘, FileName, u‘的文件夹!‘)
    else:
        print(u‘名字叫做‘, FileName, u‘的文件夹已经存在了!‘)
    url = ‘http://www.xiaohuar.com/list-1-1.html‘
    html = requests.get(url).content    # 返回html
    # html = html.decode(‘utf-8‘)
    soup  = BeautifulSoup(html,‘html.parser‘)   # BeautifulSoup对象
    jpg_data = soup.find_all(‘img‘,width="210") # 找到图片信息
    index = 1
    for i in jpg_data:
        deindex = str(index) +  "a"
        data = i[‘src‘] # 图片的URL
        print("图片url为"+data)
        if "https://www.dxsabc.com/" not in data:
            data = ‘http://www.xiaohuar.com‘+data
        r2 = requests.get(data)
        fpath = os.path.join(FileName,deindex)
        with open(fpath+‘.jpg‘,‘wb+‘)as f : # 循环写入图片
            f.write(r2.content)
        index += 1
    print(‘保存成功,快去查看图片吧!!‘)

if __name__== ‘__main__‘:
    dd()
9记录一个爬网址的shtml下的文章,然后创建文件夹存文件的操作
还在弄,持续更新中。。。
记录初学Python的坑-----python3.7.3版本
标签:说明 opener 更新 href int 安装python nec codec down
原文地址:https://www.cnblogs.com/justtodo/p/11175245.html