标签:number his nim strong pwd emma list() transient art
一:Java简介
Java语言的介绍:Java是一门面向对象编程语言,不仅吸收了C++语言的各种优点,还摒弃了C++里难以理解的多继承、指针等概念,因此Java语言具有功能强大和简单易用两个特征。
Java语言的特点:简单性、面向对象、分布式、健壮性、安全性、平台独立与可移植性、多线程、动态性等
Java语言的应用:编写桌面应用程序、Web应用程序、分布式系统和嵌入式系统应用程序等
二:Java自学路线图
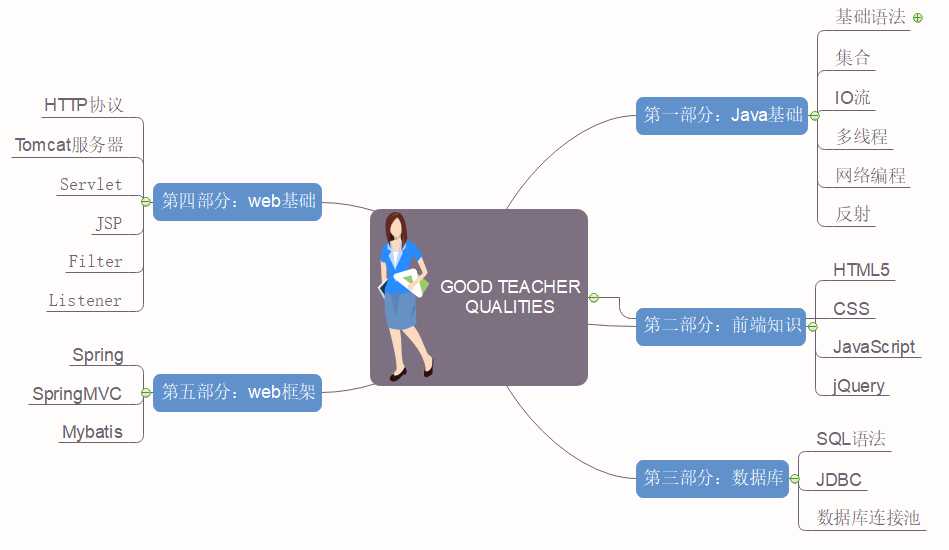
三:Java基础
一、标识符和关键字
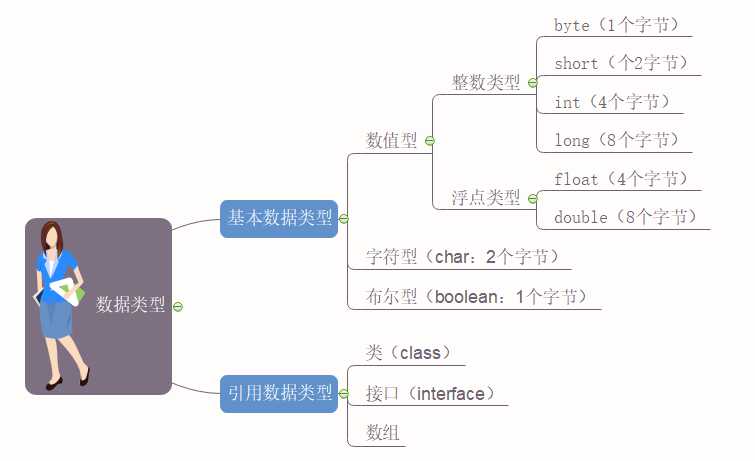
二、数据类型
三、运算符与表达式
1. 算数运算符:加(+),减(-),乘(*),除(/),求余(%)
2. 赋值运算符:=,+=,-=,*=,%=
3. 关系运算符:>,<,>=,<=,==,!=
4. 逻辑运算符:[&&,||](只有左侧满足才计算右侧),!,[&,|](不管左侧结果如何,都要计算右侧)
5. 三目运算符:(表达式) ? 值1,值2;
四:流程控制语句
1. 条件分支语句:if语句,switch语句
2. 循环语句:while循环,do while循环,for循环,foreach循环
四:数组
1. 声明数组:
1. 静态初始化: 数据类型 [ ]... 数组名 = {值1,值2,...}
2. 动态初始化:数据类型 [ ]... 数组名 = new 数据类型[长度];
2. 打印数组:foreach循环
3. 数组排序:冒泡排序,选择排序,反转排序,插入排序
4. Arrays工具类:
1. 排序
1. 实现Comparable接口:Arrays.sort(要排序的数组)
2. 实现Comparator接口:Arrays.sort(要排序的数组,new Comparator);
2. 二分法查找:binarySearch(要查找的数组,要查找的值),必须提前拍好序
3. 数组元素比较:Arrays.equals(数组1,数组2)
4. 数组填充:Arrays.fill(要填充的数组,值)

import java.util.Arrays;

public class TestArray {
    public static void main(String[] args) {
        // 数组的静态初始化
        int[] array1 = { 1, 3, 5, 6, 7, 2, 4, 10 };
        // 数组的动态初始化
        int[] array2 = new int[5];
        array2[0] = 1;
        array2[1] = 2;
        array2[2] = 7;
        array2[3] = 3;
        array2[4] = 4;
        // for循环打印数组
        for (int i = 0; i < array2.length; i++) {
            System.out.print (array2[i]);
        }
        // foreach打印数组
        for (int i : array2) {
            System.out.print(i);
        }
        // 排序
        Arrays.sort(array2);
        for (int i : array2) {
            System.out.print(i);
        }
        // 二分法查找
        System.out.print(Arrays.binarySearch(array2, 3));
        // 数组元素比较
        System.out.println(Arrays.equals(array1, array2));
        // 数组元素填充
        Arrays.fill(array2, 1);
        for (int j : array2) {
            System.out.println(j);
        }
    }
}
五:面向对象
一、封装
1. 核心思想:隐藏细节,保护数据安全。
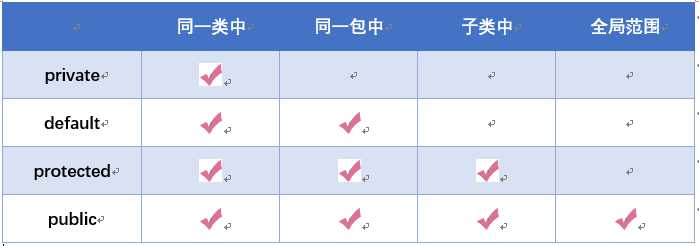
2. 访问权限

public class Encapsulation {
    // 1.成员属性私有化
    private String name;
    private String pwd;

    // 2.提供getter和setter方法来访问
    public String getName() {
        return name;
    }

    public void setName(String name) {
        this.name = name;
    }

    public String getPwd() {
        return pwd;
    }

    public void setPwd(String pwd) {
        this.pwd = pwd;
    }
}

class TestEncapsulation {
    public static void main(String[] args) {
        Encapsulation test = new Encapsulation();
        // 3.通过setter方法设置属性值
        test.setName("封装");
        test.setPwd("666");
        // 4.通过getter方法获取值
        System.out.println("姓名:" + test.getName() + " -- 密码:" + test.getPwd());

    }
}
二、方法的重载和重写
1. 方法的重载:方法名相同,参数列表不同
2. 方法的重写:方法名、返回值类型、参数列表都相同,构造方法和使用final、static修饰的方法不能被重写
三、继承
1. 核心思想:解决代码冗余,提高代码的复用性
2. 继承关系:满足is-a的关系,父类更通用,子类更具体。

/**
 * 1. 将类中重复的部分提取成为父类
 */
public class Animal {
    private String name;
    private String food;

    public Animal(String name, String food) {
        this.name = name;
        this.food = food;
    }

    public void eat() {
        System.out.println(name + "正在吃" + food);
    }
}

/**
 * 2. 子类继承父类,对父类进行扩展
 */
public class Cat extends Animal {

    public Cat(String name, String food) {
        super(name, food);
    }
}
public class Dog extends Animal{

    public Dog(String name, String food) {
        super(name, food);
    }
}

/**
 * 3. 测试
 */
public class TestExtends{
    public static void main(String[] args) {
        Animal cat = new Cat("三三", "鱼");
        cat.eat();
        Animal dog = new Dog("二哈", "香肠");
        cat.eat();
    }
}
四、多态
1. 核心思想:提高代码可维护性和可扩展性
2. 实现多态的三个必要条件:继承、重写、父类引用指向子类对象(向下转型)
3. 多态的实现方式:重写、接口、抽象类和抽象方法

/**
 * 1. 创建动物类,定义动物吃什么的方法
 */
class Animals {
    private String name;
    private String food;

    public Animals(String name, String food) {
        super();
        this.name = name;
        this.food = food;
    }

    public void eat() {
        System.out.println(this.name + "会吃" + this.food);
    }
}


/**
 * 2. 创建Cat类来实现吃的功能
 */
class Cat extends Animals{
    public Cat(String name, String food) {
        super(name, food);
    }

    @Override
    public void eat() {
        super.eat();
    }
}


/**
 * 3. 通过向上转型和向下转型实现多态
 */
public class Test01 {
    public static void main(String[] args) {
        // 向下转型
        Animals animals = new Cat("三三", "鱼");
        animals.eat();
        // 向上转型
        Cat cat = (Cat) animals;
        cat.eat();
    }
}
五、抽象类
1. 核心思想:让代码有更强的可扩展性
2. 特点:
1. 抽象类不能实例化对象。
2. 如果一个类包含抽象方法,那么该类必须是抽象类。
3. 任何子类必须重写父类的抽象方法(具体实现),或者声明自身为抽象类。
4. 抽象类中的抽象方法只有方法声明,没有方法体
5. 构造方法和static修饰的方法不能声明为抽象方法

/**
 * 1. 创建员工抽象类
 */
abstract class Employees {
    // 成员变量
    private String name;
    private String address;
    private Integer number;

    // 构造方法
    public Employees(String name, String address, Integer number) {
        System.out.println("Employees.Employees()");
        this.name = name;
        this.address = address;
        this.number = number;
    }

    // 定义信息抽象函数
    public abstract void call();

    public String getName() {
        return name;
    }

    public void setName(String name) {
        this.name = name;
    }

    public String getAddress() {
        return address;
    }

    public void setAddress(String address) {
        this.address = address;
    }

    public Integer getNumber() {
        return number;
    }

    public void setNumber(Integer number) {
        this.number = number;
    }
}

class Salary extends Employees {
    private Double salary;

    public Salary(String name, String address, Integer number, Double salary) {
        super(name, address, number);
        this.salary = salary;
        System.out.println("Salary.Salary()");
    }

    // 2. 重写父类的抽象方法
    @Override
    public void call() {
        System.out.println(super.getNumber() + "是" + super.getName() + "的电话,他住在" +
        super.getAddress() + "他现在的工资是" + this.salary);
    }
}

public class Test {
    public static void main(String[] args) {
        // 3. 抽象类的对象必须由子类去实例化
        Employees emp = new Salary("孙悟空", "花果山", 1234, 222.66);
        emp.call();
    }
}
六、接口
1. 核心思想:让代码有更强的可扩展性
2. 特点:
1. 接口不能实例化对象,没有构造方法
2. 接口中的方法只能是抽象方法,默认使用public abstract修饰
3. 接口中的变量只能是常量,默认使用public static final修饰
4. 接口支持多继承,但接口不是被继承了,而是被实现了
3. 接口和抽象类的区别
1. 接口中的方法只能是抽象方法,而抽象类中的方法可以是普通方法,构造方法和抽象方法
2. 接口中的变量只能是常量,而抽象类中的方法可以是任意类型
3. 接口中不能含有静态代码块和静态方法,而抽象类中可以有
4. 一个类可以实现多个接口,但一个类只能继承一个抽象类

/**
 * 1. 创建Animal接口
 */
interface Animal {
    // 定义睡觉抽象方法
    void sleep();

    // 定义吃饭抽象方法
    void eat();
}

/**
 * 2. 创建Dog接口继承Animal接口
 */
interface Dog extends Animal {
    // 定义游泳抽象方法
    void swim();
}

/**
 * 3. 创建HaShiQi接口继承Dog和Animal接口,实现多继承
 */
interface HaShiQi extends Dog, Animal {
    // 定义拆家抽象方法
    void demolishedFamily();
}

/**
 * 4. 创建测试类来实现接口,并且复写所有抽象方法
 */
public class TestAnimal implements HaShiQi {

    @Override
    public void swim() {
        System.out.println("哈士奇会游泳");
    }

    @Override
    public void sleep() {
        System.out.println("哈士奇会睡觉");
    }

    @Override
    public void eat() {
        System.out.println("哈士奇喜欢吃苦瓜");
    }

    @Override
    public void demolishedFamily() {
        System.out.println("哈士奇会拆家");
    }

    public static void main(String[] args) {
        // 使用多态实例化对象
        HaShiQi dog = new TestAnimal();
        dog.eat();
        dog.sleep();
        dog.demolishedFamily();
        dog.swim();
    }

}
六:集合
一、集合简介
集合的主要作用是存储引用类型数据,长度可以动态的改变,解决了存储数据数量不确定的问题
二、Collection集合体系
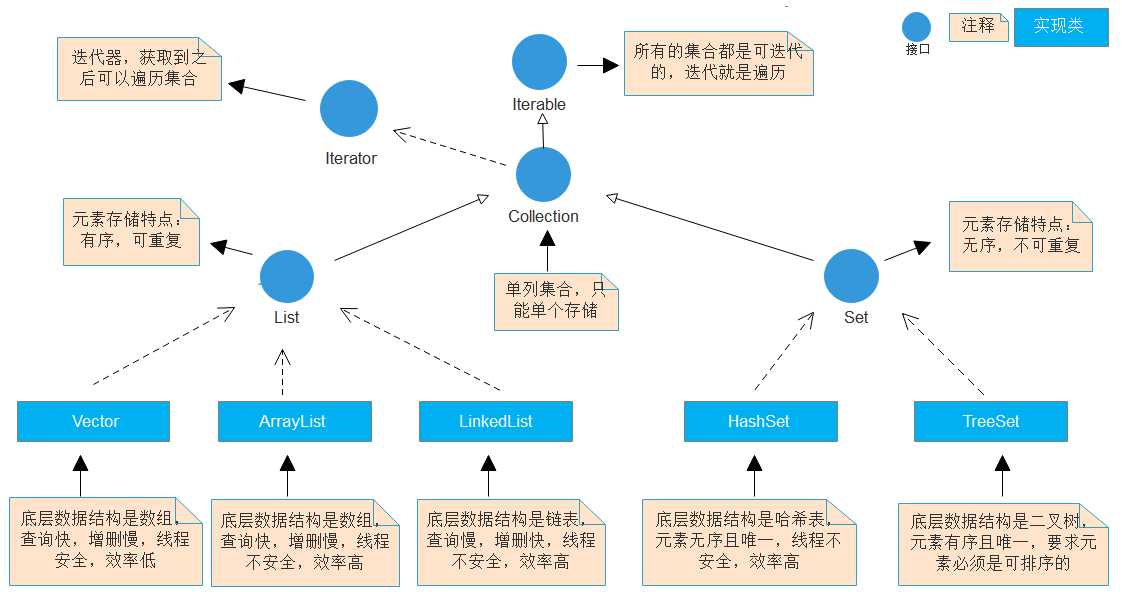
一、Collection常用方法
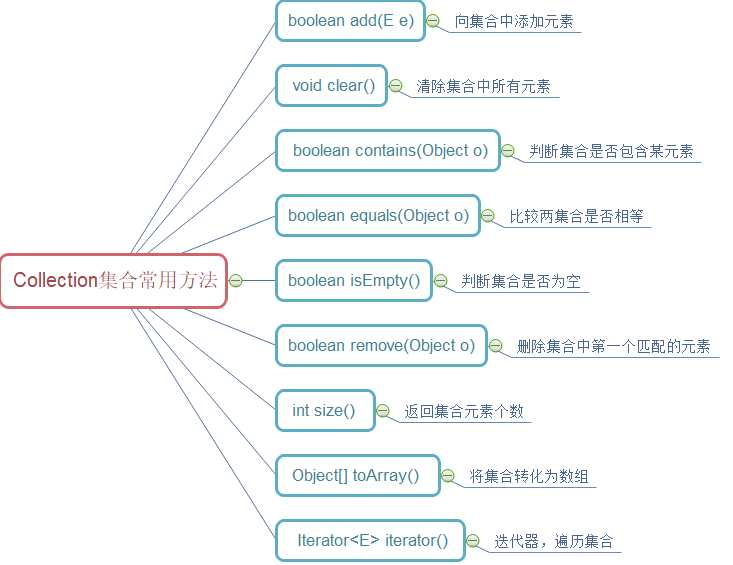
二、不同集合的使用场景
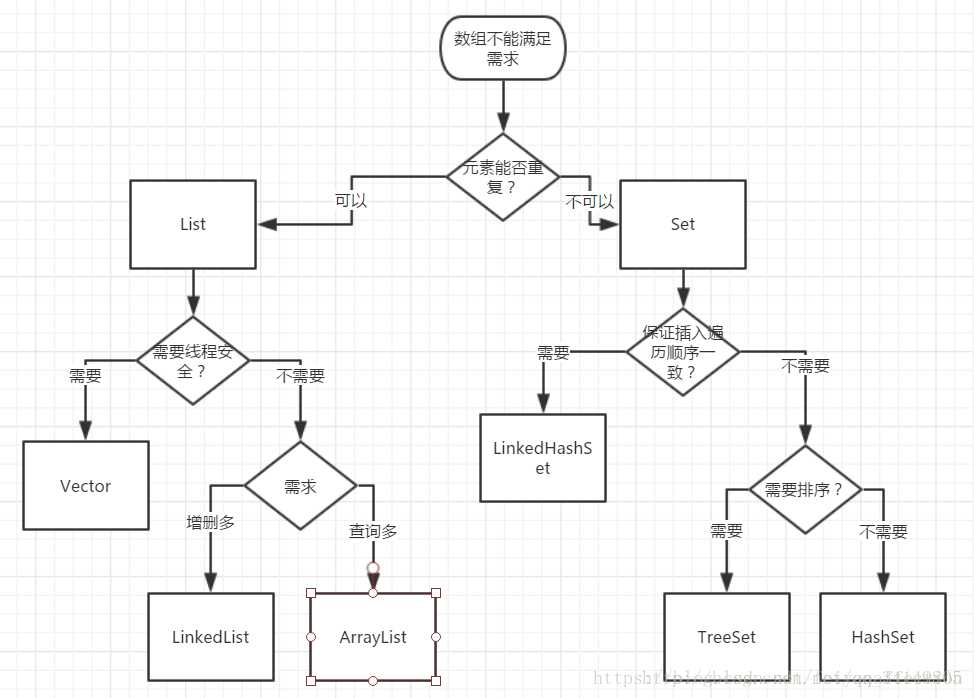

import java.util.ArrayList;
import java.util.Iterator;
import java.util.List;

/**
 * 创建学生类
 */
class Student {
    // 学号
    private Integer id;
    // 姓名
    private String name;

    public Student(Integer id, String name) {
        this.id = id;
        this.name = name;
    }

    @Override
    public String toString() {
        return "Student [id=" + id + ", name=" + name + "]";
    }

}

public class TestCollection {
    public static void main(String[] args) {
        // 1. 创建集合存储String类型数据
        List<String> list = new ArrayList<String>();

        // 2.向集合中添加元素
        list.add("猪猪侠");
        list.add("超人强");
        list.add("波比");
        list.add("小菲菲");

        // 3. 遍历集合
        // 3.1普通for循环
        String[] strArray = new String[list.size()];
        list.toArray(strArray); // 将集合转换为数组
        for (int i = 0; i < strArray.length; i++) {
            System.out.println(strArray[i]);
        }

        // 3.2 foreach循环
        for (String str : list) {
            System.out.println(str);
        }

        // 3.3 迭代器遍历
        Iterator<String> iterator = list.iterator();
        while (iterator.hasNext()) { // hasNext():判断指针后是否有下一个元素
            System.out.println(iterator.next()); // next():返回指针后的元素
        }

        // 4. 判断集合中是否包含某元素
        System.out.println(list.contains("小菲菲")); // true

        // 5. 判断集合是否为空
        System.out.println(list.isEmpty()); // false

        // 6. 清除集合中所有元素
        list.clear();
        System.out.println(list.isEmpty()); // true
        System.out.println("---------------------------------------------------");


        // 创建集合存储对象类型数据
        List<Student> list2 = new ArrayList<Student>();

        // 向集合中添加对象类型数据
        list2.add(new Student(1, "张三"));
        list2.add(new Student(2, "李四"));

        // foreach遍历集合
        for (Student student : list2) {
            System.out.println(student);
        }

        // 迭代器遍历集合
        Iterator<Student> iterator2 = list2.iterator();
        while (iterator2.hasNext()) {
            Student student = iterator2.next();
            System.out.println(student);
        }
    }
}
三、Map集合体系
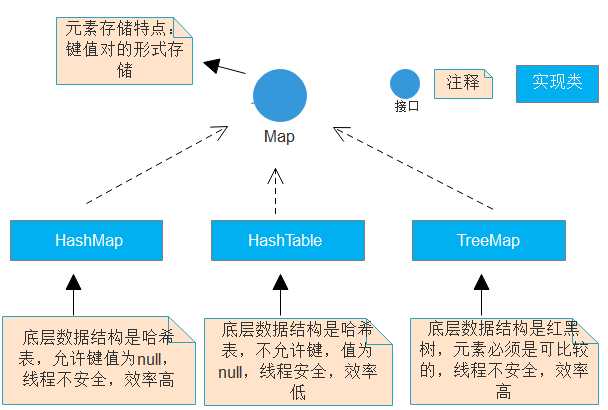
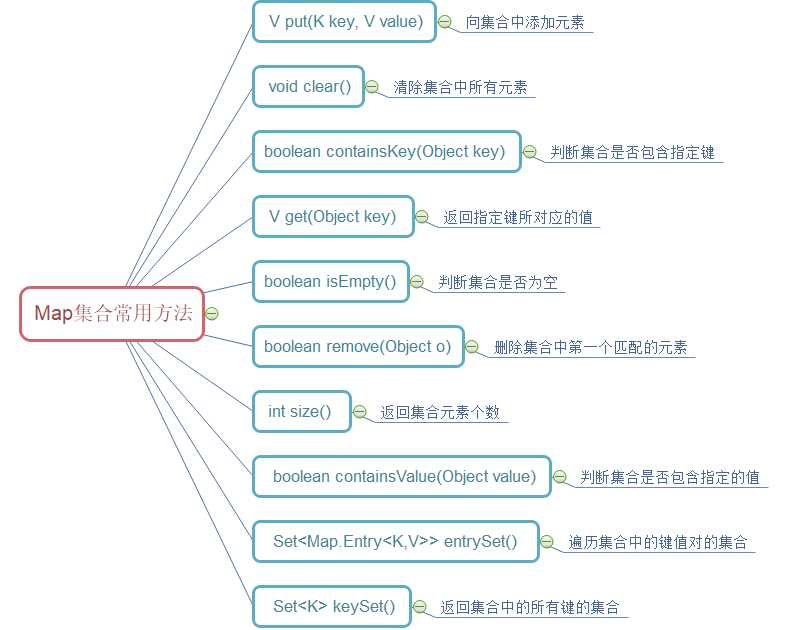

import java.util.HashMap;
import java.util.Iterator;
import java.util.Map;
import java.util.Map.Entry;

import javax.enterprise.inject.New;

class Teacher {
    private String name;
    private Integer age;

    public Teacher(String name, Integer age) {
        this.name = name;
        this.age = age;
    }

    @Override
    public String toString() {
        return "Teacher [name=" + name + ", age=" + age + "]";
    }

}

public class TestMap {
    public static void main(String[] args) {
        // 1. 创建Map集合存储学号和姓名
        Map<Integer, String> map = new HashMap<Integer, String>();

        // 2. 向map集合中添加元素
        map.put(1, "张三");
        map.put(2, "李四");
        map.put(3, "王五");

        // 3. 遍历map集合
        // 3.1 通过map.keySet()遍历集合
        for (Integer key : map.keySet()) {
            System.out.println("key=" + key + " value=" + map.get(key));
        }

        // 3.2 通过迭代器遍历集合
        Iterator<Entry<Integer, String>> iterator = map.entrySet().iterator();
        while (iterator.hasNext()) {
            Map.Entry<Integer, String> entry = iterator.next();
            System.out.println("key=" + entry.getKey() + " value=" + entry.getValue());
        }

        // 3.3 通过map.entrySet()遍历集合
        for (Entry<Integer, String> entry : map.entrySet()) {
            System.out.println("key=" + entry.getKey() + " value=" + entry.getValue());
        }

        // 4. 判断集合中是否包含指定键
        System.out.println(map.containsKey("1")); // true
        System.out.println(map.containsValue("list")); // false

        // 5. 判断集合是否为空
        System.out.println(map.isEmpty()); // false

        // 6. 清除集合中所有元素
        map.clear();
        System.out.println(map.isEmpty()); // true
        System.out.println("----------------------------------------");


        // 1. 创建Map集合存储对象类型数据
        Map<Integer, Teacher> map2 = new HashMap<Integer, Teacher>();

        // 2. 向Map集合中添加对象类型数据
        map2.put(1, new Teacher("张三", 18));
        map2.put(2, new Teacher("李四", 19));
        map2.put(3, new Teacher("王五", 20));

        // 3. 遍历集合
        // 3.1 通过map.keySet()遍历
        for (Integer key : map2.keySet()) {
            System.out.println("key=" + key + " value=" + map2.get(key));
        }

        // 3.2 通过迭代器遍历集合
        Iterator<Entry<Integer, Teacher>> iterator2 = map2.entrySet().iterator();
        while (iterator2.hasNext()) {
            Entry<Integer, Teacher> entry = iterator2.next();
            System.out.println("key=" + entry.getKey() + " value=" + entry.getValue());
        }

        // 3.3 通过map.entrySet()遍历集合
        for (Entry<Integer, Teacher> entry : map2.entrySet()) {
            System.out.println("key=" + entry.getKey() + " value=" + entry.getValue());
        }
    }
}
七:IO流
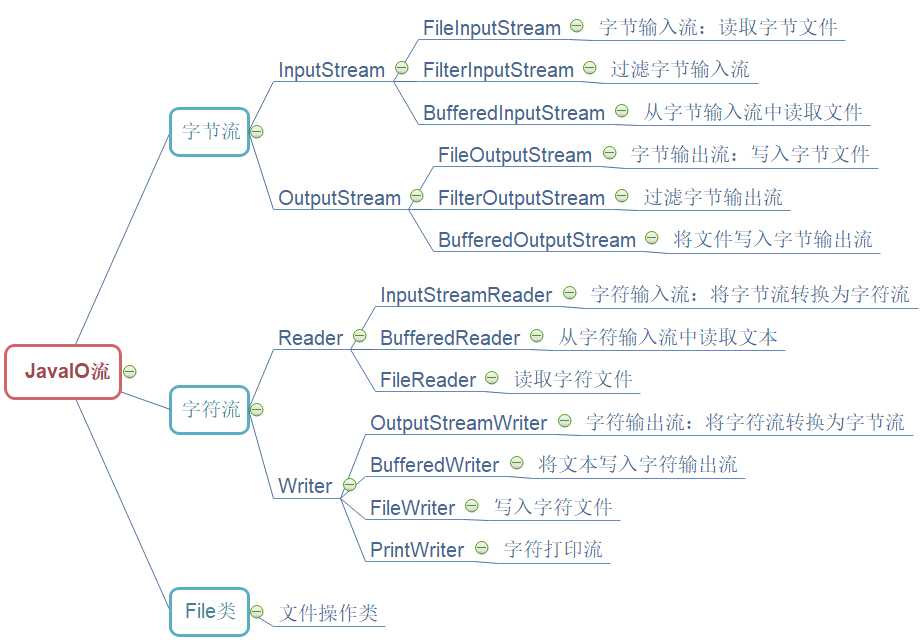
一、IO流简介
1. 流的概念:流是有起点和终点的一组有顺序的字节集合,作用是进行数据传输
2. 流的分类:
1. 按照数据流向不同可以分为输入输出流;
2. 按照处理数据单位不同可以分为字节流和字符流
3. 输入流和输出流的作用
1. 输入流:程序从数据源读取数据
2. 输出流:将数据从程序中写入指定文件
4. 字节流和字符流的作用
1. 字节流:以字节为单位处理所有类型数据
2. 字符流:以字符为单位处理纯文本文件
二、IO流体系
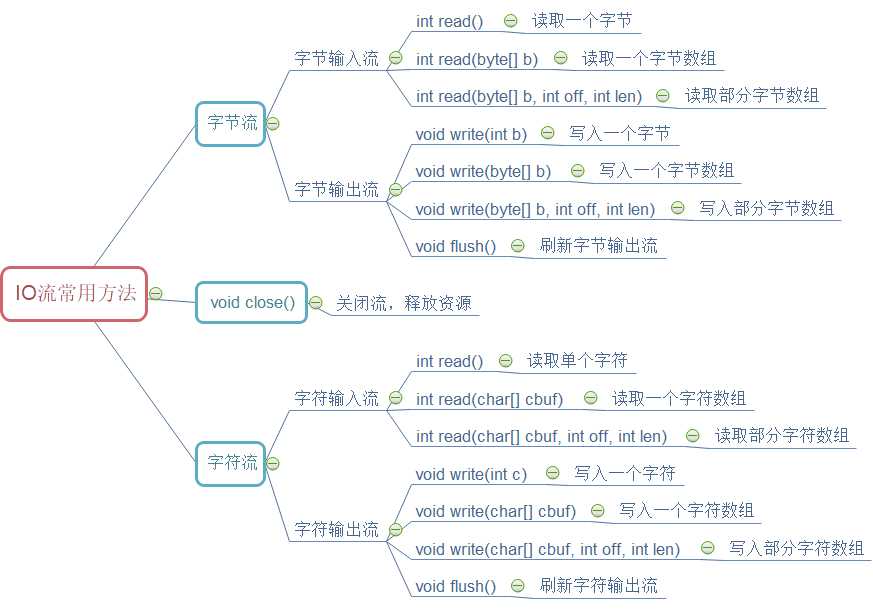
三、IO流常用方法

import java.io.FileInputStream;
import java.io.FileNotFoundException;
import java.io.FileOutputStream;
import java.io.FileReader;
import java.io.FileWriter;
import java.io.IOException;

/**
 * 1. 文本文件复制
 * @author DELL
 *
 */
public class TestIO {
    public static void main(String[] args) {
        // 要读取的文件
        String src = "E:/Workspaces1/Demo/src/TestFile.java";
        // 要写入的文件
        String dest = "d:/test.java";

        // 1.1 一次复制一个字节
        copyFile1(src, dest);
        // 1.2 一次复制一个字节数组
        copyFile2(src, dest);

        // 2.1 一次复制一个字符
        copyFile3(src, dest);
        // 2.2 一次复制一个字符数组
        copyFile4(src, dest);
    }

    // 1. 一次复制一个字节,异常处理,手动关闭流
    public static void copyFile1(String srcFileName, String destFileName) {
        FileInputStream fis = null;
        FileOutputStream fos = null;
        try {
            fis = new FileInputStream(srcFileName);
            fos = new FileOutputStream(destFileName);
            int cc = fis.read();
            while (cc != -1) {
                // 一次写入一个字节
                fos.write(cc);
                // 一次写入一个字节
                cc = fis.read();
            }
        } catch (FileNotFoundException e) {
            e.printStackTrace();
        } catch (IOException e) {
            e.printStackTrace();
        } finally {
            if (fos != null) {
                try {
                    fos.close();
                } catch (IOException e) {
                    e.printStackTrace();
                }
            }
            if (fis != null) {
                try {
                    fis.close();
                } catch (IOException e) {
                    e.printStackTrace();
                }
            }
        }
    }

    // 2. 一次复制一个字节数组,异常处理,自动关闭流
    public static void copyFile2(String srcFileName, String destFileName) {
        // 自动关闭流
        try (
                FileInputStream fis = new FileInputStream(srcFileName);
                FileOutputStream fos = new FileOutputStream(destFileName);
                ) {
            byte[] bytes = new byte[1024];
            int len = fis.read(bytes);
            while (len != -1) {
                // 一次写入一个字节数组
                fos.write(bytes, 0, len);
                // 一次读取一个字节数组
                len = fis.read(bytes);
            }
        } catch (FileNotFoundException e) {
            e.printStackTrace();
        } catch (IOException e) {
            e.printStackTrace();
        }
    }

    // 3. 一次复制一个字符,异常处理,自动关闭流
    public static void copyFile3(String srcFileName, String destFileName) {
        try (
                FileReader fr = new FileReader(srcFileName);
                FileWriter fw = new FileWriter(destFileName);
                ){
            int cc = fr.read();
            while (cc != -1) {
                // 一次写入一个字符
                fw.write(cc);
                // 一次读取一个字符
                cc = fr.read();
            }
        } catch (FileNotFoundException e) {
            e.printStackTrace();
        } catch (Exception e) {
            e.printStackTrace();
        }
    }

    // 4. 一次复制一个字符数组,异常处理,手动关闭流
    public static void copyFile4(String srcFileName, String destFileName) {
        FileReader fr = null;
        FileWriter fw = null;
        try {
            fr = new FileReader(srcFileName);
            fw = new FileWriter(destFileName);
            char[] cbuf = new char[1024];
            int len = fr.read(cbuf);
            while (len != -1) {
                // 一次写入一个字符数组
                fw.write(cbuf);
                // 一次读取一个字符数组
                len = fr.read(cbuf);
            }
        } catch (FileNotFoundException e) {
            e.printStackTrace();
        } catch (IOException e) {
            e.printStackTrace();
        } finally {
            if (fw != null) {
                try {
                    fw.close();
                } catch (IOException e) {
                    e.printStackTrace();
                }
            }
            if (fr != null) {
                try {
                    fr.close();
                } catch (IOException e) {
                    e.printStackTrace();
                }
            }
        }
    }
}

import java.io.File;
import java.io.FileInputStream;
import java.io.FileNotFoundException;
import java.io.FileOutputStream;
import java.io.IOException;
import java.io.ObjectInputStream;
import java.io.ObjectOutputStream;
import java.io.Serializable;

/**
 * 1. 序列化和反序列化的概念
 *          1. 对象序列化:把对象转换为字节序列(二进制数据)的过程
 *          2. 对象反序列化:把字节序列恢复为对象的过程
 *
 * 2. 什么情况下需要序列化:
 *          1. 将对象保存到文件或数据库中时
 *          2. 使用套接字在网上传送对象时
 *          3. 通过RMI传输对象时
 *
 * 3. 如何实现序列化
 *          1. 创建类实现Serializable接口
 *          2. 指定serialVersionUID序列号
 *          3. 使用对象输出流(ObjectOutputStream)将对象保存到指定位置
 *          4. 使用writerObject()方法将对象写入到文件中
 *
 *
 * 4. 哪些属性不能被序列化
 *          1. 使用transient修饰的属性
 *          2. 使用static修饰的属性
 *
 */

// 1. 创建类实现Serializable接口
class People implements Serializable {

    // 2. 指定序列号
    private static final long serialVersionUID = 1L;
    // 静态字段
    private static String id = "2019";
    // transient关键字修饰的字段
    private transient String name;

    private Integer age;

    public String getName() {
        return name;
    }

    public void setName(String name) {
        this.name = name;
    }

    public Integer getAge() {
        return age;
    }

    public void setAge(Integer age) {
        this.age = age;
    }

    @Override
    public String toString() {
        return "People [name=" + name + ", age=" + age + "]";
    }

}

public class Test {
    public static void main(String[] args) throws FileNotFoundException, IOException, ClassNotFoundException {
        serializePeople();
        deserializePeople();
    }

    /**
      * 序列化
     */
    public static void serializePeople() throws FileNotFoundException, IOException {
        People p = new People();
        p.setName("张三");
        p.setAge(18);
        // 3. 使用对象输出流将对象保存到指定位置
        ObjectOutputStream oos = new ObjectOutputStream(new FileOutputStream(new File("D:/test.txt")));
        // 4. 将对象写入文件
        oos.writeObject(p);
        System.out.println("对象序列化成功!!");
        oos.close();
    }

    /**
      * 反序列化
     */
    public static People deserializePeople() throws ClassNotFoundException, IOException {
        // 使用对象输入流从指定位置读取对象
        ObjectInputStream ois = new ObjectInputStream(new FileInputStream(new File("D:/test.txt")));
        // 读取对象
        People p = (People) ois.readObject();
        System.out.println("对象反序列化成功!!");
        return p;

    }
}
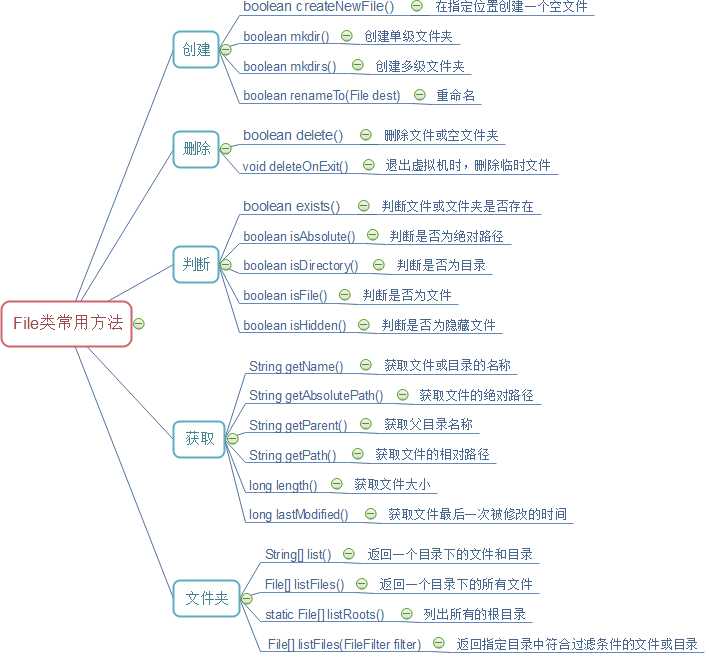
四、File类常用方法

import java.io.File;
import java.io.FileFilter;
import java.io.IOException;
import java.text.SimpleDateFormat;

public class TestFile {
    public static void main(String[] args) throws IOException {
        // 1. 构造方法指明文件路径以及格式
        File file = new File("D:\\test2\\test.txt");
        File file2 = new File("D:\\test2");
        File file3 = new File("D:\\test3");

        // 2.1 创建一个文件
        file.createNewFile();
        // 2.2 创建一个单级目录
        file2.mkdir();
        // 2.3 创建一个多级目录
        file3.mkdirs();

        // 3.1 判断文件或文件夹是否存在
        System.out.println(file.exists()); // true
        // 3.2 判断是否为绝对路径
        System.out.println(file.isAbsolute()); // true
        // 3.3 判断是否为文件
        System.out.println(file2.isFile()); // false
        // 3.4 判断是否为目录
        System.out.println(file2.isDirectory()); // true
        // 3.5 判断是否为隐藏文件
        System.out.println(file3.isHidden()); // false

        // 4.1 获取文件或目录名称
        System.out.println(file.getName());
        // 4.2 获取文件的绝对路径
        System.out.println(file.getAbsolutePath());
        // 4.3 获取文件相对路径
        System.out.println(file.getPath());
        // 4.4 获取文件父目录
        System.out.println(file.getParent());
        // 4.5 获取文件大小
        System.out.println(file.length());
        // 4.6 获取文件最后一次被修改时间
        SimpleDateFormat sdf = new SimpleDateFormat("yyyy-MM-dd HH:mm:ss");
        String updateTime = sdf.format(file.lastModified());
        System.out.println(updateTime);

        // 5.1 返回此目录下的所有文件和目录
        String [] fileString = file2.list();
        for (String str : fileString) {
            System.out.println(str);
        }
        // 5.2 返回此目录下的所有文件
        File [] files = file2.listFiles();
        for (File file4 : files) {
            System.out.println(file4.getName());
        }
        // 5.3  返回所有根目录
        File [] files2 = File.listRoots();
        for (File file4 : files2) {
            System.out.println(file4);
        }
        // 5.4 返回指定目录中符合过滤条件的文件和目录
        File [] files3 = file2.listFiles(new FileFilter() {

            @Override
            public boolean accept(File pathname) {
                while ("a.txt".equals(pathname.getName())){
                    return true;
                }
                return false;
            }
        });
        for (File file4 : files3) {
            System.out.println(file4.getName());
        }
    }
}
八:多线程
一、线程相关概念
1. 线程和进程
1. 进程:操作系统中的应用程序,一个进程就是一个应用程序
2. 线程:CPU调度的最小单元,进程的一个执行流
2. 上下文切换
1. 上下文切换:CPU从一个线程或进程切换到另一个进程或线程;
2. 多线程程序并不是同时进行的,由于CPU的执行速度太快,CPU会在不同的线程之间快速的切换执行;
二、多线程的三种实现方式及优缺点

import java.util.concurrent.Callable;
import java.util.concurrent.FutureTask;

/**
 * 1. 创建多线程的三种方式
 *        1. 继承Thread类
 *
 *        2. 实现Runnable接口
 *             1. 方式一:创建类实现Runnable接口
 *                    1. 创建类实现Runnable接口
 *                    2. 重写run()方法
 *                    3. 使用Thread类的构造方法实例化实现Runnable接口的类对象
 *                    4. 开启线程
 *
 *             2. 方式二:使用匿名内部类
 *                    1. 使用Thread类的构造方法创建一个Runnable接口的代理对象
 *                    2. 重写run()方法
 *                    2. 开启线程
 *
 *        3. 实现Callable接口
 *              1. 方式一:创建类实现Callable接口
 *                     1. 创建类实现Callable接口
 *                     2. 重写call()方法
 *                     3. 使用Thread类的构造方法实例化FutureTask对象
 *                     4. 使用FutureTask类的构造方法实例化实现了Callable接口的类对象
 *                     5. 开启线程
 *
 *              2. 方式二:使用匿名内部类
 *                     1. 使用Thread类的构造方法实例化FutureTask对象
 *                     2. 使用FutureTask类的构造方法创建Callable接口的代理对象
 *                     3. 重写call()方法
 *                     4. 开启线程
 *
 * 2. 三种方式的优缺点
 *        1. 继承了Thread类
 *             1. 优点:代码书写简单
 *             2. 缺点:由于Java的单继承性,代码的耦合度比较高
 *
 *        2. 实现了Runnable接口和Callable接口
 *             1. 方式一:
 *                 1. 优点:代码的可扩展性更强
 *                 2. 缺点:没有缺点
 *
 *             2. 方式二:
 *                 1. 优点:代码书写简单
 *                 2. 缺点:只适合线程使用一次的时候
 */


/**
 * 1. 继承Thread类
 */
class Thread1 extends Thread{
    public static void test() {
        for (int i = 0; i < 100; i++) {
            System.out.println("继承Thread类执行的第" + i + "次");
        }
    }
}

/**
 * 2. 实现Runnable接口
 */
class Thread2 implements Runnable{

    @Override
    public void run() {
        for (int i = 0; i < 100; i++) {
            System.out.println("实现Runnable接口方式一执行的第" + i + "次");
        }
    }
}

/**
 * 3. 实现Callable接口
 */
class Thread3 implements Callable<Integer>{
    @Override
    public Integer call() throws Exception {
        int i = 0;
        for (; i < 100; i++) {
            System.out.println("实现Callable接口方式一执行的第" + i + "次");
        }
        return i;
    }
}

public class TestThread {
    public static void main(String[] args) {
        // 1. 测试继承Thread类
        Thread1 thread1 = new Thread1();
        thread1.start();
        Thread1.test();


        // 2. 测试实现Runnable接口
        // 2.1 方式一
        new Thread(new Thread2()).start();

        // 2.2 方式二
        new Thread(new Runnable() {
            @Override
            public void run() {
                for (int i = 0; i < 100; i++) {
                    System.out.println("实现Runnable接口方式一执行的第" + i + "次");
                }
            }
        }).start();


        // 3. 测试实现Callable接口
        // 3.1 方式一
        new Thread(new FutureTask<Integer>(new Thread3() {
        }), "方式三").start();;

        // 3.2 方式二
        new Thread(new FutureTask<Integer>(new Callable<Integer>() {
            @Override
            public Integer call() throws Exception {
                int i = 0;
                for (; i < 100; i++) {
                    System.out.println("实现Runnable接口方式二执行的第" + i + "次");
                }
                return i;
            }
        })).start();;
    }
}
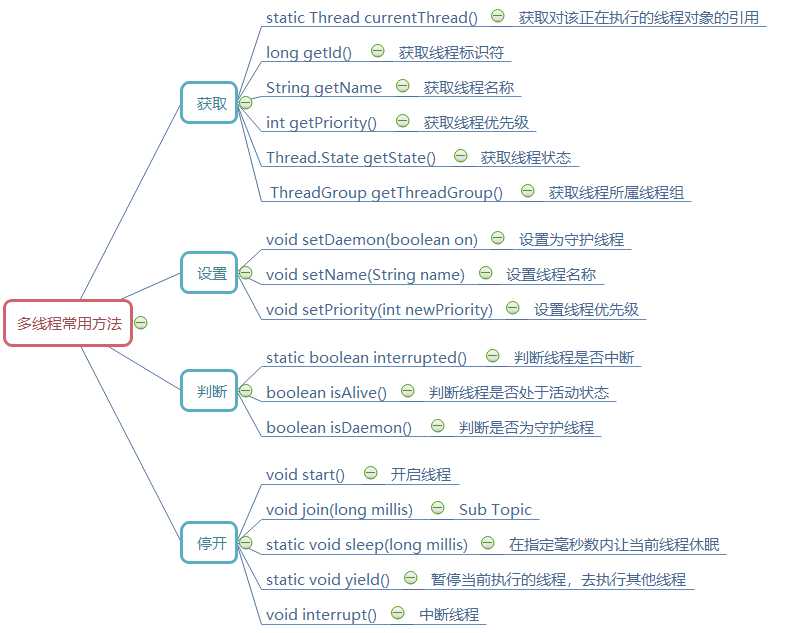
三、多线程常用方法

public class TestThreadMethod {
    public static void main(String[] args) {
        Thread thread = new Thread(new Runnable() {
            @Override
            public void run() {
                for (int i = 0; i < 100; i++) {
                    // 获取正在执行的线程对象的引用
                    System.out.println(Thread.currentThread().getName() + "执行的第" + i + "次");
                }
            }
        });
        // 1. 开启线程
        thread.start();


        // 2. 设置
        // 2.1 设置该线程名称
        thread.setName("线程1号");
        // 2.2 设置该线程为守护线程:main方法结束之后该线程停止
        //thread.setDaemon(true);
        // 2.3 设置该线程的优先级
        thread.setPriority(7);


        // 3. 获取
        // 3.1 获取线程名称
        System.out.println(thread.getName()); // 线程1号
        // 3.2 获取线程标识符
        System.out.println(thread.getId()); // 13
        // 3.3 获取线程优先级
        System.out.println(thread.getPriority()); // 7
        // 3.4 获取线程状态
        System.out.println(thread.getState()); // RUNNABLE
        // 3.5 获取线程所在线程组
        System.out.println(thread.getThreadGroup()); // java.lang.ThreadGroup[name=main,maxpri=10]


        // 4. 判断
        // 4.1 判断线程是否中断
        System.out.println(thread.isInterrupted()); // false
        // 4.2 判断线程是否为活动状态
        System.out.println(thread.isAlive()); // true
        // 4.3 判断线程是否为守护线程
        System.out.println(thread.isDaemon()); // false


        // 5. 停
        // 5.1 让线程休眠指定毫秒数
        new Thread(new Runnable() {
            @Override
            public void run() {
                for (int i = 0; i < 50; i++) {
                    System.out.println(Thread.currentThread().getName() + "执行的第" + i + "次");
                    if (i == 25) {
                        try {
                            /**
                             * 1. sleep()是静态方法
                             * 2. sleep()使用时必须捕获异常
                             * 3. sleep()执行时,只是让该线程进入阻塞状态,并不会释放锁
                             */
                            System.out.println("线程2号正在休眠");
                            Thread.sleep(5000);
                        } catch (InterruptedException e) {
                            e.printStackTrace();
                        }
                    }
                }
            }
        },"线程2号").start();

        // 5.2 暂停当前线程去执行其他线程
        new Thread(new Runnable() {
            @Override
            public void run() {
                for (int i = 0; i < 50; i++) {
                    System.out.println(Thread.currentThread().getName() + "执行了" + i + "次");
                    if (i == 25) {
                        /**
                         * 1. yield()是静态方法
                         * 2. yield()执行时,让线程进入就绪状态,重新争抢CPU执行权,并不会释放锁
                         */
                        Thread.yield();
                    }
                }
            }
        },"线程3号").start();

        // 5.3 等待线程销毁
        new Thread(new Runnable() {
            @Override
            public void run() {
                for (int i = 0; i < 100; i++) {
                    if (i == 50) {
                        /**
                         * 1. join()是对象方法
                         * 2. join()使用时必须捕获异常
                         * 3. join()使用场景:一个执行完的线程需要另一个正在执行的线程的运行结果时
                         */
                        System.out.println("线程1号正在销毁!!!!");
                        try {
                            thread.join();
                        } catch (InterruptedException e) {
                            e.printStackTrace();
                        }
                        System.out.println("线程1号销毁成功!!!!");
                    }
                }
            }
        },"线程4号").start();

    }
}
四、线程同步
5.网络编程
6.反射
标签:number his nim strong pwd emma list() transient art
原文地址:https://www.cnblogs.com/mh20131118/p/11070787.html