标签:style blog http color io os ar 使用 for
参考博客:http://www.cnblogs.com/kenshincui/p/3972100.html
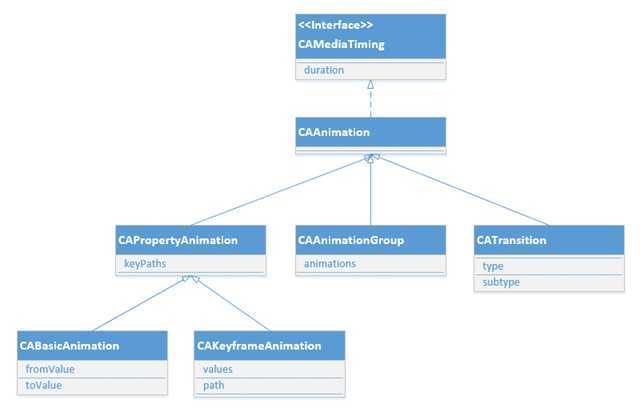
IOS中核心动画主要分4类:基础动画,关键帧动画,动画组,转场动画

CAAnimation:核心动画的基础类,不能直接使用,负责动画运行时间、速度的控制,本身实现了CAMediaTiming协议。
CAPropertyAnimation:属性动画的基类(通过属性进行动画设置,注意是可动画属性),不能直接使用。
CAAnimationGroup:动画组,动画组是一种组合模式设计,可以通过动画组来进行所有动画行为的统一控制,组中所有动画效果可以并发执行。
CATransition:转场动画,主要通过滤镜进行动画效果设置。
CABasicAnimation:基础动画,通过属性修改进行动画参数控制,只有初始状态和结束状态。
CAKeyframeAnimation:关键帧动画,同样是通过属性进行动画参数控制,但是同基础动画不同的是它可以有多个状态控制。
基础动画、关键帧动画都属于属性动画,就是通过修改属性值产生动画效果,开发人员只需要设置初始值和结束值,中间的过程动画(又叫“补间动画”)由系统自动计算产生。和基础动画不同的是关键帧动画可以设置多个属性值,每两个属性中间的补间动画由系统自动完成,因此从这个角度而言基础动画又可以看成是有两个关键帧的关键帧动画。
CABasicAnimation
CABasicAnimation设置layer某一属性的起始状态(fromValue)和结束状态(toValue),然后会自动实现两个属性值之间的动画效果,这一过程类似于flash中插入两个关键帧,然后创建补间动画一样,如果不设置fromValue的话,CABasicAnimation会默认以layer当前的属性值作为起始状态。
- (void)viewDidLoad
{
    [super viewDidLoad];

    CALayer *layer = [CALayer layer];
    layer.bounds = CGRectMake(0, 0, 120, 120);
    layer.position = CGPointMake(120, 120);
    layer.contents = (id)[UIImage imageNamed:@"5"].CGImage;

    [self.view.layer addSublayer:layer];
}


- (void)touchesEnded:(NSSet *)touches withEvent:(UIEvent *)event {
    UITouch *touch = [touches anyObject];
    CGPoint point = [touch locationInView:self.view];


    CALayer *layer = [self.view.layer.sublayers lastObject];
    CABasicAnimation *animation = [CABasicAnimation animationWithKeyPath:@"position"];
    animation.toValue = [NSValue valueWithCGPoint:point];
  //动画持续时间1秒
    animation.duration = 1;
    [layer addAnimation:animation forKey:@"animation"];
}
上诉代码执行过程中,当手指点击屏幕后,layer将会移动到手指点击的位置,移动的时间为1秒。
但是上诉代码还有让人疑惑的地方,就是当动画结束之后,layer又会移动回动画开始前的初始位置。
之前介绍CALayer时有提过CAlayer图层树有三种模型,模型树,呈现树和渲染树,我们可以在上面示例的动画执行过程中把模型树和呈现树的属性打印出来
- (void)touchesEnded:(NSSet *)touches withEvent:(UIEvent *)event {
    UITouch *touch = [touches anyObject];
    CGPoint point = [touch locationInView:self.view];


    CALayer *layer = [self.view.layer.sublayers lastObject];
    CABasicAnimation *animation = [CABasicAnimation animationWithKeyPath:@"position"];
    animation.toValue = [NSValue valueWithCGPoint:point];
    animation.duration = 1;
    [layer addAnimation:animation forKey:@"animation"];


    [NSTimer scheduledTimerWithTimeInterval:0.1 target:self selector:@selector(showinfor) userInfo:nil repeats:YES];
}

-(void)showinfor {
    CALayer *layer = [self.view.layer.sublayers lastObject];
    //取得呈现树
    CALayer *layer1 = (CALayer *)layer.presentationLayer;
    NSLog(@"%f,%f | %f,%f",layer.position.x,layer.position.y,layer1.position.x,layer1.position.y);
}
结果显示
120.000000,120.000000 | 133.257126,151.033737
120.000000,120.000000 | 146.471985,181.968521
120.000000,120.000000 | 159.609634,212.722565
120.000000,120.000000 | 172.856140,243.731415
120.000000,120.000000 | 186.023682,274.555450
120.000000,120.000000 | 199.323563,305.689240
120.000000,120.000000 | 212.402435,336.305695
120.000000,120.000000 | 225.678482,367.383698
120.000000,120.000000 | 238.803833,398.108978
120.000000,120.000000 | 120.000000,120.000000
120.000000,120.000000 | 120.000000,120.000000
120.000000,120.000000 | 120.000000,120.000000
可以看出动画执行过程中模型树属性并没有发生改变,上面代码中CAAnimation先创建了模型树的拷贝-呈现树,然后动画执行过程中仅仅修改呈现树,呈现树将被绘制到屏幕上,绘制完成后所有的更改都会丢失并由模型树决定新状态,模型树并没有改变,所以动画结束后界面回复到初始的样子。
因此我们需要改进代码,当动画结束之后将layer的属性也一并修改,可以通过给CABasicAnimation设置delegate代理实现需求
- (void)touchesEnded:(NSSet *)touches withEvent:(UIEvent *)event {
    UITouch *touch = [touches anyObject];
    CGPoint point = [touch locationInView:self.view];


    CALayer *layer = [self.view.layer.sublayers lastObject];
    CABasicAnimation *animation = [CABasicAnimation animationWithKeyPath:@"position"];
    animation.toValue = [NSValue valueWithCGPoint:point];
    animation.duration = 1;
    //设置animation代理
    animation.delegate = self;
    //将point值存储到animation属性值
    [animation setValue:[NSValue valueWithCGPoint:point] forKey:@"KCBasicAnimationLocation"];
    [layer addAnimation:animation forKey:@"animation"];


}
//动画开始后触发此方法
- (void)animationDidStart:(CAAnimation *)anim {

}
//动画结束后触发此方法,flag表示动画是否执行完成
- (void)animationDidStop:(CAAnimation *)anim finished:(BOOL)flag {
    //取到存储的point值
    CGPoint point = [[anim valueForKey:@"KCBasicAnimationLocation"] CGPointValue];

    //设置layer的属性
    CALayer *layer = [self.view.layer.sublayers lastObject];
    layer.position = point;
}
上面代码在动画结束后主动改变了layer的位置值,但是又触发了layer的隐式动画,造成图片移动两次的效果,我们可以再CAtransaction中将layer的隐式动画效果去除
//动画结束后触发此方法,flag表示动画是否执行完成
- (void)animationDidStop:(CAAnimation *)anim finished:(BOOL)flag {
    //取到存储的point值
    CGPoint point = [[anim valueForKey:@"KCBasicAnimationLocation"] CGPointValue];

    [CATransaction begin];
    [CATransaction setDisableActions:YES];
    //设置layer的属性
    CALayer *layer = [self.view.layer.sublayers lastObject];
    layer.position = point;
    [CATransaction commit];
}
CAMediaTiming
http://www.cocoachina.com/programmer/20131218/7569.html
通过CAMediaTiming实现旋转动画的暂停和开始
- (void)viewDidLoad
{
    [super viewDidLoad];

    CALayer *layer = [CALayer layer];
    layer.bounds = CGRectMake(0, 0, 120, 120);
    layer.position = CGPointMake(100, 300);
    layer.cornerRadius = 60;
    layer.masksToBounds = YES;
    layer.contents = (id)[UIImage imageNamed:@"5.png"].CGImage;
    [self.view.layer addSublayer:layer];


    CABasicAnimation *animation = [CABasicAnimation animationWithKeyPath:@"transform.rotation.z"];
    animation.toValue = @M_PI;
    animation.duration = 3;
    animation.autoreverses = YES;
    animation.repeatCount = 5;
    [layer addAnimation:animation forKey:nil];


}


- (void)touchesEnded:(NSSet *)touches withEvent:(UIEvent *)event {
    CALayer *layer = [self.view.layer.sublayers lastObject];

    if (layer.speed == 1) {

        CFTimeInterval timer = [layer convertTime:CACurrentMediaTime() fromLayer:nil];

        layer.timeOffset = timer;
        layer.speed = 0;


    } else {
        CFTimeInterval beginTime = CACurrentMediaTime()- layer.timeOffset;
        layer.beginTime = beginTime;
        layer.timeOffset = 0;

        layer.speed = 1;
    }

}
UIView封装基础动画
1.静态方法实现
- (void)viewDidLoad
{
    [super viewDidLoad];

    UIImageView *imageView = [[UIImageView alloc] initWithFrame:CGRectMake(20, 20, 100, 100)];
    imageView.image = [UIImage imageNamed:@"3.png"];
    [self.view addSubview:imageView];

    [self performSelector:@selector(animation) withObject:self afterDelay:3];
}

- (void)animation {
    UIImageView *imageView = [[self.view subviews] lastObject];

    [UIView beginAnimations:@"animation1" context:nil];
    //动画持续时间
    [UIView setAnimationDuration:1];
    //1秒后执行
    [UIView setAnimationDelay:1];
    //重复次数
    [UIView setAnimationRepeatCount:2];
    //是否以动画方式回复到原始状态,相当于autoreverses
    [UIView setAnimationRepeatAutoreverses:YES];
    //动画开始时间
    //[UIView setAnimationStartDate:(NSDate *)];
    //动画即将开始的触发函数
    //[UIView setAnimationWillStartSelector:(SEL)];
    //动画结束的触发函数
    //[UIView setAnimationDidStopSelector:<#(SEL)#>];

    imageView.center = CGPointMake(200, 300);

    //开始动画
    [UIView commitAnimations];
}
2.block方式实现
- (void)animation {
    UIImageView *imageView = [[self.view subviews] lastObject];


    //方式1
    [UIView animateWithDuration:2 animations:^{
        imageView.center = CGPointMake(200, 300);
    }];


    //方式2
    [UIView animateWithDuration:2 animations:^{
        imageView.center = CGPointMake(200, 300);
    } completion:^(BOOL finished) {
        NSLog(@"animation complete");
    }];

    //方式3
    [UIView animateWithDuration:2 delay:1 options:UIViewAnimationOptionCurveEaseInOut animations:^{
        imageView.center = CGPointMake(200, 300);
    } completion:nil];

    //方式4,弹簧效果的动画
    //damping:阻尼,范围0-1,阻尼越接近于0,弹性效果越明显
    //velocity:弹性复位的速度
    [UIView animateWithDuration:2 delay:0 usingSpringWithDamping:0 initialSpringVelocity:0.1 options:UIViewAnimationOptionCurveLinear animations:^{
        imageView.center = CGPointMake(200, 300);
    } completion:nil];
}
在动画方法中有一个option参数,UIViewAnimationOptions类型,它是一个枚举类型,动画参数分为三类,可以组合使用:
1.常规动画属性设置(可以同时选择多个进行设置)
UIViewAnimationOptionLayoutSubviews:动画过程中保证子视图跟随运动。
UIViewAnimationOptionAllowUserInteraction:动画过程中允许用户交互。
UIViewAnimationOptionBeginFromCurrentState:所有视图从当前状态开始运行。
UIViewAnimationOptionRepeat:重复运行动画。
UIViewAnimationOptionAutoreverse :动画运行到结束点后仍然以动画方式回到初始点。
UIViewAnimationOptionOverrideInheritedDuration:忽略嵌套动画时间设置。
UIViewAnimationOptionOverrideInheritedCurve:忽略嵌套动画速度设置。
UIViewAnimationOptionAllowAnimatedContent:动画过程中重绘视图(注意仅仅适用于转场动画)。
UIViewAnimationOptionShowHideTransitionViews:视图切换时直接隐藏旧视图、显示新视图,而不是将旧视图从父视图移除(仅仅适用于转场动画)
UIViewAnimationOptionOverrideInheritedOptions :不继承父动画设置或动画类型。
2.动画速度控制(可从其中选择一个设置)
UIViewAnimationOptionCurveEaseInOut:动画先缓慢,然后逐渐加速。
UIViewAnimationOptionCurveEaseIn :动画逐渐变慢。
UIViewAnimationOptionCurveEaseOut:动画逐渐加速。
UIViewAnimationOptionCurveLinear :动画匀速执行,默认值。
3.转场类型(仅适用于转场动画设置,可以从中选择一个进行设置,基本动画、关键帧动画不需要设置)
UIViewAnimationOptionTransitionNone:没有转场动画效果。
UIViewAnimationOptionTransitionFlipFromLeft :从左侧翻转效果。
UIViewAnimationOptionTransitionFlipFromRight:从右侧翻转效果。
UIViewAnimationOptionTransitionCurlUp:向后翻页的动画过渡效果。
UIViewAnimationOptionTransitionCurlDown :向前翻页的动画过渡效果。
UIViewAnimationOptionTransitionCrossDissolve:旧视图溶解消失显示下一个新视图的效果。
UIViewAnimationOptionTransitionFlipFromTop :从上方翻转效果。
UIViewAnimationOptionTransitionFlipFromBottom:从底部翻转效果。
标签:style blog http color io os ar 使用 for
原文地址:http://www.cnblogs.com/zanglitao/p/4045971.html