标签:ima java display 界面 time 面向切面 开启 odi info
备注:在myEclipse上配置Tomcat:
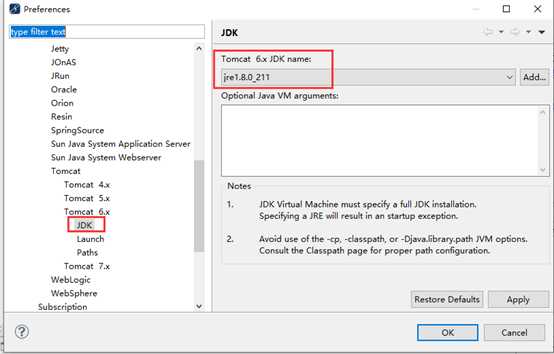
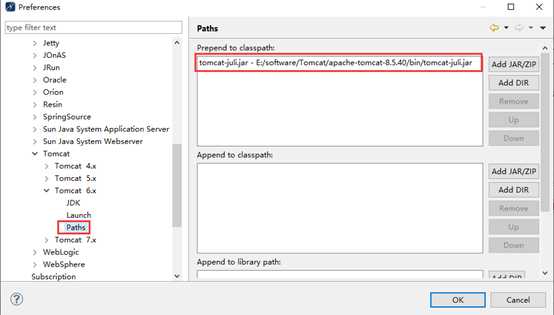
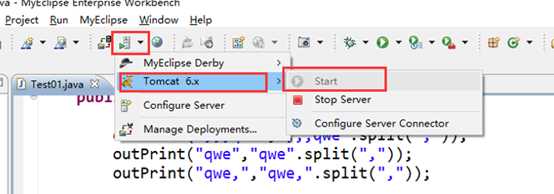
启动Tomcat服务后,在浏览器输入localhost:8080运行成功即表示配置成功
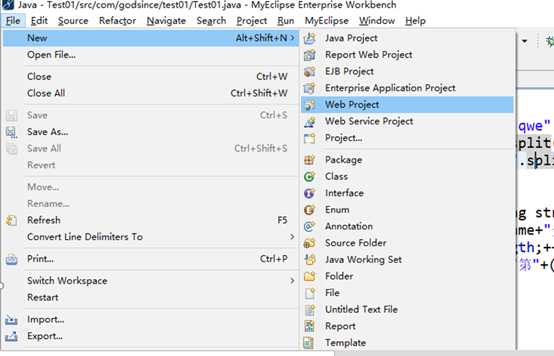
配置到Tomcat上

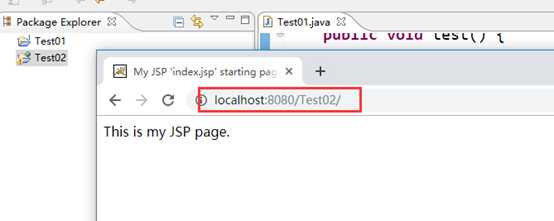
再次启动Tomcat,输入地址后,如果能运行成功即表示新建成功
下载地址:
spring-framework-4.0.4.RELEASE-dist:http://repo.springsource.org/libs-release-local/org/springframework/spring/4.0.4.RELEASE/
commons-logging-1.1.3-bin:http://commons.apache.org
其他诸如log4j之类的并不是必须下载的。
如果下载速度慢可以在国内网站下载。
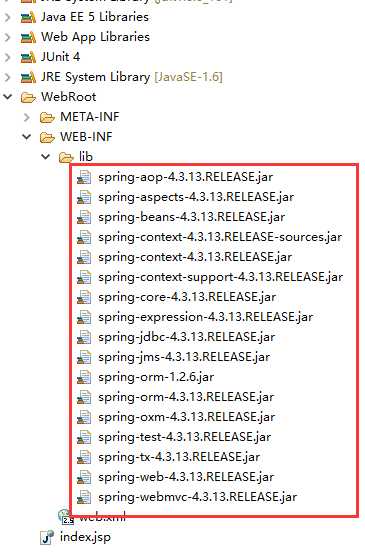
下载后获得的jar包放在lib文件夹下面
实体类Person:
package com.demo;

public class Person {
    public String say(){
        return "说了一句话:哇哈哈哈哈~";
    }

}
测试类:
package com.demo;

import org.junit.Test;

public class Test01 {

    @Test
    public void test() {
        Person p =new Person();
        System.out.println(p.say());
    }

}
项目的文件结构如下
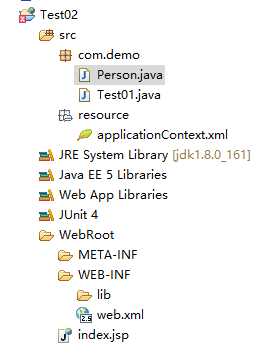
在上图位置新建一个applicationContext.xml文件
内容如下:
<?xml version="1.0" encoding="UTF-8"?>
<beans xmlns="http://www.springframework.org/schema/beans"
    xmlns:xsi="http://www.w3.org/2001/XMLSchema-instance"
    xsi:schemaLocation="http://www.springframework.org/schema/beans
          http://www.springframework.org/schema/beans/spring-beans.xsd">
    <bean id="person" class="com.demo.Person"></bean>
</beans>
之后在web.xml定义这个文件
<?xml version="1.0" encoding="UTF-8"?>
<web-app version="2.5" xmlns="http://java.sun.com/xml/ns/javaee"
    xmlns:xsi="http://www.w3.org/2001/XMLSchema-instance"
    xsi:schemaLocation="http://java.sun.com/xml/ns/javaee
    http://java.sun.com/xml/ns/javaee/web-app_2_5.xsd">
    <display-name></display-name>
    <welcome-file-list>
        <welcome-file>index.jsp</welcome-file>
    </welcome-file-list>

    <context-param>
        <param-name>contextConfigLocation</param-name>
        <param-value>classpath:resource/applicationContext.xml</param-value>
    </context-param>

</web-app>
做好声明处理之后,就可以在测试类Test测试了,内容如下:
package com.demo;

import org.junit.Test;
import org.springframework.context.ApplicationContext;
import org.springframework.context.support.ClassPathXmlApplicationContext;

public class Test01 {

    @Test
    public void test() {
        ApplicationContext ctx = new ClassPathXmlApplicationContext("resource/applicationContext.xml");
        Person p = (Person) ctx.getBean("person", Person.class);
        System.out.println(p.say());
    }

}
测试成功后,这样,最简单的spring框架就弄好了。
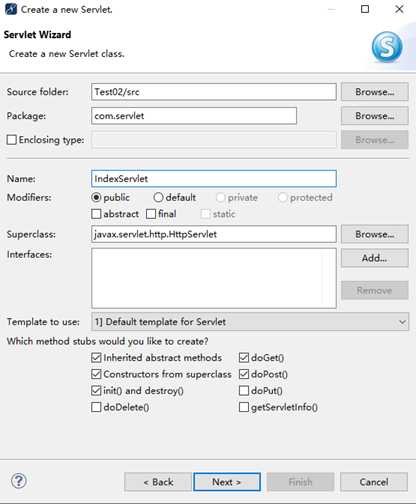
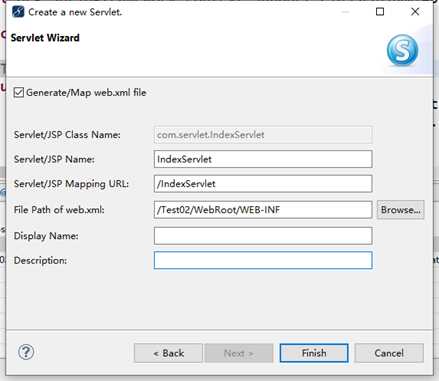
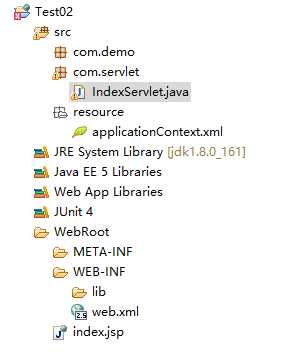
新建完,在web.xml会自动添加以下配置:
<servlet>
    <servlet-name>IndexServlet</servlet-name>
    <servlet-class>com.servlet.IndexServlet</servlet-class>
  </servlet>

  <servlet-mapping>
    <servlet-name>IndexServlet</servlet-name>
    <url-pattern>/IndexServlet</url-pattern>
</servlet-mapping>在IndexServlet类下,修改如下代码:
public void doGet(HttpServletRequest request, HttpServletResponse response)
            throws ServletException, IOException {

        ApplicationContext ctx = new ClassPathXmlApplicationContext("resource/applicationContext.xml");
        Person p = (Person) ctx.getBean("person", Person.class);

        response.setCharacterEncoding("UTF-8");
        response.setContentType("text/html");
        PrintWriter out = response.getWriter();
        out.println("<html><head><title>一二零叁的网站</title></head><body>");
        out.print(p.say()+"</body></html>");

    }
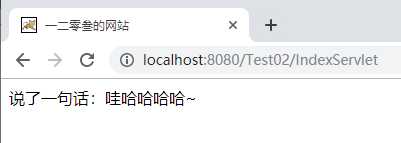
这时候输入地址,就会出现想要的结果:
spring-aop-4.3.13.RELEASE.jar
配置信息如下:
<?xml version="1.0" encoding="UTF-8"?>
<beans xmlns="http://www.springframework.org/schema/beans"
    xmlns:context="http://www.springframework.org/schema/context"
    xmlns:xsi="http://www.w3.org/2001/XMLSchema-instance"
    xsi:schemaLocation="http://www.springframework.org/schema/beans
          http://www.springframework.org/schema/beans/spring-beans.xsd
          http://www.springframework.org/schema/context
          http://www.springframework.org/schema/context/spring-context.xsd">

      <context:component-scan base-package="com.entity"></context:component-scan>

      <bean id="person1" class="com.entity.Person"></bean>

</beans>
备注:
开启注解扫描有两种配置:
<context:component-scan base-package= ""/>
<context:annotation-config/>
区别是:
a.两种配置都能开启注解扫描,这样就可以使用@Component、@Autowired这些注解了。
b.<context:component-scan base-package= “”/>会到指定包(包括指定包下的所有子包)中扫描类、方法、属性上面是否有注解。(如有多个,可使用逗号分隔)
<context:annotation-config></context:annotation-config>这个配置只扫描属性上是否有注解,所以一般不用写。
package com.entity;

import org.springframework.stereotype.Component;

@Component("person2")
public class Person {

    private String username;
    private int sex;

    public String getUsername() {
        return username;
    }
    public void setUsername(String username) {
        this.username = username;
    }
    public int getSex() {
        return sex;
    }
    public void setSex(int sex) {
        this.sex = sex;
    }
    public String say(){
        return "说了一句话:哇哈哈哈哈~";
    }

}
调用:
public void doGet(HttpServletRequest request, HttpServletResponse response)
            throws ServletException, IOException {

        ApplicationContext ctx = new ClassPathXmlApplicationContext("resource/applicationContext.xml");
        Person p1 = (Person) ctx.getBean("person1");
        p1.setUsername("张三");
        Person p2 = (Person) ctx.getBean("person2");
        p2.setUsername("李四");

        response.setCharacterEncoding("UTF-8");
        response.setContentType("text/html");
        PrintWriter out = response.getWriter();
        out.println("<html><head><title>一二零叁的网站</title></head><body>");
        out.print(p1.getUsername() + p1.say()+"<br/>");
        out.print(p2.getUsername() + p2.say());
        out.print("</body></html>");

    }
结果:
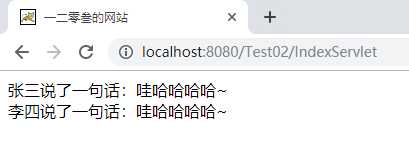
这样,使用xml配置文件和使用注释来注入依赖就都可以实现了
备注:
Spring容器有三种方式配置Bean:
1、基于xml配置Bean
2、使用注解定义Bean
(@Component、@Controller、@Service、@Repository)
3、基于javaConfig提供Bean定义信息(@Configuration、@Bean)
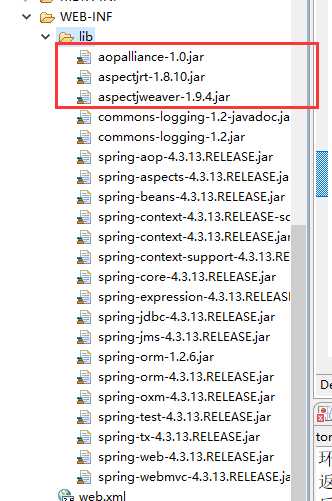
aspectj 1.8.10:http://mvnrepository.com/artifact/org.aspectj/aspectjrt/1.8.10
aspectjweaver 1.8.10:http://mvnrepository.com/artifact/org.aspectj/aspectjweaver/1.8.10
aopalliance 1.0:http://mvnrepository.com/artifact/aopalliance/aopalliance/1.0
package com.service;

import org.aspectj.lang.JoinPoint;
import org.aspectj.lang.ProceedingJoinPoint;

public class MyAdvice {
    public void beforeMethod(JoinPoint joinpoint) {
        System.out.println("前置通知---");
    }

    public void afterMethod(JoinPoint joinpoint) {
        System.out.println("后置通知---");
    }

    public void afterReturnning(JoinPoint joinpoint, Object result) {
        System.out.println("返回通知---");
    }

    public void afterThrowing(JoinPoint joinpoint, Exception ex) {
        System.out.println("【异常通知】---" + joinpoint.toString());
    }

    public Object aroundMethod(ProceedingJoinPoint pjp) {
        Object obj = null;
        try {
            System.out.println("环绕通知---");
            long start = System.currentTimeMillis();
            obj = pjp.proceed(); // 执行目标方法
            long end = System.currentTimeMillis();
            System.out.println("环绕通知结束---方法执行时间:" + (end - start));
        } catch (Throwable e) {
            e.printStackTrace();
        }
        return obj;
    }
}
注:
JoinPoint:连接点(切入点)的连接对象,通过它可以获取目标对象中的信息。
Object resuldt的参数名必须与配置文件中的
<?xml version="1.0" encoding="UTF-8"?>
<beans xmlns="http://www.springframework.org/schema/beans"
    xmlns:context="http://www.springframework.org/schema/context"
    xmlns:aop="http://www.springframework.org/schema/aop"
    xmlns:xsi="http://www.w3.org/2001/XMLSchema-instance"
    xsi:schemaLocation="http://www.springframework.org/schema/beans
          http://www.springframework.org/schema/beans/spring-beans.xsd
          http://www.springframework.org/schema/context
          http://www.springframework.org/schema/context/spring-context.xsd
          http://www.springframework.org/schema/aop
          http://www.springframework.org/schema/aop/spring-aop-4.1.xsd">

    <context:component-scan base-package="com.entity"></context:component-scan>

    <bean id="person1" class="com.entity.Person"></bean>
    <bean id="makePerson" class="com.service.MakePerson" />
    <bean id="myAdvice" class="com.service.MyAdvice" />

    <!-- aop的配置 -->
    <aop:config>
        <!-- 配置切入点 -->
        <!-- public * *(..) 表示所有public的方法 -->
        <aop:pointcut expression="execution(public * *(..))" id="pointcut" />
        <!-- 配置切面及切入的对象 -->
        <aop:aspect ref="myAdvice">
            <aop:before pointcut-ref="pointcut" method="beforeMethod" />
            <aop:after pointcut-ref="pointcut" method="afterMethod" />
            <aop:after-returning pointcut-ref="pointcut"
                method="afterReturnning" returning="result" />
            <aop:around pointcut-ref="pointcut" method="aroundMethod" />
            <aop:after-throwing pointcut-ref="pointcut"
                method="afterThrowing" throwing="ex" />
        </aop:aspect>
    </aop:config>

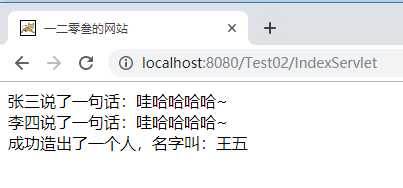
</beans>public void doGet(HttpServletRequest request, HttpServletResponse response)
throws ServletException, IOException {
ApplicationContext ctx = new ClassPathXmlApplicationContext("resource/applicationContext.xml");
Person p1 = (Person) ctx.getBean("person1");
p1.setUsername("张三");
Person p2 = (Person) ctx.getBean("person2");
p2.setUsername("李四");
MakePerson p3 = (MakePerson) ctx.getBean("makePerson");
response.setCharacterEncoding("UTF-8");
response.setContentType("text/html");
PrintWriter out = response.getWriter();
out.println("<html><head><title>一二零叁的网站</title></head><body>");
out.print(p1.getUsername() + p1.say()+"<br/>");
out.print(p2.getUsername() + p2.say()+"<br/>");
out.print(p3.getNewPerson("王五"));
out.print("</body></html>");
}
后台显示:
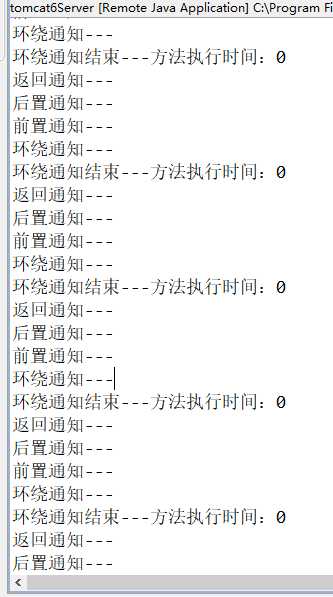
这样,就能够使用spring的注入依赖和面向切面技术了,一个很简单的spring框架就搭好了。
标签:ima java display 界面 time 面向切面 开启 odi info
原文地址:https://www.cnblogs.com/GodSince/p/11213355.html