标签:tst class etl call 方法 system 思想 temp 事务管理
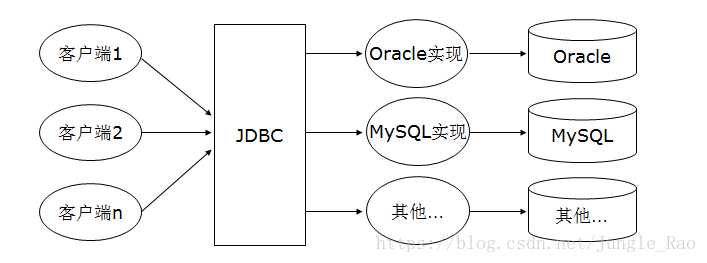
JDBC(Java DataBase Connectivity)是Java和数据库之间的一个桥梁,是一个规范而不是一个实现,能够执行SQL语句。它由一组用Java语言编写的类和接口组成。各种不同类型的数据库都有相应的实现。

 1 Connection conn = null;
 2         Statement stmt = null;
 3         try {
 4             // 注册 JDBC 驱动
 5             Class.forName("com.mysql.jdbc.Driver");
 6
 7             // 创建链接
 8             conn = DriverManager.getConnection("jdbc:mysql://localhost:3306/push_system_new?characterEncoding=UTF-8", "root", "123456");
 9
10             // 执行查询
11             stmt = conn.createStatement();
12             String sql = "SELECT id, app_id, device_token FROM push_device_0";
13             ResultSet rs = stmt.executeQuery(sql);
14
15             while (rs.next()) {
16                 // 通过字段检索
17                 long id  = rs.getLong("id");
18                 long appId = rs.getLong("app_id");
19                 String deviceToken = rs.getString("device_token");
20
21                 // 输出数据
22                 System.out.print("device_id: " + id);
23                 System.out.print(", appId: " + appId);
24                 System.out.print(", device_token: " + deviceToken);
25                 System.out.print("\n");
26                 break;
27             }
28
29             // 完成后关闭
30             rs.close();
31             stmt.close();
32             conn.close();
33
34         } catch(SQLException se) {
35             // 处理 JDBC 错误
36             se.printStackTrace();
37
38         } catch(Exception e) {
39             // 处理 Class.forName 错误
40             e.printStackTrace();
41
42         } finally {
43             // 关闭资源
44             try {
45                 if (stmt != null) stmt.close();
46             } catch(SQLException se2) {
47
48             }
49
50             // 什么都不做
51             try {
52                 if (conn != null) conn.close();
53             } catch(SQLException se) {
54                 se.printStackTrace();
55             }
56         }
JDBC主要接口:
DataSource表示一种创建Connection的工厂,在jdk 1.4引入,相对DriverManager的方式更优先推荐使用DataSource。支持三种实现类型:
基于DataSource产生了两个非常常用的数据库连接池框架:DBCP和C3P0,解决了数据库连接的复用问题,极大地提高了数据库连接的使用性能。
看一个DBCP的简单用例,bean配置:
<bean id="dataSource" class="org.apache.commons.dbcp.BasicDataSource">
        <property name="driverClassName" value="com.mysql.jdbc.Driver"/>
        <property name="url" value="jdbc:mysql://localhost:3306/push_system_new"/>
        <property name="username" value="root"/>
        <property name="password" value="123456"/>
        <property name="initialSize" value="5"/>
        <property name="maxActive" value="30"/>
        <property name="maxIdle" value="5"/>
        <property name="minIdle" value="2"/>
</bean>
pom.xml 依赖
<dependency>
   <groupId>commons-dbcp</groupId>
   <artifactId>commons-dbcp</artifactId>
   <version>1.4</version>
</dependency>
public class pushDeviceDaoImpl {

    private JdbcTemplate jdbcTemplate;

    public List<DeviceInfo> query(long appId) {
        String sql = "select * from push_device_0 where app_id=? ";
        return jdbcTemplate.query(sql, new DeviceRowMapper(), appId);
    }


    @Data
    class DeviceInfo {
        long app_id;
        long id;
        String device_token;
    }

    class DeviceRowMapper implements RowMapper<DeviceInfo> {
        public DeviceInfo mapRow(ResultSet rs, int rowNum) throws SQLException {
            DeviceInfo deviceInfo = new DeviceInfo();
            deviceInfo.setId(rs.getLong("id"));
            deviceInfo.setApp_id(rs.getLong("app_id"));
            deviceInfo.setDevice_token(rs.getString("device_token"));
            return deviceInfo;
        }
    }

    public void setJdbcTemplate(JdbcTemplate jdbcTemplate) {
        this.jdbcTemplate = jdbcTemplate;
    }
}
<bean id="jdbcTemplate" class="org.springframework.jdbc.core.JdbcTemplate">
   <property name = "dataSource" ref="dataSource"/>
</bean>

<bean id="pushDeviceDao" class="com.example.demo.pushDeviceDaoImpl">
   <property name="jdbcTemplate" ref="jdbcTemplate"/>
</bean>
方法2、
public class pushDeviceDaoImpl {

    private JdbcTemplate jdbcTemplate;

    public List<DeviceInfo> query(long appId) {
        String sql = "select * from push_device_0 where app_id=? ";
        return jdbcTemplate.query(sql, new DeviceRowMapper(), appId);
    }

    @Data
    class DeviceInfo {
        long app_id;
        long id;
        String device_token;
    }

    class DeviceRowMapper implements RowMapper<DeviceInfo> {
        public DeviceInfo mapRow(ResultSet rs, int rowNum) throws SQLException {
            DeviceInfo deviceInfo = new DeviceInfo();
            deviceInfo.setId(rs.getLong("id"));
            deviceInfo.setApp_id(rs.getLong("app_id"));
            deviceInfo.setDevice_token(rs.getString("device_token"));
            return deviceInfo;
        }
    }

    public void setDataSource(DataSource dataSource) {
        this.jdbcTemplate = new JdbcTemplate(dataSource);
    }
}
xml中的bean配置:
<bean id="pushDeviceDao" class="com.example.demo.pushDeviceDaoImpl">
    <property name="dataSource" ref="dataSource"/>
</bean>
public class pushDeviceDaoImpl extends JdbcDaoSupport {

    public List<DeviceInfo> query(long appId) {
        String sql = "select * from push_device_0 where app_id=? ";
        return getJdbcTemplate().query(sql, new DeviceRowMapper(), appId);
    }

    @Data
    class DeviceInfo {
        long app_id;
        long id;
        String device_token;
    }

    class DeviceRowMapper implements RowMapper<DeviceInfo> {
        public DeviceInfo mapRow(ResultSet rs, int rowNum) throws SQLException {
            DeviceInfo deviceInfo = new DeviceInfo();
            deviceInfo.setId(rs.getLong("id"));
            deviceInfo.setApp_id(rs.getLong("app_id"));
            deviceInfo.setDevice_token(rs.getString("device_token"));
            return deviceInfo;
        }
    }

}
xml中的bean配置:
<bean id="pushDeviceDao" class="com.example.demo.pushDeviceDaoImpl">
   <property name="dataSource" ref="dataSource"/>
</bean>
标签:tst class etl call 方法 system 思想 temp 事务管理
原文地址:https://www.cnblogs.com/chenny7/p/11232803.html
