标签:error loader png 跨域 执行 col rewrite 写入 阶段
第12天课程-多页:多入口,匹配多个打包的js
const path = require(‘path‘);
const HtmlWebpackPlugin = require(‘html-webpack-plugin‘);

module.exports = {
    mode: ‘development‘,
    entry: {
        home: ‘./src/home.js‘,
        other: ‘./src/other.js‘
    },
    output: {
        filename: ‘[name].js‘,
        path: path.resolve(__dirname, ‘dist‘)
    },
    plugins: [
        new HtmlWebpackPlugin({
            template: ‘./src/home.html‘,
            filename: ‘home.html‘,
            chunks:[‘home‘]
        }),
        new HtmlWebpackPlugin({
            template: ‘./src/other.html‘,
            filename: ‘other.html‘,
            chunks:[‘other‘]
        })
    ]
}
补充章节:webpack-mode
mode分为development/production,默认为production。每个选项的默认配置如下(common指两个配置项都存在的属性):
common:
//parent chunk中解决了的chunk会被删除
optimization.removeAvailableModules:true
//删除空的chunks
optimization.removeEmptyChunks:true
//合并重复的chunk
optimization.mergeDuplicateChunks:true
production
//性能相关配置
performance:{hints:"error"....}
//某些chunk的子chunk已一种方式被确定和标记,这些子chunks在加载更大的块时不必加载
optimization.flagIncludedChunks:true
//给经常使用的ids更短的值
optimization.occurrenceOrder:true
//确定每个模块下被使用的导出
optimization.usedExports:true
//识别package.json or rules sideEffects 标志
optimization.sideEffects:true
//尝试查找模块图中可以安全连接到单个模块中的段。- -
optimization.concatenateModules:true
//使用uglify-js压缩代码
optimization.minimize:true
development
//调试
devtool:eval
//缓存模块, 避免在未更改时重建它们。
cache:true
//缓存已解决的依赖项, 避免重新解析它们。
module.unsafeCache:true
//在 bundle 中引入「所包含模块信息」的相关注释
output.pathinfo:true
//在可能的情况下确定每个模块的导出,被用于其他优化或代码生成。
optimization.providedExports:true
//找到chunk中共享的模块,取出来生成单独的chunk
optimization.splitChunks:true
//为 webpack 运行时代码创建单独的chunk
optimization.runtimeChunk:true
//编译错误时不写入到输出
optimization.noEmitOnErrors:true
//给模块有意义的名称代替ids
optimization.namedModules:true
//给模chunk有意义的名称代替ids
optimization.namedChunks:true
webpack运行时还会根据mode设置一个全局变量process.env.NODE_ENV,
这里的process.env.NODE_ENV不是node中的环境变量,而是webpack.DefinePlugin中定义的全局变量,允许你根据不同的环境执行不同的代码.
生产环境下,uglify打包代码时会自动删除不可达代码,也就是说生产环境压缩后最终的代码为:
第13天课程-配置source-map
安装依赖
npm install -D babel-loader @babel/core @babel/preset-env

npm install webpack-dev-server --save-dev
devtool设置项理解,eval 可以理解为发射,不是编译阶段产生
  //devtool: ‘source-map‘,//产生文件,可以显示行和列
  //devtool: ‘eval-source-map‘,//不实际产生文件,但是可以显示行和列
  //devtool: ‘cheap-module-source-map‘,//不显示列,产生文件
  devtool: ‘cheap-module-eval-source-map‘,//不显示列,不产生文件
试验代码src/home.js:
class Demo{
    constructor(){
        console.loga();
    }
}
let d=new Demo();
const path = require(‘path‘);
const HtmlWebpackPlugin = require(‘html-webpack-plugin‘);

module.exports = {
  mode: ‘production‘,
  entry: {
    home: ‘./src/home.js‘,
  },
  output: {
    filename: ‘index.js‘,
    path: path.resolve(__dirname, ‘dist‘)
  },
  //devtool: ‘source-map‘,//产生文件,可以显示行和列
  //devtool: ‘eval-source-map‘,//不实际产生文件,但是可以显示行和列
  //devtool: ‘cheap-module-source-map‘,//不显示列,产生文件
  devtool: ‘cheap-module-eval-source-map‘,//不显示列,不产生文件
  module: {
    rules: [
      {
        test: /\.m?js$/,
        exclude: /(node_modules|bower_components)/,
        use: {
          loader: ‘babel-loader‘,
          options: {
            presets: [‘@babel/preset-env‘]
          }
        }
      }
    ]
  },
  plugins: [
    new HtmlWebpackPlugin({
      template: ‘./src/home.html‘,
      filename: ‘index.html‘,
      chunks: [‘home‘]
    })
  ]
}
14章节:watch用法,执行npm run build时候开始
更改完代码之后,立即build,产生编译文件,
const path = require(‘path‘);
const HtmlWebpackPlugin = require(‘html-webpack-plugin‘);

module.exports = {
  mode: ‘production‘,
  entry: {
    home: ‘./src/home.js‘,
  },
  output: {
    filename: ‘index.js‘,
    path: path.resolve(__dirname, ‘dist‘)
  },
  watch:true,
  watchOptions:{
    poll:1000,//每秒检查一次变动
    aggregateTimeout:500,//防抖延迟,500秒之后输入,
    ignored: /node_modules/ //ignored: "files/**/*.js"
  },
  module: {
    rules: [
      {
        test: /\.m?js$/,
        exclude: /(node_modules|bower_components)/,
        use: {
          loader: ‘babel-loader‘,
          options: {
            presets: [‘@babel/preset-env‘]
          }
        }
      }
    ]
  },
  plugins: [
    new HtmlWebpackPlugin({
      template: ‘./src/home.html‘,
      filename: ‘index.html‘,
      chunks: [‘home‘]
    })
  ]
}
15:webpack小插件介绍
cleanWebpackPlugin:npm install clean-webpack-plugin -D
关键代码:
const { CleanWebpackPlugin } = require(‘clean-webpack-plugin‘); // 引入清除文件插件
new CleanWebpackPlugin()
官方说明:详细说明
        /**
         * All files inside webpack‘s output.path directory will be removed once, but the
         * directory itself will not be. If using webpack 4+‘s default configuration,
         * everything under <PROJECT_DIR>/dist/ will be removed.
         * Use cleanOnceBeforeBuildPatterns to override this behavior.
         *
         * During rebuilds, all webpack assets that are not used anymore
         * will be removed automatically.
         *
         * See `Options and Defaults` for information
         */
所有output.path目录都会被一次删除,目录本身不会删除
copyWebPackPlugin:
const CopyWebpackPlugin = require(‘copy-webpack-plugin‘); // 文件拷贝
new CopyWebpackPlugin([{from:‘./doc‘,to:‘./‘}])
bannerPlugin:
let webpack=require(‘webpack‘);
new webpack.BannerPlugin(‘版权所有,违反必究 2019 copyright‘)

本章节webpack配置文件
const path = require(‘path‘);
const HtmlWebpackPlugin = require(‘html-webpack-plugin‘);
const { CleanWebpackPlugin } = require(‘clean-webpack-plugin‘); // 引入清除文件插件
const CopyWebpackPlugin  = require(‘copy-webpack-plugin‘); // 引入清除文件插件
let webpack=require(‘webpack‘);

module.exports = {
  mode: ‘development‘,
  entry: {
    home: ‘./src/home.js‘,
  },
  output: {
    filename: ‘index.js‘,
    path: path.resolve(__dirname, ‘dist‘)
  },
  module: {
    rules: [
      {
        test: /\.m?js$/,
        exclude: /(node_modules|bower_components)/,
        use: {
          loader: ‘babel-loader‘,
          options: {
            presets: [‘@babel/preset-env‘]
          }
        }
      }
    ]
  },
  plugins: [
    new HtmlWebpackPlugin({
      template: ‘./src/home.html‘,
      filename: ‘index.html‘,
      chunks: [‘home‘]
    }),
    new CleanWebpackPlugin(),
    new CopyWebpackPlugin([{from:‘./doc‘,to:‘./‘}]),
    new webpack.BannerPlugin(‘版权所有,违反必究 2019 copyright‘)
  ]
}
16章节:webpack跨域问题

webpack端口默认是8080 如果请求这么写,会跨域,跨域是浏览器本身的限制,如果使用浏览器跨域设置,可以请求到数据
1:devServer-proxy设置
本地express服务器:localhost:3000/api/user

代理设置:proxy:{‘/api‘:‘http://localhost:3000‘}

但是不是服务端每个接口都是api开头的,所以需要用下面的方式

本地express服务器:localhost:3000/user

代理devServer设置
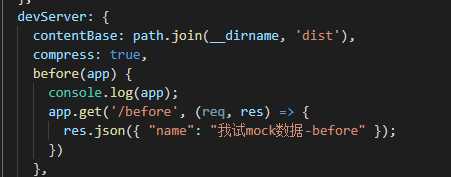
2:单纯模拟数据mock 启动钩子函数

3:有服务端,但是不想用代理处理,用express 启动webpack 端口用express端口
npm install webpack-dev-middleware --save-dev //安装依赖
server.js

let express = require(‘express‘);
let config=require(‘./webpack.config‘);
const webpack = require(‘webpack‘);
const middleware = require(‘webpack-dev-middleware‘);
const compiler = webpack(config);
let app = express();
app.use(
  middleware(compiler, {
  })
);
app.get(‘/api/user‘, (req, res) => {
    res.json({ "name": "珠峰设计-express" });
})
app.listen(3000);
webpack.config.js
const path = require(‘path‘);
const HtmlWebpackPlugin = require(‘html-webpack-plugin‘);
const { CleanWebpackPlugin } = require(‘clean-webpack-plugin‘); // 引入清除文件插件
const CopyWebpackPlugin = require(‘copy-webpack-plugin‘); // 引入清除文件插件
let webpack = require(‘webpack‘);

module.exports = {
  mode: ‘development‘,
  entry: {
    home: ‘./src/home.js‘,
  },
  devServer: {
    contentBase: path.join(__dirname, ‘dist‘),
    compress: true,
    before(app) {
      console.log(app);
      app.get(‘/before‘, (req, res) => {
        res.json({ "name": "我试mock数据-before" });
      })
    },
    port: 9000,
    /*proxy:{
      ‘/api‘:‘http://localhost:3000‘
    } */
    proxy: {
      ‘/api‘: {
        target: ‘http://localhost:3000‘,
        pathRewrite: { ‘/api‘: ‘‘ }//需要先启动3000端口的服务
      }
    }
  },

  output: {
    filename: ‘index.js‘,
    path: path.resolve(__dirname, ‘dist‘)
  },
  module: {
    rules: [
      {
        test: /\.m?js$/,
        exclude: /(node_modules|bower_components)/,
        use: {
          loader: ‘babel-loader‘,
          options: {
            presets: [‘@babel/preset-env‘]
          }
        }
      }
    ]
  },
  plugins: [
    new HtmlWebpackPlugin({
      template: ‘./src/home.html‘,
      filename: ‘index.html‘,
      chunks: [‘home‘]
    }),
    new CleanWebpackPlugin(),
    new CopyWebpackPlugin([{ from: ‘./doc‘, to: ‘./‘ }]),
    new webpack.BannerPlugin(‘版权所有,违反必究 2019 copyright‘)
  ]
}
标签:error loader png 跨域 执行 col rewrite 写入 阶段
原文地址:https://www.cnblogs.com/liuguiqian/p/11287631.html