1.prometheus安装
wget https://github.com/prometheus/prometheus/releases/download/v1.5.2/prometheus-1.5.2.linux-amd64.tar.gz

tar -zxvf prometheus-1.5.2.linux-amd64.tar.gz -C /opt/prometheus --strip-components=1

cd /opt/prometheus

mv prometheus.yml prometheus.yml-bak

# vi prometheus.yml
global:
scrape_interval: 10s
evaluation_interval: 10s

scrape_configs:
- job_name: linux
static_configs:
- targets: [‘192.168.0.8:9100‘]
labels:
instance: db-0.8

- job_name: mysql
static_configs:
- targets: [‘192.168.0.8:9104‘]
labels:
instance: db-0.8
启动 nohup /opt/prometheus/prometheus &
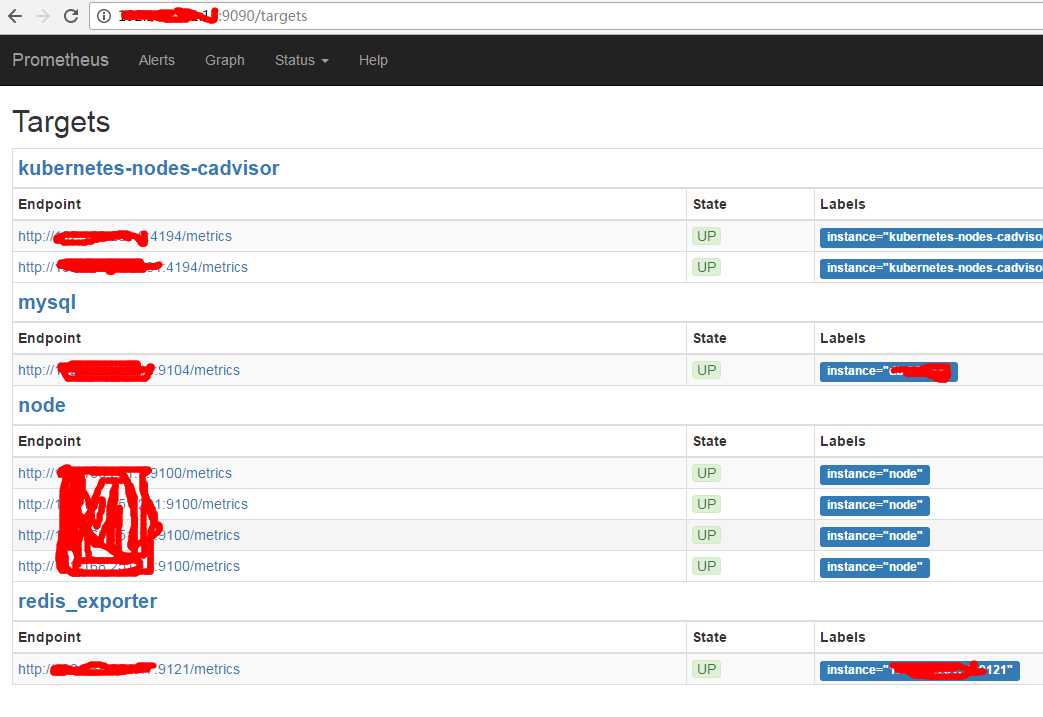
web界面 http://192.168.0.15:9090/graph
2.grafana安装
wget https://s3-us-west-2.amazonaws.com/grafana-releases/release/grafana-4.0.1-1480694114.x86_64.rpm
yum localinstall grafana-4.0.1-1480694114.x86_64.rpm


service grafana-server start
至此安装完成。
浏览器打开 http://192.168.0.15:3000 ,输入默认用户名密码 (admin/admin) 可以进入 Grafana 。
然后配置数据源:
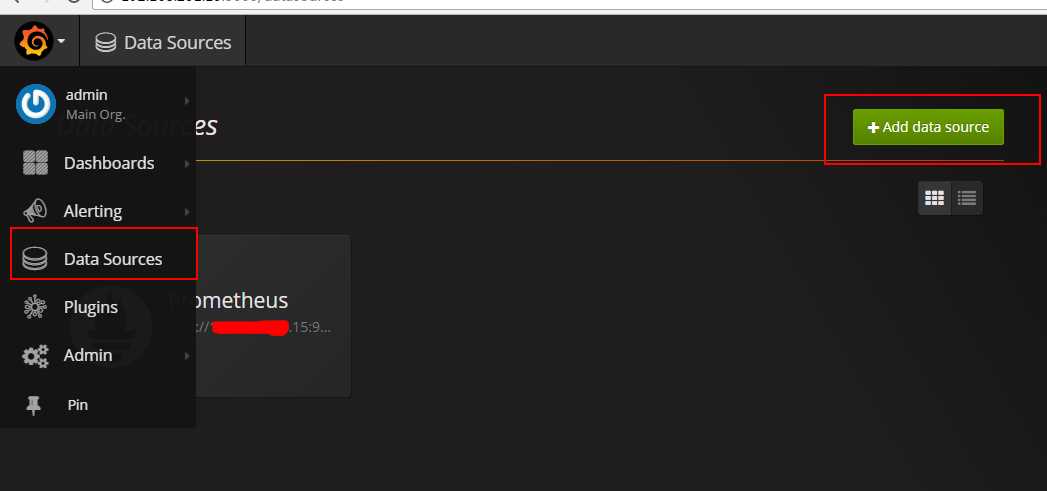
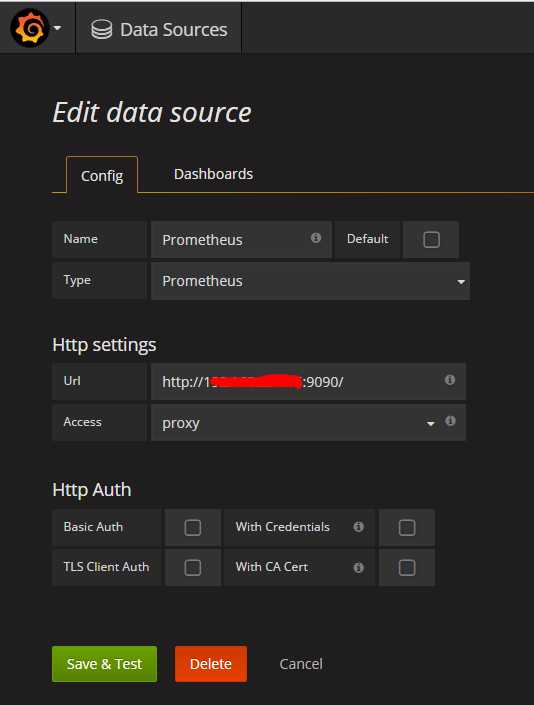
Prometheus: URL: http://192.168.0.15:9090/
即可完成 Prometheus 和 Grafana 的对接。
3.替换grafana的dashboards
Grafana 并没有太多的配置好的图表模板,除了 Percona 开源的一些外,很多需要自行配置。
下载dashboards
(https://github.com/percona/grafana-dashboards)

git clone https://github.com/percona/grafana-dashboards.git
cp -r grafana-dashboards/dashboards /var/lib/grafana/

编辑 Grafana config

vi /etc/grafana/grafana.ini

[dashboards.json]
enabled = true
path = /var/lib/grafana/dashboards


systemctl restart grafana-server
4.客户端安装
(1)mysql:在需要监控的mysql上安装 node_exporter和 mysqld_exporter
wget https://github.com/prometheus/node_exporter/releases/download/0.13.0/node_exporter-0.13.0.linux-amd64.tar.gz
wget https://github.com/prometheus/mysqld_exporter/releases/download/v0.9.0/mysqld_exporter-0.9.0.linux-amd64.tar.gz

tar -zxvf node_exporter-0.13.0.linux-amd64.tar.gz -C /opt/prometheus_exporters  --strip-components=1
tar -zxvf mysqld_exporter-0.9.0.linux-amd64.tar.gz -C /opt/prometheus_exporters  --strip-components=1

运行node_exporter :
nohup /opt/prometheus_exporters/node_exporter &

mysqld_exporter需要连接到Mysql,所以需要Mysql的权限,我们先为它创建用户并赋予所需的权限:

mysql> GRANT REPLICATION CLIENT, PROCESS ON *.* TO ‘prom‘@‘localhost‘ identified by ‘amnt@#*IK<1qaz‘;
mysql> GRANT SELECT ON performance_schema.* TO ‘prom‘@‘localhost‘;
mysql> flush privileges;

创建.my.cnf文件并运行mysqld_exporter:

$ cd /usr/local/services/prometheus_exporters
$ cat << EOF > .my.cnf
[client]
user=prom
password=abc123
EOF
$ nohup /opt/prometheus_exporters/mysqld_exporter -config.my-cnf=".my.cnf" &
(2).redis 在redis服务器安装node_exporter和redis_exporter
wget https://github.com/oliver006/redis_exporter/releases/download/v0.10.8/redis_exporter-v0.10.8.linux-amd64.tar.gz
wget https://github.com/prometheus/node_exporter/releases/download/0.13.0/node_exporter-0.13.0.linux-amd64.tar.gz
tar -zxvf node_exporter-0.13.0.linux-amd64.tar.gz -C /opt/prometheus_exporters --strip-components=1
tar -zxvf redis_exporter-v0.10.8.linux-amd64.tar.gz -C /opt/prometheus_exporters --strip-components=1
启动
nohup /opt/prometheus_exporters/node_exporter &
nohup /opt/prometheus_exporters/redis_exporter redis//192.168.0.17:6379 &
配置prometheus.yml 加入
- job_name: redis_exporter
  static_configs:
  - targets: [‘192.168.0.17:9121‘]
下载grafana的redis的prometheus-redis_rev1.json模板
wget https://grafana.com/api/dashboards/763/revisions/1/download
在grafana中导入json模板
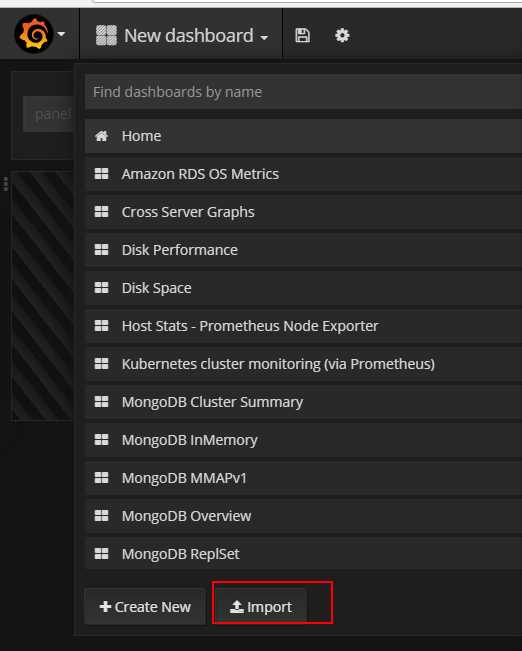
过一段时间就能看到图形了
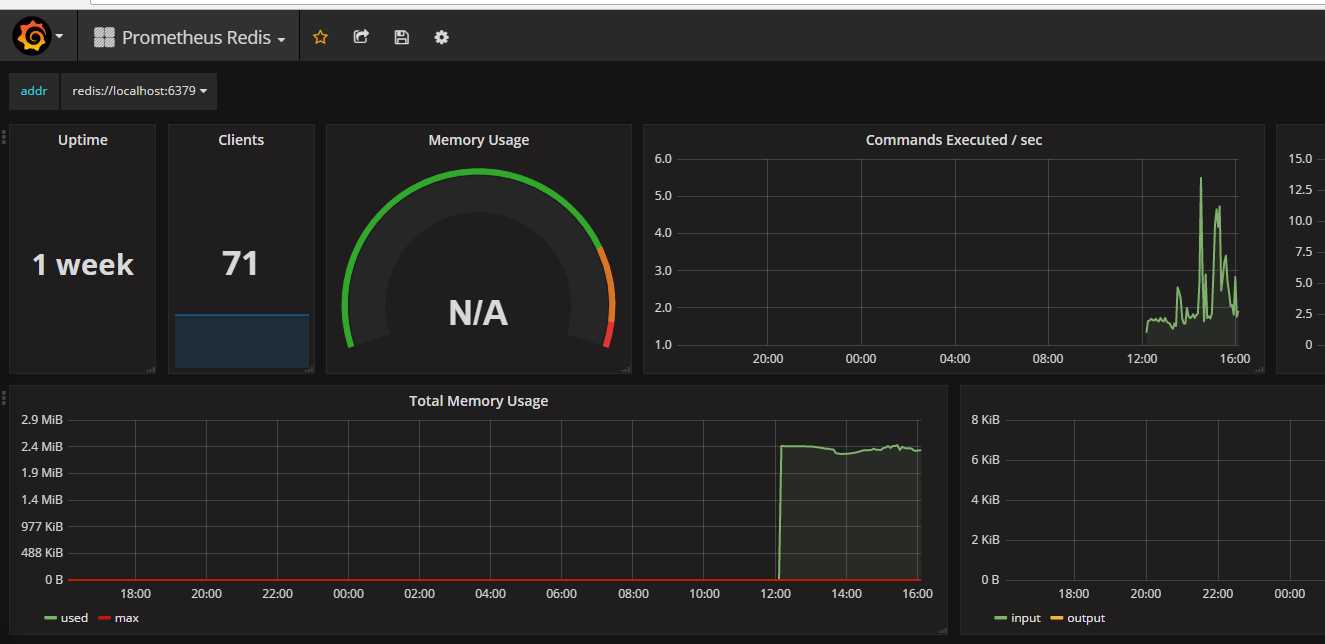
(3).
kubernetes 模板配置
因为prometheus和kubernetes是结合的,所以导入模板后,直接配置prometheus.yml即可
模板下载:https://grafana.com/dashboards/315
prometheus.yml 加入以下配置

- job_name: kubernetes-nodes-cadvisor
static_configs:
- targets: [‘192.168.0.19:4194‘,‘192.168.0.21:4194‘]
labels:
instance: kubernetes-nodes-cadvisor
kubernetes_sd_configs:
- role: node
relabel_configs:
- action: labelmap
regex: __meta_kubernetes_node_label_(.+)
metric_relabel_configs:
- action: replace
source_labels: [id]
regex: ‘^/machine\.slice/machine-rkt\\x2d([^\\]+)\\.+/([^/]+)\.service$‘
target_label: rkt_container_name
replacement: ‘${2}-${1}‘
- action: replace
source_labels: [id]
regex: ‘^/system\.slice/(.+)\.service$‘
target_label: systemd_service_name
replacement: ‘${1}‘
等待片刻可见图形:
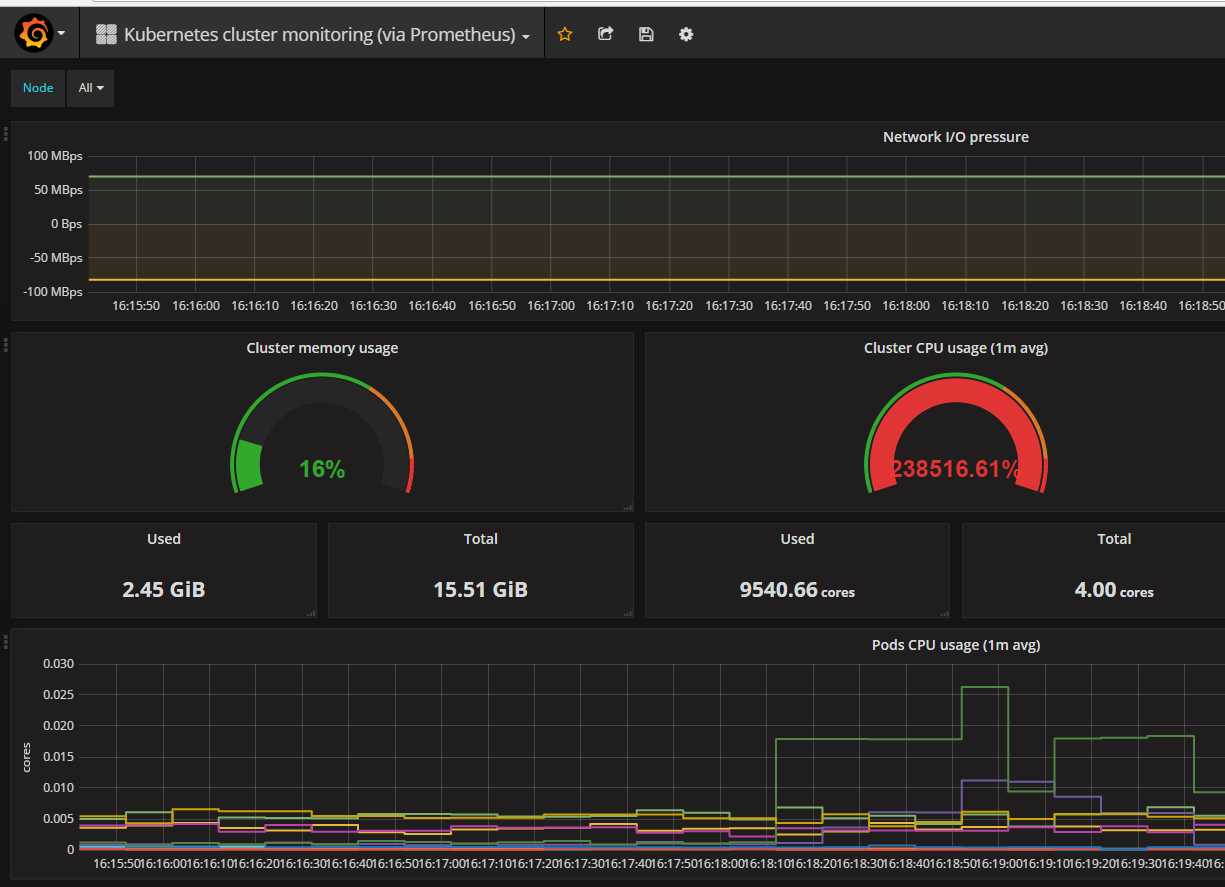
最终prometheus配置:
# cat prometheus.yml
global:
  scrape_interval:     10s
  evaluation_interval: 10s

scrape_configs:
  - job_name: node
    static_configs:
      - targets: [‘192.168.0.8:9100‘,‘192.168.0.19:9100‘,‘192.168.0.21:9100‘,‘192.168.0.17:9100‘]
        labels:
          instance: node

  - job_name: mysql
    static_configs:
      - targets: [‘192.168.0.8:9104‘]
        labels:
          instance: db-0.8

  - job_name: redis_exporter
    static_configs:
      - targets: [‘192.168.0.17:9121‘]

  - job_name: kubernetes-nodes-cadvisor
    static_configs:
      - targets: [‘192.168.0.19:4194‘,‘192.168.0.21:4194‘]
        labels:
          instance: kubernetes-nodes-cadvisor
    kubernetes_sd_configs:
      - role: node
    relabel_configs:
      - action: labelmap
        regex: __meta_kubernetes_node_label_(.+)
    metric_relabel_configs:
      - action: replace
        source_labels: [id]
        regex: ‘^/machine\.slice/machine-rkt\\x2d([^\\]+)\\.+/([^/]+)\.service$‘
        target_label: rkt_container_name
        replacement: ‘${2}-${1}‘
      - action: replace
        source_labels: [id]
        regex: ‘^/system\.slice/(.+)\.service$‘
        target_label: systemd_service_name
        replacement: ‘${1}‘
参考文档:
https://segmentfault.com/a/1190000007040144
http://www.tuicool.com/articles/vEVjai
https://github.com/prometheus
dashboards模板下载:https://grafana.com/dashboards
redis模板:https://github.com/oliver006/redis_exporter
启动 nohup /opt/prometheus_exporters/redis_exporter redis//192.168.0.17:6379 &
Prometheus监控 - Alertmanager报警模块:http://blog.csdn.net/y_xiao_/article/details/50818451
[转帖]安装prometheus+grafana监控mysql redis kubernetes等
标签:word service title 没有 star cli int mysql client
原文地址:https://www.cnblogs.com/jinanxiaolaohu/p/11294515.html

