标签:删除用户 base 作者 test opera main 界面 自定义 return
一、Swagger2概念:
swagger一款RESTFUL接口生成工具,总之特别好用;
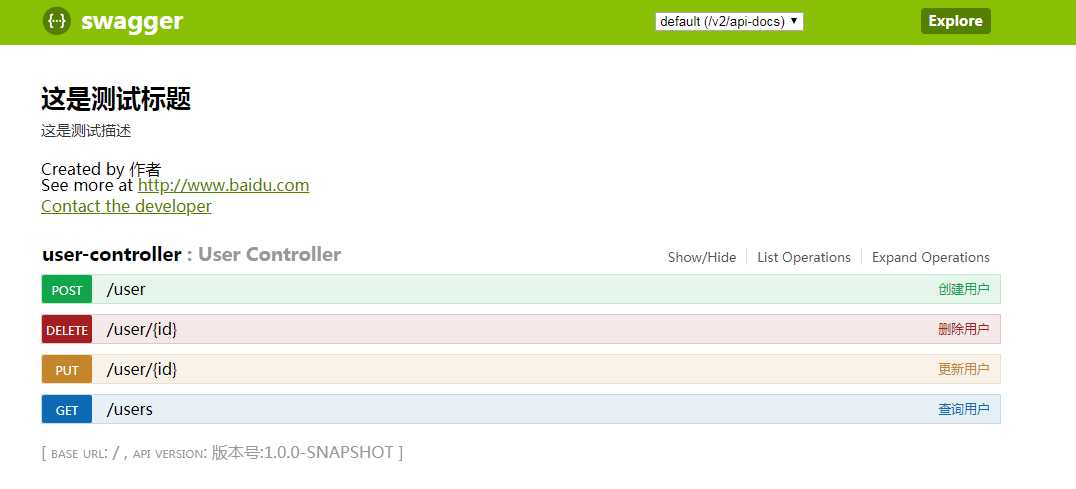
操作界面:http://localhost:8080/swagger-ui.html

二、使用示例:
(1)导入依赖:
        <dependency>
            <groupId>io.springfox</groupId>
            <artifactId>springfox-swagger2</artifactId>
            <version>2.7.0</version>
        </dependency>
        <dependency>
            <groupId>io.springfox</groupId>
            <artifactId>springfox-swagger-ui</artifactId>
            <version>2.7.0</version>
        </dependency>
(2)创建配置文件:
@Configuration
public class SwaggerConfig {
    /**创建API*/
    @Bean
    public Docket createRestApi() {
        return new Docket(DocumentationType.SWAGGER_2)
                // 用来创建该API的基本信息,展示在文档的页面中(自定义展示的信息)
                .apiInfo(apiInfo())
                // 设置哪些接口暴露给Swagger展示
                .select()
                // 扫描所有有注解的api,用这种方式更灵活
                .apis(RequestHandlerSelectors.withMethodAnnotation(ApiOperation.class))
                // 扫描指定包中的swagger注解
                 .apis(RequestHandlerSelectors.basePackage("com.gd.swagger.demo.controller"))
                // 扫描所有 .apis(RequestHandlerSelectors.any())
                .paths(PathSelectors.any())
                .build();
    }

    /**  添加摘要信息 */
    private ApiInfo apiInfo() {
        // 用ApiInfoBuilder进行定制
        return new ApiInfoBuilder()
                // 设置标题
                .title("这是测试标题")
                // 描述
                .description("这是测试描述")
                // 作者信息
                .contact(new Contact("作者", "http://www.baidu.com", "test@163.com"))
                // 版本
                .version("版本号:" + "1.0.0-SNAPSHOT")
                .build();
    }
}
(3)启动类添加注解:@EnableSwagger2
@EnableSwagger2
@SpringBootApplication
public class SwaggerDemoApplication {

    public static void main(String[] args) {
        SpringApplication.run(SwaggerDemoApplication.class, args);
    }

}
(4)接口:

@RestController
@Api("测试api")
public class UserController {

    /**
     * 查询用户列表
     */
    @ApiOperation(value = "查询用户", notes = "获取所有用户")
    @RequestMapping(value = "users", method = RequestMethod.GET)
    public void getUser() {
    }

    /**
     * 创建用户
     *
     * @param user
     */
    @ApiOperation(value = "创建用户", notes = "根据User对象创建用户")
    @ApiImplicitParam(name = "user", value = "用户实体user", required = true, dataType = "User")
    @RequestMapping(value = "user", method = RequestMethod.POST)
    public void add(@RequestBody User user) {
    }

    /**
     * 根据id删除用户
     *
     * @param id
     */
    @ApiOperation(value = "删除用户", notes = "根据url的id来指定删除用户")
    @ApiImplicitParam(name = "id", value = "用户ID", required = true, dataType = "Long", paramType = "path")
    @RequestMapping(value = "user/{id}", method = RequestMethod.DELETE)
    public void delete(@PathVariable(value = "id") Integer id) {
    }

    /**
     * 根据id修改用户信息
     *
     * @param user
     */
    @ApiOperation(value = "更新用户", notes = "根据url的id来指定更新用户信息")
    @ApiImplicitParams({
            @ApiImplicitParam(name = "id", value = "用户ID", required = true, dataType = "Long", paramType = "path"),
            @ApiImplicitParam(name = "user", value = "用户实体user", required = true, dataType = "User")
    })
    @RequestMapping(value = "user/{id}", method = RequestMethod.PUT)
    public void update(@PathVariable("id") Integer id, @RequestBody User user) {
    }

    @ApiIgnore//使用该注解忽略这个API
    @RequestMapping(value = "/hi", method = RequestMethod.GET)
    public String jsonTest() {
        return " hi you!";
    }
}
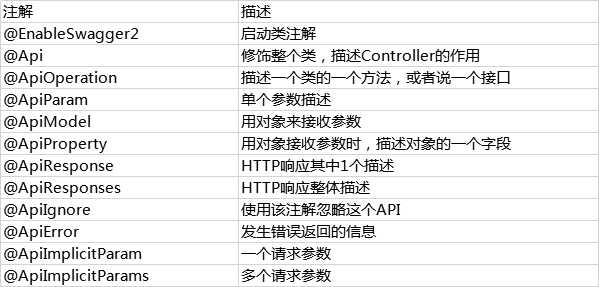
三、swagger常用注解:

标签:删除用户 base 作者 test opera main 界面 自定义 return
原文地址:https://www.cnblogs.com/Tractors/p/11419984.html