标签:web app sim contex framework ann value instance color class
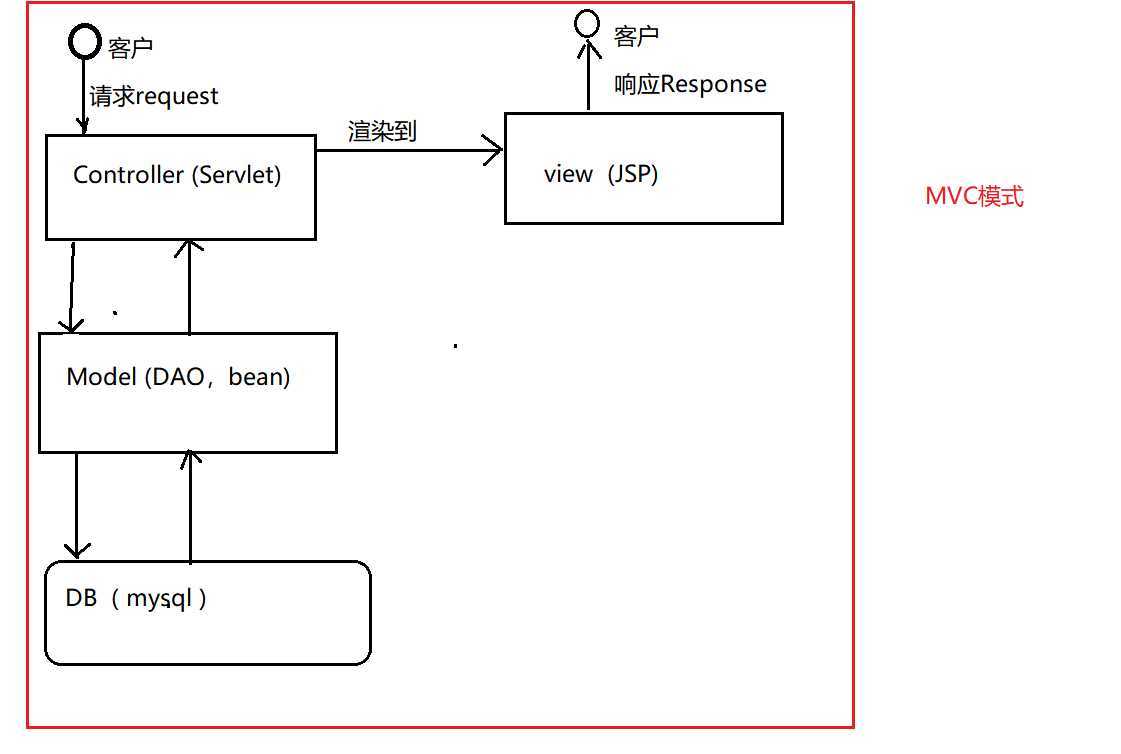
客户发送请求,程序进入控制器servlet中,进行一系列的操作,对操作类dao的和实体类bean实现相应的功能,在对操作类调用里面的方法的时候,要与数据库进行交互,从而取得里面的数据,然后从这里回到控制层,把数据渲染到页面去,页面得到数据后响应给客户,这就是MVC的整个流程。
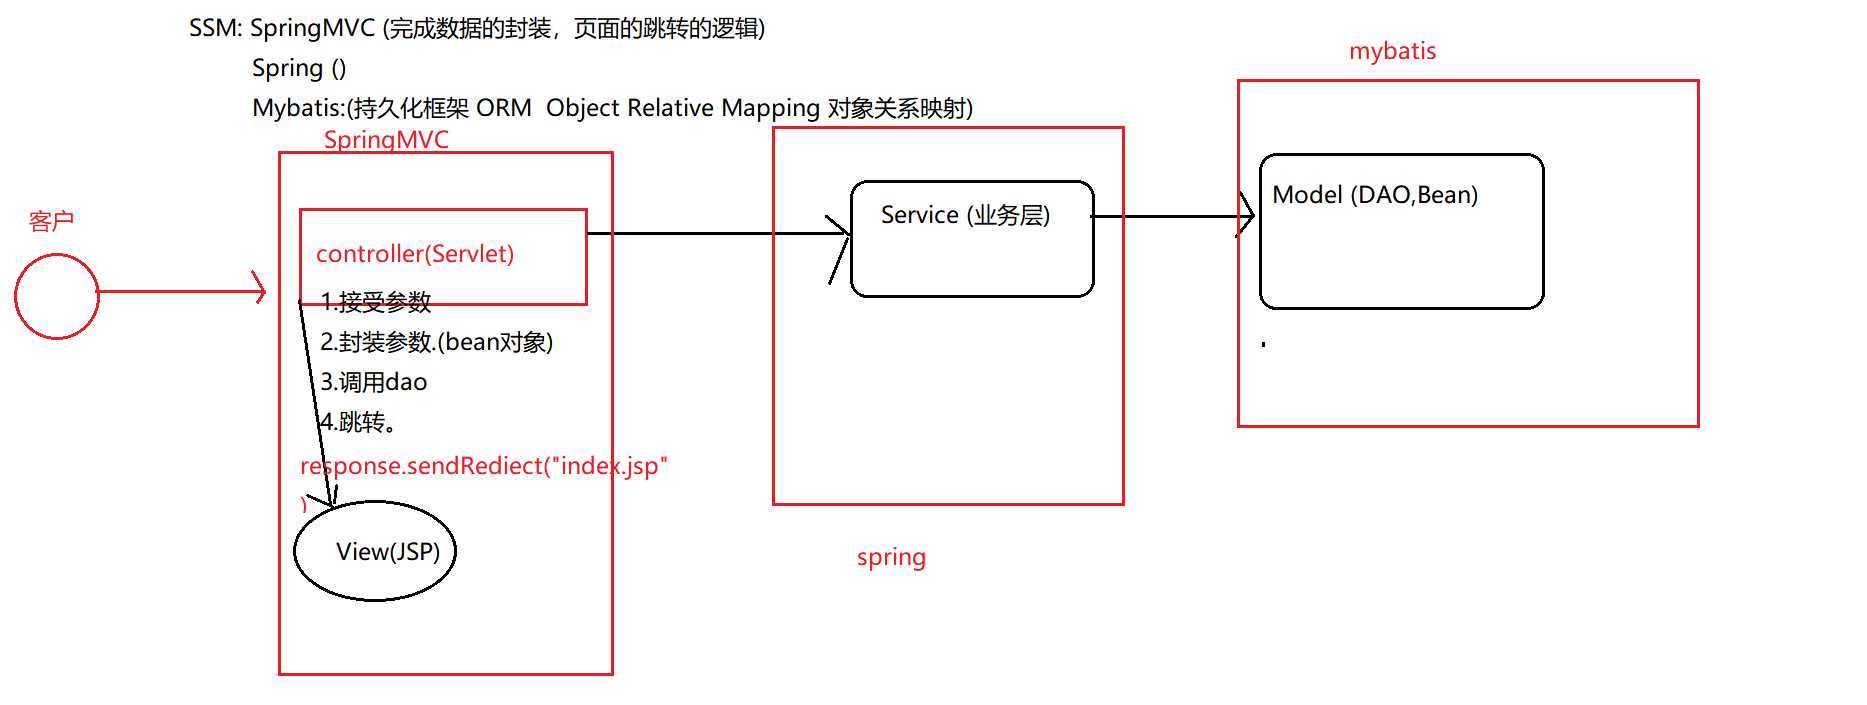
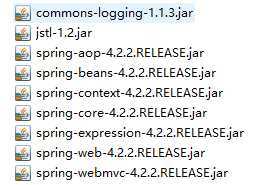
客户发出请求,程序进入控制层DispatcherServlet(是springMVC的核心),首先在项目中加入jar包:
在web.xml中配置文件,才能运行
<?xml version="1.0" encoding="UTF-8"?>
<web-app xmlns:xsi="http://www.w3.org/2001/XMLSchema-instance" xmlns="http://java.sun.com/xml/ns/javaee" xsi:schemaLocation="http://java.sun.com/xml/ns/javaee http://java.sun.com/xml/ns/javaee/web-app_3_0.xsd" id="WebApp_ID" version="3.0">
  <display-name>springmvc02</display-name>
  <welcome-file-list>
    <welcome-file>index.html</welcome-file>
    <welcome-file>index.htm</welcome-file>
    <welcome-file>index.jsp</welcome-file>
    <welcome-file>default.html</welcome-file>
    <welcome-file>default.htm</welcome-file>
    <welcome-file>default.jsp</welcome-file>
  </welcome-file-list>

  <filter>
      <filter-name>charEncoding</filter-name>
      <filter-class>org.springframework.web.filter.CharacterEncodingFilter</filter-class>
      <init-param>
          <param-name>encoding</param-name>
          <param-value>utf-8</param-value>
      </init-param>
      <init-param>
            <param-name>forceEncoding</param-name>
            <param-value>true</param-value>
    </init-param>
  </filter>
  <filter-mapping>
      <filter-name>charEncoding</filter-name>
      <url-pattern>/*</url-pattern>
  </filter-mapping>
  <!-- The front controller of this Spring Web application, responsible for handling all application requests -->
    <servlet>
        <servlet-name>springDispatcherServlet</servlet-name>
        <servlet-class>org.springframework.web.servlet.DispatcherServlet</servlet-class>
        <init-param>
            <param-name>contextConfigLocation</param-name>
            <param-value>classpath*:/springmvc.xml</param-value>
        </init-param>
        <load-on-startup>1</load-on-startup>
    </servlet>

    <!-- Map all requests to the DispatcherServlet for handling -->
    <servlet-mapping>
        <servlet-name>springDispatcherServlet</servlet-name>
        <url-pattern>*.do</url-pattern>
    </servlet-mapping>
</web-app>
其中下面的代码是对请求和响应的编码的设置
<filter>
      <filter-name>charEncoding</filter-name>
      <filter-class>org.springframework.web.filter.CharacterEncodingFilter</filter-class>
      <init-param>
          <param-name>encoding</param-name>
          <param-value>utf-8</param-value>
      </init-param>
      <init-param>
            <param-name>forceEncoding</param-name>
            <param-value>true</param-value>
    </init-param>
  </filter>
  <filter-mapping>
      <filter-name>charEncoding</filter-name>
      <url-pattern>/*</url-pattern>
  </filter-mapping>
这部分(已经优化过后的)是对springMVC的dispatcherservlet和handleMapping的配置,这是我下载插件调用自动生成的,着实方便,只要对里面的一些路径和作用范围修改一下就行。
<servlet>
<servlet-name>springDispatcherServlet</servlet-name>
<servlet-class>org.springframework.web.servlet.DispatcherServlet</servlet-class>
<init-param>
<param-name>contextConfigLocation</param-name>
<param-value>classpath*:/springmvc.xml</param-value>
</init-param>
<load-on-startup>1</load-on-startup>
</servlet>
<!-- Map all requests to the DispatcherServlet for handling -->
<servlet-mapping>
<servlet-name>springDispatcherServlet</servlet-name>
<url-pattern>*.do</url-pattern>
</servlet-mapping>
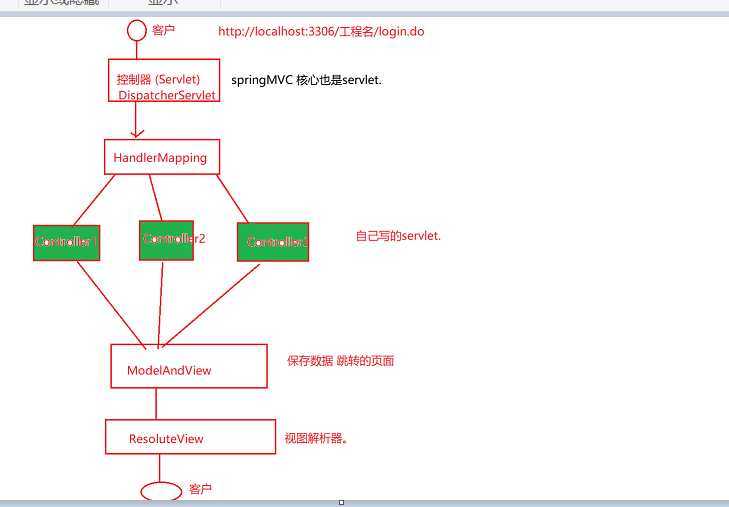
handleMapping有三种方式:
BeanNameURLHandleMapping 这是根据bean标签的名称找到的对应的controller类
simpleUrlHandleMapping 根据bean的id查找对应的controller类
controllerClassNameHandleMapping 根据controller类的名字找到对应的controller。
这三种在优化后就用不到,系统默认的是第一种,根据bean标签的名称找到的对应的类
创建controller类
用注解的方式创建如图:
package com.zhiyou100.lw.controller;

import org.springframework.stereotype.Controller;
import org.springframework.web.bind.annotation.RequestMapping;
import org.springframework.web.servlet.ModelAndView;

import com.zhiyou100.lw.bean.Users;

@Controller
public class MyController1 {
    @RequestMapping("/list.do")
    public ModelAndView list() {
        Users u=new Users();
        u.setName("张三");
        u.setAge(16);
        u.setSex("男");
        u.setPhone(12332313);
        ModelAndView mv=new ModelAndView();
        mv.setViewName("login");
        mv.addObject("user", u);
        return mv;
    }
}
这种方式创建,可以写很多的方法,就不想以前的每个实体类创建一个servlet了,减少大量的代码,返回类型是
ModelAndView,里面可以装对象也可以装字符串,也可以跳转到指定的页面去。
最后的视图解析器,在springMVC配置文件中设置,如图:
<bean class="org.springframework.web.servlet.view.InternalResourceViewResolver">
<property name="prefix" value="/WEB-INF/view/"/>
<property name="suffix" value=".jsp"/>
</bean>
这就是视图解析器的配置,根据jar包中的类,标签<property>的作用是在地址栏输入的时候解析的。
标签:web app sim contex framework ann value instance color class
原文地址:https://www.cnblogs.com/lw97-1014/p/11450439.html