标签:Fix fast article summary vim version conf 解决方法 下载
1. 下载安装nginx
注意 因为stream 并不是 nginx自带的module 所以需要 在安装是 通过 --with 的方式增加上.
下载必要的程序包
# openssl
wget https://www.openssl.org/source/openssl-1.1.1c.tar.gz
#zilib
wget http://www.zlib.net/zlib-1.2.11.tar.gz
#pcre
wget  https://netix.dl.sourceforge.net/project/pcre/pcre/8.40/pcre-8.40.tar.gz
#nginx
wget http://nginx.org/download/nginx-1.17.3.tar.gz
2. 解压缩
tar -zxvf xxxx.tar.gz
3. 分别进行安装
1. 首先  使用 tar 包 安装上 zlib openssh 以及 pcre 三个包
Firest 进入解压缩好的目录
./configure  or  ./config
second
make && make install

2. 进行安装nginx
#进入nginx 的目录
执行配置.
./configure --prefix=/usr/local/nginx --with-http_stub_status_module --with-http_ssl_module --with-http_realip_module  --with-http_gzip_static_module --with-stream --with-stream_ssl_module
# 注意 stream 就可以进行 TCP层的反向代理了.

参考网站:https://blog.csdn.net/jijiuqiu6646/article/details/78675891
4. 问题解决.
打开nginx 时会报错 如下:
[root@k8smaster sbin]# ./nginx
./nginx: error while loading shared libraries: libssl.so.1.1: cannot open shared object file: No such file or directory
[root@k8smaster sbin]# openssl version
openssl: error while loading shared libraries: libssl.so.1.1: cannot open shared object file: No such file or directory
解决方法为:
参考网站:

https://blog.csdn.net/caohongshuang/article/details/78031978

查看 依赖关系
ldd $(which /usr/local/nginx/sbin/nginx)
[root@k8smaster sbin]# ldd $(which /usr/local/nginx/sbin/nginx)
linux-vdso.so.1 => (0x00007ffe6b5f2000)
libdl.so.2 => /lib64/libdl.so.2 (0x00007f95a7389000)
libpthread.so.0 => /lib64/libpthread.so.0 (0x00007f95a716d000)
libcrypt.so.1 => /lib64/libcrypt.so.1 (0x00007f95a6f36000)
libpcre.so.1 => /lib64/libpcre.so.1 (0x00007f95a6cd4000)
libssl.so.1.1 => /lib64/libssl.so.1.1 (0x00007f95a6a42000)
libcrypto.so.1.1 => /lib64/libcrypto.so.1.1 (0x00007f95a6559000)
libz.so.1 => /lib64/libz.so.1 (0x00007f95a6343000)
libc.so.6 => /lib64/libc.so.6 (0x00007f95a5f76000)
/lib64/ld-linux-x86-64.so.2 (0x00007f95a758d000)
libfreebl3.so => /lib64/libfreebl3.so (0x00007f95a5d73000)
进入到openssl 相关的目录 进行 软连接处理
[root@k8smaster sbin]# cd /usr/local/lib64/
[root@k8smaster lib64]# ll
total 10468
drwxr-xr-x 2 root root 55 Sep 2 18:26 engines-1.1
-rw-r--r-- 1 root root 5619436 Sep 2 18:26 libcrypto.a
lrwxrwxrwx 1 root root 16 Sep 2 18:26 libcrypto.so -> libcrypto.so.1.1
-rwxr-xr-x 1 root root 3383960 Sep 2 18:26 libcrypto.so.1.1
-rw-r--r-- 1 root root 1022072 Sep 2 18:26 libssl.a
lrwxrwxrwx 1 root root 13 Sep 2 18:26 libssl.so -> libssl.so.1.1
-rwxr-xr-x 1 root root 684992 Sep 2 18:26 libssl.so.1.1
drwxr-xr-x 2 root root 61 Sep 2 18:26 pkgconfig
[root@k8smaster lib64]# ln libssl.so.1.1 /usr/lib64/libssl.so.1.1
[root@k8smaster lib64]# ln libcrypto.so.1.1 /usr/lib64/libcrypto.so.1.1
5. 修改nginx配置文件.
注意 第三步 nginx的 configure 时有一个配置简述

Configuration summary
  + using system PCRE library
  + using system OpenSSL library
  + using system zlib library

  nginx path prefix: "/usr/local/nginx"
  nginx binary file: "/usr/local/nginx/sbin/nginx"
  nginx modules path: "/usr/local/nginx/modules"
  nginx configuration prefix: "/usr/local/nginx/conf"
  nginx configuration file: "/usr/local/nginx/conf/nginx.conf"
  nginx pid file: "/usr/local/nginx/logs/nginx.pid"
  nginx error log file: "/usr/local/nginx/logs/error.log"
  nginx http access log file: "/usr/local/nginx/logs/access.log"
  nginx http client request body temporary files: "client_body_temp"
  nginx http proxy temporary files: "proxy_temp"
  nginx http fastcgi temporary files: "fastcgi_temp"
  nginx http uwsgi temporary files: "uwsgi_temp"
  nginx http scgi temporary files: "scgi_temp"
这里面就可以看到配置文件的位置了. 进行修改可以.
vim /usr/local/nginx/conf/nginx.conf

增加上与 http 同级的配置节:

stream{
    server {
      listen 1433;
      proxy_pass 10.24.14.56:1433;
  }
}

# 注意 第一点 需要有 分号 我经常忘记
# 第二点 大括号要处理好.

如果 80 端口已经使用的花 可以在http 里面讲 80端口修改一下就可以了.
6. 启动以及验证
/usr/local/nginx/sbin/nginx -s reload

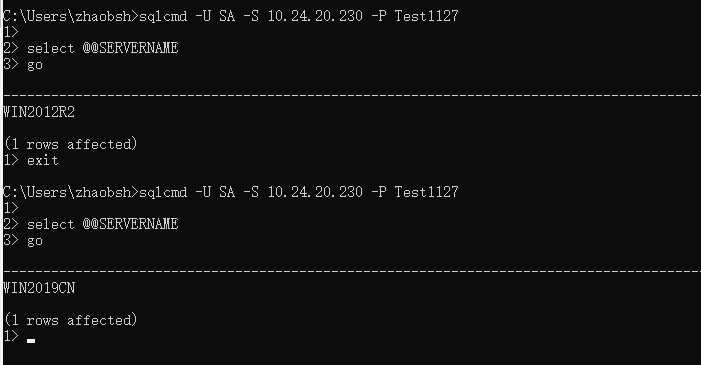
7. 验证负载均衡
修改配置节的内容:
stream{
   upstream zhaobsh{
    server 10.24.14.56:1433;
    server 10.24.210.11:1433;
    }
   server {
      listen 1433;
      proxy_pass zhaobsh;
  }
}
验证效果为:

Linux 下面安装 nginx 以及进行TCP反向代理、负载均衡的过程
标签:Fix fast article summary vim version conf 解决方法 下载
原文地址:https://www.cnblogs.com/jinanxiaolaohu/p/11445417.html