标签:xml配置 turn sys ase 控制反转 student package lis string
1.Spring依赖注入的方式
平常的java开发中,程序员在某个类中需要依赖其它类的方法,则通常是new一个依赖类再调用类实例的方法,这种开发存在的问题是new的类实例不好统一管理。
spring提出了依赖注入的思想,即依赖类不由程序员实例化,而是通过spring容器帮我们new指定实例并且将实例注入到需要该对象的类中。依赖注入的另一种说法是“控制反转”。
通俗的理解是:平常我们new一个实例,这个实例的控制权是我们程序员,而控制反转是指new实例工作不由我们程序员来做而是交给spring容器来做。
Spring通过DI(依赖注入)实现IOC(控制反转),常用的注入方式主要有三种:构造方 法注入,set方法参数注入,接口注入,这里我们先运用构造方法注入,set方法参数注入。
1.1通过set方法完成依赖注入
建好实体类Hello并生成set方法
private String name;
private Integer age;
在配置文件中写入代码以完成set方法依赖注入
<bean id="he" class="com.zhiyou100.spring.Hello">
    <property name="name" value="地方大师傅"/>
    <property name="age" value="33"/>
</bean>
写好测试类进行测试
1 public class Test {
2     public static void main(String[] args) {
3         ApplicationContext app=new ClassPathXmlApplicationContext("app.xml");
4         Hello hh = (Hello) app.getBean("he");
5         System.out.println(hh);
6     }
7 }
结果输出

一般我们建议使用set方法进行依赖注入
1.2通过构造方法注入
在上面的实体类中生成构造方法三种,无参,单参和全参
//无参
public Hello() {
    super();
}
//单参
public Hello(String name) {
    super();
    this.name = name;
}
//全参
public Hello(String name, Integer age) {
    super();
    this.name = name;
    this.age = age;
}
在配置文件中进行依赖注入,其中传入两个参则寻找上面两个参的,一个则寻找单参的
<bean id="he2" class="com.zhiyou100.spring.Hello">
    <constructor-arg index="0" value="李四"/>
    <constructor-arg index="1" value="13"/>
</bean>
进行测试
1 public class Test {
2     public static void main(String[] args) {
3         ApplicationContext app=new ClassPathXmlApplicationContext("app.xml");
4         Hello hh = (Hello) app.getBean("he2");
5         System.out.println(hh);
6     }
7 }
测试结果为,依赖注入成功

2.依赖注入的类型
基本数据类型和字符串 使用value属性,如果是引入的对象类型则使用ref属性
在上面实体类的基础上加入新属性类型
private Student student;
private List<String> list;
private Map<Integer, String> map;
对应的student实体类为
 1 public class Student {
 2     private String addr;
 3     public String getAddr() {
 4         return addr;
 5     }
 6     public void setAddr(String addr) {
 7         this.addr = addr;
 8     }
 9     @Override
10     public String toString() {
11         return "Student [addr=" + addr + "]";
12     }
13 }
编写配置代码
 1 <bean id="he" class="com.zhiyou100.spring.Hello">
 2         <property name="name" value="地方大师傅"/>
 3         <property name="age" value="33"/>
 4         <property name="student" ref="stu"/>
 5         <property name="list">
 6             <list>
 7                 <value>琼恩雪诺</value>
 8                 <value>史塔克三萨</value>
 9                 <value>提里昂</value>
10             </list>
11         </property>
12         <property name="map">
13             <map>
14                 <entry key="1" value="啊啊啊"/>
15                 <entry key="2" value="事实上"/>
16                 <entry key="3" value="顶顶顶"/>
17             </map>
18         </property>
19     </bean>
20
21     <bean id="stu" class="com.zhiyou100.spring.Student">
22         <property name="addr" value="温哥华"/>
23     </bean>
编写测试代码,进行测试:
1 public class Test {
2     public static void main(String[] args) {
3         ApplicationContext app=new ClassPathXmlApplicationContext("app.xml");
4         Hello hh = (Hello) app.getBean("he");
5         System.out.println(hh);
6         System.out.println(hh.getMap());
7     }
8 }
测试成功后如下所示

3.Bean的作用域
Bean的作用域默认为单例模式
scope:表示bean的作用域,默认singleton, struts框架要求非单例
prototype:原生,非单例
<bean id="he" class="com.zhiyou100.spring.Hello" scope="prototype"/>
4.自动注入
新建两个实体类UserDao和UserService
public class UserDao {
    private String uname;
    public String getUname() {
        return uname;
    }
    public void setUname(String uname) {
        this.uname = uname;
}
public class UserService {
    private UserDao userDao;
    public UserDao getUserDao() {
        return userDao;
    }
    public void setUserDao(UserDao userDao) {
        System.out.println("setUserDao");
        this.userDao = userDao;
    }
}
xml配置文件代码,其中userservice使用自动依赖注入autowire="byName"对于此属性的其他解释
byType:根据userDao属性的类型,找与之匹配的bean
private UserDao userDao;
byName :根据属性名找与之匹配的bean的id
no:需要手动注入
default :采取全局的default- autowire没置
<bean id="userDao" class="com.zhiyou100.spring.UserDao"/>

<bean id="userservice" class="com.zhiyou100.spring.UserService" autowire="byName"/>
编写测试
public class UserTest {
    public static void main(String[] args) {
        ApplicationContext app=new ClassPathXmlApplicationContext("appUser.xml");
    }
}
测试结果为

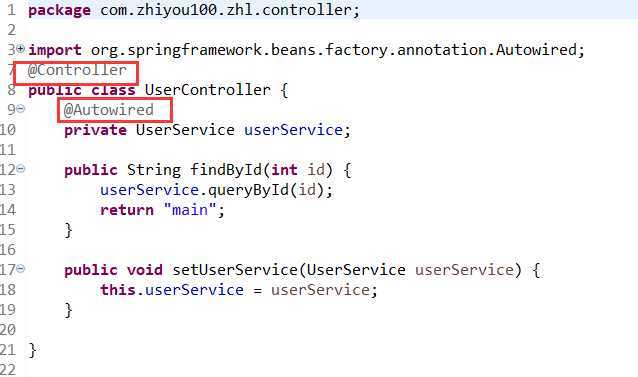
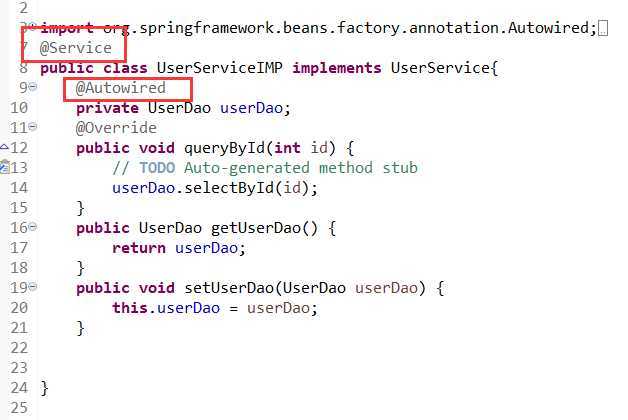
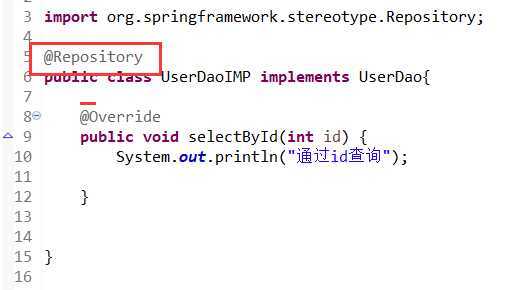
5.使用注解的方式

<context:component-scan base-package="com.zhiyou100.zhl"/>


6.在spring配置文件中引入属性文件
1 <context:property-placeholder location="classpath:my.properties"/>
2 <bean id="users" class="com.zhiyou100.spring.Users">
3     <!-- ${user.name}这个属性会打印电脑的用户名 -->
4     <property name="name" value="${users.name}"></property>
5     <property name="age" value="${users.age}"></property>
6     <property name="address" value="${users.address}"></property>
7 </bean>
users.name=zzzz
users.age=55
users.address=asdasd
测试结果为

若使用user.name这个属性会打印电脑的用户名,将上面的代码不变,改变这一条后测试结果为


标签:xml配置 turn sys ase 控制反转 student package lis string
原文地址:https://www.cnblogs.com/murmansk/p/11478579.html