标签:tde 数组 ref 传递 ssr 配置方法 resource trapper err
一.Spring装配机制
Spring提供了三种主要的装配机制:
1.在XML中进行显示配置
2.在Java中进行显示配置
3.隐式的bean发现机制和自动装配
--自动化装配bean
Spring可以通过注解来进行自动装配(无需再手动写配置文件),Spring从两个角度实现自动化装配:
1.组件扫描(component scanning):Spring会自动发现应用上下文中所创建的bean;
2.自动装配(autowiring):Spring自动满足bean之间的依赖;
--以CD及CD播放器为示例,如果我们不将CD注入到CD播放器之中,那么CD播放器其实是没有太大用处的,在CompactDisc接口中定义CD的概念:
 1 package cd;
 2
 3 /**
 4  * @author : S K Y
 5  * @version :0.0.1
 6  */
 7 public interface CompactDisc {
 8     /**
 9      * 播放CD
10      */
11     void play();
12 }
--定义实现类
 1 package cd;
 2
 3 import org.springframework.stereotype.Component;
 4
 5 /**
 6  * @author : S K Y
 7  * @version :0.0.1
 8  */
 9 @Component      //使用@Component注解将告知Spring为这个类创建bean
10 public class SgtPeppers implements CompactDisc {
11     @Override
12     public void play() {
13         System.out.println("SgtPeppers播放中....");
14     }
15 }
--想要实现自动装配,单单使用@Component是不够的,我们还需要启动组件扫描来完成配置,在XML的配置文件中开启组件扫描:
<?xml version="1.0" encoding="UTF-8"?>
<beans xmlns="http://www.springframework.org/schema/beans"
       xmlns:xsi="http://www.w3.org/2001/XMLSchema-instance"
       xmlns:context="http://www.springframework.org/schema/context"
       xsi:schemaLocation="http://www.springframework.org/schema/beans http://www.springframework.org/schema/beans/spring-beans.xsd http://www.springframework.org/schema/context http://www.springframework.org/schema/context/spring-context.xsd">
    <context:component-scan base-package="cd"/>     <!--组件扫描,扫描cd包-->
</beans>
--使用Junit测试来验证CompactDisc是否真的被创建成功,使用Java配置来完成:
 1 package cd;
 2
 3 import org.springframework.context.annotation.ComponentScan;
 4 import org.springframework.context.annotation.Configuration;
 5
 6 /**
 7  * @author : S K Y
 8  * @version :0.0.1
 9  */
10 @Configuration
11 @ComponentScan(basePackages = {"cd"})
12 public class CDPlayerConfig {
13 }
 1 package cd.test;
 2
 3 import cd.CDPlayerConfig;
 4 import cd.CompactDisc;
 5 import org.junit.Assert;
 6 import org.junit.Test;
 7 import org.junit.runner.RunWith;
 8 import org.springframework.beans.factory.annotation.Autowired;
 9 import org.springframework.test.context.ContextConfiguration;
10 import org.springframework.test.context.junit4.SpringJUnit4ClassRunner;
11
12 /**
13  * @author : S K Y
14  * @version :0.0.1
15  */
16 @RunWith(SpringJUnit4ClassRunner.class)     //需要使用spring-test-4.3.4.RELEASE.jar
17 @ContextConfiguration(classes = CDPlayerConfig.class)
18 public class CDPlayerTest {
19     @Autowired
20     private CompactDisc cd;
21
22     @Test
23     public void cdShouldNotBeNull(){
24         Assert.assertNotNull(cd);
25     }
26 }
--事实上Spring应用上下文中所有的bean都会给定一个ID,在上述的例子中,我们使用@Autowired注解的时候并没有设置其ID值,此时Spring会根据类名为其分配一个ID值(ID值就是类名,并且首字母小写)。当然我们也可以在使用@AutoWired的时候为其自定义ID值:
 1 package cd;
 2
 3 import org.springframework.stereotype.Component;
 4
 5 /**
 6  * @author : S K Y
 7  * @version :0.0.1
 8  */
 9 @Component("myPeppers")      //使用@Component注解将告知Spring为这个类创建bean
10 public class SgtPeppers implements CompactDisc {
11     @Override
12     public void play() {
13         System.out.println("SgtPeppers播放中....");
14     }
15 }
1     @Test
2     public void getBeanByID(){
3         AnnotationConfigApplicationContext context = new AnnotationConfigApplicationContext(CDPlayerConfig.class);
4         CompactDisc myPeppers = context.getBean("myPeppers", CompactDisc.class);
5         myPeppers.play();
6     }
--运行结果
九月 07, 2019 10:35:36 上午 org.springframework.test.context.support.DefaultTestContextBootstrapper getDefaultTestExecutionListenerClassNames
信息: Loaded default TestExecutionListener class names from location [META-INF/spring.factories]: [org.springframework.test.context.web.ServletTestExecutionListener, org.springframework.test.context.support.DirtiesContextBeforeModesTestExecutionListener, org.springframework.test.context.support.DependencyInjectionTestExecutionListener, org.springframework.test.context.support.DirtiesContextTestExecutionListener, org.springframework.test.context.transaction.TransactionalTestExecutionListener, org.springframework.test.context.jdbc.SqlScriptsTestExecutionListener]
九月 07, 2019 10:35:36 上午 org.springframework.test.context.support.DefaultTestContextBootstrapper instantiateListeners
信息: Could not instantiate TestExecutionListener [org.springframework.test.context.transaction.TransactionalTestExecutionListener]. Specify custom listener classes or make the default listener classes (and their required dependencies) available. Offending class: [org/springframework/transaction/interceptor/TransactionAttributeSource]
九月 07, 2019 10:35:36 上午 org.springframework.test.context.support.DefaultTestContextBootstrapper instantiateListeners
信息: Could not instantiate TestExecutionListener [org.springframework.test.context.web.ServletTestExecutionListener]. Specify custom listener classes or make the default listener classes (and their required dependencies) available. Offending class: [javax/servlet/ServletContext]
九月 07, 2019 10:35:36 上午 org.springframework.test.context.support.DefaultTestContextBootstrapper instantiateListeners
信息: Could not instantiate TestExecutionListener [org.springframework.test.context.jdbc.SqlScriptsTestExecutionListener]. Specify custom listener classes or make the default listener classes (and their required dependencies) available. Offending class: [org/springframework/transaction/interceptor/TransactionAttribute]
九月 07, 2019 10:35:36 上午 org.springframework.test.context.support.DefaultTestContextBootstrapper getTestExecutionListeners
信息: Using TestExecutionListeners: [org.springframework.test.context.support.DirtiesContextBeforeModesTestExecutionListener@6bdf28bb, org.springframework.test.context.support.DependencyInjectionTestExecutionListener@6b71769e, org.springframework.test.context.support.DirtiesContextTestExecutionListener@2752f6e2]
九月 07, 2019 10:35:36 上午 org.springframework.context.support.GenericApplicationContext prepareRefresh
信息: Refreshing org.springframework.context.support.GenericApplicationContext@3a03464: startup date [Sat Sep 07 10:35:36 CST 2019]; root of context hierarchy
九月 07, 2019 10:35:37 上午 org.springframework.context.annotation.AnnotationConfigApplicationContext prepareRefresh
信息: Refreshing org.springframework.context.annotation.AnnotationConfigApplicationContext@635eaaf1: startup date [Sat Sep 07 10:35:37 CST 2019]; root of context hierarchy
SgtPeppers播放中....
九月 07, 2019 10:35:37 上午 org.springframework.context.support.GenericApplicationContext doClose
信息: Closing org.springframework.context.support.GenericApplicationContext@3a03464: startup date [Sat Sep 07 10:35:36 CST 2019]; root of context hierarchy

Process finished with exit code 0
--同时Spring支持将@Named作为@Component注解的替代方法,但是更多的是使用@Component注解来完成
二.设置组件扫描的基础包
在上述示例中,对CDPlayerConfig类使用了@ComponentScan注解.并使用basePackages={"cd"}来指定了所需要扫描的包,观察@ComponentScan注解的实现:
@AliasFor("basePackages")
String[] value() default {};
@AliasFor("value")
String[] basePackages() default {};
--可以发现为basePackages设置了default属性,虽然在定义的类中没有给出具体的值,但是在Spring的内部实现中,会将配置类所在的包作为基础包来进行组件扫描,同时可以发现所定义的basePackages为一个数组,因此我们可以指定多个包为所需要扫描的包;当然还有另一种方法,我们可以指定包中所含有的类或接口:Class<?>[] basePackageClasses() default {}:
 1 package cd;
 2
 3 import org.springframework.context.annotation.ComponentScan;
 4 import org.springframework.context.annotation.Configuration;
 5
 6 /**
 7  * @author : S K Y
 8  * @version :0.0.1
 9  */
10 @Configuration
11 @ComponentScan(basePackageClasses = {CompactDisc.class})
12 public class CDPlayerConfig {
13 }
1     @Test
2     public void bothShouldNotBeNull(){
3         AnnotationConfigApplicationContext context = new AnnotationConfigApplicationContext(CDPlayerConfig.class);
4         CompactDisc myPeppers = context.getBean("myPeppers", CompactDisc.class);
5         CompactDisc cdPlayer = context.getBean("cdPlayer", CompactDisc.class);
6         myPeppers.play();
7         cdPlayer.play();
8     }
--运行结果
SgtPeppers播放中....
CDPlayer播放....
九月 07, 2019 10:58:38 上午 org.springframework.context.support.GenericApplicationContext doClose
信息: Closing org.springframework.context.support.GenericApplicationContext@3a03464: startup date [Sat Sep 07 10:58:37 CST 2019]; root of context hierarchy

Process finished with exit code 0
--我们可以发现实现自CompactDisc接口的所有类都成功的被自动扫描加入了Spring容器之中,因此我们可以优化我们的代码结构,我们可以用一个空接口,所有需要进行自动扫描的组件都可以使用这个空接口来进行标记(在Java序列化之中Serializable 接口就是一个空接口,只是用来声明某个类具有可以序列化的功能),这样一来对于项目代码的维护和重构将更加的友好.
--在你的应用程序中,如果所有的对象都是独立的,彼此之间没有任何 依赖,就像SgtPeppersbean这样,那么你所需要的可能就是组件扫 描而已。但是,很多对象会依赖其他的对象才能完成任务。这样的 话,我们就需要有一种方法能够将组件扫描得到的bean和它们的依赖 装配在一起。要完成这项任务,我们需要了解一下Spring自动化配置 的另外一方面内容,那就是自动装配。
三.通过为bean添加注解实现自动装配
自动装配就是让Spring自动满足bean依赖的一种方法,在满足依赖的过程中,Spring会在应用中寻找匹配某个bean需求的其他bean.为了声明要进行自动装配可以借助@AutoWired注解来完成:
 1 package cd;
 2
 3 import knights.Knight;
 4 import org.springframework.context.annotation.ComponentScan;
 5 import org.springframework.context.annotation.Configuration;
 6
 7 /**
 8  * @author : S K Y
 9  * @version :0.0.1
10  */
11 @Configuration
12 @ComponentScan(basePackageClasses = {CompactDisc.class,CDorDVDPlayer.class})
13 public class CDPlayerConfig {
14 }
 1 package cd;
 2
 3 import org.springframework.beans.factory.annotation.Autowired;
 4 import org.springframework.stereotype.Component;
 5
 6 /**
 7  * @author : S K Y
 8  * @version :0.0.1
 9  */
10 @Component("CDorDVDPlayer")
11 public class CDorDVDPlayer {
12     private CompactDisc compactDisc;
13
14     @Autowired      //@AutoWired注解可以使用在构造器上,这样bean ID为myPeppers的bean将会为这个构造器自动装配进去
15     public CDorDVDPlayer(CompactDisc myPeppers) {
16         this.compactDisc = myPeppers;
17     }
18
19     public void play() {
20         compactDisc.play();
21     }
22 }
--运行结果
    @Test
    public void testCDorDVDPlayer() {
        AnnotationConfigApplicationContext context = new AnnotationConfigApplicationContext(CDPlayerConfig.class);
        CDorDVDPlayer cDorDVDPlayer = context.getBean("CDorDVDPlayer", CDorDVDPlayer.class);
        cDorDVDPlayer.play();
        context.close();
    }
--事实上@AutoWired注解不仅能够用在构造器之上,还能用在属性的setter方法放,也可以用在其他的任何方法上,其发挥的作用也是完全相同的.假设只有一个bean匹配依赖的话,那么Spring会自动的将这个bean装配起来,否则在idea中将无法通过编译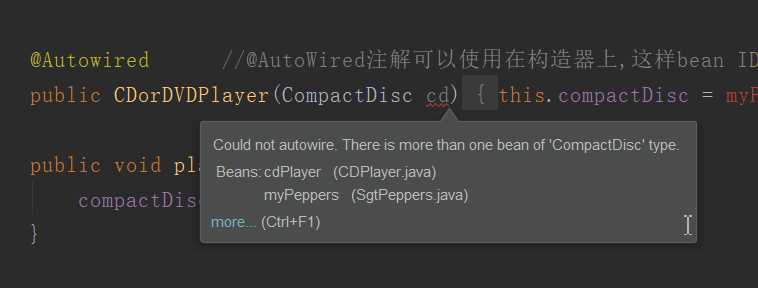
--如果说没有相关的可匹配bean,Spring会抛出一个异常,为了避免异常的出现,可以将@AutoWired的required属性设置为false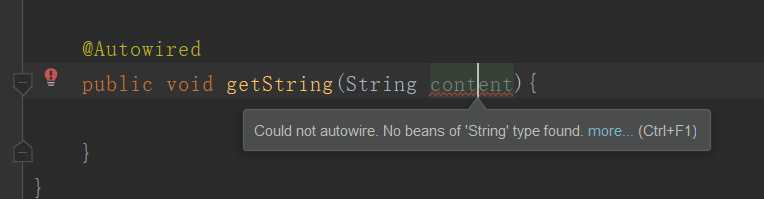
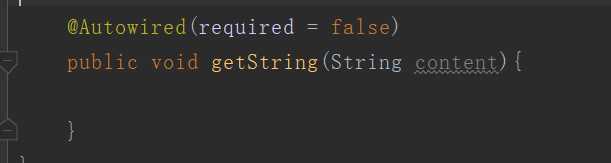
--此时如果没有合适匹配的bean的话,Spring会将这个bean作为无装配状态,但是此时我们就需要在代码中进行null检查,否则这个处于未装配状态的对象很容易出现NullPointerException.实际上在Java依赖注入规范中为我们定义了@Inject注解(@Named注解也是在这之中提供的),其作用和@AutoWired注解相类似.
四.通过Java代码装配Bean
在很多的情况下我们通过组件扫描和自动装配实现Spring的自动化配置是更为推荐的方式,但是有时候自动化装配的方案行不通,因此需要明确配置Spring.如果想要将第三方库中的组件装配到我们的应用中,那么在这种情况下,是没有办法在它的类上添加@Component和@AutoWired注解的.
--使用Java配置类来实现装配(移除了所有的@Component,@AutoWired,@ComponentScan注解):
 1 package cd.使用Java配置类进行装配;
 2
 3 /**
 4  * @author : S K Y
 5  * @version :0.0.1
 6  */
 7 public interface CompactDisc {      //定义一个CD 和DVD的共同接口
 8     /**
 9      * 播放内容
10      */
11     void play();
12 }
 1 package cd.使用Java配置类进行装配;
 2
 3 /**
 4  * @author : S K Y
 5  * @version :0.0.1
 6  */
 7 public class MyDVD implements CompactDisc {
 8     @Override
 9     public void play() {
10         System.out.println("现在播放的是我最喜欢的DVD...");
11     }
12 }
 1 package cd.使用Java配置类进行装配;
 2
 3 /**
 4  * @author : S K Y
 5  * @version :0.0.1
 6  */
 7 public interface MediaPlayer {      //定义一个多媒体播放器接口
 8     /**
 9      * 播放多媒体文件
10      */
11     void play();
12 }
 1 package cd.使用Java配置类进行装配;
 2
 3
 4 /**
 5  * @author : S K Y
 6  * @version :0.0.1
 7  */
 8 public class CDorDvdPlayer implements MediaPlayer {
 9     private CompactDisc compactDisc;
10
11     public CDorDvdPlayer(CompactDisc compactDisc) {
12         this.compactDisc = compactDisc;
13     }
14
15     @Override
16     public void play() {
17         compactDisc.play();
18     }
19 }
 1 package cd.使用Java配置类进行装配;
 2
 3 import org.springframework.context.annotation.Bean;
 4 import org.springframework.context.annotation.Configuration;
 5
 6 /**
 7  * @author : S K Y
 8  * @version :0.0.1
 9  */
10 @Configuration      //声明此类为Java配置文件
11 public class PlayerConfig {
12     @Bean
13     public CompactDisc myDVD() {
14         return new MyDVD();
15     }
16
17     @Bean
18     public MediaPlayer player() {
19         return new CDorDvdPlayer(myDVD());
20     }
21 }
 1 package cd.使用Java配置类进行装配;
 2
 3 import org.junit.Test;
 4 import org.springframework.context.annotation.AnnotationConfigApplicationContext;
 5
 6 /**
 7  * @author : S K Y
 8  * @version :0.0.1
 9  */
10 public class PlayerTest {
11     @Test
12     public void runWithJavaConfig(){
13         AnnotationConfigApplicationContext applicationContext =
14                 new AnnotationConfigApplicationContext(PlayerConfig.class);
15         MediaPlayer player = applicationContext.getBean("player", MediaPlayer.class);
16         player.play();
17     }
18 }
--在默认的情况下@Bean注解返回的bean的ID与方法名是一样的,当然该注解也拥有属性name可以修改当前装配的Bean的ID,当然更为合理的可以使用这样的方式进行拥有相关依赖的bean的装配: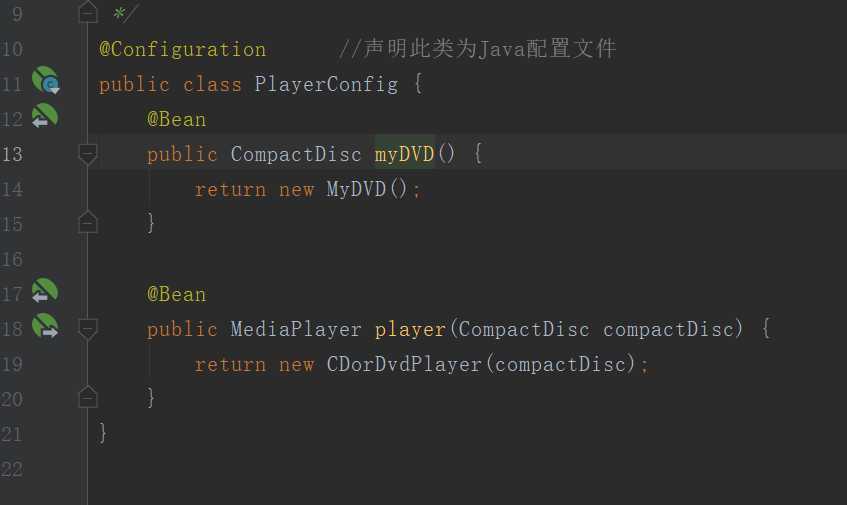
--这种方式的装配,在Spring之中并不会要求这两个相关联的bean必须声明在同一个类之中,甚至,可以是一个声明在XML配置之中,另一个声明在Java类的配置文件之中.
--使用XML配置文件来装载配置
 1 <?xml version="1.0" encoding="UTF-8"?>
 2 <beans xmlns="http://www.springframework.org/schema/beans"
 3        xmlns:xsi="http://www.w3.org/2001/XMLSchema-instance"
 4        xsi:schemaLocation="http://www.springframework.org/schema/beans http://www.springframework.org/schema/beans/spring-beans.xsd">
 5     <!--进行bean的装配-->
 6     <bean id="myDVD" class="cd.使用Java配置类进行装配.MyDVD"/>
 7     <bean id="player" class="cd.使用Java配置类进行装配.CDorDvdPlayer">
 8         <constructor-arg ref="myDVD"/>
 9     </bean>
10 </beans>
1     @Test
2     public void runWithXMLConfig(){
3         ClassPathXmlApplicationContext context =
4                 new ClassPathXmlApplicationContext("cd/使用Java配置类进行装配/PlayerConfig.xml");
5         MediaPlayer player = context.getBean("player", MediaPlayer.class);
6         player.play();
7     }
--使用XML来装配我们的bean只有一个方法,那就是使用<bean>标签来完成,其中也有两种基本的配置方法可以选择:
1.<constructor-arg>元素
2.使用Spring3.0所引入的c-命名空间来完成
--使用c-命名空间完成装配首先需要在Spring的XML配置文件顶部声明其模式,而后在bean标签中使用c:compactDisc-ref属性来完成注入:
 1 <?xml version="1.0" encoding="UTF-8"?>
 2 <beans xmlns="http://www.springframework.org/schema/beans"
 3        xmlns:xsi="http://www.w3.org/2001/XMLSchema-instance"
 4        xmlns:c="http://www.springframework.org/schema/c"
 5        xsi:schemaLocation="http://www.springframework.org/schema/beans http://www.springframework.org/schema/beans/spring-beans.xsd">
 6     <!--进行bean的装配-->
 7     <bean id="myDVD" class="cd.使用Java配置类进行装配.MyDVD"/>
 8     <bean id="player" class="cd.使用Java配置类进行装配.CDorDvdPlayer" c:compactDisc-ref="myDVD">
 9     </bean>
10 </beans>
--观察c-命名空间的组成: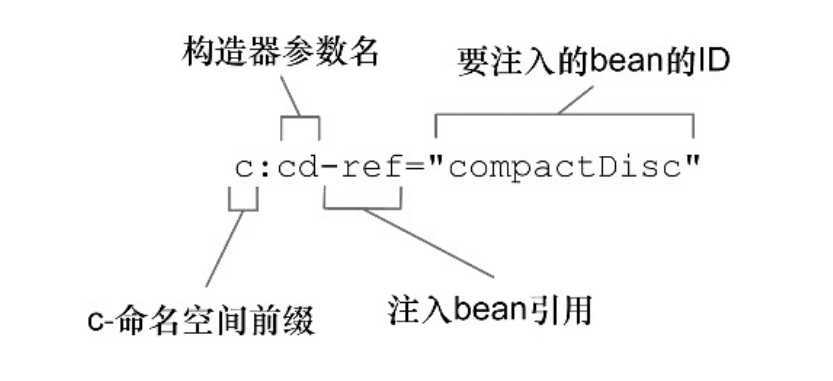
--属性名以“c:”开头,也就是命名空间的前缀。接下来就是要装配的构 造器参数名,在此之后是“-ref”,这是一个命名的约定,它会告诉 Spring,正在装配的是一个bean的引用,这个bean的名字 是compactDisc,而不是字面量“compactDisc”。但是这样的做法还是存在问题,他所引用的构造器参数的名称,我们还可以使用这个参数在构造器之中的位置来进行依赖的注入:
 1 <?xml version="1.0" encoding="UTF-8"?>
 2 <beans xmlns="http://www.springframework.org/schema/beans"
 3        xmlns:xsi="http://www.w3.org/2001/XMLSchema-instance"
 4        xmlns:c="http://www.springframework.org/schema/c"
 5        xsi:schemaLocation="http://www.springframework.org/schema/beans http://www.springframework.org/schema/beans/spring-beans.xsd">
 6     <!--进行bean的装配-->
 7     <bean id="myDVD" class="cd.使用Java配置类进行装配.MyDVD"/>
 8     <bean id="player" class="cd.使用Java配置类进行装配.CDorDvdPlayer" c:_0-ref="myDVD">
 9     </bean>
10 </beans>
--由于在XML中,不允许使用数字作为属性的第一个造福,所以在之前加了一个_来作为前缀.那么如何将字面量属性最为参数赋值给我们的bean呢,修改MyDVD类的结构:
 1 package cd.使用Java配置类进行装配;
 2
 3 /**
 4  * @author : S K Y
 5  * @version :0.0.1
 6  */
 7 public class MyDVD implements CompactDisc {
 8     private String title;       //当前这个CD的标题名称
 9     private long time;          //当前CD的播放时长
10
11     public MyDVD(String title, long time) {
12         this.title = title;
13         this.time = time;
14     }
15
16     @Override
17     public void play() {
18         System.out.println("现在播放的是我最喜欢的DVD,DVD名称为: " + title + " 可播放时长为: " + time + "分钟");
19     }
20 }
 1 <?xml version="1.0" encoding="UTF-8"?>
 2 <beans xmlns="http://www.springframework.org/schema/beans"
 3        xmlns:xsi="http://www.w3.org/2001/XMLSchema-instance"
 4        xmlns:c="http://www.springframework.org/schema/c"
 5        xsi:schemaLocation="http://www.springframework.org/schema/beans http://www.springframework.org/schema/beans/spring-beans.xsd">
 6     <!--进行bean的装配-->
 7     <bean id="myDVD" class="cd.使用Java配置类进行装配.MyDVD" c:_0="歌曲串烧" c:_1="120"/>
 8     <bean id="player" class="cd.使用Java配置类进行装配.CDorDvdPlayer" c:_0-ref="myDVD">
 9     </bean>
10 </beans>
 1 <?xml version="1.0" encoding="UTF-8"?>
 2 <beans xmlns="http://www.springframework.org/schema/beans"
 3        xmlns:xsi="http://www.w3.org/2001/XMLSchema-instance"
 4        xmlns:c="http://www.springframework.org/schema/c"
 5        xsi:schemaLocation="http://www.springframework.org/schema/beans http://www.springframework.org/schema/beans/spring-beans.xsd">
 6     <!--进行bean的装配-->
 7     <bean id="myDVD" class="cd.使用Java配置类进行装配.MyDVD">
 8         <constructor-arg value="歌曲串烧"/>
 9         <constructor-arg value="120"/>
10     </bean>
11     <bean id="player" class="cd.使用Java配置类进行装配.CDorDvdPlayer" c:_0-ref="myDVD">
12     </bean>
13 </beans>
--以上两种配置方式都能够达到我们的目的,但是在需要装配集合的时候,使用c-命名空间无法做到,但是使用<constructor-arg>可以达到我们的目的:
 1 package cd.使用Java配置类进行装配;
 2
 3 import java.util.List;
 4
 5 /**
 6  * @author : S K Y
 7  * @version :0.0.1
 8  */
 9 public class MyDVD implements CompactDisc {
10     private String title;       //当前这个CD的标题名称
11     private long time;          //当前CD的播放时长
12     private List<String> musicList;     //歌曲清单
13     public MyDVD(String title, long time) {
14         this.title = title;
15         this.time = time;
16     }
17
18     public MyDVD(String title, long time, List<String> musicList) {
19         this.title = title;
20         this.time = time;
21         this.musicList = musicList;
22     }
23
24     @Override
25     public void play() {
26         System.out.println("现在播放的是我最喜欢的DVD,DVD名称为: " + title + " 可播放时长为: " + time + "分钟" +
27                 " 歌曲清单为: " + musicList);
28     }
29 }
--如果不想为musicLIst传递任何参数的话,我们可以使用<null/>标签来实现
 1 <?xml version="1.0" encoding="UTF-8"?>
 2 <beans xmlns="http://www.springframework.org/schema/beans"
 3        xmlns:xsi="http://www.w3.org/2001/XMLSchema-instance"
 4        xmlns:c="http://www.springframework.org/schema/c"
 5        xsi:schemaLocation="http://www.springframework.org/schema/beans http://www.springframework.org/schema/beans/spring-beans.xsd">
 6     <!--进行bean的装配-->
 7     <bean id="myDVD" class="cd.使用Java配置类进行装配.MyDVD">
 8         <constructor-arg value="歌曲串烧"/>
 9         <constructor-arg value="120"/>
10         <constructor-arg><null/></constructor-arg>
11     </bean>
12     <bean id="player" class="cd.使用Java配置类进行装配.CDorDvdPlayer" c:_0-ref="myDVD">
13     </bean>
14 </beans>
--如果想为歌曲清单赋值,那么我们需要使用到<list/>元素将其声明为一个列表:
 1 <?xml version="1.0" encoding="UTF-8"?>
 2 <beans xmlns="http://www.springframework.org/schema/beans"
 3        xmlns:xsi="http://www.w3.org/2001/XMLSchema-instance"
 4        xmlns:c="http://www.springframework.org/schema/c"
 5        xsi:schemaLocation="http://www.springframework.org/schema/beans http://www.springframework.org/schema/beans/spring-beans.xsd">
 6     <!--进行bean的装配-->
 7     <bean id="myDVD" class="cd.使用Java配置类进行装配.MyDVD">
 8         <constructor-arg value="歌曲串烧"/>
 9         <constructor-arg value="120"/>
10         <constructor-arg>
11             <list>
12                 <value>第一首歌曲</value>
13                 <value>第二首歌曲</value>
14                 <value>第三首歌曲</value>
15                 <value>第四首歌曲</value>
16                 <value>最厉害的歌曲:我爱Java</value>
17             </list>
18         </constructor-arg>
19     </bean>
20     <bean id="player" class="cd.使用Java配置类进行装配.CDorDvdPlayer" c:_0-ref="myDVD">
21     </bean>
22 </beans>
--观察输出实现:
现在播放的是我最喜欢的DVD,DVD名称为: 歌曲串烧 可播放时长为: 120分钟 歌曲清单为: [第一首歌曲, 第二首歌曲, 第三首歌曲, 第四首歌曲, 最厉害的歌曲:我爱Java]

Process finished with exit code 0
--除了java,util,List集合外,我们还可以使用java.util.set在完成,其使用方法与List一致,使用的则是<set/>标签,但是需要注意的是,使用<set/>进行装配的话,那么所有重复的值都会被忽略.
--使用XML进行属性的设置
如果说我们所提供的构造器是一个无参构造,并且使用getter,setter来实现属性的注入.事实上对于这个类形成所必须的属性,还是会建议使用构造器注入,但是对于那么可选的属性我们则可以选择使用属性注入的方式来完成,而属性的注入与<constructor-arg>相类似,使用的是<property>标签来完成:
 1 package cd.使用Java配置类进行装配;
 2
 3 import java.util.List;
 4
 5 /**
 6  * @author : S K Y
 7  * @version :0.0.1
 8  */
 9 public class MyDVD implements CompactDisc {
10     private String title;       //当前这个CD的标题名称
11     private long time;          //当前CD的播放时长
12     private List<String> musicList;     //歌曲清单
13
14     public MyDVD() {
15     }
16
17     public MyDVD(String title, long time) {
18         this.title = title;
19         this.time = time;
20     }
21
22     public MyDVD(String title, long time, List<String> musicList) {
23         this.title = title;
24         this.time = time;
25         this.musicList = musicList;
26     }
27
28     @Override
29     public void play() {
30         System.out.println("现在播放的是我最喜欢的DVD,DVD名称为: " + title + " 可播放时长为: " + time + "分钟" +
31                 " 歌曲清单为: " + musicList);
32     }
33
34     public String getTitle() {
35         return title;
36     }
37
38     public void setTitle(String title) {
39         this.title = title;
40     }
41
42     public long getTime() {
43         return time;
44     }
45
46     public void setTime(long time) {
47         this.time = time;
48     }
49
50     public List<String> getMusicList() {
51         return musicList;
52     }
53
54     public void setMusicList(List<String> musicList) {
55         this.musicList = musicList;
56     }
57 }
 1 <?xml version="1.0" encoding="UTF-8"?>
 2 <beans xmlns="http://www.springframework.org/schema/beans"
 3        xmlns:xsi="http://www.w3.org/2001/XMLSchema-instance"
 4        xmlns:c="http://www.springframework.org/schema/c"
 5        xsi:schemaLocation="http://www.springframework.org/schema/beans http://www.springframework.org/schema/beans/spring-beans.xsd">
 6     <!--进行bean的装配-->
 7     <bean id="myDVD" class="cd.使用Java配置类进行装配.MyDVD">
 8         <property name="title" value="歌曲串烧"/>
 9         <property name="time" value="120"/>
10         <property name="musicList">
11             <list>
12                 <value>第一首歌曲</value>
13                 <value>第二首歌曲</value>
14                 <value>第三首歌曲</value>
15                 <value>第四首歌曲</value>
16                 <value>最厉害的歌曲:我爱Java</value>
17             </list>
18         </property>
19     </bean>
20     <bean id="player" class="cd.使用Java配置类进行装配.CDorDvdPlayer">
21         <property name="compactDisc" ref="myDVD"/>
22     </bean>
23 </beans>
--Spring为<constructor-arg>提供了c-命名空间作为替代,那么与之相同的,为<property>属性也提供了p-命名空间与之替代: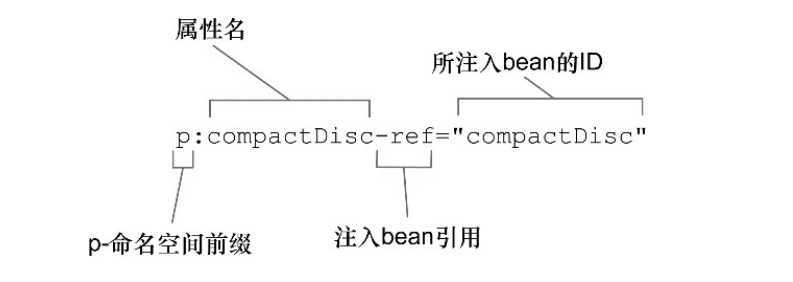
 1 <?xml version="1.0" encoding="UTF-8"?>
 2 <beans xmlns="http://www.springframework.org/schema/beans"
 3        xmlns:xsi="http://www.w3.org/2001/XMLSchema-instance"
 4        xmlns:c="http://www.springframework.org/schema/c"
 5        xmlns:p="http://www.springframework.org/schema/p"
 6        xsi:schemaLocation="http://www.springframework.org/schema/beans http://www.springframework.org/schema/beans/spring-beans.xsd">
 7     <!--进行bean的装配-->
 8     <bean id="myDVD" class="cd.使用Java配置类进行装配.MyDVD"
 9           p:title="歌曲串烧" p:time="120">
10         <property name="musicList">
11             <list>
12                 <value>第一首歌曲</value>
13                 <value>第二首歌曲</value>
14                 <value>第三首歌曲</value>
15                 <value>第四首歌曲</value>
16                 <value>最厉害的歌曲:我爱Java</value>
17             </list>
18         </property>
19     </bean>
20     <bean id="player" class="cd.使用Java配置类进行装配.CDorDvdPlayer" p:compactDisc-ref="myDVD">
21     </bean>
22 </beans>
--同样的,使用p-命名空间就可能无法顺利的实现集合的装配,没有便利的办法使用p-命名空间来指定一个(或bean引用)的列表,但是我们可以使用Spring util-命名空间来完成一些功能简单的BlankDiscbean:
 1 <?xml version="1.0" encoding="UTF-8"?>
 2 <beans xmlns="http://www.springframework.org/schema/beans"
 3        xmlns:xsi="http://www.w3.org/2001/XMLSchema-instance"
 4        xmlns:c="http://www.springframework.org/schema/c"
 5        xmlns:util="http://www.springframework.org/schema/util"
 6        xmlns:p="http://www.springframework.org/schema/p"
 7        xsi:schemaLocation="http://www.springframework.org/schema/beans http://www.springframework.org/schema/beans/spring-beans.xsd">
 8     <!--进行bean的装配-->
 9     <util:list id="musicList">
10         <list>
11             <value>第一首歌曲</value>
12             <value>第二首歌曲</value>
13             <value>第三首歌曲</value>
14             <value>第四首歌曲</value>
15             <value>最厉害的歌曲:我爱Java</value>
16         </list>
17     </util:list>
18     <bean id="myDVD" class="cd.使用Java配置类进行装配.MyDVD"
19           p:title="歌曲串烧" p:time="120" p:musicList-ref="musicList">
20     </bean>
21     <bean id="player" class="cd.使用Java配置类进行装配.CDorDvdPlayer" p:compactDisc-ref="myDVD">
22     </bean>
23 </beans>
--Spring util-命名空间提供了以下的集合类型支持: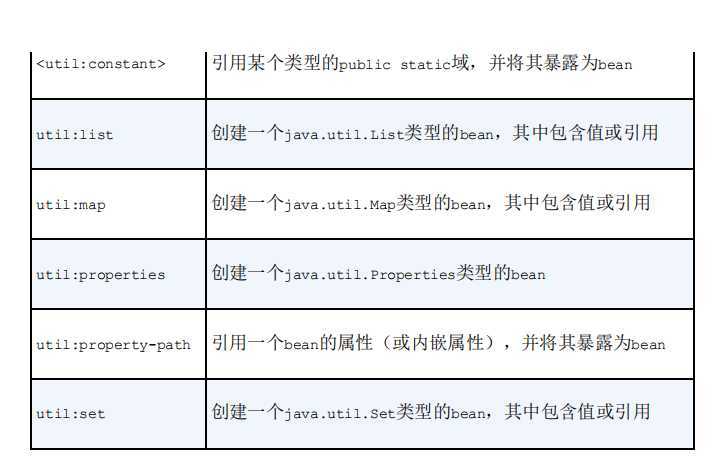
五.导入和混合配置
我们可以进Spring JavaConfig的配置与XML配置相结合,并且在自动装配时,不论是来自哪个配置文件的bean,Spring都能很好的将他们装配到一起.
--在JavaConfig中引用XML配置
此时,如果觉得XML配置文件已经显得比较笨重,那么我们可以选择将其拆分,我们可以将player的bean采用JavaConfig的配置形式来完成:
 1 <?xml version="1.0" encoding="UTF-8"?>
 2 <beans xmlns="http://www.springframework.org/schema/beans"
 3        xmlns:xsi="http://www.w3.org/2001/XMLSchema-instance"
 4        xmlns:p="http://www.springframework.org/schema/p" xmlns:util="http://www.springframework.org/schema/util"
 5        xsi:schemaLocation="http://www.springframework.org/schema/beans http://www.springframework.org/schema/beans/spring-beans.xsd http://www.springframework.org/schema/util http://www.springframework.org/schema/util/spring-util.xsd">
 6     <!--进行bean的装配-->
 7     <util:list id="musicList">
 8         <value>第一首歌曲</value>
 9         <value>第二首歌曲</value>
10         <value>第三首歌曲</value>
11         <value>第四首歌曲</value>
12         <value>最厉害的歌曲:我爱Java</value>
13     </util:list>
14     <bean id="myDVD" class="cd.使用Java配置类进行装配.MyDVD"
15           p:title="歌曲串烧" p:time="120" p:musicList-ref="musicList">
16     </bean>
17 </beans>
 1 package cd.使用Java配置类进行装配;
 2
 3 import org.springframework.context.annotation.Bean;
 4 import org.springframework.context.annotation.Configuration;
 5 import org.springframework.context.annotation.Import;
 6 import org.springframework.context.annotation.ImportResource;
 7
 8 /**
 9  * @author : S K Y
10  * @version :0.0.1
11  */
12 @Configuration      //声明此类为Java配置文件
13 @ImportResource("classpath:cd/使用Java配置类进行装配/PlayerConfig.xml")        //引入XML配置文件
14 //@Import({PlayerConfig.class})         //引入JavaConfig配置文件
15 public class PlayerConfig {
16
17     @Bean("player")
18     public MediaPlayer player(CompactDisc myDVD) {
19         return new CDorDvdPlayer(myDVD);
20     }
21 }
1     @Test
2     public void runWithXMLConfig(){
3         AnnotationConfigApplicationContext context =
4                 new AnnotationConfigApplicationContext(PlayerConfig.class);
5         MediaPlayer player = context.getBean("player", MediaPlayer.class);
6         player.play();
7     }
--此时我们在JavaConfig配置文件中引入了XML配置文件(需要注意的是在指定XML配置文件的路径的时候,我们需要加上classpath前缀),运行单元测试方法,我们可以得到正确的输出结果,同时除此之外,我们还可以在XML配置文件中引入JavaConfig配置文件:
 1 <?xml version="1.0" encoding="UTF-8"?>
 2 <beans xmlns="http://www.springframework.org/schema/beans"
 3        xmlns:xsi="http://www.w3.org/2001/XMLSchema-instance"
 4        xmlns:p="http://www.springframework.org/schema/p" xmlns:util="http://www.springframework.org/schema/util"
 5        xmlns:context="http://www.springframework.org/schema/context"
 6        xsi:schemaLocation="http://www.springframework.org/schema/beans http://www.springframework.org/schema/beans/spring-beans.xsd http://www.springframework.org/schema/util http://www.springframework.org/schema/util/spring-util.xsd http://www.springframework.org/schema/context http://www.springframework.org/schema/context/spring-context.xsd">
 7     <!--引入XML配置文件-->
 8     <!--    <import resource="PlayerConfig.xml"/>-->
 9     <!--为确保成功,我们需要开启注解配置的支持-->
10     <context:annotation-config/>
11     <!--引入JavaConfig配置文件-->
12     <bean class="cd.使用Java配置类进行装配.PlayerConfig"/>
13     <!--进行bean的装配-->
14     <util:list id="musicList">
15         <value>第一首歌曲</value>
16         <value>第二首歌曲</value>
17         <value>第三首歌曲</value>
18         <value>第四首歌曲</value>
19         <value>最厉害的歌曲:我爱Java</value>
20     </util:list>
21     <bean id="myDVD" class="cd.使用Java配置类进行装配.MyDVD"
22           p:title="歌曲串烧" p:time="120" p:musicList-ref="musicList">
23     </bean>
24 </beans>
 1 package cd.使用Java配置类进行装配;
 2
 3 import org.springframework.context.annotation.Bean;
 4 import org.springframework.context.annotation.Configuration;
 5
 6 /**
 7  * @author : S K Y
 8  * @version :0.0.1
 9  */
10 @Configuration      //声明此类为Java配置文件
11 //@ImportResource("classpath:cd/使用Java配置类进行装配/PlayerConfig.xml")        //引入XML配置文件
12 //@Import({PlayerConfig.class})         //引入JavaConfig配置文件
13 public class PlayerConfig {
14     @Bean("player")
15     public MediaPlayer player(CompactDisc myDVD) {
16         return new CDorDvdPlayer(myDVD);
17     }
18 }
1     @Test
2     public void runWithXMLAndJavaConfig(){
3         ClassPathXmlApplicationContext context =
4                 new ClassPathXmlApplicationContext("cd/使用Java配置类进行装配/PlayerConfig.xml");
5         MediaPlayer player = context.getBean("player", MediaPlayer.class);
6         player.play();
7         context.close();
8     }
--这里需要说明的是,为了确保在XML配置文件中正确应用JavaConfig中的Bean,我们需要在XML中开启注解配置的支持,即需要使用<context:annotation-config/>标签实现注解配置的支持.当然,你也可以选择创建一个XML配置文件不进行任何的配置,但是用来将其他的各类配置文件装配到一块,这取决于你的编程习惯.在Spring的官方建议中,建议我们去使用基于注解的自动装配以避免显示配置带来的维护成本.
标签:tde 数组 ref 传递 ssr 配置方法 resource trapper err
原文地址:https://www.cnblogs.com/skykuqi/p/11478659.html