标签:repeat border :hover 导入 透明度 chm :active 特点 插入
CSS是Cascading Style Sheets的简称,中文称为层叠样式表,对html标签的渲染和布局
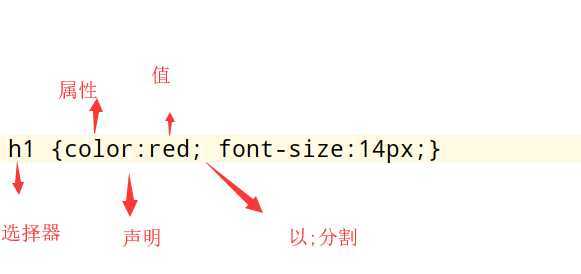
CSS 规则由两个主要的部分构成:选择器,以及一条或多条声明
实例

注释
/*这是注释*/在写css样式的时候要写一个
body{
    margin:0;
}
意思是说,body的上下左右的margin都设置为0
在下面会将为什么
行内式是在标记的style属性中设定CSS样式。不推荐大规模使用。
<p style="color: red">Hello world.</p>嵌入式是将CSS样式集中写在网页的<head></head>标签对的<style></style>标签对中。格式如下:
<head>
    <meta charset="UTF-8">
    <title>Title</title>
    <style>
        p{
            background-color: #2b99ff;
        }
    </style>
</head>外部样式就是将css写在一个单独的文件中,然后在页面进行引入即可。推荐使用此方式。
<link href="mystyle.css" rel="stylesheet" type="text/css"/>
#现在写的这个.css文件是和你的html是一个目录下,如果不是一个目录,href里面记得写上这个.css文件的路径@import "index.css"#有缺陷页比较大则会儿出现先显示无样式的页面,闪烁一下之后,再出现网页的样式。标签名字
p {color: "red";} p标签所有的id属性
#d2{color: "red";} id等于2的标签.c1{color: red;} class都等于c1的标签* { color: white;} 所有的标签.c1 a{color:red;} c1类下的a标签都变红.c1>a{color:red;} 只找子代.c1+p{color:red;} 找class属性下面第一个p标签.c1~p{color:red;} 找下面与自己同级别的p标签div.c1 #找到有c1的 div标签不常用,上面足以完成各种需求
通过标签属性找到对应的标签
p{xxx]{
    color:red; 找到xxx属性下的所有标签
    }

[xxx='p2']{color:red;}  找到属性为p2的标签
实例:
<!DOCTYPE html>
<html lang="en">
<head>
    <meta charset="UTF-8">
    <title>Title</title>
    <style>
        p[xxx]{
            color: red;
        }
        /*p[xxx="p2"]{*/
        /*    color: blue;*/
        /*}*/
    </style>
</head>
<body>

<p>213213</p>
<p xxx="p1">213213</p>
<p xxx="p2">213213</p>

</body>
</html>分组(多个选择器逗号分隔)
当多个元素的样式相同的时候,没有必要重复地为每个元素都设置样式,可以通过在多个选择器之间使用逗号分隔的分组选择器来统一设置元素样式。
示例
div, p {
  color: red;
}
div 和 p 标签统一设置为red
不BB直接上例子
<!DOCTYPE html>
<html lang="en">
<head>
    <meta charset="UTF-8">
    <title>Title</title>
    <style>
        a:link{ /* 未访问的链接 */
            color: red;
        }
        a:hover{ /* 鼠标移动到链接上 */
            color: green;
        }
        a:active{ /* 选定的链接 */
            color: blue;
        }
        a:visited{ /* 已访问的链接 */
            color: pink;
        }
        div{
            height: 100px;
            width: 100px;
            background-color: maroon;
        }
        div:hover{
            background-color: #000;
        }
        input:focus{ /* input标签捕获光标时的样式显示 */
            background-color: teal;
        }
    </style>
</head>
<body>
<a href="http://www.jd.com">京东</a>
<div></div>
<input  type="text">
</body>
</html>通过css来造标签,不推荐使用
first-letter 给首字母设置特殊样式 ------
div:first-letter{
    color:red;
    font-size: 40px;}
before示例:
/*在每个<p>元素之前插入内容*/
p:before {
  content:"*";
  color:red;
}
after示例:
/*在每个<div>元素之后插入内容*/
div:after{
    content: '?';
    color:red;
}
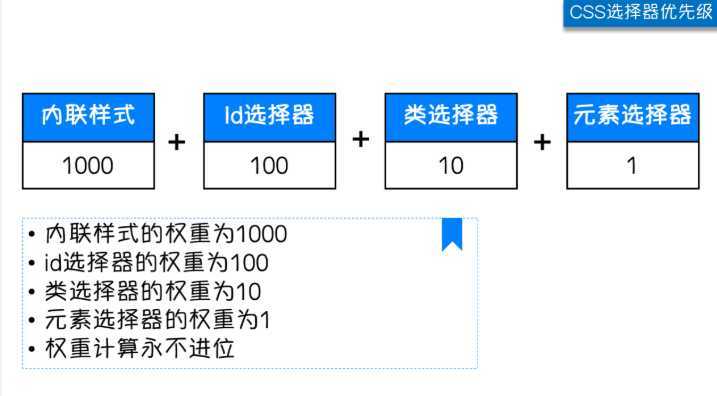
权重越高,对应选择器的样式会被优先显示
组合选择器,各选择器的权重相加
权重不进位,11类选择器组合到一起,也没有一个id选择器的优先级大,小就是小
默认css样式是可以继承的,继承的权重为0
权重相同的选择器,谁后写的,用谁的
但CSS继承也是有限制的。
有一些属性不能被继承,如:border, margin, padding, background等。
a标签设置样式,需要选中设置,不能继承父级标签的样式
优先级最高级别
div{color:red!important;} #一般不用width属性可以为元素设置宽度。
height属性可以为元素设置高度。
块级标签才能设置宽度,内联标签的宽度由内容来决定。div{
height: 100px;
width: 200px;
background-color: purple;font-family可以把多个字体名称作为一个“回退”系统来保存。如果浏览器不支持第一个字体,则会尝试下一个。浏览器会使用它可识别的第一个值。
div {
    font-family: "Microsoft Yahei", "微软雅黑", "Arial";
    font-size: 14px; 字体大小
    font-weight:bold;加粗
    color:red; 字体颜色
}
font-weight用来设置字体的字重(粗细)。
| 值 | 描述 |
|---|---|
| normal | 默认值,标准粗细 |
| bold | 粗体 |
| bolder | 更粗 |
| lighter | 更细 |
| 100~900 | 设置具体粗细,400等同于normal,而700等同于bold |
| inherit | 继承父元素字体的粗细值 |
文本颜色
颜色属性被用来设置文字的颜色。
颜色是通过CSS最经常的指定:
1.十六进制值 - 如: **#**FF0000 #前两位是表示红,中间两位表示绿,后面两位表示蓝,F是最高级别,0表示最低级别(无色)
2.一个RGB值 - 如: RGB(255,0,0) #红绿蓝就是RGB的意思,第一个参数是红,最高255,最低0
3.颜色的名称 - 如:  red
4.还有rgba(255,0,0,0.3),第四个值为alpha, 指定了色彩的透明度/不透明度,它的范围为0.0到1.0之间。text-align 属性规定元素中的文本的水平对齐方式。(letter-spacing)
| 值 | 描述 | ||
|---|---|---|---|
| left | 左边对齐 默认值 | ||
| right | 右对齐 | ||
| center | 居中对齐 |
text-align: center;
text-align: right;
text-align: left;
垂直对齐
div{
    width: 200px;
    height: 200px;
    border: 1px solid red;
    text-align: center;
    line-height:200px;
}text-decoration 属性用来给文字添加特殊效果。
| 值 | 描述 |
|---|---|
| none | 默认。定义标准的文本。 |
| underline | 定义文本下的一条线。 |
| overline | 定义文本上的一条线。 |
| line-through | 定义穿过文本下的一条线。 |
| inherit | 继承父元素的text-decoration属性的值。 |
常用的为去掉a标签默认的自划线:
a {
  text-decoration: none;
}将段落的第一行缩进 32像素:
p {
  text-indent: 32px; #首行缩进两个字符,因为我记得一个字在页面上的默认大小为16px
} div{
border: 1px solid red;
height: 400px;
width: 400px;
background-color: oldlace;
background-image: url("https://ss0.bdstatic.com/70cFvHSh_Q1YnxGkpoWK1HF6hhy/it/u=353307491,2508029503&fm=15&gp=0.jpg");
background-repeat: no-repeat;
background-position: right bottom;
/*background-position: 100px 100px;*/
}简写方式
background: yellow url("meinv.jpg") no-repeat 100px 50px;
背景颜色 背景图片路径 是否平铺 图片位置  距离左上
背景固定
<!DOCTYPE html>
<html lang="en">
<head>
    <meta charset="UTF-8">
    <title>Title</title>
    <style>
        .d2{
            width: 100%;
            height: 500px;
            background:url("https://ss1.bdstatic.com/70cFvXSh_Q1YnxGkpoWK1HF6hhy/it/u=4013122459,1672649128&fm=26&gp=0.jpg") no-repeat center center;
            background-attachment: fixed; /*背景固定*/
        }
        .d1{
            height: 500px;
            background-color: red;
        }
        .d3{
            height: 500px;
            background-color: oldlace;
        }
        .d4{
            height: 500px;
            background-color: maroon;
        }
    </style>
</head>
<body>

<div class="d1"></div>
<div class="d2"></div>
<div class="d3"></div>
<div class="d4"></div>

</body>
</html>
#i1 {
  border-width: 2px;
  border-style: solid;
  border-color: red;
}
简写方式
#i1 {
  border: 2px solid red;
}
边框样式
| 值 | 描述 |
|---|---|
| none | 无边框。默认的 |
| dotted | 点状虚线边框。 |
| dashed | 矩形虚线边框。 |
| solid | 实线边框。 |
可以单独设置某一边的边框
#i1 {
  border-top-style:dotted;
  border-top-color: red;
  border-right-style:solid;
  border-bottom-style:dotted;
  border-left-style:none;
}
border-radius
实现圆角边框
div{
    height: 100px;
    width: 100px;
    background-color: red;
    border-radius: 50%;
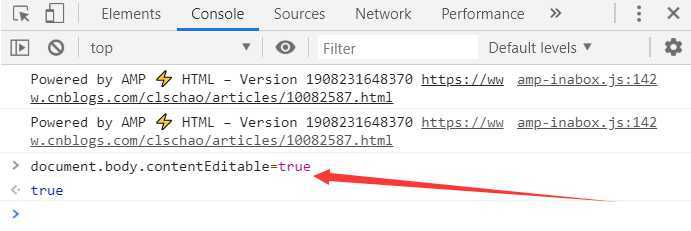
}通过调试窗口还可以玩一个神奇的东西:
document.body.contentEditable=true

| 值 | 意义 |
|---|---|
| display:"none" | HTML文档中元素存在,但是在浏览器中不显示。一般用于配合JavaScript代码使用。 |
| display:"block" | 默认占满整个页面宽度,如果设置了指定宽度,则会用margin填充剩下的部分。 |
| display:"inline" | 按行内元素显示,此时再设置元素的width、height、margin-top、margin-bottom和float属性都不会有什么影响。 |
| display:"inline-block" | 使元素同时具有行内元素和块级元素的特点。 |
示例
<!DOCTYPE html>
<html lang="en">
<head>
    <meta charset="UTF-8">
    <title>Title</title>
    <style>

        div{
            height: 200px;
            width: 200px;
            border: 1px solid red;
            /*display: inline;*/ 改变成内联标签
            display: inline-block; 可以设置长宽无法独占一行
            /*display: none; !* 隐藏标签 *!*/
        }

        span{
            height: 200px;
            width: 200px;
            border: 1px solid green;
            /*display: block;*/设置为块级标签
            display: inline-block;可以设置长宽无法独占一行

        }
    </style>
</head>
<body>
<div>xxxxxxx</div>
<span>span1111</span>
</body>
</html>
隐藏标签
/*display: none;*/   /* 隐藏标签,不占原来的位置 */
visibility: hidden;  /* 原来的位置还占着 */
在css里面,每个标签可以称为一个盒子模型
content:内容  width和height 是内容的高度宽度
padding:内边距 内容和边框之间的距离
border:边框
margin:外边距 标签之间的距离,如果两个标签都设置了margin,选最大的值,作为双方之间的距离
占用空间大小:content+padding+border
例子:
<!DOCTYPE html>
<html lang="en">
<head>
    <meta charset="UTF-8">
    <title>Title</title>
    <style>
        .c1{
            width: 100px;
            height: 100px;
            border: 10px solid red;
            /*padding: 20px 20px; !* 内边距,内容和边框之间的距离 *!*/
            padding: 8px 2px 3px 6px; /* 上右下左 */
            margin: 20px 10px;

        }
        .c2{
            width: 100px;
            height: 100px;
            border: 10px solid green;
            margin: 10px 2px 6px 8px; /* 外边距,与其他标签的距离,如果旁边没有标签,按照父级标签的位置进行移动 */
        }
        .c3{
            width: 100px;
            height: 100px;
            border: 1px solid blue;
        }
    </style>
</head>
<body>
<div class="c1">div1</div>
<div class="c2">div2</div>
<div class="c3">div3</div>
</body>
</html>
四个方向单独设置padding
padding-left: 10px;
padding-top: 8px;
padding-right: 5px;
padding-bottom: 5px;
简写: padding: 5px 10px 15px 20px;
四个方向单独设置margin
margin-top: 10px;
margin-left: 100px;
margin-bottom: 50px;
margin-right: 200px;
推荐使用简写,上右下左
margin: 5px 10px 15px 20px;
一般用来进行页面布局
浮动会脱离正常文档流
会造成父级标签塌陷问题
清除浮动(解决塌陷问题)
<!DOCTYPE html>
<html lang="en">
<head>
    <meta charset="UTF-8">
    <title>Title</title>

    <style>

        .c1{
            width: 100px;
            height: 100px;
            background-color: red;
            float: left;
        }
        .c2{
            width: 100px;
            height: 100px;
            background-color: green;
            float: right;
        }
        .c3{
            height: 100px;
            background-color: pink;
            /*clear: both; !* clear清除浮动 *!*/
        }
        .clearfix:after{  /*父级的问题,自己解决*/
            content:'';
            display: block;
            clear: both;
        }
    </style>

</head>
<body>

<div class="cc clearfix">
    <div class="c1">div1</div>
    <div class="c2">div2</div>

</div>
<div class="c3">div3</div>

</body>
</html>clear属性规定元素的哪一侧不允许其他浮动元素。
| 值 | 描述 |
|---|---|
| left | 在左侧不允许浮动元素。 |
| right | 在右侧不允许浮动元素。 |
| both | 在左右两侧均不允许浮动元素。 |
| none | 默认值。允许浮动元素出现在两侧。 |
| inherit | 规定应该从父元素继承 clear 属性的值。 |
| 值 | 描述 |
|---|---|
| visible | 默认值。内容不会被修剪,会呈现在元素框之外。 |
| hidden | 内容会被修剪,并且其余内容是不可见的。 |
| scroll | 内容会被修剪,但是浏览器会显示滚动条以便查看其余的内容。 |
| auto | 如果内容被修剪,则浏览器会显示滚动条以便查看其余的内容。 |
| inherit | 规定应该从父元素继承 overflow 属性的值。 |
<!DOCTYPE html>
<html lang="en">
<head>
    <meta charset="UTF-8">
    <title>Title</title>
    <style>
        .c1{
            height: 200px;
            width: 200px;
            border: 1px solid red;
            overflow: scroll;
        }


    </style>
</head>
<body>

<div class="c1">
    菩提本无树,明镜亦非台.本来无一物,何处惹尘埃.菩提本无树,明镜亦非台.本来无一物,何处惹尘埃.菩提本无树,明镜亦非台.本来无一物,何处惹尘埃.菩提本无树,明镜亦非台.本来无一物,何处惹尘埃.菩提本无树,明镜亦非台.本来无一物,何处惹尘埃.菩提本无树,明镜亦非台.本来无一物,何处惹尘埃.菩提本无树,明镜亦非台.本来无一物,何处惹尘埃.菩提本无树,明镜亦非台.本来无一物,何处惹尘埃.菩提本无树,明镜亦非台.本来无一物,何处惹尘埃.菩提本无树,明镜亦非台.本来无一物,何处惹尘埃.菩提本无树,明镜亦非台.本来无一物,何处惹尘埃.菩提本无树,明镜亦非台.本来无一物,何处惹尘埃.
</div>

</body>
</html>
举例上传圆形头像
<!DOCTYPE html>
<html lang="en">
<head>
    <meta charset="UTF-8">
    <title>Title</title>
    <style>
        * {
            margin: 0;
            padding: 0;
            background-color: #eeeeee;
        }
        .c1{
            width: 100px;
            height: 100px;
            border-radius: 50%;
            border:1px solid red;
            overflow: hidden; /*溢出的内容隐藏*/
        }

        div img{
            width: 100%;
            /*#相当于将图片的大小设置为父级标签的大小来显示了,
            因为用户上传的头像的像素我们是不知道的,
            就让它按照父级标签的大小来,
            就能放下整个头像了,就不会出现头像显示不全的问题了*/
        }
    </style>
</head>
<body>
<div class="c1">
    <img src="2.jpg" alt="">
</div>

</body>
</html>static无定位---默认值
position: relative;
相对于自己自己原来的位置进行移动,原来的空间还占着
往上移动?top:-100px(注意是负值)或者bottom:-100px(负值),往左移动:left:-100px(也是负值)或者right:-100px,往下移动:bottom:100px(正值)或者top:100px(正值),往右移动:right:100px(正值)或者left:100px。大家记住一点昂,凡是标签要进行移动,不管是float还是relative还是线面的absolute,都是按照元素自己的左上角进行计算的
注意:position:relative的一个主要用法:不设置任何的top、left、right、bottom等,它还是它原来的位置
position: absolute;
不占用自己原来的位置,移动的时候如果父级标签以及祖先辈标签如果设置了相对定位,父级标签或者祖先标签进行移动 ,如果父级标签都没有设置相对定位,那么就按照整个文档进行移动
position: fixed;
按照浏览器窗口的位置进行移动
所有定位的元素移动,都是通过top,left,right,bottom两个方向的值来移动.
回到顶部示例
<!DOCTYPE html>
<html lang="en">
<head>
    <meta charset="UTF-8">
    <title>Title</title>
    <style>
        .c1,.c3{
            background-color: red;
            height: 500px;
            width: 600px;
        }
        .c2{
            background-color: green;
            height: 500px;
            width: 600px;
        }

        #back_top{
            height: 40px;
            width: 80px;

            position: fixed; /*固定*/
            right: 40px;
            bottom: 40px;
            background-color: black;/*标签样式*/

            text-align: center;
            line-height: 40px;
        }
        #back_top a{
            color:white;  /*字体颜色*/
            text-decoration: none;
        }

    </style>
</head>
<body>

<a name="xxx">这是顶部位置</a>

<div class="c1"></div>
<div class="c2"></div>
<div class="c3"></div>

<span id="back_top">
    <a href="#xxx">回到顶部</a>
</span>


</body>
</html>示例
<!DOCTYPE html>
<html lang="en">
<head>
    <meta charset="UTF-8">
    <title>抽屉层级透明</title>
    <style>
        .shadow{
            background-color: rgba(0,0,0,0.5); /* rgba可以设置透明度,0-1之间的数字 */
            position: fixed;
            top:0;
            left: 0;
            right: 0;
            bottom: 0;
            z-index: 90;

        }

        .mode{
            width: 440px;
            height: 480px;
            background-color: white;
            position:fixed;
            top:50%;
            left: 50%;
            z-index: 100;
            margin-left: -220px;
            margin-top: -240px;

        }

        .mode h2,.mode h3{
            text-align: center;
        }
        .xxx{
            text-align: right;
        }

        .xxx span:hover{
            cursor: pointer;
        }


    </style>

</head>
<body>
<h1>BAT</h1>
<div>阿里</div>
<div>腾讯</div>
<div>百度</div>
<div class="mode">
    <div class="xxx">
        <span>x</span>
    </div>
    <h2>欢迎</h2>
    <h3>会员登录</h3>
    <div>
        <label>
            用户名:<input type="text">
        </label>
    </div>

    <div>
        <label>
            密码:<input type="text">
        </label>
    </div>

</div>  <!-- 对话框白框 -->

<div class="shadow"></div>  <!-- 黑色阴影遮罩层 -->


</body>
</html>
注意要点
1.z-index 值表示谁压着谁,数值大的压盖住数值小的,
2.只有定位了的元素,才能有z-index,也就是说,不管相对定位,绝对定位,固定定位,都可以使用z-index,而浮动元素float不能使用z-index
3.z-index值没有单位,就是一个正整数,默认的z-index值为0如果大家都没有z-index值,或者z-index值一样,那么谁写在HTML后面,谁在上面压着别人,定位了元素,永远压住没有定位的元素。
4.从父现象:父亲怂了,儿子再牛逼也没用用来定义透明效果。取值范围是0~1,0是完全透明,1是完全不透明。
opacity透明度和rgba透明度的区别
opactiy是整个标签的透明度
rgba是单独给某个属性设置透明度
示例
<!DOCTYPE html>
<html lang="en">
<head>
    <meta charset="UTF-8">
    <title>Title</title>
    <style>
        .c1{
            width: 100px;
            height: 100px;
            background-color: rgba(255,0,0,0.3);
        }
        .c2{
            width: 100px;
            height: 100px;
            background-color: rgb(255,0,0);
            opacity: 0.1; /* 0-1之间的数字,这是设置整个标签的透明底 */
        }


    </style>

</head>
<body>

<div class="c1">div1</div>
<hr>
<div class="c2">div2</div>


</body>
</html>标签:repeat border :hover 导入 透明度 chm :active 特点 插入
原文地址:https://www.cnblogs.com/zdqc/p/11523252.html