标签:很多 扩展 sha poi dir ror 文章 开发 directory
已经存在了很多实现了该功能的软件,为什么要自己写?
就是想自己写,有源码就感觉安全,没有那么多别的功能,另外方便自己扩展,比如上传孩子手机位置信息,东西不保存到第三方服务器
为什么不用不用Http ,通过Http协议通信,定义2个API接口不就得了?
开机就启动Tomcat 需要消耗几十M内存,另外我需要双工,这个以后说
为什么不用应用程序设置开机启动而使用Window服务?
怕不加入白名单360给提示那就尴尬了,另外启动项里面看到也不好,而服务里面的内容比较多,一般人懒得看,服务更稳定
服务端:
开机启动,接收手机发送过来的消息根据类别进行处理
客户端:
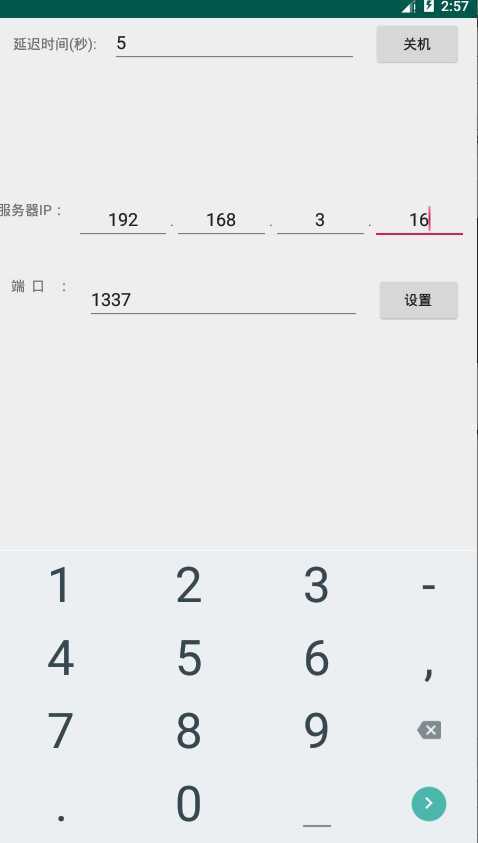
一个确定关机 和取消关机按钮,一个设置延迟时间的文本框
一个图标显示程序是否正常的连接到服务器端,2秒钟刷新一次
一个设置服务端IP跟端口 并且可以保存的界面;
第一步: 点开 Release 文件夹下面的 PhoneControl.exe.config 修改其中的 <add key="IPEndpoint" value="192.168.3.16:1337" /> ,把value换成你自己的
第二步: 点击运行 Release 文件夹下面的 PhoneControl.exe,第一次安装按1 服务端操作结束 (我设置了延迟时间,需要等待10秒才能安装完成,并不是程序运行慢,设置延迟的原因看上一篇文章)

到下面的地址安装phonecontrol-debug.apk ,完成后再界面上会出现一个非常原始的图标,MainActivty,出现下图:

第一步: 先把服务端的IP和端口填写上去,完成后点击设置
第二步: 修改多久后关机,并点击关机按钮
服务端:
  /// <summary>
        /// 应用程序的主入口点。
        /// </summary>
        static void Main(string[] args)
        {
            //判断是否已经存在日志记录目录 若不存在以第一次运行目录做为日志记录  Window服务运行目录会存在不同
            string l_strLogPath =
                System.Configuration.ConfigurationManager.AppSettings["LogPath"];
            if (string.IsNullOrEmpty(l_strLogPath))
            {
                //记录程序当前目录
                Configuration cfa =
                    ConfigurationManager.OpenExeConfiguration(ConfigurationUserLevel.None);
                cfa.AppSettings.Settings["LogPath"].Value = Environment.CurrentDirectory;
                cfa.Save();
            }


            //添加应用程序目录到防火墙规则列表里面
            try
            {
                FireWareHelper fireWareHelper = new FireWareHelper();
                // string l_strPath = Path.Combine(Environment.CurrentDirectory, "PhoneControl.exe");
                fireWareHelper.RemoveRule(Application.ExecutablePath);
                //这里的目录只能用 Application.ExecutablePath  而不能用 l_strPath 虽然你输出的时候这两个地址一样 到Window服务里面就不一样
                fireWareHelper.AddRule(Application.ExecutablePath, "PhoneControl");
            }
            catch (Exception e)
            {
                Logger.CreateErrorLog(e);
            }


#if DEBUG
            Logger.WriteAndShowLog("程序启动");
            StartClass.StartMain();
            return;
#endif


            string l_strServiceName =
                System.Configuration.ConfigurationManager.AppSettings["ServiceName"];
            //带参启动运行服务
            if (args.Length > 0)
            {
                try
                {
                    ServiceBase[] serviceToRun = new ServiceBase[] {new WindowService()};
                    ServiceBase.Run(serviceToRun);
                }
                catch (Exception ex)
                {
                    Logger.CreateErrorLog(ex);
                }
            }
            //不带参启动配置程序
            else
            {
                StartLable:
                Console.WriteLine("请选择你要执行的操作——1:自动部署服务,2:安装服务,3:卸载服务,4:验证服务状态,5:退出");
                Console.WriteLine("————————————————————");
                ConsoleKey key = Console.ReadKey().Key;

                if (key == ConsoleKey.NumPad1 || key == ConsoleKey.D1)
                {
                    if (ServiceHelper.IsServiceExisted(l_strServiceName))
                    {
                        ServiceHelper.ConfigService(l_strServiceName, false);
                    }

                    if (!ServiceHelper.IsServiceExisted(l_strServiceName))
                    {
                        ServiceHelper.ConfigService(l_strServiceName, true);
                    }

                    ServiceHelper.StartService(l_strServiceName);
                    goto StartLable;
                }
                else if (key == ConsoleKey.NumPad2 || key == ConsoleKey.D2)
                {
                    if (!ServiceHelper.IsServiceExisted(l_strServiceName))
                    {
                        ServiceHelper.ConfigService(l_strServiceName, true);
                    }
                    else
                    {
                        Console.WriteLine("\n服务已存在......");
                    }

                    goto StartLable;
                }
                else if (key == ConsoleKey.NumPad3 || key == ConsoleKey.D3)
                {
                    if (ServiceHelper.IsServiceExisted(l_strServiceName))
                    {
                        ServiceHelper.ConfigService(l_strServiceName, false);
                    }
                    else
                    {
                        Console.WriteLine("\n服务不存在......");
                    }

                    goto StartLable;
                }
                else if (key == ConsoleKey.NumPad4 || key == ConsoleKey.D4)
                {
                    if (!ServiceHelper.IsServiceExisted(l_strServiceName))
                    {
                        Console.WriteLine("\n服务不存在......");
                    }
                    else
                    {
                        Console.WriteLine("\n服务状态:" + ServiceHelper.GetServiceStatus(l_strServiceName).ToString());
                    }

                    goto StartLable;
                }
                else if (key == ConsoleKey.NumPad5 || key == ConsoleKey.D5)
                {
                }
                else
                {
                    Console.WriteLine("\n请输入一个有效键!");
                    Console.WriteLine("————————————————————");
                    goto StartLable;
                }
            }
        }

 public static void StartMain()
        {
            try
            {
                string amqEndpoint = System.Configuration.ConfigurationManager.AppSettings["IPEndpoint"].ToString();

                System.Net.IPAddress IPadr = System.Net.IPAddress.Parse(amqEndpoint.Split(‘:‘)[0]);

                System.Net.IPEndPoint
                    EndPoint = new System.Net.IPEndPoint(IPadr,
                        int.Parse(amqEndpoint.Split(‘:‘)[1])); //传递IPAddress和Port


                using (var listener = new SocketListener(EndPoint)) // Start listening
                {
                    Logger.WriteAndShowLog("启动监听.....");

                    for (;;)
                    {
                        using (var remote = listener.Accept()) // Accepts a connection (blocks execution)
                        {
                            var data = remote.Receive(); // Receives data (blocks execution)
                            Method(data);
                            // remote.Send("命令已经执行!");
                        }
                    }
                }
            }
            catch (System.Exception ex)
            {
                Logger.CreateErrorLog(ex);
                Console.ReadLine();
            }
        }
Android 客户端:
 public void btn_CloseComputer(View view) {
        //获取IP跟端口信息
        //把信息显示到界面上
        SharedPreferences sPreferences = getSharedPreferences("config", MODE_PRIVATE);
         final   String l_strIp = sPreferences.getString(ConstantModel.ip, "");
        final String l_strEndPoint = sPreferences.getString(ConstantModel.endPoint, "1337");

        new Thread() {
            @Override
            public void run() {
                super.run();
                try {
                    //1.创建监听指定服务器地址以及指定服务器监听的端口号
                    Socket socket = new Socket( l_strIp ,Integer.parseInt(l_strEndPoint) );
                    //2.拿到客户端的socket对象的输出流发送给服务器数据
                    OutputStream os = socket.getOutputStream();
                    //写入要发送给服务器的数据
                    MessageModel model = new MessageModel();
                    model.setMessageType(1);
                    //获取时间
                    EditText editText = findViewById(R.id.txt_Seconds);
                    String message = editText.getText().toString();

                    model.setDataContent(message);
                    Gson gson = new Gson();
                    String jsonObject = gson.toJson(model);

                    String s1 = new String(jsonObject.getBytes(), StandardCharsets.UTF_8);
                    os.write(s1.getBytes());
                    os.flush();
                    socket.shutdownOutput();
                    //拿到socket的输入流,这里存储的是服务器返回的数据
                    InputStream is = socket.getInputStream();
                    //解析服务器返回的数据
                    int lenght = 0;
                    byte[] buff = new byte[1024];
                    final StringBuffer sb = new StringBuffer();
                    while ((lenght = is.read(buff)) != -1) {
                        sb.append(new String(buff, 0, lenght, StandardCharsets.UTF_8));
                    }
                    runOnUiThread(new Runnable() {
                        @Override
                        public void run() {
                            //这里更新UI
                        }
                    });
                    //3、关闭IO资源(注:实际开发中需要放到finally中)
                    is.close();
                    os.close();
                    socket.close();
                } catch (UnknownHostException e) {
                    e.printStackTrace();
                } catch (IOException e) {
                    e.printStackTrace();
                }
            }
        }.start();
    }
public void btn_Setting(View view) {
        /**
         * SharedPreferences将用户的数据存储到该包下的shared_prefs/config.xml文件中,
         * 并且设置该文件的读取方式为私有,即只有该软件自身可以访问该文件
         */
        SharedPreferences sPreferences = this.getSharedPreferences("config", MODE_PRIVATE);
        SharedPreferences.Editor editor = sPreferences.edit();
        //当然sharepreference会对一些特殊的字符进行转义,使得读取的时候更加准确

        TextView txt_EndPoint = findViewById(R.id.txt_Port);
        String l_strPort = txt_EndPoint.getText().toString();
        editor.putString(ConstantModel.endPoint,  l_strPort);

        IPEditText ipEditText = findViewById(R.id.ip_text);
        String IP = ipEditText.getText(this);
        editor.putString(ConstantModel.ip, IP);
        editor.commit();

        Toast.makeText(this, "设置成功!", Toast.LENGTH_LONG)
                .show();
    }
服务端源码地址:
链接:https://pan.baidu.com/s/14hm8bM4Qx7ZwyxhxRLlWkw
提取码:41n5
Android 客户端源码地址:
链接:https://pan.baidu.com/s/1u3d-Ywa4PfiIKu7fBjeHIw
提取码:r5c8
标签:很多 扩展 sha poi dir ror 文章 开发 directory
原文地址:https://www.cnblogs.com/maanshancss/p/11537469.html