标签:最大 接口实现 return mysql statement jdb 部署 restart column
一、SpringBoot 产生背景
随着动态语言的流行(Ruby,Groovy,Scala,Node.js),Java 的开发显得格外的笨重:繁多的配置,低下的开发效率,复杂的部署流程以及第三方技术集成难度大。
在上述环境下,Spring Boot应运而生。它使用 ”习惯优于配置”(项目中存在大量的配置,此外还内置一个习惯性的配置,让你无须进行手动配置)的理念让你的项目快速运行起来。使用Spring Boot很容易创建一个独立运行(运行jar,内嵌Servlet容器),准生产级别的Spring框架的项目,使用Spring Boot你可以不使用或者只需要很少的Spring配置。
相比于以往的一些开发框架,Spring Boot不但使用更加简单,而且功能更加丰富,性能更加稳定而健壮。使用Spring Boot开发框架,不仅能提高开发速度,增强生产效率,一定意义上,可以说是解放了程序员的劳动,一种新技术的使用,更能增强系统的稳定性和扩展系统的性能指标。
二、SpringBoot 简介
Spring Boot是在Spring框架基础上创建的一个全新的框架,其设计目的是简化 Spring 应用的搭建和开发过程,更加敏捷的开发 Spring应用程序,专注于应用程序的功能, 简化了配置的过程, 甚至不配置。可以通过内嵌Servlet容器(Tomcat/Jetty或Undertow)把 Web 应用程序变成可自执行的JAR文件, 不用部署到传统的容器就能命令行里运行。它不但具有 Spring 的所有优秀特性,而且具有如下四个主要特性,能够改变开发 Spring 应用程序的方式:
Spring Boot 对于一些第三方的技术的使用,提供了非常完美的整合, 使你在简单的使用中,不知不觉运用了非常高级和先进的技术。
三、SpringBoot 优点
四、SpringBoot 环境搭建
1、创建一个 Gradle 工程
略
2、配置 build.gradle 文件并引入依赖包

buildDir = ‘target‘

apply plugin: ‘org.springframework.boot‘
apply plugin: ‘io.spring.dependency-management‘

buildscript {
    ext {
        springBootVersion = ‘2.1.6.RELEASE‘
    }
    repositories {
        maven {
            url ‘https://plugins.gradle.org/m2/‘
        }
    }
    dependencies {
        classpath("org.springframework.boot:spring-boot-gradle-plugin:${springBootVersion}")
    }
}

sourceSets.main.resources {
    if (project.hasProperty(‘profile‘)) {
        srcDir ‘src/main/resources-‘ + project.profile
        srcDir ‘src/test/resources-‘ + project.profile
    } else {
        srcDir ‘src/main/resources-test‘
        srcDir ‘src/test/resources-test‘
    }
}

clean.doLast {
    delete projectDir.path + ‘/target‘
}

configurations {

}

dependencies {
    implementation(‘org.springframework.boot:spring-boot-starter-web‘)
    implementation(‘org.springframework.boot:spring-boot-devtools‘)
    implementation(‘org.springframework.boot:spring-boot-starter-aop‘)
    testImplementation(‘org.springframework.boot:spring-boot-starter-test‘)
}
配置文件中 dependencies 闭环中的内容就是所引入的依赖包
3、 创建一个入口类
@SpringBootApplication
@EnableScheduling
public class Application {

  public static void main(String[] args) {
    SpringApplication.run(Application.class, args);
  }
}
@SpringBootApplication
@EnableScheduling
4、创建控制器
@RestController
@RequestMapping("/ping")
public class PingController {

  /**
   * 自定义配置
   */
  @Value("${info}")
  private String info;

  @RequestMapping(path = "/111",method = RequestMethod.GET)
  public String ping1(Integer id, String name, Integer age){
    System.out.println("user info:" + id + "," + name + "," + age);
    return "pong" + info;
  }

  @RequestMapping(path = "/222",
          method = {RequestMethod.POST,RequestMethod.GET},
          // "application/json;charset=utf-8"
          consumes = MediaType.APPLICATION_JSON_UTF8_VALUE)
  public String ping2(){
    return "pong" + info;
  }

  @RequestMapping(path = "/333",
          method = {RequestMethod.POST,RequestMethod.GET})
  public RetMsg ping3(User user){
    System.out.println("user = " + user);
    return RetMsg.buildSuccess();
  }
}
@Value
@RestController
@RequestMapping("/ping")
5、启动Application类
直接运行 Application 类中的 main() 方法即可
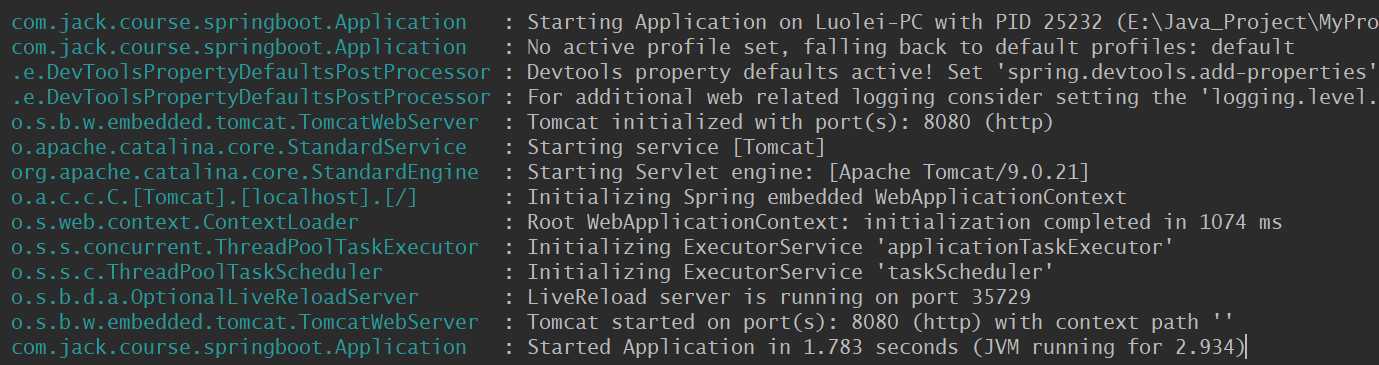 控制台打印了启动日志,展示了一些启动信息,像:启动时间、默认端口等等,我们使工具发一个Get请求,来看一下结果:

五、application.yml配置
SpringBoot支持两种配置文件:application.yml 和 application.properties,通常我们使用application.yml,下面先记录一些常用配置
server:
  prot: 8888  #配置访问的端口
  servlet:
    context-path: /xxx  #配置访问时的项目名

spring:
  devtools:
    restart:
      enabled: true  #这个好像是热加载,每次代码有改动就自动重启,原来的restart ClassLoader 被丢弃,重新创建一个restart ClassLoader,由于需要加载的类相比较少,所以实现了较快的重启时间。
  datasource:
    url: jdbc:mysql://localhost:3306/xxx?useUnicode=true&characterEncoding=UTF-8&useSSL=true  #配置数据库的路径
    username: root  #数据库登录名
    password: root   #登陆密码
    type: com.alibaba.druid.pool.DruidDataSource  #这个可以看一下 https://blog.csdn.net/qq_27191423/article/details/79146855
    driver-class-name: com.mysql.jdbc.Driver
    filters: stat
    maxActive: 20  #连接池的最大值,同一时间可以从池分配的最多连接数量,0时无限制
    initialSize: 1  #连接初始值,连接池启动时创建的连接数量的初始值
    maxWait: 60000
    minIdle: 1  #最小空闲值.当空闲的连接数少于阀值时,连接池就会预申请去一些连接,以免洪峰来时来不及申请
    timeBetweenEvictionRunsMillis: 60000
    minEvictableIdleTimeMillis: 300000
    validationQuery: select ‘x‘
    testWhileIdle: true
    testOnBorrow: false
    testOnReturn: false
    poolPreparedStatements: true   #是否对已备语句进行池管理(布尔值),是否对PreparedStatement进行缓存
    maxOpenPreparedStatements: 20

    jackson:
      date-format: yyyy-MM-dd HH:mm:ss
      time-zone: GMT+8

mybatis-plus:
  mapper-locations: classpath*:mapper/**/*Mapper.xml
  #实体扫描,多个package用逗号或者分号分隔
  typeAliasesPackage: com.yudao.platform.entity.*
  global-config:
    #主键类型  0:"数据库ID自增", 1:"用户输入ID",2:"全局唯一ID (数字类型唯一ID)", 3:"全局唯一ID UUID";
    id-type: 0
    #字段策略 0:"忽略判断",1:"非 NULL 判断"),2:"非空判断"
    field-strategy: 2
    #驼峰下划线转换
    db-column-underline: false
    #刷新mapper 调试神器
    refresh-mapper: true
    #数据库大写下划线转换
    #capital-mode: true
    # Sequence序列接口实现类配置
    #key-generator: com.baomidou.mybatisplus.incrementer.OracleKeyGenerator
    #逻辑删除配置
    logic-delete-value: 1
    logic-not-delete-value: 0
    #自定义填充策略接口实现
    #meta-object-handler: com.baomidou.springboot.xxx
    #自定义SQL注入器
    # sql-injector: com.baomidou.mybatisplus.mapper.LogicSqlInjector
  configuration:
    map-underscore-to-camel-case: true
    cache-enabled: false
    call-setters-on-nulls: true
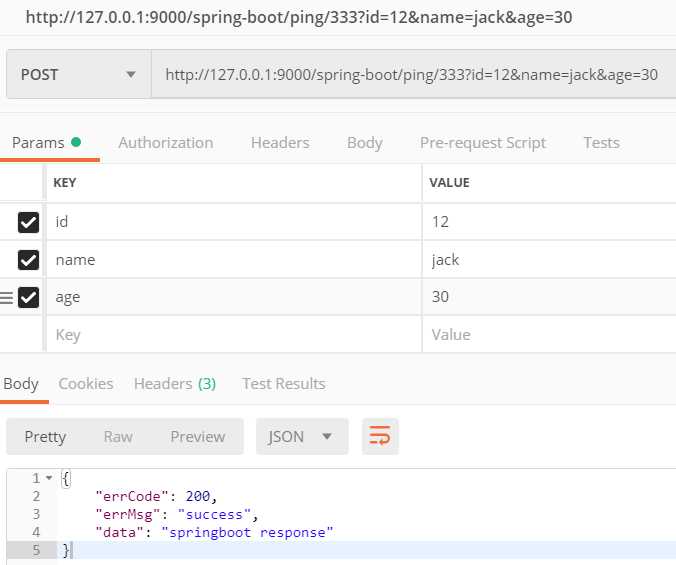
我们将 tomcat 端口配为 9000,再将项目路径配为 /spring-boot 后再次启动
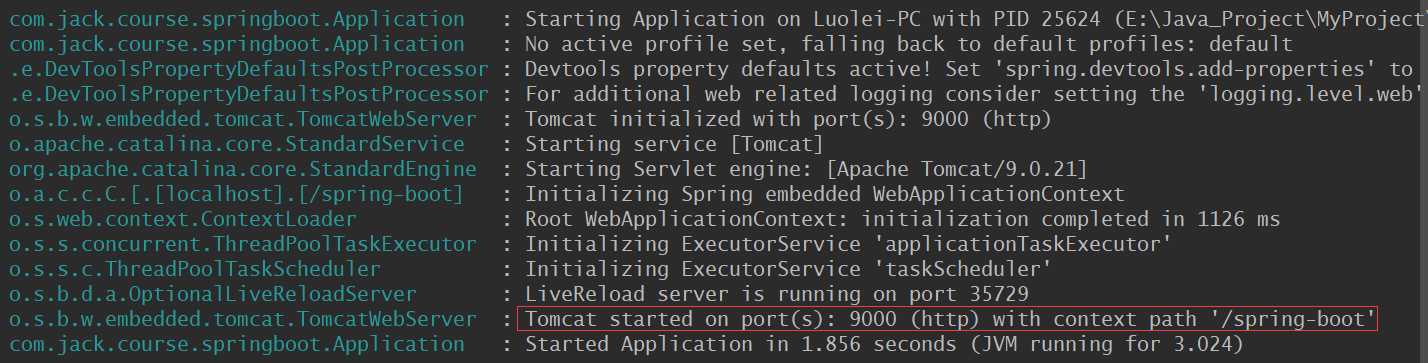
发送请求时就需要把端口和路径稍作修改
六、常用功能
1、定时任务
2、热部署
七、整合
1、Junit
2、Mybatis
标签:最大 接口实现 return mysql statement jdb 部署 restart column
原文地址:https://www.cnblogs.com/L-Test/p/11616490.html
