标签:alt throw OLE after use 拦截器 getbean end loaded
过滤器(Filter)和拦截器(Interceptor)是Web项目中常用的两个功能,本文将简单介绍在Spring Boot中使用过滤器和拦截器来计算Controller中方法的执行时长,并且简单对比两者的区别。
现有如下Controller:
@RestController
@RequestMapping("user")
public class UserController {
?
    @GetMapping("/{id:\\d+}")
    public void get(@PathVariable String id) {
        System.out.println(id);
    }
}
下面通过配置过滤器和拦截器来实现对get方法执行时间计算的功能。
定义一个TimeFilter类,实现javax.servlet.Filter:
public class TimeFilter implements Filter{
    @Override
    public void init(FilterConfig filterConfig) throws ServletException {
        System.out.println("过滤器初始化");
    }
?
    @Override
    public void doFilter(ServletRequest servletRequest, ServletResponse servletResponse, FilterChain filterChain) throws IOException, ServletException {
        System.out.println("开始执行过滤器");
        Long start = new Date().getTime();
        filterChain.doFilter(servletRequest, servletResponse);
        System.out.println("【过滤器】耗时 " + (new Date().getTime() - start));
        System.out.println("结束执行过滤器");
    }
?
    @Override
    public void destroy() {
        System.out.println("过滤器销毁");
    }
}
TimeFilter重写了Filter的三个方法,方法名称已经很直白的描述了其作用,这里不再赘述。
要使该过滤器在Spring Boot中生效,还需要一些配置。这里主要有两种配置方式。
可通过在TimeFilter上加上如下注解:
@Component
@WebFilter(urlPatterns = {"/*"})
public class TimeFilter implements Filter {
   ...
}
@Component注解让TimeFilter成为Spring上下文中的一个Bean,@WebFilter注解的urlPatterns属性配置了哪些请求可以进入该过滤器,/*表示所有请求。
启动项目时可以看到控制台输出了过滤器初始化,启动后访问http://localhost:8080/user/1,控制台输出如下:
开始执行过滤器
1
【过滤器】耗时 31
结束执行过滤器
除了在过滤器类上加注解外,我们也可以通过FilterRegistrationBean来注册过滤器。
定义一个WebConfig类,加上@Configuration注解表明其为配置类,然后通过FilterRegistrationBean来注册过滤器:
@Configuration
public class WebConfig {
    @Bean
    public FilterRegistrationBean timeFilter() {
        FilterRegistrationBean filterRegistrationBean = new FilterRegistrationBean();
        TimeFilter timeFilter = new TimeFilter();
        filterRegistrationBean.setFilter(timeFilter);
?
        List<String> urlList = new ArrayList<>();
        urlList.add("/*");
?
        filterRegistrationBean.setUrlPatterns(urlList);
        return filterRegistrationBean;
    }
}
FilterRegistrationBean除了注册过滤器TimeFilter外还通过setUrlPatterns方法配置了URL匹配规则。重启项目访问http://localhost:8080/user/1,我们可以看到和上面一样的效果。
通过过滤器我们只可以获取到servletRequest对象,所以并不能获取到方法的名称,所属类,参数等额外的信息。
定义一个TimeInterceptor类,实现org.springframework.web.servlet.HandlerInterceptor接口:
public class TimeInterceptor implements HandlerInterceptor {
    @Override
    public boolean preHandle(HttpServletRequest httpServletRequest, HttpServletResponse httpServletResponse, Object o) throws Exception {
        System.out.println("处理拦截之前");
        httpServletRequest.setAttribute("startTime", new Date().getTime());
        System.out.println(((HandlerMethod) o).getBean().getClass().getName());
        System.out.println(((HandlerMethod) o).getMethod().getName());
        return true;
    }
?
    @Override
    public void postHandle(HttpServletRequest httpServletRequest, HttpServletResponse httpServletResponse, Object o, ModelAndView modelAndView) throws Exception {
        System.out.println("开始处理拦截");
        Long start = (Long) httpServletRequest.getAttribute("startTime");
        System.out.println("【拦截器】耗时 " + (new Date().getTime() - start));
    }
?
    @Override
    public void afterCompletion(HttpServletRequest httpServletRequest, HttpServletResponse httpServletResponse, Object o, Exception e) throws Exception {
        System.out.println("处理拦截之后");
        Long start = (Long) httpServletRequest.getAttribute("startTime");
        System.out.println("【拦截器】耗时 " + (new Date().getTime() - start));
        System.out.println("异常信息 " + e);
    }
}
TimeInterceptor实现了HandlerInterceptor接口的三个方法。preHandle方法在处理拦截之前执行,postHandle只有当被拦截的方法没有抛出异常成功时才会处理,afterCompletion方法无论被拦截的方法抛出异常与否都会执行。
通过这三个方法的参数可以看到,相较于过滤器,拦截器多了Object和Exception对象,所以可以获取的信息比过滤器要多的多。但过滤器仍无法获取到方法的参数等信息,我们可以通过切面编程来实现这个目的,具体可参考https://mrbird.cc/Spring-Boot-AOP%20log.html。
要使拦截器在Spring Boot中生效,还需要如下两步配置:
1.在拦截器类上加入@Component注解;
2.在WebConfig中通过InterceptorRegistry注册过滤器:
@Configuration
public class WebConfig extends WebMvcConfigurerAdapter {
    @Autowired
    private TimeInterceptor timeInterceptor;
?
    @Override
    public void addInterceptors(InterceptorRegistry registry) {
        registry.addInterceptor(timeInterceptor);
    }
}
启动项目,访问http://localhost:8080/user/1,控制台输出如下:
处理拦截之前
cc.mrbird.controller.UserController
get
1
开始处理拦截
【拦截器】耗时 24
处理拦截之后
【拦截器】耗时 24
异常信息 null
从输出中我们可以了解到三个方法的执行顺序,并且三个方法都被执行了。
我们在UserController的get方法中手动抛出一个异常:
 @GetMapping("/{id:\\d+}")
public void get(@PathVariable String id) {
    System.out.println(id);
    throw new RuntimeException("user not exist");
}
重启项目后,访问http://localhost:8080/user/1,控制台输出如下:
处理拦截之前
cc.mrbird.controller.UserController
get
1
处理拦截之后
【拦截器】耗时 0
异常信息 java.lang.RuntimeException: user not exist
可看到,postHandle方法并没有被执行。
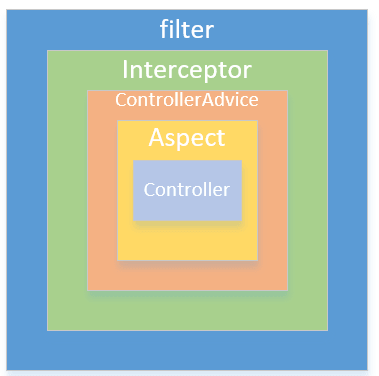
我们将过滤器和拦截器都配置上,然后启动项目访问http://localhost:8080/user/1:
开始执行过滤器
处理拦截之前
cc.mrbird.controller.UserController
get
1
开始处理拦截
【拦截器】耗时 25
处理拦截之后
【拦截器】耗时 25
异常信息 null
【过滤器】耗时 34
结束执行过滤器
可看到过滤器要先于拦截器执行,晚于拦截器结束。下图很好的描述了它们的执行时间区别:

标签:alt throw OLE after use 拦截器 getbean end loaded
原文地址:https://www.cnblogs.com/7788IT/p/11626850.html