标签:nbsp port 类型 case str scope 数据过滤 input head
大二上学期闲着没事儿干,便去了之前教我java的老师的项目组,去了之后才知道是做一个web前端的项目,但我对于这方面可以说完全是一个小白,但是老师催得也紧,简单学了学html,css,javascript跟vue,elementui便开始干活了。
在这个项目里,我的任务也挺简单的,就是画个几个设备管理界面。这里我就举一个界面的例子吧。
<!--模板-->
<template>


            <el-card class="box-card">
        <div slot="header" class="clearfix">
          <el-row :gutter="20">
        <el-col :span="6"><el-input
    placeholder="请输入查询设备型号"
    v-model="search">
    <i slot="prefix" class="el-input__icon el-icon-search"></i>
  </el-input></el-col>

        <el-col :span="6"><el-button  type="primary" style="margin:0 750px;  display: block;"
          @click="gotolink(‘/adddevicemodel‘)">添加</el-button></el-col>
        </el-row>


  </div>
  <div >
    <template>
    <el-table
      :data="tables.slice((currentPage-1)*pageSize,currentPage*pageSize)"

      style="width: 100%">
      <el-table-column
        prop="name"
        label="设备ID"
        width="180">
      </el-table-column>
      <el-table-column
        prop="model"
        label="设备型号">
      </el-table-column>
      <el-table-column
        prop="type"
        label="设备类型">
      </el-table-column>
      <el-table-column
        prop="brand"
        label="设备品牌">
      </el-table-column>
      <el-table-column
        prop="seris"
        label="设备系列">
      </el-table-column>

      <el-table-column
      fixed="right"
      label="操作"
      >
      <template slot-scope="scope">
        <el-button
          size="mini"
          @click="handleEdit(scope.$index, scope.row)">编辑</el-button>
        <el-button
          size="mini"
          type="danger"
          @click="handleDelete(scope.$index, scope.row)">删除</el-button>
      </template>
    </el-table-column>

    </el-table>
  </template>
  </div>
  <div class="block" style="margin-top:15px;">
           <el-pagination
            align=‘center‘
            @size-change="handleSizeChange"
            @current-change="handleCurrentChange"
            :current-page="currentPage"
            :page-sizes="[1,2,10,20]"
            :page-size="pageSize"
            layout="total, sizes, prev, pager, next, jumper" :total="tableData.length">
            </el-pagination>
        </div>
</el-card>


</template>


<!--逻辑-->
<script>
export default {
    name:‘DeviceModel‘,
    data(){
        return {
      search: ‘‘    ,
        activeIndex: ‘1‘,
        activeIndex2: ‘1‘,
        isCollapse: true,
        tableData: [{
            name: ‘32DVG4FON1‘,
            model:‘PEW-A-8.34‘,
            type:‘B0001‘,
            brand: ‘山特‘,
            seris:‘D0009‘,
          }, {
           name: ‘30DVG4FON1‘,
            model:‘PEW-A-8.30‘,
            type:‘B0002‘,
            brand: ‘施耐德‘,
            seris:‘D0003‘,
          }, {
           name: ‘35DVG4FON1‘,
            model:‘PEW-A-8.31‘,
            type:‘B0003‘,
            brand: ‘艾默生‘,
            seris:‘D0004‘,
          }, {
            name: ‘31DVG4FON1‘,
            model:‘PEW-A-8.34‘,
            type:‘B0004‘,
            brand: ‘任达‘,
            seris:‘D0005‘,
          }],
         total: 0,
         currentPage:1,
         pageSize:2
        }
    },
    methods: {


      gotolink(inc){
        this.$router.replace(inc);

      },
      handleRemove(file, fileList) {
        console.log(file, fileList);
      },
      handlePictureCardPreview(file) {
        this.dialogImageUrl = file.url;
        this.dialogVisible = true;
      },
      resetDateFilter() {
        this.$refs.filterTable.clearFilter(‘date‘);
      },
      clearFilter() {
        this.$refs.filterTable.clearFilter();
      },
      formatter(row, column) {
        return row.address;
      },
      filterTag(value, row) {
        return row.tag === value;
      },
      filterHandler(value, row, column) {
        const property = column[‘property‘];
        return row[property] === value;
      },
      handleSizeChange(val) {
            console.log(`每页 ${val} 条`);
            this.currentPage = 1;
            this.pageSize = val;
        },
        handleCurrentChange(val) {
            console.log(`当前页: ${val}`);
            this.currentPage = val;
        },
        handleEdit(index, row) {
        console.log(index, row);
      },
      handleDelete(index, row) {
        this.tableData.splice(index, 1);
      }


    },computed: {
    // 前端过滤
    tables () {
      const search = this.search
      if (search) {
        return this.tableData.filter(dataNews => {
          return Object.keys(dataNews).some(key => {
            return String(dataNews[key]).toLowerCase().indexOf(search) > -1
          })
        })
      }
      return this.tableData
    },
    // 总条数

  },
  watch: {
   // 检测表格数据过滤变化,自动跳到第一页
    tables () {
      this.currentPage = 1
    }
  }

}


</script>

<!-- Add "scoped" attribute to limit CSS to this component only -->
<!--样式-->
<style >

 .text {
    font-size: 14px;
  }

  .item {
    margin-bottom: 18px;
  }

  .clearfix:before,
  .clearfix:after {
    display: table;
    content: "";
  }
  .clearfix:after {
    clear: both
  }

  .box-card {
    width: 100%;
  }

  .el-row {
    margin-bottom: 20px;
    &:last-child {
      margin-bottom: 0;
    }
  }
  .el-col {
    border-radius: 4px;
  }

  .row-bg {
    padding: 10px 0;
    background-color: #f9fafc;
  }


</style>
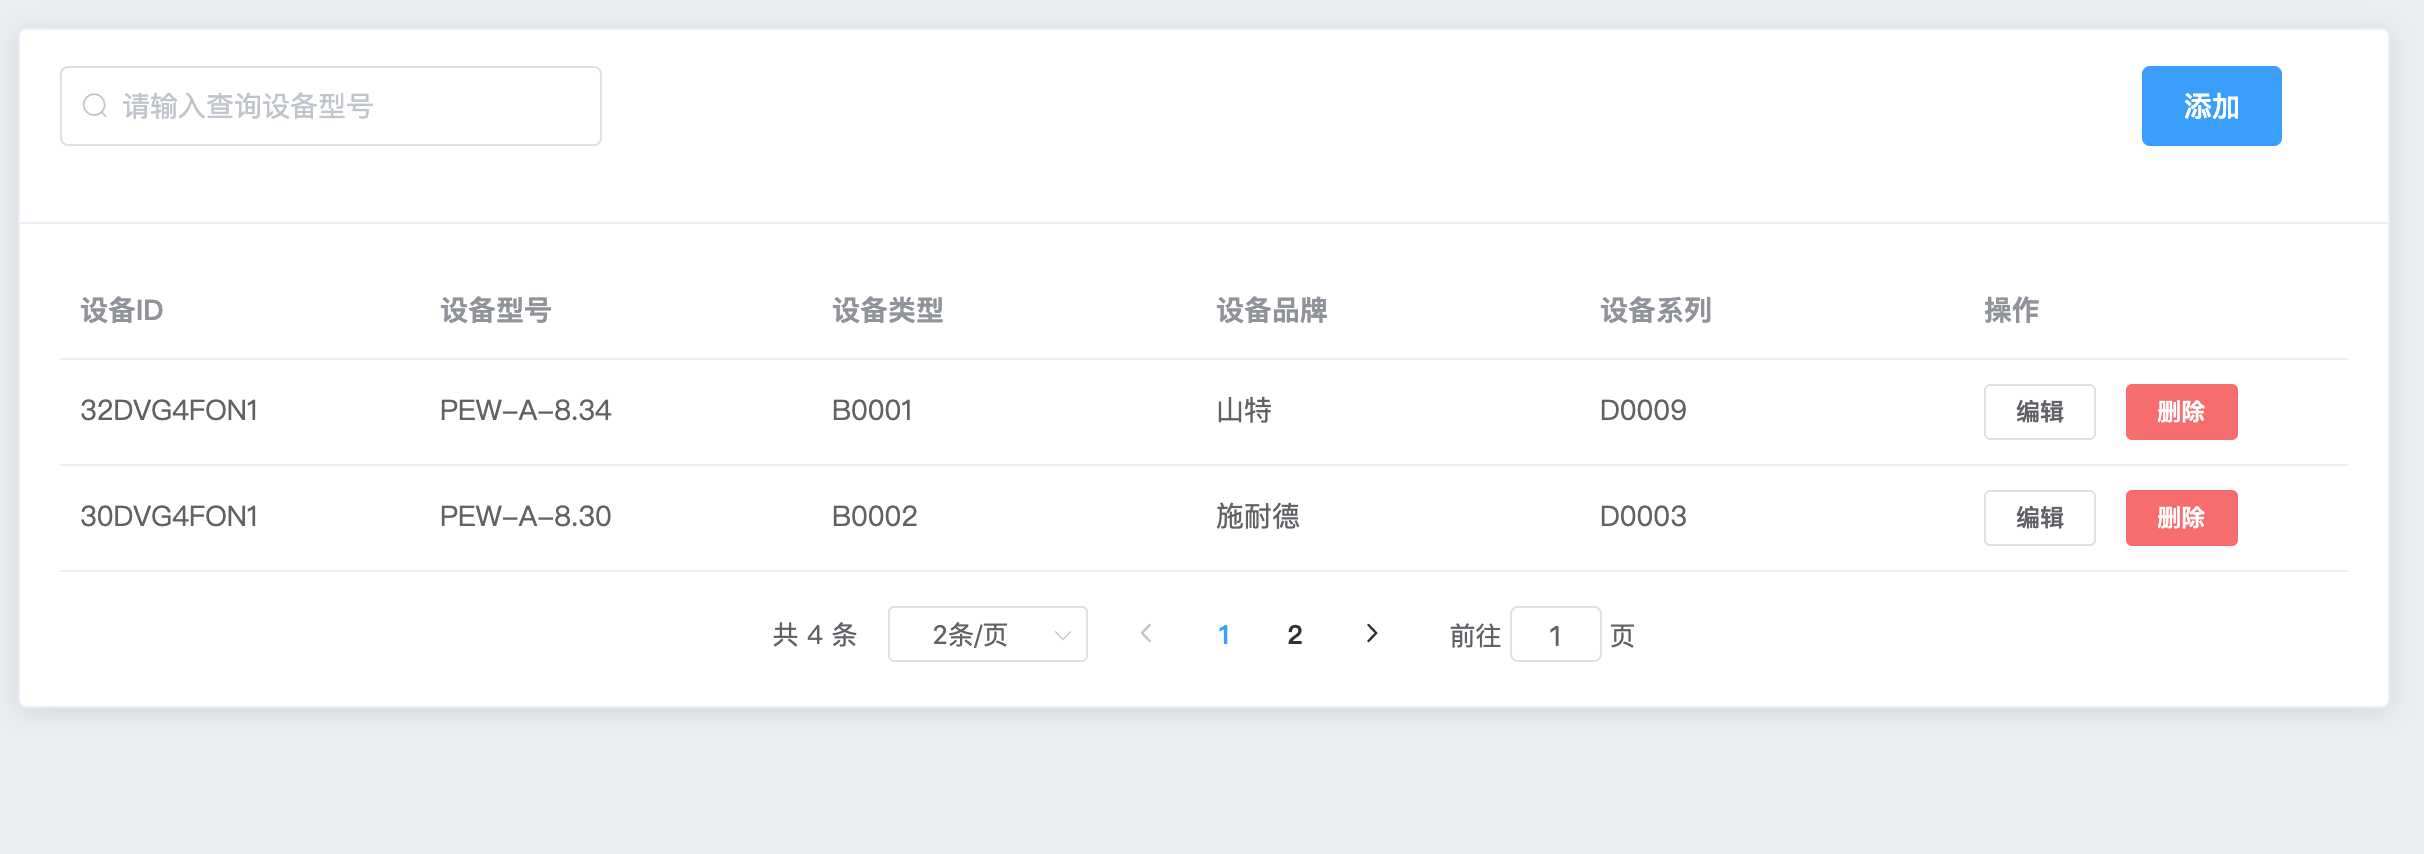
这个就是界面的展示了,至于这个编辑功能我还没有来得及实现,如果我有时间实现的话,我会在以后的文章里说明的,搜索与分页的功能我也是参考了很多的资料才融合到一块的,再者就是这个点击“添加”按钮后的跳转界面
<!--模板-->
<template>
  <div>
      <el-card class="box-card" style="width:100%">
  <div slot="header" class="clearfix">
    <span style="font-size: 20px">添加设备</span>
  </div>
  <div>
  <el-row :gutter="20">
  <el-col :span="4">设备ID:</el-col>
  <el-col :span="6"><el-input v-model="input" placeholder="请输入设备ID"></el-input></el-col>

</el-row>
<el-row :gutter="20">
  <el-col :span="4">设备型号:</el-col>
  <el-col :span="6"><el-input v-model="input" placeholder="请输入设备型号"></el-input></el-col>

</el-row>
<el-row :gutter="20">
  <el-col :span="4">设备类型:</el-col>
  <el-col :span="6"><el-select v-model="value_1" placeholder="请选择设备类型" style="width: 100%;">
    <el-option
      v-for="item in options_1"
      :key="item.value"
      :label="item.label"
      :value="item.value">
    </el-option>
  </el-select></el-col>

</el-row>
<el-row :gutter="20">
  <el-col :span="4">设备品牌:</el-col>
  <el-col :span="6"><el-select v-model="value_2" placeholder="请选择设备品牌" style="width: 100%;">
    <el-option
      v-for="item in options_2"
      :key="item.value"
      :label="item.label"
      :value="item.value">
    </el-option>
  </el-select></el-col>

</el-row>

<el-row :gutter="20">
  <el-col :span="4">设备系列:</el-col>
  <el-col :span="6"><el-select v-model="value_3" placeholder="请选择设备系列" style="width: 100%;">
    <el-option
      v-for="item in options_3"
      :key="item.value"
      :label="item.label"
      :value="item.value">
    </el-option>
  </el-select></el-col>

</el-row>
     <el-button plain @click="open1" type="primary" style="margin:0 auto;display:block;width:200px;">确定</el-button>

  </div>
</el-card>

  </div>

</template>


<!--逻辑-->
<script>
export default {
    name:‘AddDeviceModel‘,
    data(){
        return {
            input: ‘‘,
      options_1: [{
          value: ‘选项1‘,
          label: ‘黄金糕‘
        }, {
          value: ‘选项2‘,
          label: ‘双皮奶‘
        }, {
          value: ‘选项3‘,
          label: ‘蚵仔煎‘
        }, {
          value: ‘选项4‘,
          label: ‘龙须面‘
        }, {
          value: ‘选项5‘,
          label: ‘北京烤鸭‘
        }],
        options_2: [{
          value: ‘选项1‘,
          label: ‘封丘卷尖‘
        }, {
          value: ‘选项2‘,
          label: ‘双皮奶‘
        }, {
          value: ‘选项3‘,
          label: ‘蚵仔煎‘
        }, {
          value: ‘选项4‘,
          label: ‘龙须面‘
        }, {
          value: ‘选项5‘,
          label: ‘北京烤鸭‘
        }],
        options_3: [{
          value: ‘选项1‘,
          label: ‘封丘卷尖‘
        }, {
          value: ‘选项2‘,
          label: ‘双皮奶‘
        }, {
          value: ‘选项3‘,
          label: ‘蚵仔煎‘
        }, {
          value: ‘选项4‘,
          label: ‘龙须面‘
        }, {
          value: ‘选项5‘,
          label: ‘北京烤鸭‘
        }],
        value_1: ‘‘,
        value_2:‘‘,
        value_3:‘‘
        }
    },
  methods:{
    open1() {
        this.$notify({
          title: ‘成功‘,
          message: ‘添加设备型号成功‘,
          type: ‘success‘
        });
      }
  }

}
</script>

<!-- Add "scoped" attribute to limit CSS to this component only -->
<!--样式-->
<style >
.text {
    font-size: 14px;
  }

  .item {
    margin-bottom: 18px;
  }

  .clearfix:before,
  .clearfix:after {
    display: table;
    content: "";
  }
  .clearfix:after {
    clear: both
  }

  .box-card {
    width: 480px;
  }

  .el-row {
    margin-bottom: 20px;
    &:last-child {
      margin-bottom: 0;
    }
  }
  .el-col {
    border-radius: 4px;
  }
  .bg-purple-dark {
    background: #99a9bf;
  }
  .bg-purple {
    background: #d3dce6;
  }
  .bg-purple-light {
    background: #e5e9f2;
  }
  .grid-content {
    border-radius: 4px;
    min-height: 36px;
  }
  .row-bg {
    padding: 10px 0;
    background-color: #f9fafc;
  }

</style>
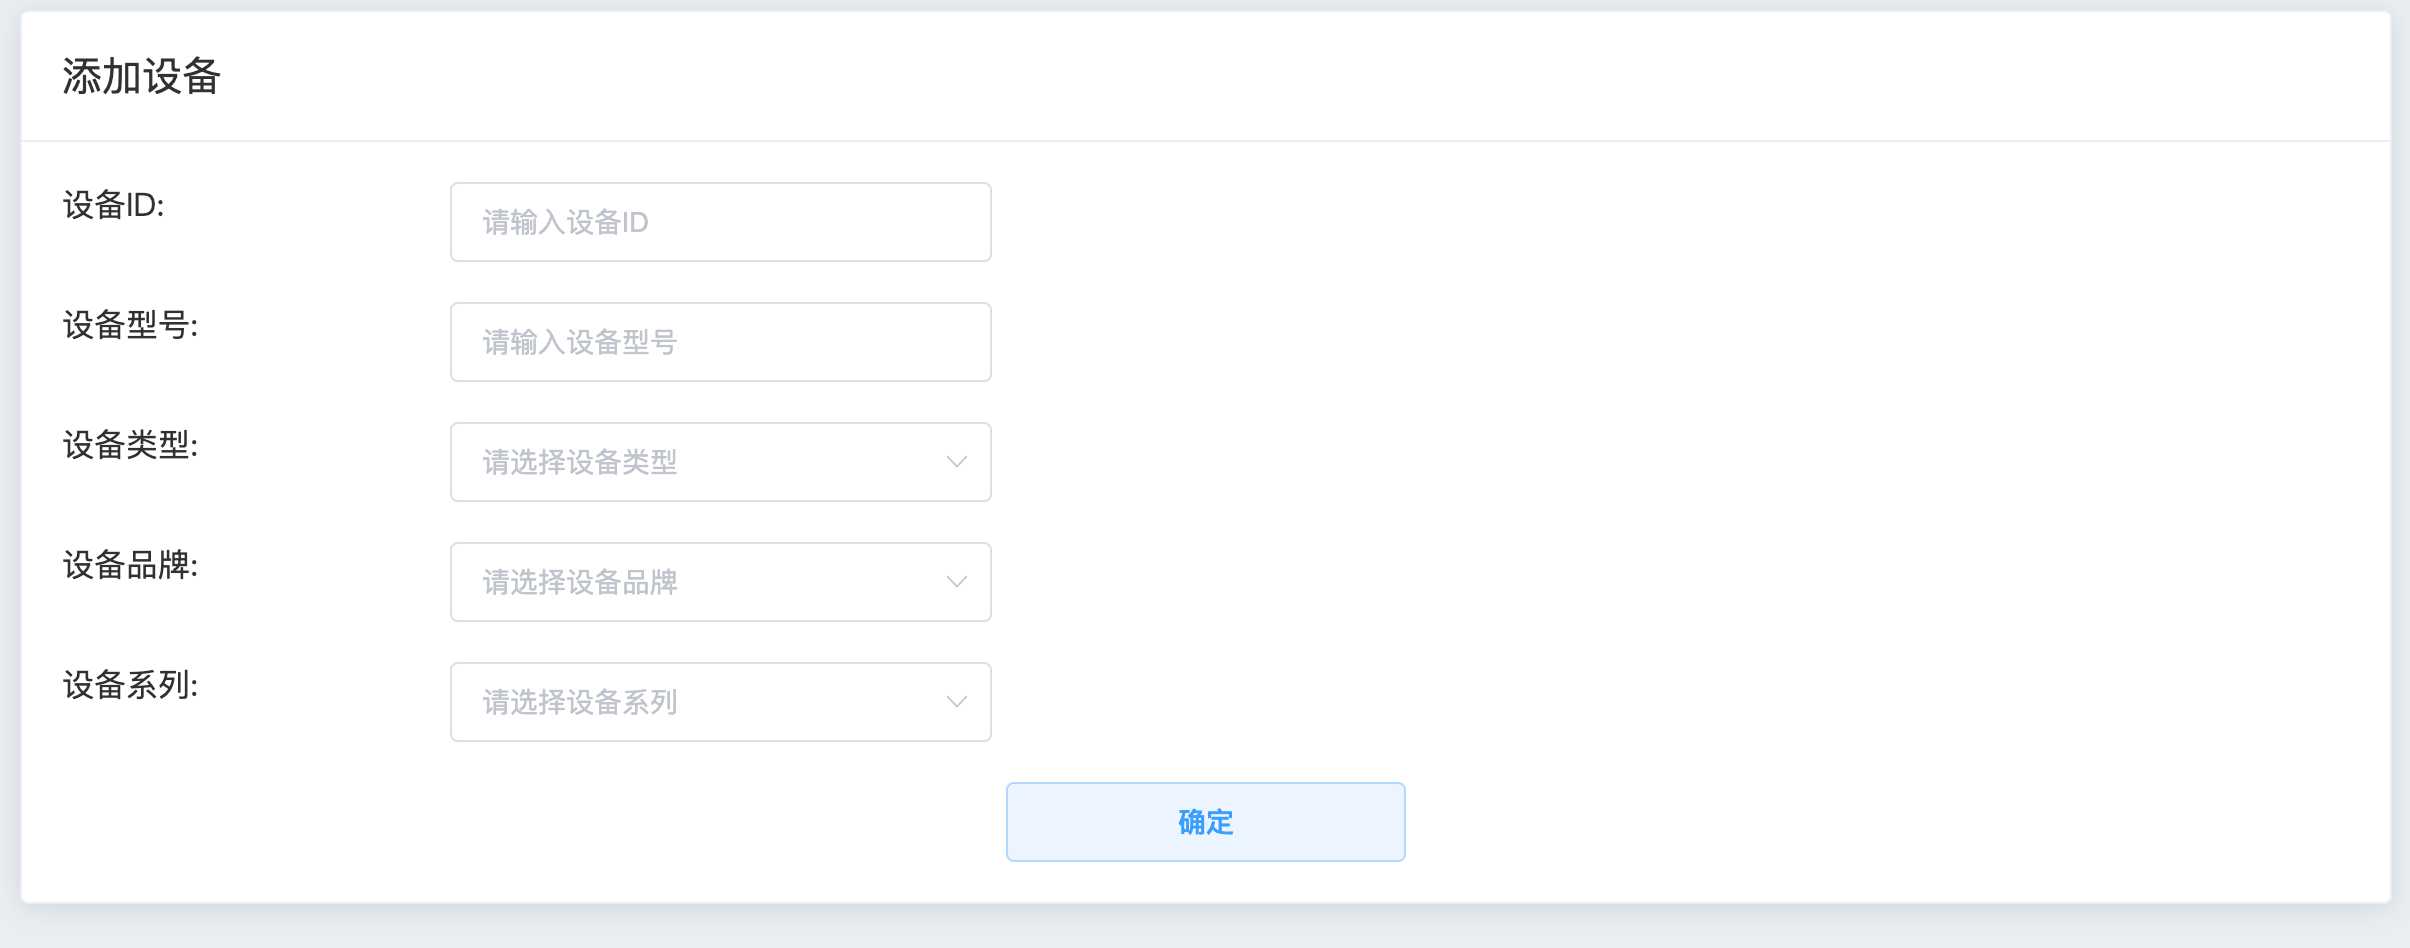
这一模块里,还有一些不足,比如说没有做一个排空检查。
事实上,做项目的过程中,我曾多次怀疑做项目的意义何在,因为在这个工程中,我不是特别的懂代码的内部原理,糊里糊涂的,我觉得原因还是学的时候节奏较快,囫囵吞枣所致,在我初步构建完界面的时候,我内心还是非常高兴的,然而在我开完项目会议时,老师跟我讲想让我连上数据库,我起初一听,合情合理,这样网页的数据存储就好办了,功能也可以更加的完善了,我就觉得还行,因为我没学过数据库,我天真的以为网页前端的数据可以直接存储在mysql里,在我开始学习数据库时,我突然发现,我的想法太天真了,我需要用java做一个后端进行数据交互,这样的话,任务难度就超过了我的预期,耗时会大大加长,现在我的内心真的是绝望的,粗制滥造,意义何在?
标签:nbsp port 类型 case str scope 数据过滤 input head
原文地址:https://www.cnblogs.com/mu-ze/p/11617893.html