标签:oca mave str nbsp username star efault css OLE
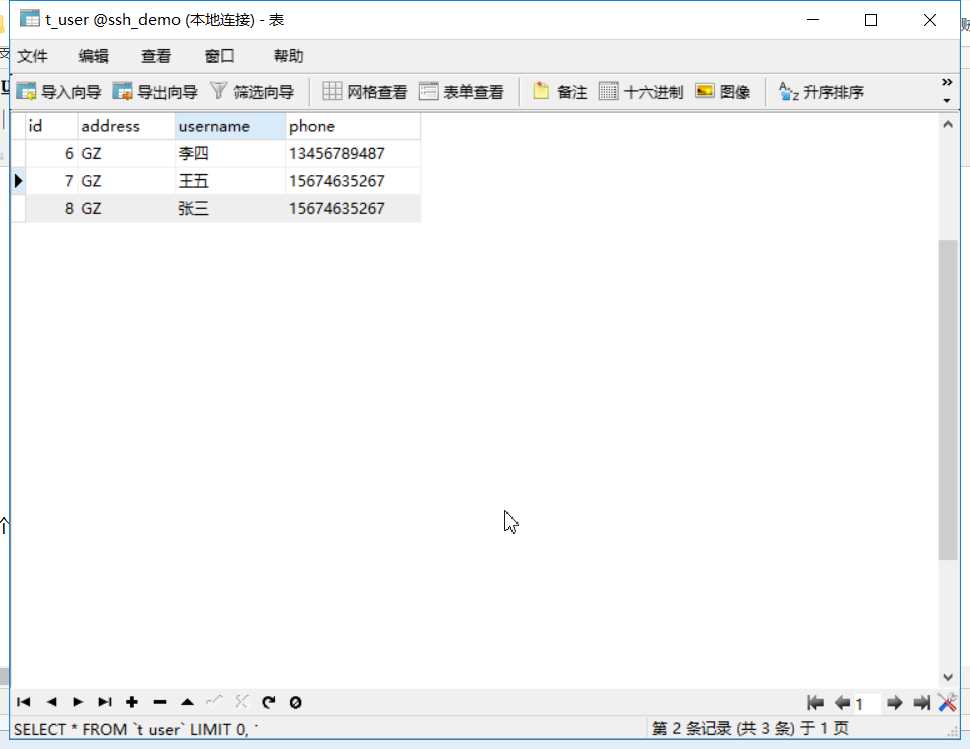
一.数据库表
/*
Navicat MySQL Data Transfer

Source Server         : 本地连接
Source Server Version : 50720
Source Host           : localhost:3306
Source Database       : ssh_demo

Target Server Type    : MYSQL
Target Server Version : 50720
File Encoding         : 65001

Date: 2019-10-07 14:19:04
*/

SET FOREIGN_KEY_CHECKS=0;

-- ----------------------------
-- Table structure for `t_user`
-- ----------------------------
DROP TABLE IF EXISTS `t_user`;
CREATE TABLE `t_user` (
  `id` int(11) NOT NULL AUTO_INCREMENT,
  `address` varchar(255) DEFAULT NULL,
  `username` varchar(50) DEFAULT NULL,
  `phone` varchar(50) DEFAULT NULL,
  PRIMARY KEY (`id`)
) ENGINE=InnoDB AUTO_INCREMENT=8 DEFAULT CHARSET=utf8;

-- ----------------------------
-- Records of t_user
-- ----------------------------
INSERT INTO `t_user` VALUES (‘6‘, ‘GZ‘, ‘张三‘, ‘13456789487‘);
INSERT INTO `t_user` VALUES (‘7‘, ‘GZ‘, ‘张三‘, ‘15674635267‘);
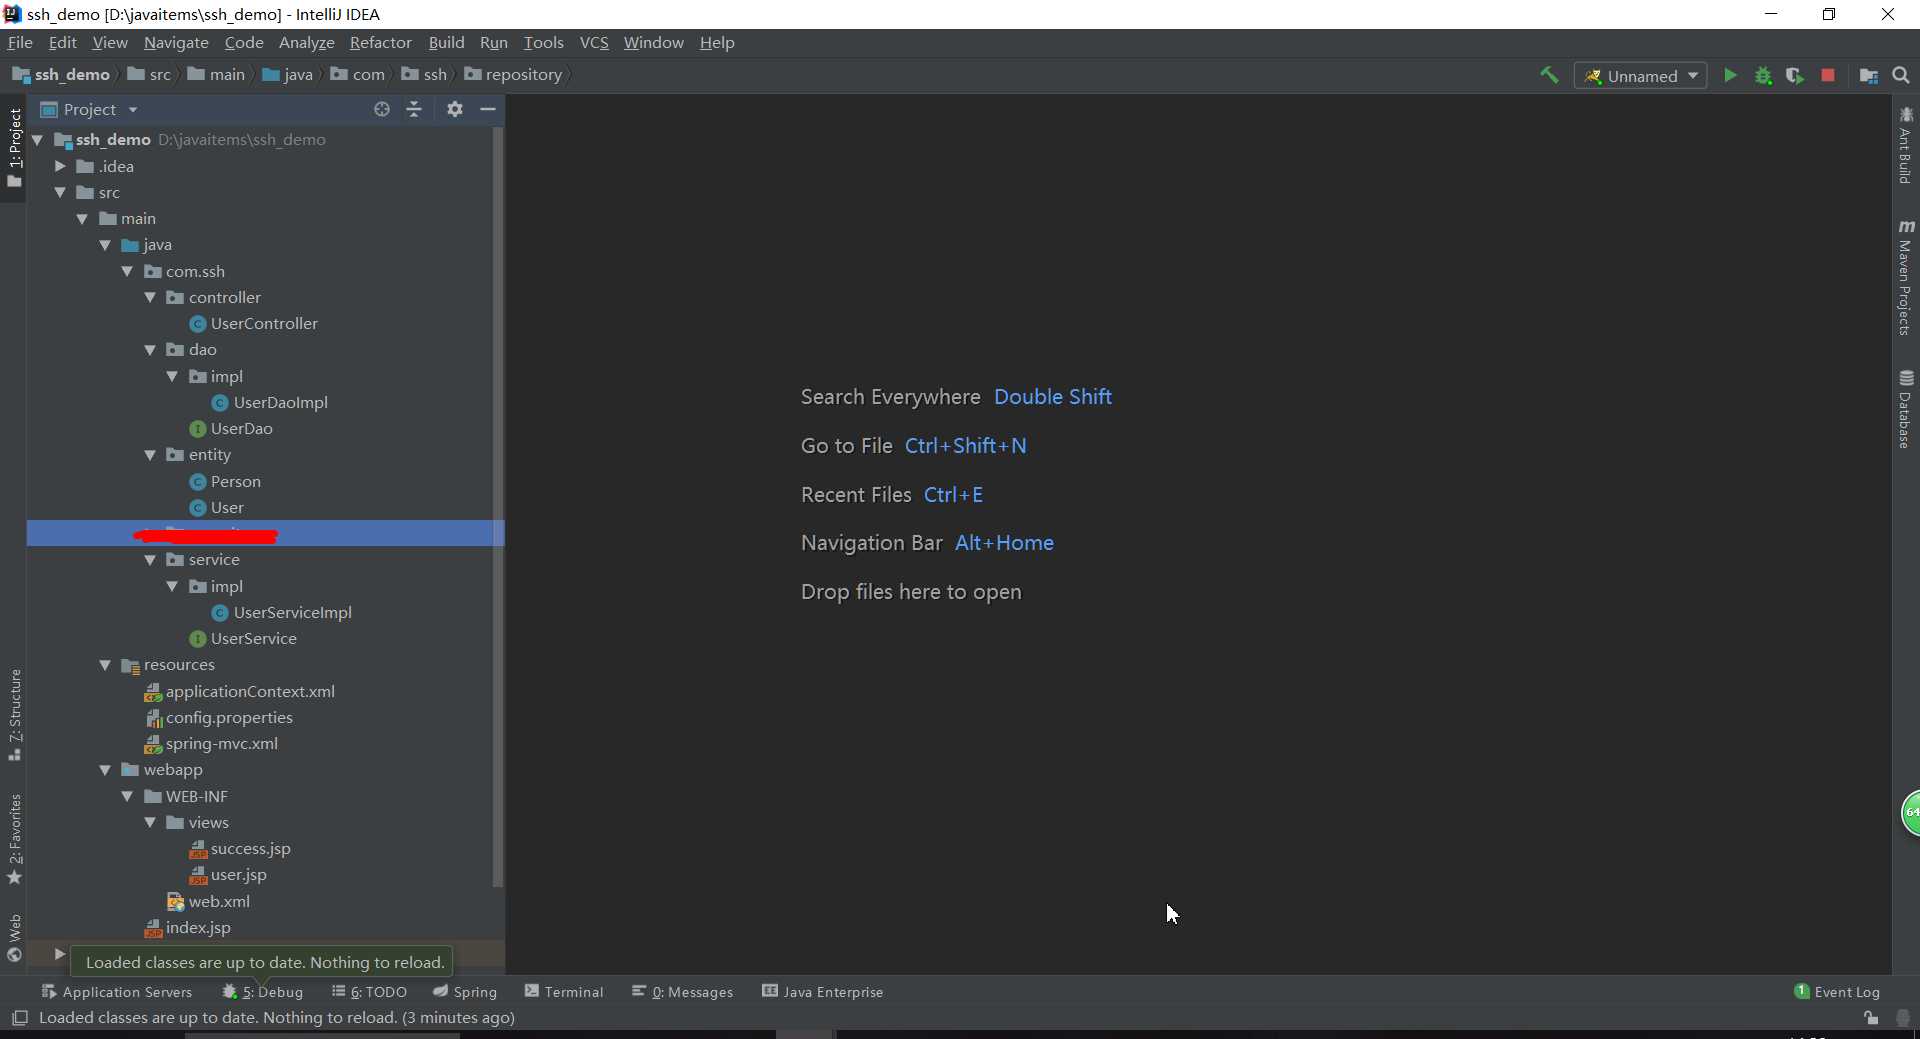
二.使用idea创建一个maven项目,然后创建如下的目录

三.各种配置文件如下
1.web.xml
<?xml version="1.0" encoding="UTF-8"?>
<web-app xmlns:xsi="http://www.w3.org/2001/XMLSchema-instance"
         xmlns="http://java.sun.com/xml/ns/javaee"
         xsi:schemaLocation="http://java.sun.com/xml/ns/javaee http://java.sun.com/xml/ns/javaee/web-app_3_0.xsd"
         version="3.0">
  <!-- 地址为http://localhost:8080/  显示的默认网页-->
  <welcome-file-list>
    <welcome-file>/index.jsp</welcome-file>
  </welcome-file-list>

  <!--加载Spring的配置文件到上下文中去-->
  <context-param>
    <param-name>contextConfigLocation</param-name>
    <param-value>
      classpath:applicationContext.xml
    </param-value>
  </context-param>

  <!-- spring MVC config start-->
  <servlet>
    <servlet-name>spring</servlet-name>
    <servlet-class>org.springframework.web.servlet.DispatcherServlet</servlet-class>
    <init-param>
      <param-name>contextConfigLocation</param-name>
      <!-- 此处指向的的是SpringMVC的配置文件 -->
      <param-value>classpath:spring-mvc.xml</param-value>
    </init-param>
    <!--配置容器在启动的时候就加载这个servlet并实例化-->
    <load-on-startup>1</load-on-startup>
  </servlet>

  <servlet-mapping>
    <servlet-name>spring</servlet-name>
    <url-pattern>/</url-pattern>
  </servlet-mapping>
  <!-- spring MVC config end-->


  <!-- Spring监听器 -->
  <listener>
    <listener-class>org.springframework.web.context.ContextLoaderListener</listener-class>
  </listener>

  <!--  字符集过滤  -->
  <filter>
    <filter-name>encodingFilter</filter-name>
    <filter-class>org.springframework.web.filter.CharacterEncodingFilter</filter-class>
    <init-param>
      <param-name>encoding</param-name>
      <param-value>UTF-8</param-value>
    </init-param>
    <init-param>
      <param-name>forceEncoding</param-name>
      <param-value>true</param-value>
    </init-param>
  </filter>
  <filter-mapping>
    <filter-name>encodingFilter</filter-name>
    <url-pattern>/*</url-pattern>
  </filter-mapping>

</web-app>
2.applicationContext.xml
<beans xmlns="http://www.springframework.org/schema/beans"
       xmlns:xsi="http://www.w3.org/2001/XMLSchema-instance"
       xmlns:context="http://www.springframework.org/schema/context"
       xmlns:mvc="http://www.springframework.org/schema/mvc"
       xsi:schemaLocation="http://www.springframework.org/schema/beans
        http://www.springframework.org/schema/beans/spring-beans-4.1.xsd
        http://www.springframework.org/schema/context
        http://www.springframework.org/schema/context/spring-context-4.1.xsd
        http://www.springframework.org/schema/mvc
        http://www.springframework.org/schema/mvc/spring-mvc-4.1.xsd">

    <!--********************************************配置Spring***************************************-->
    <!-- 自动扫描 -->
    <context:component-scan base-package="com.ssh">
        <!-- 扫描时跳过 @Controller 注解的JAVA类(控制器) -->
        <context:exclude-filter type="annotation" expression="org.springframework.stereotype.Controller"/>
    </context:component-scan>


    <!--********************************************配置hibernate********************************************-->

    <!--扫描配置文件(这里指向的是之前配置的那个config.properties)-->
    <context:property-placeholder location="classpath:config.properties" />

    <!--配置数据源-->
    <bean id="dataSource" class="com.mchange.v2.c3p0.ComboPooledDataSource" destroy-method="close">
        <property name="driverClass" value="${jdbc.driver}" />  <!--数据库连接驱动-->
        <property name="jdbcUrl" value="${jdbc.url}" />     <!--数据库地址-->
        <property name="user" value="${jdbc.username}" />   <!--用户名-->
        <property name="password" value="${jdbc.password}" />   <!--密码-->
        <property name="maxPoolSize" value="40" />      <!--最大连接数-->
        <property name="minPoolSize" value="1" />       <!--最小连接数-->
        <property name="initialPoolSize" value="10" />      <!--初始化连接池内的数据库连接-->
        <property name="maxIdleTime" value="20" />  <!--最大空闲时间-->
    </bean>

    <!--配置session工厂-->
    <bean id="sessionFactory" class="org.springframework.orm.hibernate4.LocalSessionFactoryBean">
        <property name="dataSource" ref="dataSource" />
        <property name="packagesToScan" value="com.ssh.entity" />
        <property name="hibernateProperties">
            <props>
                <prop key="hibernate.hbm2ddl.auto">${hibernate.hbm2ddl.auto}</prop> <!--hibernate根据实体自动生成数据库表-->
                <prop key="hibernate.dialect">${hibernate.dialect}</prop>   <!--指定数据库方言-->
                <prop key="hibernate.show_sql">${hibernate.show_sql}</prop>     <!--在控制台显示执行的数据库操作语句-->
                <prop key="hibernate.format_sql">${hibernate.format_sql}</prop>     <!--在控制台显示执行的数据哭操作语句(格式)-->
            </props>
        </property>
    </bean>

    <!-- 事物管理器配置  -->
    <bean id="transactionManager" class="org.springframework.orm.hibernate4.HibernateTransactionManager">
        <property name="sessionFactory" ref="sessionFactory" />
    </bean>

</beans>
3.config.properties
#database connection config
jdbc.driver = com.mysql.jdbc.Driver
jdbc.url = jdbc:mysql://localhost:3306/ssh_demo?useUnicode=true&characterEncoding=utf-8
jdbc.username = root
jdbc.password = ???

#hibernate config
hibernate.dialect = org.hibernate.dialect.MySQLDialect
hibernate.show_sql = true
hibernate.format_sql = true
hibernate.hbm2ddl.auto = update
4.spring-mvc.xml
<?xml version="1.0" encoding="UTF-8"?>
<beans xmlns="http://www.springframework.org/schema/beans"
       xmlns:xsi="http://www.w3.org/2001/XMLSchema-instance"
       xmlns:context="http://www.springframework.org/schema/context"
       xmlns:mvc="http://www.springframework.org/schema/mvc"
       xsi:schemaLocation="http://www.springframework.org/schema/beans
        http://www.springframework.org/schema/beans/spring-beans-4.1.xsd
        http://www.springframework.org/schema/context
        http://www.springframework.org/schema/context/spring-context-4.1.xsd
        http://www.springframework.org/schema/mvc
        http://www.springframework.org/schema/mvc/spring-mvc-4.1.xsd">

    <!-- 启动注解驱动的spring MVC功能,注册请求url和注解POJO类方法的映射-->
    <mvc:annotation-driven />
    <context:component-scan base-package="com.ssh" />
    <!-- 对模型视图名称的解析,在请求时模型视图名称添加前后缀 -->
    <bean id="viewResolver" class="org.springframework.web.servlet.view.InternalResourceViewResolver">
        <property name="viewClass" value="org.springframework.web.servlet.view.JstlView" />
        <property name="prefix" value="/WEB-INF/views/" />      <!-- 前缀 -->
        <property name="suffix" value=".jsp" />   <!-- 后缀 -->
    </bean>

    <!--这里是对静态资源的映射-->
    <!--<mvc:resources mapping="/js/**" location="/resources/js/" />
    <mvc:resources mapping="/css/**" location="/resources/css/" />
    <mvc:resources mapping="/img/**" location="/resources/img/" />-->

</beans>
5.UserController.java
package com.ssh.controller;

import com.ssh.entity.User;
import com.ssh.service.UserService;
import org.springframework.beans.factory.annotation.Autowired;
import org.springframework.stereotype.Controller;
import org.springframework.ui.Model;
import org.springframework.web.bind.annotation.RequestMapping;

import java.util.List;

@Controller
@RequestMapping("/user")
public class UserController {

    @Autowired
    private UserService userService;

    @RequestMapping("/getUsers")
    public String findUsers(Model model){
        List<User> users = userService.findUsers();
        model.addAttribute("users",users);
        return "user";
    }

    @RequestMapping("/saveUser")
    public String saveUsser(){
        User user = new User();
        userService.saveUser(user);
        return "success";
    }
}
6.User.java
package com.ssh.entity;

import javax.persistence.*;

@Entity
@Table(name = "t_user")
public class User {
    @Id
    @GeneratedValue(strategy = GenerationType.IDENTITY)
    private Integer id;

    @Column(name = "username")
    private String username;

    @Column(name = "address")
    private String address;

    @Column(name = "phone")
    private String phone;

    public Integer getId() {
        return id;
    }

    public void setId(Integer id) {
        this.id = id;
    }

    public String getAddress() {
        return address;
    }

    public void setAddress(String address) {
        this.address = address;
    }

    public String getUsername() {
        return username;
    }

    public void setUsername(String username) {
        this.username = username;
    }

    public String getPhone() {
        return phone;
    }

    public void setPhone(String phone) {
        this.phone = phone;
    }

    @Override
    public String toString() {
        return "Person{" +
                "id=" + id +
                ", address=‘" + address + ‘\‘‘ +
                ‘}‘;
    }
}
7.UserDao.java
package com.ssh.dao;

import com.ssh.entity.User;

import java.util.List;

public interface UserDao {
    List<User> findUsers();

    int saveUser(User entity);
}
8.UserDaoImpl.java
package com.ssh.dao.impl;

import com.ssh.dao.UserDao;
import com.ssh.entity.User;
import org.hibernate.Session;
import org.hibernate.SessionFactory;
import org.hibernate.query.Query;
import org.springframework.beans.factory.annotation.Autowired;
import org.springframework.stereotype.Repository;

import java.util.List;

@Repository
public class UserDaoImpl implements UserDao {

    @Autowired
    private SessionFactory sessionFactory;

    private Session getCurrentSession() {
        return this.sessionFactory.openSession();
    }


    @Override
    public int saveUser(User entity) {
        int id = (Integer) getCurrentSession().save(entity);
        return id;
    }
    @Override
    public List<User> findUsers() {
        Query query = getCurrentSession().createQuery("from User");
        List<User> list = query.list();
        return list;
    }
}
9.UserService.java
package com.ssh.service;

import com.ssh.entity.User;

import java.util.List;

public interface UserService {

    List<User> findUsers();

    int saveUser(User entity);
}
10.UserServiceImpl.java
package com.ssh.service.impl;

import com.ssh.dao.UserDao;
import com.ssh.entity.User;
import com.ssh.service.UserService;
import org.springframework.beans.factory.annotation.Autowired;
import org.springframework.stereotype.Service;

import java.util.List;

@Service
public class UserServiceImpl implements UserService {

    @Autowired
    private UserDao userDao;

    @Override
    public List<User> findUsers() {
        return userDao.findUsers();
    }

    @Override
    public int saveUser(User entity) {
        entity.setAddress("GZ");
        entity.setUsername("张三");
        entity.setPhone("15674635267");
        return userDao.saveUser(entity);
    }
}
11.success.jsp
<%@ page contentType="text/html;charset=UTF-8" language="java" %>
<html>
<head>
    <title>Title</title>
</head>
<body>
    save user success
</body>
</html>
12.user.jsp
<%@ taglib prefix="c" uri="http://java.sun.com/jsp/jstl/core" %>
<%@ page contentType="text/html;charset=UTF-8" language="java" %>
<html>
<head>
    <title>用户信息</title>
</head>
<body>
    <table>
        <thead>
            <tr>
                <th>ID</th>
                <th>姓名</th>
                <th>地址</th>
                <th>电话号码</th>
            </tr>
        </thead>
        <tbody>
            <c:forEach items="${users}" var="obj">
                <tr>
                    <th>${obj.id}</th>
                    <th>${obj.username}</th>
                    <th>${obj.address}</th>
                    <th>${obj.phone}</th>
                </tr>
            </c:forEach>
        </tbody>
    </table>
</body>
</html>
四.启动tomcat
1.输入http://localhost:8080/user/saveUser结果如下

表中数据增加了一个用户

2.浏览器输入http://localhost:8080/user/getUsers

Spring、SpringMVC、Hibernate整合 ----超详细教程
标签:oca mave str nbsp username star efault css OLE
原文地址:https://www.cnblogs.com/wuwuyong/p/11630316.html