标签:sdn 效果 zone void details mod project import snap
SpringCloud-服务注册与实现-Eureka创建服务注册中心(附源码下载):
https://blog.csdn.net/BADAO_LIUMANG_QIZHI/article/details/102535957
SpringCloud-服务注册与实现-Eureka创建服务提供者(附源码下载):
https://blog.csdn.net/BADAO_LIUMANG_QIZHI/article/details/102558004
在上面已经实现服务注册中心和服务提供者的基础上,再创建服务消费者,即使用上面提供服务的一方。
注:
博客:
https://blog.csdn.net/badao_liumang_qizhi
关注公众号
霸道的程序猿
获取编程相关电子书、教程推送与免费下载。
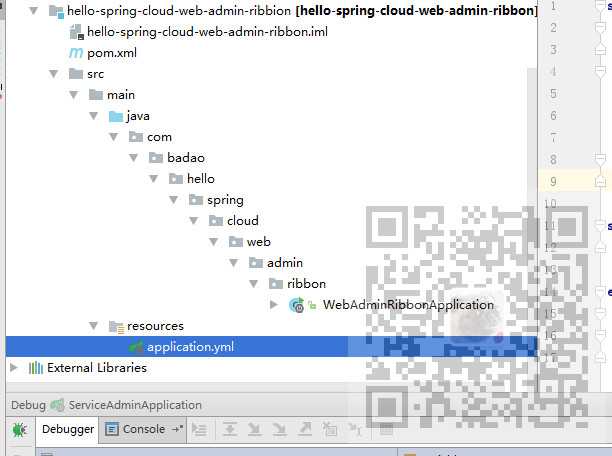
参考上面构建项目的方式,依次建立目录hello-spring-cloud-web-admin-ribbon目录以及在
目录下新建pom.xml,并将其托管。然后新建src/main/java目录和src/main/resources目录并分别进行目录设置。
然后在java下新建包,包下新建启动类,在resources下新建配置文件application.yml。
完成后的目录为:
pom.xml代码:
<?xml version="1.0" encoding="UTF-8"?>
<project xmlns="http://maven.apache.org/POM/4.0.0" xmlns:xsi="http://www.w3.org/2001/XMLSchema-instance"
         xsi:schemaLocation="http://maven.apache.org/POM/4.0.0 http://maven.apache.org/xsd/maven-4.0.0.xsd">
    <modelVersion>4.0.0</modelVersion>

    <parent>
        <groupId>com.badao</groupId>
        <artifactId>hello-spring-cloud-dependencies</artifactId>
        <version>1.0.0-SNAPSHOT</version>
        <relativePath>../hello-spring-cloud-dependencies/pom.xml</relativePath>
    </parent>

    <artifactId>hello-spring-cloud-web-admin-ribbon</artifactId>
    <packaging>jar</packaging>

    <name>hello-spring-cloud-web-admin-ribbon</name>
    <url>https://blog.csdn.net/badao_liumang_qizhi</url>
    <inceptionYear>2019-Now</inceptionYear>

    <dependencies>
        <!-- Spring Boot Begin -->
        <dependency>
            <groupId>org.springframework.boot</groupId>
            <artifactId>spring-boot-starter-web</artifactId>
        </dependency>
        <dependency>
            <groupId>org.springframework.boot</groupId>
            <artifactId>spring-boot-starter-tomcat</artifactId>
        </dependency>
        <dependency>
            <groupId>org.springframework.boot</groupId>
            <artifactId>spring-boot-starter-thymeleaf</artifactId>
        </dependency>
        <dependency>
            <groupId>org.springframework.boot</groupId>
            <artifactId>spring-boot-starter-actuator</artifactId>
        </dependency>
        <dependency>
            <groupId>org.springframework.boot</groupId>
            <artifactId>spring-boot-starter-test</artifactId>
            <scope>test</scope>
        </dependency>
        <!-- Spring Boot End -->

        <!-- Spring Cloud Begin -->
        <dependency>
            <groupId>org.springframework.cloud</groupId>
            <artifactId>spring-cloud-starter-netflix-eureka-server</artifactId>
        </dependency>
        <dependency>
            <groupId>org.springframework.cloud</groupId>
            <artifactId>spring-cloud-starter-netflix-ribbon</artifactId>
        </dependency>
        <!-- Spring Cloud End -->

        <!-- 解决 thymeleaf 模板引擎一定要执行严格的 html5 格式校验问题 -->
        <dependency>
            <groupId>net.sourceforge.nekohtml</groupId>
            <artifactId>nekohtml</artifactId>
        </dependency>
    </dependencies>

    <build>
        <plugins>
            <plugin>
                <groupId>org.springframework.boot</groupId>
                <artifactId>spring-boot-maven-plugin</artifactId>
                <configuration>
                    <mainClass>com.funtl.hello.spring.cloud.web.admin.ribbon.WebAdminRibbonApplication</mainClass>
                </configuration>
            </plugin>
        </plugins>
    </build>
</project>
注:
这里的parent标签要与上面的统一的依赖管理对应起来。
要修改指定的程序入口类为自己相应的路径。
然后应用启动类的代码:
package com.badao.hello.spring.cloud.web.admin.ribbon;

import org.springframework.boot.SpringApplication;
import org.springframework.boot.autoconfigure.SpringBootApplication;
import org.springframework.cloud.client.discovery.EnableDiscoveryClient;

@SpringBootApplication
@EnableDiscoveryClient
public class WebAdminRibbonApplication {
    public static void main(String[] args) {
        SpringApplication.run(WebAdminRibbonApplication.class, args);
    }
}
注:
通过 @EnableDiscoveryClient 注解注册到服务中心
然后是配置文件代码:
spring:
  application:
    name: hello-spring-cloud-web-admin-ribbon
  thymeleaf:
    cache: false
    mode: LEGACYHTML5
    encoding: UTF-8
    servlet:
      content-type: text/html

server:
  port: 8764

eureka:
  client:
    serviceUrl:
      defaultZone: http://localhost:8761/eureka/
注:
1.服务注册与发现是根据上面的name去寻找。
2.port表示端口号。
3.serviceURL设置eureka的地址,与上面创建服务注册中心时的URL对应。
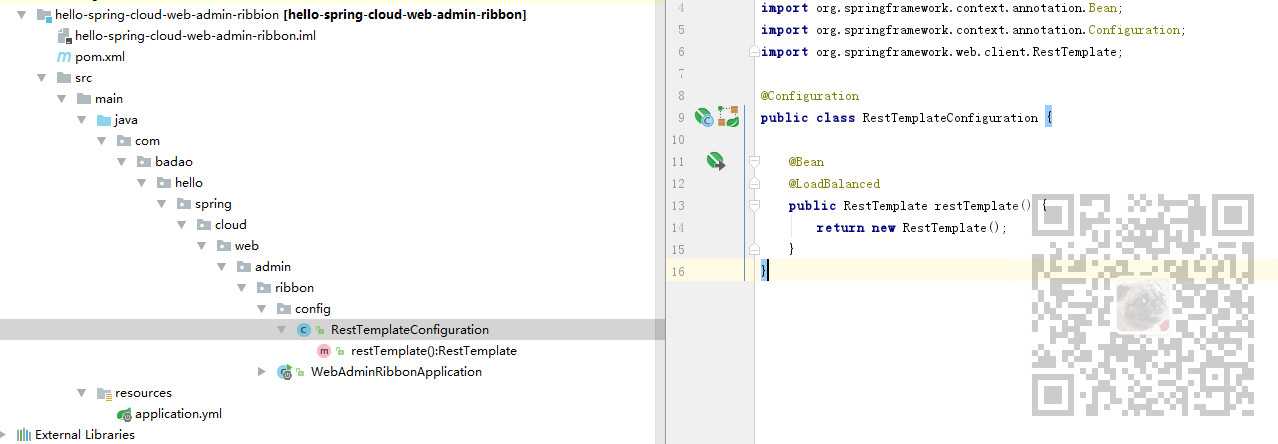
然后新建配置类注入RestTemplte的Bean并通过@LoadBalanced 注解表明开启负载均衡功能。
在包下新建config包并新建RestTemplateConfiguration配置类
package com.badao.hello.spring.cloud.web.admin.ribbon.config;

import org.springframework.cloud.client.loadbalancer.LoadBalanced;
import org.springframework.context.annotation.Bean;
import org.springframework.context.annotation.Configuration;
import org.springframework.web.client.RestTemplate;

@Configuration
public class RestTemplateConfiguration {

    @Bean
    @LoadBalanced
    public RestTemplate restTemplate() {
        return new RestTemplate();
    }
}
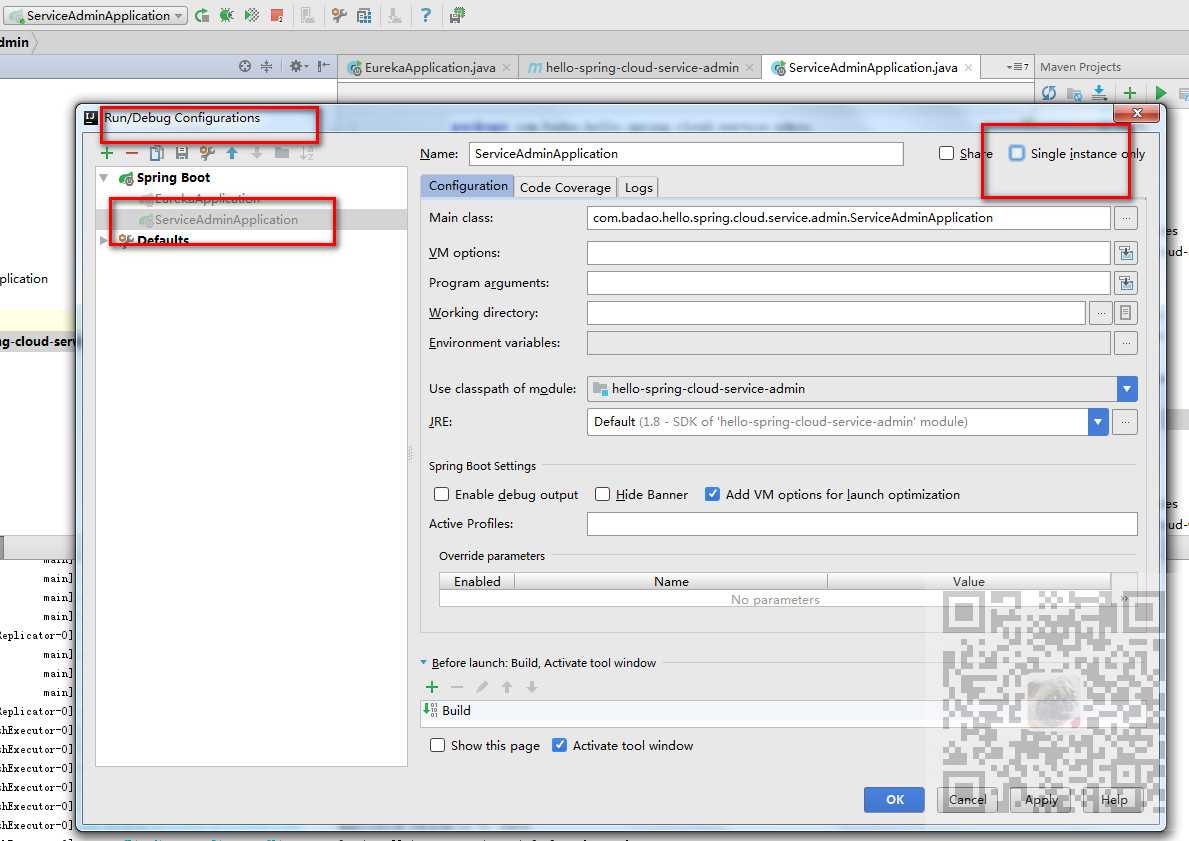
为了体现出负载均衡效果,我们要启动两台service-admin,即启动两个服务提供者。
我们先启动服务注册中心Eureka服务8761端口,再以8762端口启动一个服务提供者,然后点击Run-Edit Configuration,将启动单实例去掉。
然后修改服务提供者的配置文件中端口号为8763,再启动一个服务提供者。
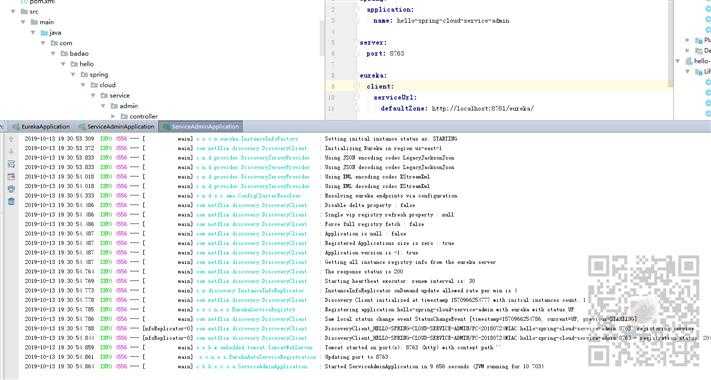
然后我们在Eureka的界面即:http://localhost:8761/刷新就可以看到两个服务提供者。
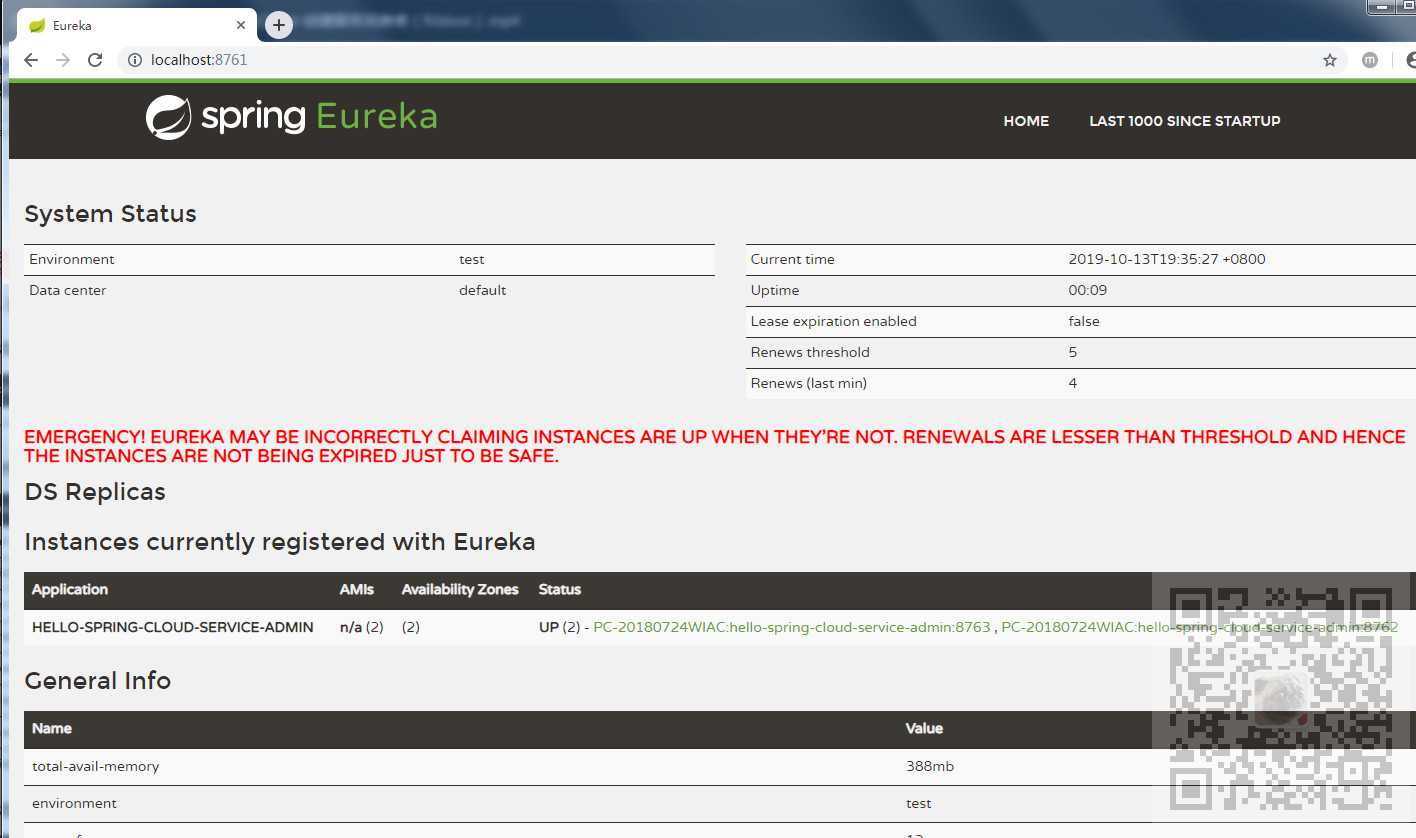
消费者要想实现负载均衡的效果,应该一会访问8762的服务提供者,一会访问8763的服务提供者。
所以我们在服务消费者配置了@LoadBalanced即可实现。
既然是消费服务者,所以要新建调用服务的controller和service
在ribbon包下新建service包,包下新建AdminService
package com.badao.hello.spring.cloud.web.admin.ribbon.service;

import org.springframework.beans.factory.annotation.Autowired;
import org.springframework.stereotype.Service;
import org.springframework.web.client.RestTemplate;

@Service
public class AdminService {

    @Autowired
    private RestTemplate restTemplate;

    public String sayHi(String message) {
        return restTemplate.getForObject("http://HELLO-SPRING-CLOUD-SERVICE-ADMIN/hi?message=" + message, String.class);
    }
}
这里使用的是Ribbon+RestTemlate进行服务的调用,使用RestTeplate的getForObject()方法。其中url参数就是
上面服务提供者的配置文件中的name。
然后再新建controller包,包下新建AdminController
package com.badao.hello.spring.cloud.web.admin.ribbon.controller;

import com.badao.hello.spring.cloud.web.admin.ribbon.service.AdminService;
import org.springframework.beans.factory.annotation.Autowired;
import org.springframework.web.bind.annotation.RequestMapping;
import org.springframework.web.bind.annotation.RequestMethod;
import org.springframework.web.bind.annotation.RequestParam;
import org.springframework.web.bind.annotation.RestController;

@RestController
public class AdminController {

    @Autowired
    private AdminService adminService;

    @RequestMapping(value = "hi", method = RequestMethod.GET)
    public String sayHi(@RequestParam String message) {
        return adminService.sayHi(message);
    }
}
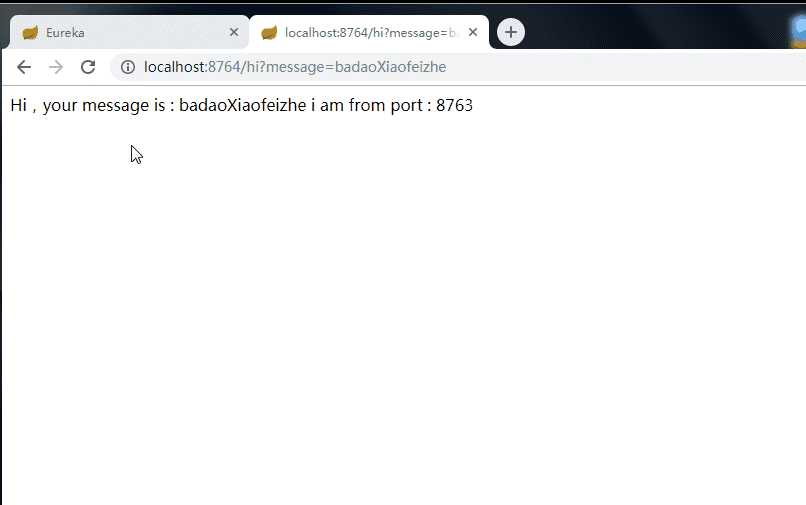
然后运行当前服务消费者的启动程序。
打开浏览器输入:
http://localhost:8764/hi?message=badaoXiaofeizhe
https://download.csdn.net/download/badao_liumang_qizhi/11860102
此时的架构
一个服务注册中心,Eureka Server,端口号为:8761
service-admin 工程运行了两个实例,端口号分别为:8762,8763
web-admin-ribbon 工程端口号为:8764
web-admin-ribbon 通过 RestTemplate 调用 service-admin
接口时因为启用了负载均衡功能故会轮流调用它的 8762 和 8763 端口
SpringCloud-创建服务消费者-Ribbon方式(附代码下载)
标签:sdn 效果 zone void details mod project import snap
原文地址:https://www.cnblogs.com/badaoliumangqizhi/p/11674642.html