标签:shm XML 说明 title 文件 create variable har java
Swagger 是一个规范和完整的框架,用于生成、描述、调用和可视化 RESTful 风格的 Web 服务。总体目标是使客户端和文件系统作为服务器以同样的速度来更新。文件的方法,参数和模型紧密集成到服务器端的代码,允许API来始终保持同步。
     <!--swagger 在线接口生成插件-->
        <dependency>
            <groupId>io.springfox</groupId>
            <artifactId>springfox-swagger2</artifactId>
            <version>2.9.2</version>
        </dependency>
        <dependency>
            <groupId>io.springfox</groupId>
            <artifactId>springfox-swagger-ui</artifactId>
            <version>2.9.2</version>
        </dependency>
        <!-- 解决FluentIterable.class找不到问题 -->
        <dependency>
            <groupId>com.google.guava</groupId>
            <artifactId>guava</artifactId>
            <version>23.0</version>
        </dependency>
        <!-- java8 不需要添加,高版本需要添加 -->
        <dependency>
            <groupId>javax.xml.bind</groupId>
            <artifactId>jaxb-api</artifactId>
            <version>2.3.0</version>
        </dependency>
@Configuration
@EnableSwagger2
public class Swagger2 implements WebMvcConfigurer {

    /**
     * 创建API应用
     * apiInfo() 增加API相关信息
     * 通过select()函数返回一个ApiSelectorBuilder实例,用来控制哪些接口暴露给Swagger来展现,
     * 本例采用指定扫描的包路径来定义指定要建立API的目录。
     *
     * @return
     */
    @Bean
    public Docket createRestApi() {
        return new Docket(DocumentationType.SWAGGER_2)
                .apiInfo(apiInfo())
                .select()
                .apis(RequestHandlerSelectors.withMethodAnnotation(ApiOperation.class))                         //这里采用包含注解的方式来确定要显示的接口
                .paths(PathSelectors.any())
                .build();
    }

    /**
     * 创建该API的基本信息(这些基本信息会展现在文档页面中)
     * 访问地址:http://项目实际地址/swagger-ui.html
     * @return
     */
    private ApiInfo apiInfo() {
        return new ApiInfoBuilder()
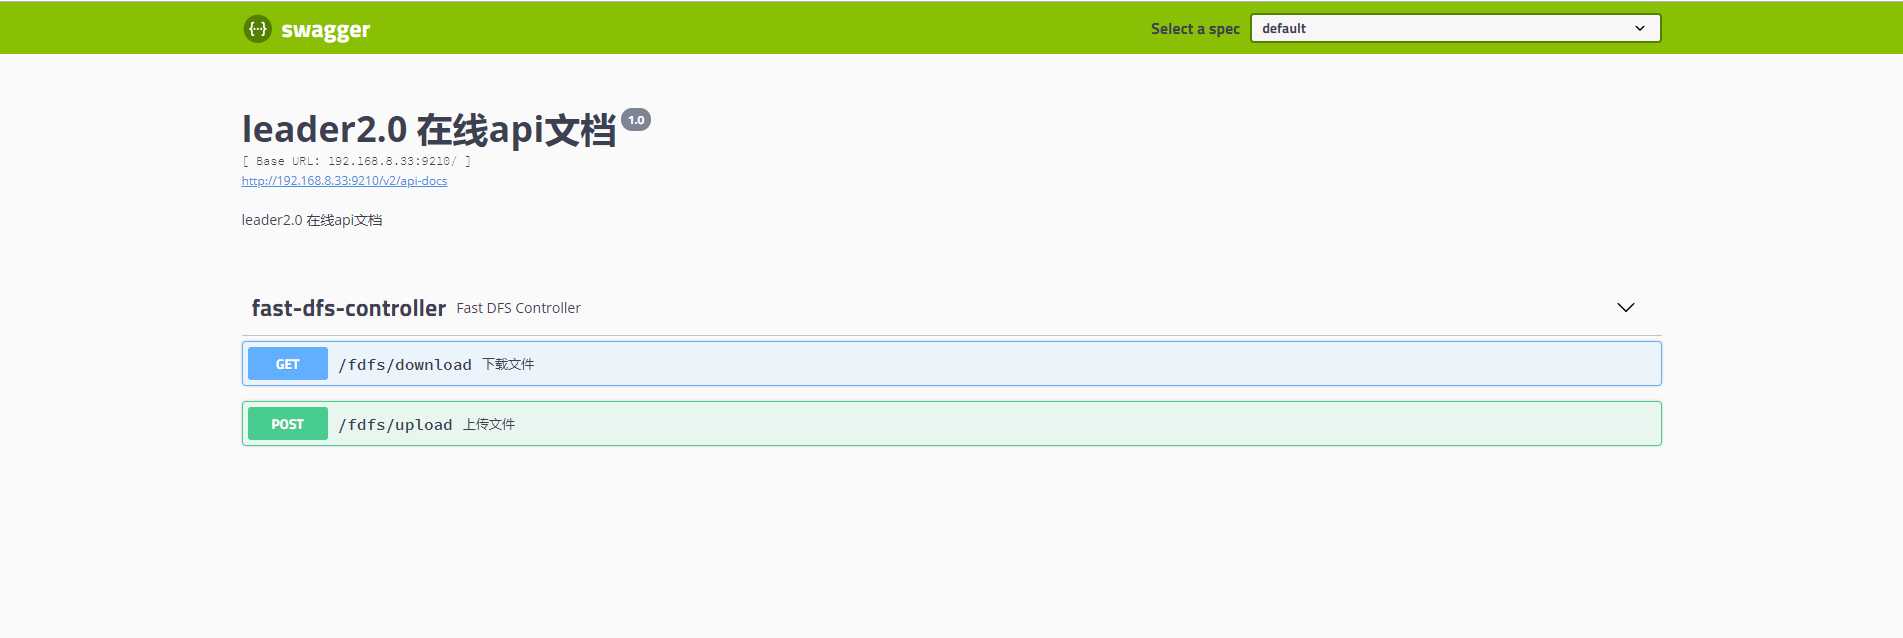
                .title("leader2.0 在线api文档")
                .description("leader2.0 在线api文档")
                .version("1.0")
                .build();
    }

    /**
     * 静态资源配置
     * @return
     */
    @Override
    public void addResourceHandlers(ResourceHandlerRegistry registry) {
        registry.addResourceHandler("/**")
                .addResourceLocations("classpath:/static/");

        registry.addResourceHandler("swagger-ui.html")
                .addResourceLocations("classpath:/META-INF/resources/");

        registry.addResourceHandler("/webjars/**")
                .addResourceLocations("classpath:/META-INF/resources/webjars/");
    }

}
通过createRestApi函数创建Docket的Bean之后,apiInfo()用来创建该Api的基本信息。
启动类中添加 @EnableSwagger2注解,开启swagger;
@SpringBootApplication
@EnableSwagger2
public class Application {

    public static void main(String[] args) {
        new SpringApplicationBuilder(Application.class)
                .run(args);
    }
}
@Api:用在类上,说明该类的作用。
@ApiOperation:注解来给API增加方法说明。
@ApiImplicitParams : 用在方法上包含一组参数说明。
@ApiImplicitParam:用来注解来给方法入参增加说明。
@ApiResponses:用于表示一组响应
@ApiResponse:用在@ApiResponses中,一般用于表达一个错误的响应信息
l code:数字,例如400
l message:信息,例如"请求参数没填好"
l response:抛出异常的类
@ApiModel:描述一个Model的信息(一般用在请求参数无法使用@ApiImplicitParam注解进行描述的时候)
l @ApiModelProperty:描述一个model的属性
注意:@ApiImplicitParam的参数说明:
| paramType:指定参数放在哪个地方 |
header:请求参数放置于Request Header,使用@RequestHeader获取 query:请求参数放置于请求地址,使用@RequestParam获取 path:(用于restful接口)-->请求参数的获取:@PathVariable body:(不常用) form(不常用) |
| name:参数名 | |
| dataType:参数类型 | |
| required:参数是否必须传 | true | false |
| value:说明参数的意思 | |
| defaultValue:参数的默认值 |
@RestController
@RequestMapping("/fdfs")
public class FastDFSController {
    @Autowired
    private FastDFSClient fdfsClient;

    /**
     * 文件上传
     * @param file
     * @return
     * @throws Exception
     */
    @ApiOperation(value = "上传文件", notes = "选择文件上传")
    @ApiImplicitParam(name = "file",paramType= "File",value = "选择上上传的文件",required = true)
    @RequestMapping(value = "/upload",method = RequestMethod.POST,produces = MediaType.APPLICATION_JSON,headers = "content-type=multipart/form-data")
    public Map<String,Object> upload(MultipartFile file) throws Exception{
        Boolean ifsize = CheckFileSize.check(file,10240,"M");
        Map<String,Object> result = new HashMap<>();
        if(ifsize){
            String url = fdfsClient.uploadFile(file);
            result.put("code", 200);
            result.put("msg", "上传成功");
            result.put("filename",file.getOriginalFilename());
            String extname = file.getOriginalFilename().split("\\.")[1];
            result.put("extname",extname);
            if (!"jpg".equals(extname) && !"jpeg".equals(extname) && !"png".equals(extname)){
                result.put("url", url + "?attname=" + file.getOriginalFilename());
            }else {
                result.put("url", url);
            }
        }else {
            result.put("code", 500);
            result.put("msg", "允许上传最大为10G!");
        }
        return result;
    }

    /**
     * 文件下载
     * @param fileUrl  url 开头从组名开始
     * @param response
     * @throws Exception
     */
    @ApiOperation(value = "下载文件", notes = "根据url下载文件")
    @ApiImplicitParams({@ApiImplicitParam(name = "fileUrl",value = "文件路径")})
    @RequestMapping(value = "/download",method = RequestMethod.GET,produces = MediaType.APPLICATION_JSON)
    public void  download(String fileUrl, HttpServletResponse response) throws Exception{

        byte[] data = fdfsClient.download(fileUrl);

        response.setCharacterEncoding("UTF-8");
        response.setHeader("Content-disposition", "attachment;filename=" + URLEncoder.encode("test.7z", "UTF-8"));

        // 写出
        ServletOutputStream outputStream = response.getOutputStream();
        IOUtils.write(data, outputStream);
    }

}
启动springboot后,浏览器 ip:port/swagger-ui.html

【Swagger2】springboot整合swagger2
标签:shm XML 说明 title 文件 create variable har java
原文地址:https://www.cnblogs.com/jxd283465/p/11714003.html