标签:hand expires sof username lnp iap cti 生成 字段
来源:https://www.cnblogs.com/RainingNight/p/cookie-authentication-in-asp-net-core.html
由于HTTP协议是无状态的,但对于认证来说,必然要通过一种机制来保存用户状态,而最常用,也最简单的就是Cookie了,它由浏览器自动保存并在发送请求时自动附加到请求头中。尽管在现代Web应用中,Cookie已略显笨重,但它依然是最为重要的用户身份保存方式。在 上一章 中整体的介绍了一下 ASP.NET Core 中的认证流程,而未提及具体的实现方式,较为抽象,那本章就通过一个完整的示例,以及对其原理的解剖,来详细介绍一下Cookie认证,希望能帮助大家对 ASP.NET Core 认证系统有一个更深入的了解。
目录
我们从零开始,一步一步来创建一个完整的 ASP.NET Core Cookie认证的详细示例。
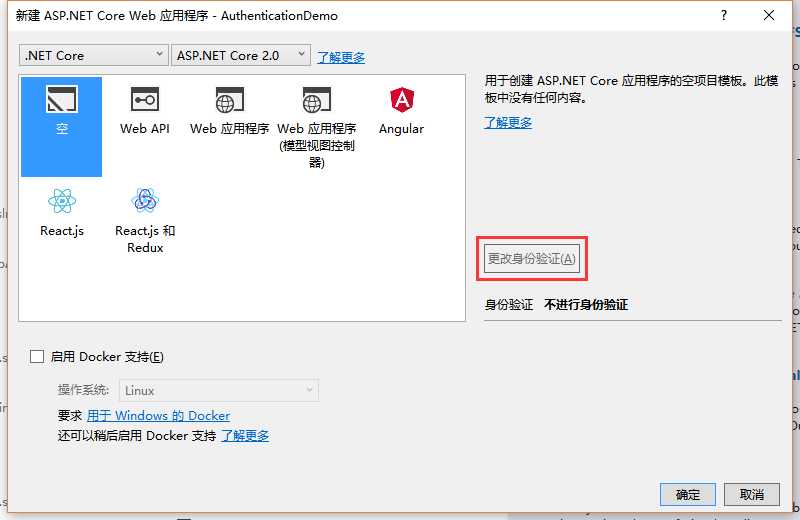
我们首先创建一个空的 .NET Core 2.0 Web 项目:

在创建的空项目中,默认具有如下引用:
<ItemGroup>
    <PackageReference Include="Microsoft.AspNetCore.All" Version="2.0.0" />
</ItemGroup>
Microsoft.AspNetCore.All 是 ASP.NET Core 的全家桶,包含 Mvc, EFCore, Identity, NodeService, AzureAppServe 等等,并集成到了 .NET Core SDK 当中,个人感觉略坑,有违 .NET Core 轻量模块化的理念,虽然使用看似更加方便了,却也让我们变得更加傻瓜化。在本文中为了更好的演示,就移除掉 Microsoft.AspNetCore.All 的引用,然后手动安装需要的Nuget包,当然,你可以不这么做,并略过此小节。
在本章中,会用到以下几个项目中的Nuget包:
HttpSysServer或IISIntegration。Cookies, JwtBearer, OAuth, OpenIdConnect等。我们使用 DotNet CLI 来安装Nuget包:
dotnet add package Microsoft.AspNetCore.Hosting --version 2.0.0
dotnet add package Microsoft.AspNetCore.Server.Kestrel --version 2.0.0
dotnet add package Microsoft.Extensions.Logging.Console --version 2.0.0
dotnet add package Microsoft.AspNetCore.Authentication.Cookies --version 2.0.0由于WebHost.CreateDefaultBuilder包含在Microsoft.AspNetCore.All中,需要对Program做如下修改:
public static IWebHost BuildWebHost(string[] args) =>
        new WebHostBuilder()
        .UseKestrel()
        .UseUrls("http://localhost:5000")
        .UseContentRoot(Directory.GetCurrentDirectory())
        .ConfigureLogging((hostingContext, logging) =>
        {
            logging.AddConsole();
        })
        .UseStartup<Startup>()
.Build();如上,我们使用Kestrel服务器,监听5000端口,并将日志打印到控制台,需要注意的是我们并没有使用UseIISIntegration,因此不支持在IIS下运行,需要使用控制台的方式来运行,修改Properties/launchSettings.json文件:
{
  "profiles": {
    "Console": {
      "commandName": "Project",
      "launchBrowser": false,
      "environmentVariables": {
        "ASPNETCORE_ENVIRONMENT": "Development"
      }
    }
  }
}如上,将IIS的相关配置删除掉,只保留控制台的启动配置,然后在Starup文件的Configure方法中添加如下代码:
public void Configure(IApplicationBuilder app, IHostingEnvironment env)
{
    app.Run(async (context) =>
    {
        await context.Response.WriteAsync("Hello World!");
    });
}最后按下F5,启动程序,在浏览器中访问访问:http://localhost:5000/,输出:
Hello World!在 ASP.NET Core 中,有一个非常重要的依赖注入系统,它贯穿于所有项目中。对于认证系统,同样要先进行注册:
public void ConfigureServices(IServiceCollection services)
{
    services.AddAuthentication(options =>
    {
      options.DefaultScheme = CookieAuthenticationDefaults.AuthenticationScheme;
    })
    .AddCookie(options =>
    {
        // 在这里可以根据需要添加一些Cookie认证相关的配置,在本次示例中使用默认值就可以了。
    });
}如上,我们只配置了DefaultScheme,这样,DefaultSignInScheme, DefaultSignOutScheme, DefaultChallengeScheme, DefaultForbidScheme 等都会使用该 Scheme 作为默认值。
AddCookie 用来注册 CookieAuthenticationHandler,由它来完成身份认证的主要逻辑。
在注册完服务之后,接下来便是注册中间件,在 ASP.NET Core 中都是这个套路:
public void Configure(IApplicationBuilder app)
{
    app.UseAuthentication();
}如上,使用UseAuthentication方法注册了AuthenticationMiddleware中间件,它会负责调用对应的Handler,在上一章中有详细的介绍。
既然是身份认证,那首先要有用户,我们在这里模拟一个用户仓储,用来实现用户登录时的用户名和密码的检查。
定义用户类:
public class User
{
    public int Id { get; set; }

    public string Name { get; set; }

    public string Email { get; set; }

    public string PhoneNumber { get; set; }

    public string Password { get; set; }

    public DateTime Birthday { get; set; }
}
定义用户仓储:
public class UserStore
{
    private static List<User> _users = new List<User>() {
        new User {  Id=1, Name="alice", Password="alice", Email="alice@gmail.com", PhoneNumber="18800000001" },
        new User {  Id=1, Name="bob", Password="bob", Email="bob@gmail.com", PhoneNumber="18800000002" }
    };

    public User FindUser(string userName, string password)
    {
        return _users.FirstOrDefault(_ => _.Name == userName && _.Password == password);
    }
}将UserStore注册到DI系统中:
public void ConfigureServices(IServiceCollection services)
{
  ...

  services.AddSingleton<UserStore>();
}
由于我们并没有使用MVC,而使用字符串拼接的形式返回HTML较为费劲,在这里定义几个生成HTML的扩展方法:
public static class HttpResponseExtensions
{
    public static async Task WriteHtmlAsync(this HttpResponse response, Func<HttpResponse, Task> writeContent)
    {
        var bootstrap = "<link rel=\"stylesheet\" href=\"https://cdn.bootcss.com/bootstrap/3.3.7/css/bootstrap.min.css\" integrity=\"sha384-BVYiiSIFeK1dGmJRAkycuHAHRg32OmUcww7on3RYdg4Va+PmSTsz/K68vbdEjh4u\" crossorigin=\"anonymous\">";
        response.ContentType = "text/html";
        await response.WriteAsync($"<!DOCTYPE html><html lang=\"zh-CN\"><head><meta charset=\"UTF-8\">{bootstrap}</head><body><div class=\"container\">");
        await writeContent(response);
        await response.WriteAsync("</div></body></html>");
    }
    public static async Task WriteTableHeader(this HttpResponse response, IEnumerable<string> columns, IEnumerable<IEnumerable<string>> data)
    {
        await response.WriteAsync("<table class=\"table table-condensed\">");
        await response.WriteAsync("<tr>");
        foreach (var column in columns)
        {
            await response.WriteAsync($"<th>{HtmlEncode(column)}</th>");
        }
        await response.WriteAsync("</tr>");
        foreach (var row in data)
        {
            await response.WriteAsync("<tr>");
            foreach (var column in row)
            {
                await response.WriteAsync($"<td>{HtmlEncode(column)}</td>");
            }
            await response.WriteAsync("</tr>");
        }
        await response.WriteAsync("</table>");
    }
    public static string HtmlEncode(string content) =>
        string.IsNullOrEmpty(content) ? string.Empty : HtmlEncoder.Default.Encode(content);
}接下来,便可以在我们的应用程序中愉快的使用认证系统了。在本文中只是最简单的演示,便不使用MVC了,而是在Configure中通过中间件的形式来实现。
首先,我们定义一个登录的页面以及登录成功后身体令牌的发放:
app.Map("/Account/Login", builder => builder.Run(async context =>
{
    if (context.Request.Method == "GET")
    {
        await context.Response.WriteHtmlAsync(async res =>
        {
            await res.WriteAsync($"<form method=\"post\">");
            await res.WriteAsync($"<input type=\"hidden\" name=\"returnUrl\" value=\"{HttpResponseExtensions.HtmlEncode(context.Request.Query["ReturnUrl"])}\"/>");
            await res.WriteAsync($"<div class=\"form-group\"><label>用户名:<input type=\"text\" name=\"userName\" class=\"form-control\"></label></div>");
            await res.WriteAsync($"<div class=\"form-group\"><label>密码:<input type=\"password\" name=\"password\" class=\"form-control\"></label></div>");
            await res.WriteAsync($"<button type=\"submit\" class=\"btn btn-default\">登录</button>");
            await res.WriteAsync($"</form>");
        });
    }
    else
    {
        var userStore = context.RequestServices.GetService<UserStore>();
        var user = userStore.FindUser(context.Request.Form["userName"], context.Request.Form["password"]);
        if (user == null)
        {
            await context.Response.WriteHtmlAsync(async res =>
            {
                await res.WriteAsync($"<h1>用户名或密码错误。</h1>");
                await res.WriteAsync("<a class=\"btn btn-default\" href=\"/Account/Login\">返回</a>");
            });
        }
        else
        {
            var claimIdentity = new ClaimsIdentity("Cookie");
            claimIdentity.AddClaim(new Claim(ClaimTypes.NameIdentifier, user.Id.ToString()));
            claimIdentity.AddClaim(new Claim(ClaimTypes.Name, user.Name));
            claimIdentity.AddClaim(new Claim(ClaimTypes.Email, user.Email));
            claimIdentity.AddClaim(new Claim(ClaimTypes.MobilePhone, user.PhoneNumber));
            claimIdentity.AddClaim(new Claim(ClaimTypes.DateOfBirth, user.Birthday.ToString()));

            var claimsPrincipal = new ClaimsPrincipal(claimIdentity);
            // 在上面注册AddAuthentication时,指定了默认的Scheme,在这里便可以不再指定Scheme。
            await context.SignInAsync(claimsPrincipal);
            if (string.IsNullOrEmpty(context.Request.Form["ReturnUrl"])) context.Response.Redirect("/");
            else context.Response.Redirect(context.Request.Form["ReturnUrl"]);
        }
    }
}));
如上,我们在Get请求中返回登录页面,在Post请求中验证用户名密码,匹配成功后,创建用户Claim, ClaimsIdentity, ClaimsPrincipal 最终通过SignInAsync方法将用户身份写入到响应Cookie中,完成身份令牌的发放。
我们在登录中间件后面添加一个自定义的授权中间件,用来禁用匿名用户的访问:
app.UseAuthorize();UseAuthorize的实现很简单,就是判断用户是否已通过认证,并跳过对首页的验证:
public static IApplicationBuilder UseAuthorize(this IApplicationBuilder app)
{
    return app.Use(async (context, next) =>
    {
        if (context.Request.Path == "/")
        {
            await next();
        }
        else
        {
            var user = context.User;
            if (user?.Identity?.IsAuthenticated ?? false)
            {
                await next();
            }
            else
            {
                await context.ChallengeAsync();
            }
        }
    });
}其实上面的实现和我们在MVC5中常用的[Authorize]特性非常相似。
再定义一个认证后才能访问的页面,并把当前登录用户的信息展示出来:
app.Map("/profile", builder => builder.Run(async context =>
{
    await context.Response.WriteHtmlAsync(async res =>
    {
        await res.WriteAsync($"<h1>你好,当前登录用户: {HttpResponseExtensions.HtmlEncode(context.User.Identity.Name)}</h1>");
        await res.WriteAsync("<a class=\"btn btn-default\" href=\"/Account/Logout\">退出</a>");
        await res.WriteAsync($"<h2>AuthenticationType:{context.User.Identity.AuthenticationType}</h2>");

        await res.WriteAsync("<h2>Claims:</h2>");
        await res.WriteTableHeader(new string[] { "Claim Type", "Value" },
            context.User.Claims.Select(c => new string[] { c.Type, c.Value }));
    });
}));退出则直接调用SignOutAsync方法即可:
app.Map("/Account/Logout", builder => builder.Run(async context =>
{
    await context.SignOutAsync();
    context.Response.Redirect("/");
}));最后,添加一个简单的首页,方便测试:
app.Run(async context =>
{
    await context.Response.WriteHtmlAsync(async res =>
    {
        await res.WriteAsync($"<h2>Hello Cookie Authentication</h2>");
        await res.WriteAsync("<a class=\"btn btn-default\" href=\"/profile\">我的信息</a>");
    });
});在浏览器中打开http://localhost:5000/,显示 "Hello Cookie Authentication",点击 “我的信息” 按钮:
请求:
GET http://localhost:5000/profile HTTP/1.1
Host: localhost:5000

响应:
HTTP/1.1 302 Found
Location: http://localhost:5000/Account/Login?ReturnUrl=%2Fprofile因为我们没有登录,会在授权中间件中会执行context.ChallengeAsync();方法,最终会跳转到登录页面,然后输入用户名密码(alice/alice),登录成功:
请求:
POST http://localhost:5000/Account/Login?ReturnUrl=%2Fprofile HTTP/1.1
Host: localhost:5000
Content-Type: application/x-www-form-urlencoded

returnUrl=%2Fprofile&userName=alice&password=alice

响应:
HTTP/1.1 302 Found
Location: /profile
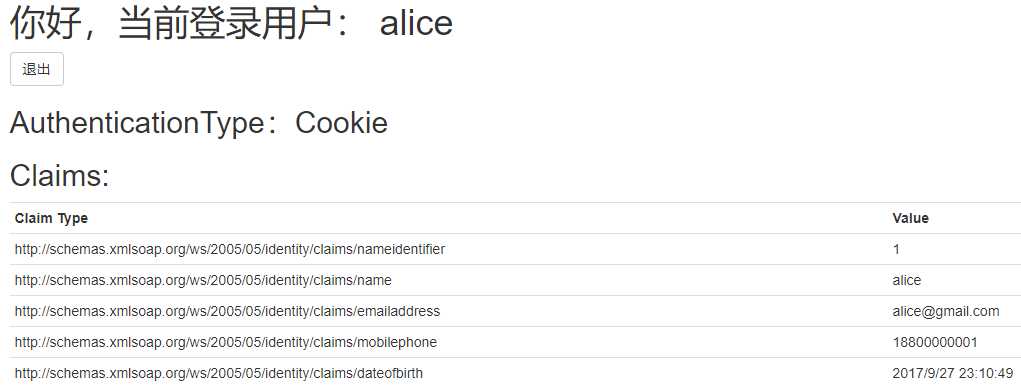
Set-Cookie: .AspNetCore.Cookies=CfDJ8B4XRZETkRhMt3mT9VduB8KTzFhbcuszdNDXZpaQI3zSOcOD8uAzjr-iHzNCPVgXrKqxfK-MrP5d5r9X1zfKOgg2_j54t0ccAQ5nshSmXnRvjIZ6id3GD5fDP9v2x1iV0JE7X9IdoA458DZjx6qm6971GeY5HYVnT7odwgQR8eRaHo0-Wacmt95QuC9IVSapqsShHOeu5ZowFmDAPXrlUHOSwBPAjiLkf8mNbu8U4ZcWFlaBXC9-H-2_ts5wyi-90zw6jGxX3o7tRiQB4qq8IDmIJbZtN4Nl8TKHHcTbyFl5Z__MrgrjJ7s4cGdnIoDJWB9ENw1IGRgF3Rib8KmhkwhlUyO2VMnuVI8vSP2PcwrkUGtudJwHMHrA8cuS021xpmIhkhgW3e82r_0_jxAh1nqG4zwTP5i8iLU6FsOLLWatveSWB441Ntqw-L-pYczsBAYFRT0Hh56ofUAxGd7aaGtDx0jvuuxW5gK245Pf0TKG-4G46yDwLrFtjNcN_GREbpwtHAz-I7XqiDZgS3nbzjik5s05NxB7d6X3aOFc5JHCwFxW-i-xW-ToJLZrp3Jo8W0bAxVwxZIW2PwZlVtyeYSkqByFRaDS4qcBywE2Bmar_TyJm9UpVWaL2s9KxpU_DHN6meYne5E5dH4-k1DoABl6FyNPn6xYfMWxzu0_7ZFhVJjCycScy1jggCv4Hk5nkltj9A3QrFpNb_HCk21Uek9g-7Zi150EKfDzhGjMto5_hbWcmQtUsHuLbZlnYTHXZ-7zELZOepAUts2ZGoUnEaI; path=/; samesite=lax; httponly可以看到,响应报文在Cookie中附加了身份令牌,并会跳转到之前未登录时访问的页面/profile,跳转后显示如下:

如上,因为浏览器会自动附带上刚才写入的Cookie,所以授权通过,并展示出我们在登录时设置的Claim。
最后,点击 “退出” ,响应报文中会将Cookie设置为空(清除Cookie):
请求:
GET http://localhost:5000/Account/Logout HTTP/1.1
Host: localhost:5000

响应:
HTTP/1.1 302 Found
Location: /
Set-Cookie: .AspNetCore.Cookies=; expires=Thu, 01 Jan 1970 00:00:00 GMT; path=/; samesite=lax在上面的演示中,我们可以看到Cookie中的值非常的长,而我们设置的Claim并不多,这是因为微软内置的ClaimTypes都是一大串的ULR地址。而对于 ASP.NET Core 本身来说,它并不关心你使用的ClaimType是什么,只要你读取与保存时使用的ClaimType保持一致就没有问题。我们可以使用简短的字符串name来代替ClaimTypes.Name,但是推荐的做法是直接使用JwtClaimTypes,因为它够简短而且通用。
首先添加ClaimTypes的Package引用:
dotnet add package IdentityModel --version 2.12.0然后,将之前的添加Claim的代码修改如下:
var claimIdentity = new ClaimsIdentity("Cookie", JwtClaimTypes.Name, JwtClaimTypes.Role);
claimIdentity.AddClaim(new Claim(JwtClaimTypes.Id, user.Id.ToString()));
claimIdentity.AddClaim(new Claim(JwtClaimTypes.Name, user.Name));
claimIdentity.AddClaim(new Claim(JwtClaimTypes.Email, user.Email));
claimIdentity.AddClaim(new Claim(JwtClaimTypes.PhoneNumber, user.PhoneNumber));
claimIdentity.AddClaim(new Claim(JwtClaimTypes.BirthDate, user.Birthday.ToString()));需要注意的是在创建ClaimsIdentity时需要手动指定它的NameType和RoleType,否则它将会使用默认的ClaimTypes.Name和ClaimTypes.Role,这样会导致我们从ClaimsPrincipal中获取Identity.Name属性和执行IsInRole检查时失败。
运行,重新登录,看看效果如何:
请求:
POST http://localhost:5000/Account/Login?ReturnUrl=%2Fprofile HTTP/1.1
Host: localhost:5000
Content-Type: application/x-www-form-urlencoded

returnUrl=%2Fprofile&userName=alice&password=alice

响应:
HTTP/1.1 302 Found
Date: Sun, 24 Sep 2017 06:04:28 GMT
Location: /profile
Set-Cookie: .AspNetCore.Cookies=CfDJ8B4XRZETkRhMt3mT9VduB8JV9NE2zJ9YVQmTpAU3E9Op9rQHvJ7WvdcrarbTGWE7c_e2aLpoZCdDJ7-0fTFZGUwuLVMC0vD_eeE9ct2Vj7gHCPCVeK3qQPsQ2lNmKvPwPf82-CURFXGgFC1y-N17tXdT7RoZhLHskIHx7qNcxeicS7wiSDhQD3l3mgOgq0bdjWJTk3LnpHk8zS0fDhKp6Vd6vFvCyzzRJu1ax5Y27Bg3dZp4Zsa3I9HAp5wXmyp51de8scS25nyaV0FEd1YUWgC1LsuwOODrSPqMkokv7XQXQc8W212O2dHbuuJ1xYEr1i5_Gl1syIX3ZuPj1_wqcnAKu5keY0ZVJz45iGYIRC09hd4n8j1SEA8dDlhbslCtyZ6xMt6MdRFv1D7fhbt_g4RGDk7ZkjpnT6z9q3dTWNzkS3gSd9AekBNbUNw9ojZmTWoCFhZgxz-6Wwtcp9z7vIo; path=/; samesite=lax; httponly
是不是短了很多?好吧,其实感觉还是有点长,没关系,下面再介绍一种更加彻底的优化方式。
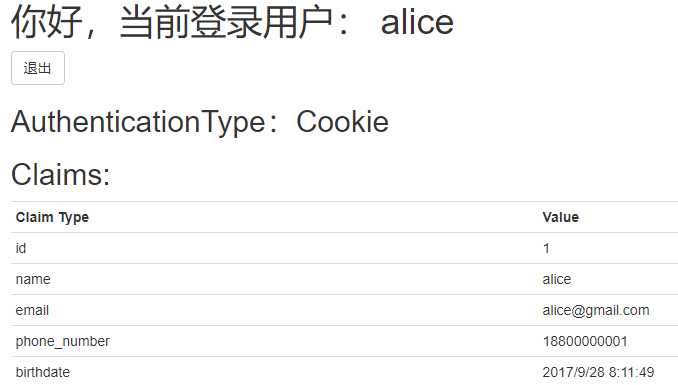
而最终页面上展示的Claims信息如下:

终极的解决方案就是参考Session的原理,把Claims信息则保存在服务端,并为其设置一个ID,Cookie中则只保存该ID,这样就可以在服务端通过该ID来检索出完整的Claims信息。不过注意,这并不是在使用 ASP.NET Core 中的Session,只是参考其存储方式。
那么怎么做呢?在前面注册Cookie认证时,使用的AddCookie方法中,其CookieAuthenticationOptions参数还可以设置一个ITicketStore类型的SessionStore属性,我们可以通过实现该接口来自定义Cookie的存取方式,在这里,使用本地缓存来实现:
首先添加Microsoft.Extensions.Caching.Memory的Package引用:
dotnet add package Microsoft.Extensions.Caching.Memory --version 2.0.0然后,定义MemoryCacheTicketStore类:
public class MemoryCacheTicketStore : ITicketStore
{
    private const string KeyPrefix = "CSS-";
    private IMemoryCache _cache;

    public MemoryCacheTicketStore()
    {
        _cache = new MemoryCache(new MemoryCacheOptions());
    }

    public async Task<string> StoreAsync(AuthenticationTicket ticket)
    {
        var key = KeyPrefix + Guid.NewGuid().ToString("N");
        await RenewAsync(key, ticket);
        return key;
    }

    public Task RenewAsync(string key, AuthenticationTicket ticket)
    {
        var options = new MemoryCacheEntryOptions();
        var expiresUtc = ticket.Properties.ExpiresUtc;
        if (expiresUtc.HasValue)
        {
            options.SetAbsoluteExpiration(expiresUtc.Value);
        }
        options.SetSlidingExpiration(TimeSpan.FromHours(1));
        _cache.Set(key, ticket, options);
        return Task.FromResult(0);
    }

    public Task<AuthenticationTicket> RetrieveAsync(string key)
    {
        _cache.TryGetValue(key, out AuthenticationTicket ticket);
        return Task.FromResult(ticket);
    }

    public Task RemoveAsync(string key)
    {
        _cache.Remove(key);
        return Task.FromResult(0);
    }
}将MemoryCacheTicketStore配置到CookieAuthenticationOptions中:
.AddCookie(options =>
{
    options.SessionStore = new MemoryCacheTicketStore();
});
再次重新登录,响应如下:
HTTP/1.1 302 Found
Location: /profile
Set-Cookie: .AspNetCore.Cookies=CfDJ8B4XRZETkRhMt3mT9VduB8JOI85seEY347RswRzSiL_BQlJTb4JeFqpJzXNW8xOH1CwUKjwsx4CJWyMV5Wwq61IV0Kz4If0LmmJpEicZi2uxmyE2jcCXw_IRaPOaP0eJYM-DkpsjlA_Qu9knFxrpGQaI_BuRbUbbVhy62V5vjwMzoSewmQiPblS1PbPiqXfjAGmF_ZaSM40kwNOboAP_SMoJjX0AtEzmsUqECWFPZLxLoOJJ10Kz16cnSjtxha_KXY7i8f95jVbnX3cj79-GQ5iXnRePBBR_2LsXI5eDW_6E; path=/; samesite=lax; httponly
这样,Cookie中的值就非常简短了(由于其还包含AuthenticationProperties序列化后的值,并没有想象中的短),并且Cookie中的值不会再随着我们设置的Claims的增加而变长,在分布式环境下则可以使用分布式缓存来保存。
对于认证系统,身份令牌都会有一个有效期的概念,而Cookie认证中默认有效期是14天,因此只要浏览器没有清除Cookie,并且Cookie没有过期,便么就一直可以验证通过。但是,如果用户修改了密码,我们希望该Cookie失效,或者是用户更新了Claims的信息时,我们希望重新生成Cookie,否则我们取到的还是旧的Claims信息。那么,该怎么做呢?
对此,网上比较流行的做法是在用户数据库中添加一个安全字段,当用户修改了一些安全性信息时,便更新该字段,并在Claim中加入此字段,一起写入到Cookie中,验证时便可以判断该字段是否与数据库一致,若不一致则验证失败或重新生成:
public static class LastChangedValidator
{
    public static async Task ValidateAsync(CookieValidatePrincipalContext context)
    {
        var userRepository = context.HttpContext.RequestServices.GetRequiredService<IUserRepository>();
        var userPrincipal = context.Principal;
        string lastChanged = (from c in userPrincipal.Claims where c.Type == "LastUpdated" select c.Value).FirstOrDefault();
        if (string.IsNullOrEmpty(lastChanged) || !userRepository.ValidateLastChanged(userPrincipal, lastChanged))
        {
            // 1. 验证失败 等同于 Principal = principal;
            context.RejectPrincipal();

            // 2. 验证通过,并会重新生成Cookie。
            context.ShouldRenew = true;
        }
    }
}
如上,1 和 2 两种方式,我们可以根据实际情况选择一种,而不应该同时存在。
在Cookie认证的配置中,提供了一系列的事件,其中便有一个OnValidatePrincipal事件,用来附加服务端的验证逻辑:
.AddCookie(options =>
{
    options.Events = new CookieAuthenticationEvents
    {
        OnValidatePrincipal = LastChangedValidator.ValidateAsync
    };
});
如上,便完成了该事件的注册,不过该验证通常会查询数据库,损耗较大,可以通过设置验证周期来提高性能,如:每5分钟执行验证一次(在MVC5中是有该配置的,Core中暂未发现)。
对于Cookie来说,默认的过期时间为Session,即关闭浏览器后就清除。通常在用户登录时会提供一个记住我的选项,用来保证在关闭浏览时不清除Cookie。而在SignInAsync方法中,还接收一个AuthenticationProperties类型的参数,可以用来指定Cookie是否持久化以及过期时间:
await HttpContext.SignInAsync("MyCookieAuthenticationScheme", principal, new AuthenticationProperties
{
    // 持久保存
    IsPersistent = true

    // 指定过期时间
    ExpiresUtc = DateTime.UtcNow.AddMinutes(20)
});看一下CookieAuthenticationHandler中SignInAsync方法关于该配置的实现:
if (!signInContext.Properties.ExpiresUtc.HasValue)
{
    signInContext.Properties.ExpiresUtc = issuedUtc.Add(Options.ExpireTimeSpan);
}
if (signInContext.Properties.IsPersistent)
{
    var expiresUtc = signInContext.Properties.ExpiresUtc ?? issuedUtc.Add(Options.ExpireTimeSpan);
    signInContext.CookieOptions.Expires = expiresUtc.ToUniversalTime();
}只有在IsPersistent为True时,才会在写入Cookie指定Expires。需要注意的是浏览器中的Cookie过期时间仅仅是用来指定浏览器是否删除Cookie,而在Cookie存储的值中,也会包含该Cookie认证的发布时间和过期时间等,并在HandleAuthenticateAsync方法中对会其进行验证,并不是说只要你有Cookie就能验证通过。
AddCookie已多次用过,无需多说,直接看源码:
public static AuthenticationBuilder AddCookie(this AuthenticationBuilder builder)
    => builder.AddCookie(CookieAuthenticationDefaults.AuthenticationScheme, null, null);

public static AuthenticationBuilder AddCookie(this AuthenticationBuilder builder, string authenticationScheme, string displayName, Action<CookieAuthenticationOptions> configureOptions)
{
    builder.Services.TryAddEnumerable(ServiceDescriptor.Singleton<IPostConfigureOptions<CookieAuthenticationOptions>, PostConfigureCookieAuthenticationOptions>());
    return builder.AddScheme<CookieAuthenticationOptions, CookieAuthenticationHandler>(authenticationScheme, displayName, configureOptions);
}其实现非常简单,首先注册了Cookie认证的配置项CookieAuthenticationOptions,而authenticationScheme参数用来指定当前认证的唯一的标识,不能重复。通常,使用默认的CookieAuthenticationDefaults.AuthenticationScheme就可以了,但是当我们同时使用多个Cookie认证方式时,需要手动为他们指定不同的Scheme。
最后,直接调用上一章中介绍的AddScheme,完成对CookieAuthenticationHandler的注册。
CookieAuthenticationOptions是针对Cookie认证的各种配置,如重定向地址,认证阶段事件的注册,Cookie名,过期时间等等,首先看一下它的定义:
public class CookieAuthenticationOptions : AuthenticationSchemeOptions
{
    private CookieBuilder _cookieBuilder = new RequestPathBaseCookieBuilder
    {
        SameSite = SameSiteMode.Lax,
        HttpOnly = true,
        SecurePolicy = CookieSecurePolicy.SameAsRequest,
    };
    public CookieAuthenticationOptions()
    {
        ExpireTimeSpan = TimeSpan.FromDays(14);
        ReturnUrlParameter = CookieAuthenticationDefaults.ReturnUrlParameter;
        SlidingExpiration = true;
        Events = new CookieAuthenticationEvents();
    }
    public CookieBuilder Cookie
    {
        get => _cookieBuilder;
        set => _cookieBuilder = value ?? throw new ArgumentNullException(nameof(value));
    }
    public new CookieAuthenticationEvents Events
    {
        get => (CookieAuthenticationEvents)base.Events;
        set => base.Events = value;
    }
    public ITicketStore SessionStore { get; set; }
    // 当用户未登录时,重定向到该路径,默认:/Account/Login
    public PathString LoginPath { get; set; }
    // 指定登出的路径,默认:/Account/Logout
    public PathString LogoutPath { get; set; }
    // 当用户无权访问时,重定向到该路径,默认:/Account/AccessDenied
    public PathString AccessDeniedPath { get; set; }
    // 返回地址参数名,默认:ReturnUrl
    public string ReturnUrlParameter { get; set; }
    // 指定Cookie的过期时间
    public TimeSpan ExpireTimeSpan { get; set; }
    // 当Cookie过期时间已达一半时,是否重置为ExpireTimeSpan
    public bool SlidingExpiration { get; set; }
    // 用来将Cookie写入到浏览器或删除
    public ICookieManager CookieManager { get; set; }
    public IDataProtectionProvider DataProtectionProvider { get; set; }
    public ISecureDataFormat<AuthenticationTicket> TicketDataFormat { get; set; }
}在 ASP.NET Core 2.0 中对针对Cookie的配置集中放到CookieBuilder类型当中,相比之前更加清晰:
public class CookieBuilder : object
{
    public virtual string Name { get; set; }
    public virtual string Path { get; set; }
    public virtual string Domain { get; set; }
    public virtual bool HttpOnly { get; set; }
    public virtual SameSiteMode SameSite { get; set; }
    public virtual CookieSecurePolicy SecurePolicy { get; set; }
    public virtual TimeSpan? Expiration { get; set; }
    public virtual TimeSpan? MaxAge { get; set; }
    public CookieOptions Build(HttpContext context);
}
都是一些针对Cookie配置的标准用法,无需多说。
CookieAuthenticationEvents为我们提供了在Cookie认证的各个阶段(如,登录前后,退出前后,重定向等)注册事件的机会,以便我们拦截一些默认行为,来自定义处理逻辑。
public class CookieAuthenticationEvents
{
    public virtual Task ValidatePrincipal(CookieValidatePrincipalContext context) => OnValidatePrincipal(context);
    public virtual Task SigningIn(CookieSigningInContext context) => OnSigningIn(context);
    public virtual Task SignedIn(CookieSignedInContext context) => OnSignedIn(context);
    public virtual Task SigningOut(CookieSigningOutContext context) => OnSigningOut(context);
    public virtual Task RedirectToLogout(RedirectContext<CookieAuthenticationOptions> context) => OnRedirectToLogout(context);
    public virtual Task RedirectToLogin(RedirectContext<CookieAuthenticationOptions> context) => OnRedirectToLogin(context);
    public virtual Task RedirectToReturnUrl(RedirectContext<CookieAuthenticationOptions> context) => OnRedirectToReturnUrl(context);
    public virtual Task RedirectToAccessDenied(RedirectContext<CookieAuthenticationOptions> context) => OnRedirectToAccessDenied(context);
}
每一个事件都有它的默认实现,这里就不再多说,我们可以根据实际情况进行注册。
CookieAuthenticationHandler便是Cookie认证的具体实现:
public class CookieAuthenticationHandler : AuthenticationHandler<CookieAuthenticationOptions>, IAuthenticationSignInHandler, IAuthenticationSignOutHandler
{
    ...

    protected override async Task<AuthenticateResult> HandleAuthenticateAsync()
    {
        var result = await EnsureCookieTicket();
        if (!result.Succeeded)
        {
            return result;
        }
        var context = new CookieValidatePrincipalContext(Context, Scheme, Options, result.Ticket);

        // 执行前而介绍的服务端验证
        await Events.ValidatePrincipal(context);

        if (context.ShouldRenew)
        {
            // 重新生成Cookie
            RequestRefresh(result.Ticket);
        }
        return AuthenticateResult.Success(new AuthenticationTicket(context.Principal, context.Properties, Scheme.Name));
    }

    public async virtual Task SignInAsync(ClaimsPrincipal user, AuthenticationProperties properties)
    {
        ...

        var ticket = new AuthenticationTicket(signInContext.Principal, signInContext.Properties, signInContext.Scheme.Name);

        ....

        var cookieValue = Options.TicketDataFormat.Protect(ticket, GetTlsTokenBinding());
        Options.CookieManager.AppendResponseCookie(Context, Options.Cookie.Name, cookieValue, signInContext.CookieOptions);
        var signedInContext = new CookieSignedInContext(Context, Scheme, signInContext.Principal, signInContext.Properties, Options);
        await Events.SignedIn(signedInContext);
        var shouldRedirect = Options.LoginPath.HasValue && OriginalPath == Options.LoginPath;
        await ApplyHeaders(shouldRedirect, signedInContext.Properties);
        Logger.SignedIn(Scheme.Name);
    }
}其核心方法HandleAuthenticateAsync会检查请求Cookie,查找与CookieBuilder.Name对应的Cookie值,解密反序列化成AuthenticationTicket对象,最后在上一章介绍的AuthenticationMiddleware中间件中将Principal赋予给HttpContext。
而CookieAuthenticationHandler还实现了IAuthenticationSignInHandler和IAuthenticationSignOutHandler,这也是ASP.NET Core中内置的唯一支持登录和退出的认证方式。在SignInAsync方法中使用ClaimsPrincipal来创建一个AuthenticationTicket对象,然后将其加密,写入到Cookie中,便完成了登录(身份令牌的发放),而SignOutAsync方法则只是简单的删除Cookie。
篇幅有限,就不再多说,感兴趣的可以去看一下完整代码:CookieAuthenticationHandler。
Cookie认证是一种本地认证方式,也是最为简单,最为常用的认证方式。其认证逻辑也很简单,总结一下就是获取请求中指定的Cookie,解密成功后,反序列生成 AuthenticationTicket 对象,并进行一系列的验证,而登录方法与之对应:根据用户信息创建 AuthenticationTicket 对象,并加密后序列化,写入到Cookie中。在下一章中,就来介绍一下最为流行的远程认证方式:OAuth 和 OpenID Connect。
最后附上本文中的示例代码:https://github.com/RainingNight/AspNetCoreSample/tree/master/src/Functional/Authentication/CookieSample。
ASP.NET Core 认证与授权[2]:Cookie认证
标签:hand expires sof username lnp iap cti 生成 字段
原文地址:https://www.cnblogs.com/frank0812/p/11731529.html