标签:oid password red out rop 空间 解决 pos path
Spring配置文件
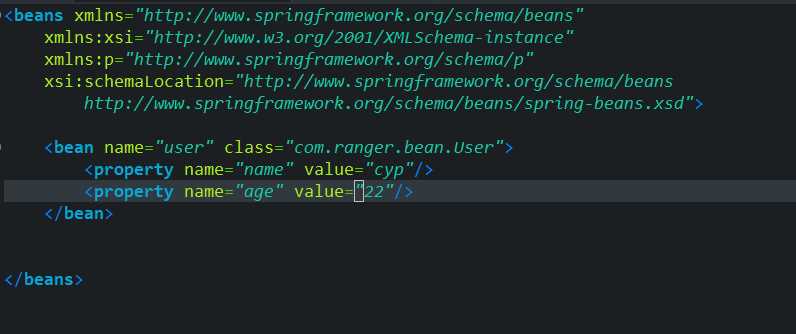
Spring的配置文件名可以任意,单官方建议命名为applicationContext.xml,放在src目录下,基本bean配置文件如下:
代码测试
新建一个Javabean类
public class User {
  private  String name;
    private Integer age;
    public String getName() {
        return name;
    }
    public void setName(String name) {
        this.name = name;
    }
    public Integer getAge() {
        return age;
    }
    public void setAge(Integer age) {
        this.age = age;
    }

    @Override
    public String toString() {
      // TODO Auto-generated method stub
      return "[name]:"+this.name+"  [age]:"+this.age;
    }
}
编写测试代码
@Test
  public void test1() {
        //1.创建容器对象
        ApplicationContext ac=new                      ClassPathXmlApplicationContext("applicationContext.xml");
        //2.向容器获取对象
        User u=(User) ac.getBean("user");
        //3.打印user对象
        System.out.println(u);
Ioc—
Inversion of Control,即“控制反转”,不是什么技术,而是一种设计思想。在Java开发中,Ioc意味着将你设计好的对象交给容器控制,而不是传统的在你的对象内部直接控制
IOC 将对象的控制权交给了Spring容器
IOC的底层实现原理:工厂模式+反射+配置文件
DI-
Dependency Injection,即依赖注入,为IOC提供了支撑,Spring管理一个对象时使用DI将对象依赖的属性注入进来
注入的三种方式:
注入的类型:
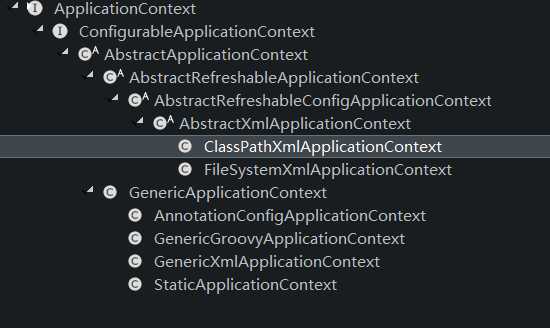
ApplicationContext实现了BeanFactory接口
在容器启动时就创建配置文件中的所有对象
可以通过从类路径下加载配置文件和从文件系统路径下加载配置文件
id和name的配置
class为类的全限定名bean的作用范围使用scope属性指定,属性值可以是下面几个:
singleton
默认值,Spring会采用单例模式创建这个对象
prototype
多例模式,每次创建的对象都是新的
request
在Web应用程序中,Spring创建这个对象后将其放入request域中
session
在Web应用程序中,Spring创建这个对象后将其放入session域中
globalsession
在Web应用程序中,必须在porlet环境中使用,没有这个环境时,相当于session
构造方法
在类中定义属性的set方法
public class Teacher {
   private String name;
   private String title;
   private Course course;


   public void setName(String name) {
       this.name = name;
   }

   public void setTitle(String title) {
       this.title = title;
   }

   public void setCourse(Course course) {
       this.course = course;
   }
   @Override
   public String toString() {
       return "Teacher [name=" + name + ", title=" + title + ", course=" + course + "]";
   }

}
配置文件中配置
   <bean name="teacher" class="com.ranger.bean.Teacher">
           <property name="name" value="tom"></property>
           <property name="title" value="english"></property>
           <property name="course" ref="course"></property>
   </bean>
set方法
在类中定义带参数的构造方法
public class Student {
   private String name;
   private String num;
   private Teacher teacher;

   public Student(String name,String num,Teacher teacher){
       this.name = name;
       this.num = num;
       this.teacher = teacher;
   }

   @Override
   public String toString() {
       return "Student [name=" + name + ", num=" + num + ", teacher=" + teacher + "]";
   }

}
Spring配置文件中配置bean
    <bean name="student" class="com.ranger.bean.Student">
       <constructor-arg name="name" value="cyp"></constructor-arg>
       <constructor-arg name="num" value="123"></constructor-arg>
        <!--value属性设置基本类型的值,ref属性设置其它bean的name或者id-->
       <constructor-arg name="teacher" ref="teacher"></constructor-arg>
    </bean>
p空间注入
xml文件中引入p
xmlns:p="http://www.springframework.org/schema/p"配置方式
<!-- 基本类型:p:属性名=属性值,引用类型:p:属性名-ref=属性值 -->
   <bean name="user2" class="com.ranger.bean.User"    p:name="jack" p:age="20">

</bean>SpEL:Spring Expression Language,Spirng表达式语言
<bean name="user3" class="com.ranger.bean.User" >
    <property name="name" value="#{user.name}"></property>
    <property name="age" value="#{user3.age}"></property>
    <property name="car" ref="#{car}"></property>
</bean>如果一个类的属性是复杂的类型(集合或者数组)类型的注入方式
类
public class CollectionsBean {
  private Object[] arr;//数组类型注入
    private List list;//list/set类型注入
    private Map map;//map注入
    private Properties prop;// Properties 类型注入
  public void setArr(Object[] arr) {
      this.arr = arr;
  }
  public void setList(List list) {
      this.list = list;
  }
  public void setMap(Map map) {
      this.map = map;
  }
  public void setProp(Properties prop) {
      this.prop = prop;
  }
  @Override
  public String toString() {
      return "CollectionsBean [arr=" + Arrays.toString(arr) + ", list=" + list + ", map=" + map + ", prop=" + prop
              + "]";
  }


}
Spring 的配置文件
<!-- 复杂类型的属性注入 -->
    <bean name="cb" class="com.ranger.bean.CollectionsBean">
      <!-- 数组类型注入 -->
          <property name="arr">
              <array>
                  <value>cyp</value>
                  <value>whl</value>
                  <ref bean="user"/>
              </array>
          </property>

          <!-- list/set类型注入 -->
            <property name="list">
              <list>
                  <value>cyp</value>
                  <value>whl</value>
                  <ref bean="user"></ref>
              </list>

          </property>
          <!-- 当只有一个值时(基本类型或者引用类型) -->
          <!--<property name="list" ref="user"></property>-->

          <!-- map类型注入 -->
          <property name="map">
              <map>
                  <entry key="1" value="cyp"></entry>
                  <entry key="2" value="whl"></entry>
                  <entry key="user" value-ref="user"></entry>
              </map>
          </property>

          <!-- Properties类型注入 -->
          <property name="prop">
              <props>
                  <prop key="password" >123</prop>
                  <prop key="username">cyp</prop>
              </props>
          </property>
</bean>创建ApplicationContext对象时指定多个配置文件
ApplicationContext ac=new ClassPathXmlApplicationContext("applicationContext1.xml","applicationContext2.xml");在主文件中导入其它配置文件
<import resource="com/ranger/bean/applicationContext.xml"/>
引入约束:context
在Spring配置文件中添加约束文件和空间名
<beans xmlns="http://www.springframework.org/schema/beans"
    xmlns:xsi="http://www.w3.org/2001/XMLSchema-instance"
    xmlns:p="http://www.springframework.org/schema/p"

    xmlns:context="http://www.springframework.org/schema/context"

    xsi:schemaLocation="http://www.springframework.org/schema/beans
    http://www.springframework.org/schema/beans/spring-beans.xsd

    http://www.springframework.org/schema/context
    http://www.springframework.org/schema/context/spring-context-4.2.xsd">
配置文件中配置组件(包)扫描
 <!-- 配置注解扫描包 -->
     <context:component-scan base-package="com.ranger.bean"></context:component-scan>
在类上添加注解 @Component(value="")
import org.springframework.beans.factory.annotation.Value;
import org.springframework.stereotype.Component;

//  注解的方式IOC
@Component(value="product")  // value的值代表bean的name属性
public class Product {

 private String pName;

 private Double price;
 @Override
 public String toString() {
     return "Product [pName=" + pName + ", price=" + price + "]";
 }


}
注解方式设置值 @Value()
没有set方法,注解加到属性上
@Component(value="product")
public class Product {
   // 使用注解的方式向属性中注值
   @Value("电冰箱")
   private String pName;
   @Value("2999.0")
   private Double price;
   @Override
   public String toString() {
       return "Product [pName=" + pName + ", price=" + price + "]";
   }


}
有set方法,注解加到set方法上
@Component 修饰一个类,将这个类交给Spring来管理
该注解有三个类似的注解:
@Controller Web层使用
@Service Service层使用
`@Repository Dao层使用
普通属性: @Value
对象类型: @Autowired 按照类型注入
? 如果要按照名称注入,则需要配@Qulifier一起使用
? 可以使用@Resource来按照名称进行注入
初始化方法,销毁方法注解
在类的方法上加 @PostConstruct
@PostConstruct //在对象被创建之后调用,init-method
在类方法上加 @PreDestory
@PreDestroy //在对象销毁之前调用,destroy-method
bean的作用范围注解
//指定对象作用范围
@Scope(scopeName="prototype")
public class User {
}
标签:oid password red out rop 空间 解决 pos path
原文地址:https://www.cnblogs.com/watertreestar/p/Spring.html