标签:fir org 面试 驼峰 isp null from oca ack
注解本身并没有什么实际的功能(非要说标记也是一个“实际”的功能的话,也可以算吧),隐藏在背后的注解处理器才是实现注解机制的核心。本篇将从这两个层面出发探索 spring boot 自动装配的秘密,并使用 spring boot 的自动装配机制来实现自动装配。
本次代码已经放到 github:https://github.com/christmad/code-share/tree/master/spring-boot-config-practice
代码中主要是做了 @Configuration 和 @ConfigurationProperties 使用的练习,以及本篇博客笔记重点:自定义 ImportSelector 实现类实现批量扫描包下类文件。
(1) 首先,从 spring 3.X 开始,AnnotationConfigApplicationContext 替代 ClassPathXmlApplicationContext,迎来了全新的 java bean config 配置方式,使用 java bean 和 注解就能轻松添加配置。
(2) 3.X 开始提供的致力于零配置文件的注解:
@Configuration——用来替代 xml 文件的。
@Bean——标记在方法上,替代 xml 配置中的 <bean></bean> 定义,方法名称就是 bean id。
@Import——将 Bean 导入到容器的 BeanDefinition Map 中,可以接收 Class[] 数组,通常只用它来导入 1~2 个类,不适合批量导入场景。
但是 @Import 适合用来做“启动”装配的动作,配置不会无中生有,不可能所有的配置步骤都是自动的,必须有个起点的地方是手动的“硬编码”,就像我们刚接触 window 操作系统时了解到有很多系统缺省值一样它们是写死的硬编码。而 @Import 就能起到这个作用。其实不需要这个注解 spring boot 也能实现自动装配,只不过作为一个开源框架,使用 @Import 更能突出需要导入的意图和需求,让框架变得更好理解。
另外一个 ImportSelector 接口的 selectImports() 方法可以批量导入。算是 spring boot 能够完成自动配置的一个关键注解。
@Conditional——spring 4.0 起提供,spring boot 1.X 版本应该是基于 spring 4.0+ 而诞生的,这个注解起到了条件标记的作用,其衍生的注解在 spring boot 自动配置中也起到了一个关键的作用,常用的比如 @ConditionalOnClass、@ConditionalOnMissClass、@ConditionalOnBean、@ConditionalOnMissingBean、@ConditionalOnProperty 等。在分析和实战环节中会用到其中某几个注解。
(3) 一些新的注解——组合注解的效果,比如 @SpringBootApplication 融合了 @SpringBootConfiguration(即 @Configuration)、@EnableAutoConfiguration(依赖 @Import,间接依赖 @Conditional)、@ComponentScan 等几个注解。因为组合注解的存在,我们才可以在 @SpringBootApplication 标记的类里面使用 @Bean 等注解,而不用担心识别不了。@EnableAutoConfiguration 这个注解也是接下来会重点分析到的。
由于 Pivotal 团队牛人比较多,而且写 spring boot 框架的人不止一个(spring 3.X 版本开始代码开始规范和优化了,并一直积累到现在,代码量非常大),所以很多骚操作的细节在本篇不会深入。
前面说了,@SpringBootApplication 融合了 @SpringBootConfiguration(即 @Configuration)、@EnableAutoConfiguration(依赖 @Import,间接依赖 @Conditional)、@ComponentScan 等几个注解。
(1)@SpringBootConfiguration 注解就没什么好说的了,直接是在 @Configuration 注解上派生的注解,多了一层包装而已
(2)@EnableAutoConfiguration 注解是个组合注解,里面对我们有用的注解有两个
2.1 @AutoConfigurationPackage
2.2 @Import(AutoConfigurationImportSelector.class)
@Target(ElementType.TYPE)
@Retention(RetentionPolicy.RUNTIME)
@Documented
@Inherited
@Import(AutoConfigurationPackages.Registrar.class)
public @interface AutoConfigurationPackage {

}
看了下 AutoConfigurationPackages.Registrar 这个类的代码,比较少,实现两个接口 ImportBeanDefinitionRegistrar, DeterminableImports 。直接在其中一个方法上打上一个断点开始 debug 起来...

可以看到下面那个 determineImports 方法,只是返回了一个集合,相当于 new 了一个东西,就算断点跑到它上面去了,后面跟着断点返回出去也还可能是一些创建对象的代码,或者其他和你本次想调试的行为无关的代码,而且不得不说的是,spring 代码的结构非常深,如果打错断点就很可能在某几个方法里调试几天都没调试出来......
好了,接着让断点执行一行,你可以在 debug 面板 Variables 栏里面看到 registry 对象的 beanDefinitionNames 属性变蓝了,beanDefinitionNames 被修改了,如下图:
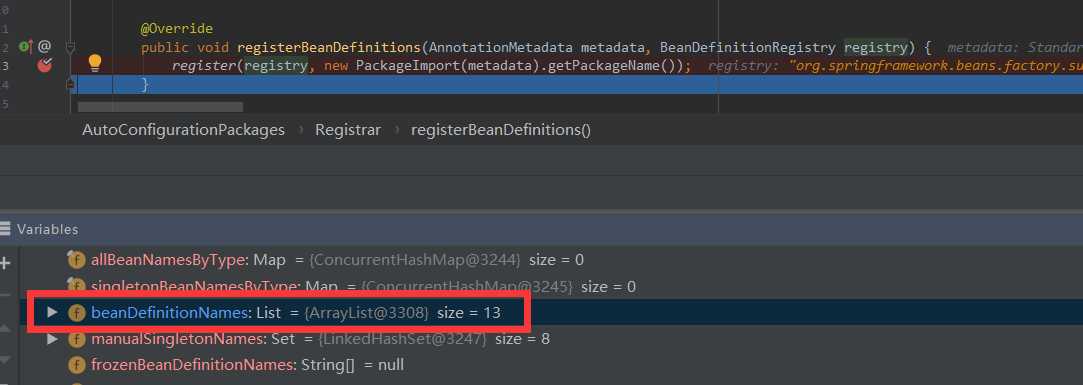
最后查看 beanDefinitionNames,可以发现 AutoConfigurationPackages.Registrar 只是将 AutoConfigurationPackages 注册到 IOC BeanDefinition 中。而在这之前,我自己在项目中配置的一些 bean 已提前注册了。断点停在这里往上找 debug 的调用栈(emmm,从图上看是往下找),如下图,验证了开篇说的 spring boot 使用 AnnotationConfigApplicationContext 作为 ApplicationContext 实现类:
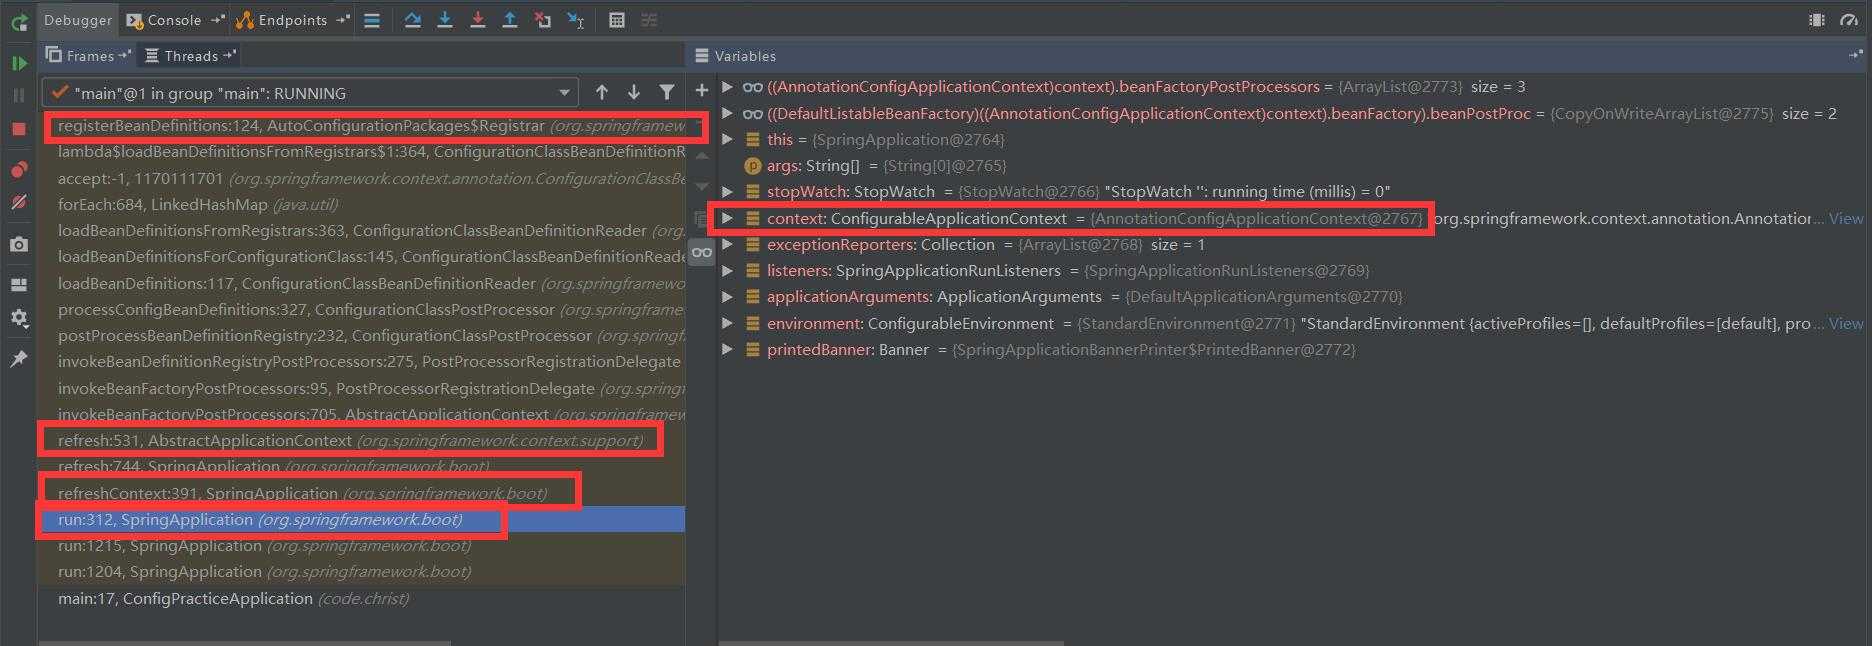
SpringApplication 这个类定义了一些骚操作,模仿 spring IOC 的一些 prepareContext、refreshContext 流程,如上图左侧那些 refresh 方法分别有不同的类在实现,在调用到 AbstractApplicationContext#refresh() 方法之前,SpringApplication 还做了很多工作,不是本次讨论重点。
目前看起来,@AutoConfigurationPackage 注解的作用是把 AutoConfigurationPackages 注册到 IOC BeanDefinition 中。
这个过程从 debug 来看属于 AbstractApplicationContext#refresh() 中的 invokeBeanFactoryPostProcessors(beanFactory); 流程。
在这个流程中可以对 BeanFactory 中的 BeanDefinition 进行修改,相当于修改房屋构造图。之后的流程会用 BeanDefinition 去创建一个个实例,然后会用到 BeanPostProcessor——属于在 java 实例的基础上修改的层面了,屋子本来不通风的现在想换通风的也换不了了,但是里面的家具或者装修风格还可以更换,嗯,换完之后可能会住的舒服点。
前面说到“ImportSelector 接口的 selectImports() 方法可以批量导入”,下面就来 debug 一下源码,如果顺利的话可以找到 @Import 注解的处理器,最次也能了解 selectImports() 的实现过程,嗯。
先到 AutoConfigurationImportSelector 的 selectImports() 方法里打一个断点......如下图:
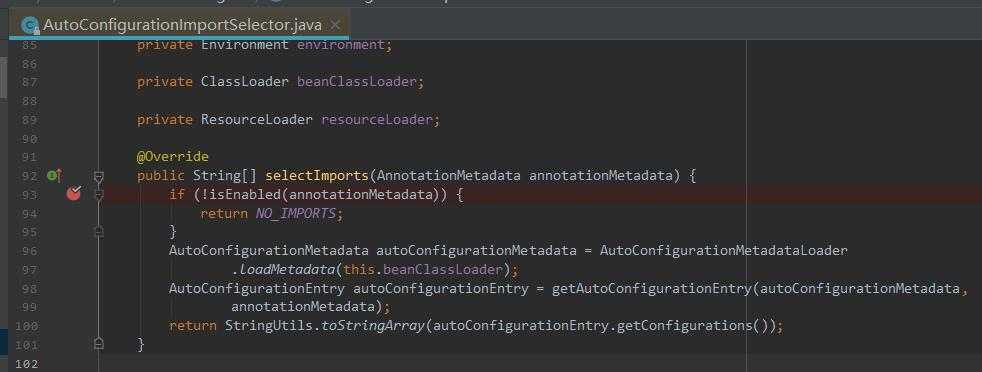
嗯???结果断点没停在这里???纠结了一阵之后,我开始猜想是不是 spring boot autoconfig 包把实现又换了......目前我用的是 2.1.8.RELEASE 版本。既然 debug 时没有停在预想的地方,但是这个类其实又没有被替换掉,那应该会运行到其他方法上面去了,所以我们可以换个方法打断点......经过尝试,发现断点进入到了 AutoConfigurationSelectImportor#getAutoConfigurationEntry() 方法中。
顺着断点往上找,找到了 2.0.X 和 2.1.X 版本之间的差异。可以看到方法调用逻辑变了,下面是 2.1.0.RELEASE 版本中 AutoConfigurationSelectImportor$AutoConfigurationGroup#process() 的代码:
 1         @Override
 2         public void process(AnnotationMetadata annotationMetadata, DeferredImportSelector deferredImportSelector) {
 3             Assert.state(deferredImportSelector instanceof AutoConfigurationImportSelector,
 4                     () -> String.format("Only %s implementations are supported, got %s",
 5                             AutoConfigurationImportSelector.class.getSimpleName(),
 6                             deferredImportSelector.getClass().getName()));
 7             AutoConfigurationEntry autoConfigurationEntry = ((AutoConfigurationImportSelector) deferredImportSelector)
 8                     .getAutoConfigurationEntry(getAutoConfigurationMetadata(), annotationMetadata);
 9             this.autoConfigurationEntries.add(autoConfigurationEntry);
10             for (String importClassName : autoConfigurationEntry.getConfigurations()) {
11                 this.entries.putIfAbsent(importClassName, annotationMetadata);
12             }
13         }
需要注意上面代码的 第7~第8行。同样的函数在 2.0.9.RELEASE 版本的代码如下:
1         @Override
2         public void process(AnnotationMetadata annotationMetadata,
3                 DeferredImportSelector deferredImportSelector) {
4             String[] imports = deferredImportSelector.selectImports(annotationMetadata);
5             for (String importClassName : imports) {
6                 this.entries.put(importClassName, annotationMetadata);
7             }
8         }
现在知道, spring-boot-autoconfig 2.1.0.RELEASE 及以后的版本中 AutoConfigurationSelectImportor#selectImports() 方法已经不再被调用了。在此方法中打断点,直到项目启动完也没有进去过,间接证实了猜想。虽然方法路径替换了,但是实现是几乎一模一样的。将两个版本的代码copy如下:
AutoConfigurationSelectImportor#getAutoConfigurationEntry() 方法代码(PS:spring-boot-autoconfig-2.1.X.RELEASE):
 1     protected AutoConfigurationEntry getAutoConfigurationEntry(AutoConfigurationMetadata autoConfigurationMetadata,
 2             AnnotationMetadata annotationMetadata) {
 3         if (!isEnabled(annotationMetadata)) {
 4             return EMPTY_ENTRY;
 5         }
 6         AnnotationAttributes attributes = getAttributes(annotationMetadata);
 7         List<String> configurations = getCandidateConfigurations(annotationMetadata, attributes);
 8         configurations = removeDuplicates(configurations);
 9         Set<String> exclusions = getExclusions(annotationMetadata, attributes);
10         checkExcludedClasses(configurations, exclusions);
11         configurations.removeAll(exclusions);
12         configurations = filter(configurations, autoConfigurationMetadata);
13         fireAutoConfigurationImportEvents(configurations, exclusions);
14         return new AutoConfigurationEntry(configurations, exclusions);
15     }
AutoConfigurationSelectImportor#selectImports() 方法代码(PS:spring-boot-autoconfig-2.0.X.RELEASE 及以下):
 1     @Override
 2     public String[] selectImports(AnnotationMetadata annotationMetadata) {
 3         if (!isEnabled(annotationMetadata)) {
 4             return NO_IMPORTS;
 5         }
 6         AutoConfigurationMetadata autoConfigurationMetadata = AutoConfigurationMetadataLoader
 7                 .loadMetadata(this.beanClassLoader);
 8         AnnotationAttributes attributes = getAttributes(annotationMetadata);
 9         List<String> configurations = getCandidateConfigurations(annotationMetadata,
10                 attributes);
11         configurations = removeDuplicates(configurations);
12         Set<String> exclusions = getExclusions(annotationMetadata, attributes);
13         checkExcludedClasses(configurations, exclusions);
14         configurations.removeAll(exclusions);
15         configurations = filter(configurations, autoConfigurationMetadata);
16         fireAutoConfigurationImportEvents(configurations, exclusions);
17         return StringUtils.toStringArray(configurations);
18     }
那么现在来看看 getAutoConfigurationEntry(旧版本 selectImports())方法中做了什么事情:
在这个方法中,有几行代码需要关注:
第一行:List<String> configurations = getCandidateConfigurations(annotationMetadata, attributes); 这行代码声明的 configurations 变量,会在方法最后返回值 entry 中用到,是调试需要关注的一个重点之一。
第二行:configurations = filter(configurations, autoConfigurationMetadata); 这行代码的方法名明显地告诉我们将会进行一些过滤策略,这个方法就是为什么 autoconfig 不会帮你配置不需要的 bean 的原因所在,里面用到了 @Conditional 条件来过滤,一些上下文条件不符合的 bean 不会帮你注册到 IOC 中。
先看下 getCandidateConfigurations 代码:
1     protected List<String> getCandidateConfigurations(AnnotationMetadata metadata, AnnotationAttributes attributes) {
2         List<String> configurations = SpringFactoriesLoader.loadFactoryNames(getSpringFactoriesLoaderFactoryClass(),
3                 getBeanClassLoader());
4         Assert.notEmpty(configurations, "No auto configuration classes found in META-INF/spring.factories. If you "
5                 + "are using a custom packaging, make sure that file is correct.");
6         return configurations;
7     }
看到上面方法中的第一行有个 SpringFactoriesLoader ,从结果逆向来看这个名字起得很好,它的名字起得和要加载的文件名一模一样,SpringFactoriesLoader#loadFactoryNames() 做的事情就是去 ./META-INF/spring.factories 文件中加载一些配置,下面一行代码的 Assert 工具也能说明这点。那么在 spring-boot-autoconfig jar 包下 META-INF/spring.factories 文件里的配置长什么样?我们点开来看一下:
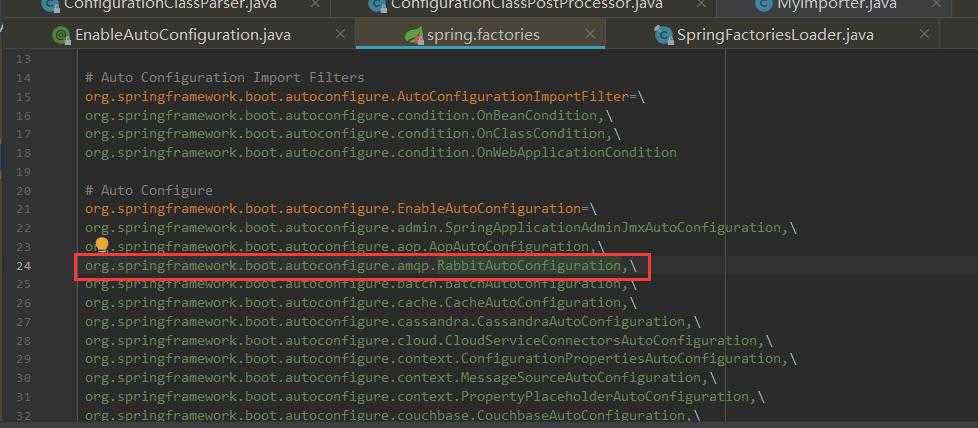
文件中的配置是以一个KEY多个VAL形式的映射存在。经过 getCandidateConfigurations 方法之后,spring.factories 文件中为 EnableAutoConfiguration 配置的自动装配类的全类名都被加载出来了,全类名是为后面实例化这些自动装配类做准备。对 spring.factories 文件进行加载的时候,spring 团队做了一些骚操作,做了个缓存,防止该文件被读取多次消耗性能。反正我在 debug 的时候代码从 cache.get() 那个地方进去了,说明前面某个地方进行了扫描 spring.factories 这个动作。
在下面分析中我会挑一个最近在用的 RabbitAutoConfiguration 来说明这些自动装配类到底是怎么用的。
前面说完 getCandidateConfigurations 方法,现在结合 RabbitAutoConfiguration 这个自动装配类来分析下在 filter(configurations, autoConfigurationMetadata); 这个过滤方法中做了什么。
先看一眼 filter 方法长什么样:
 1     private List<String> filter(List<String> configurations, AutoConfigurationMetadata autoConfigurationMetadata) {
 2         long startTime = System.nanoTime();
 3         String[] candidates = StringUtils.toStringArray(configurations);
 4         boolean[] skip = new boolean[candidates.length];
 5         boolean skipped = false;
 6         for (AutoConfigurationImportFilter filter : getAutoConfigurationImportFilters()) {
 7             invokeAwareMethods(filter);
 8             boolean[] match = filter.match(candidates, autoConfigurationMetadata);
 9             for (int i = 0; i < match.length; i++) {
10                 if (!match[i]) {
11                     skip[i] = true;
12                     candidates[i] = null;
13                     skipped = true;
14                 }
15             }
16         }
17         if (!skipped) {
18             return configurations;
19         }
20         List<String> result = new ArrayList<>(candidates.length);
21         for (int i = 0; i < candidates.length; i++) {
22             if (!skip[i]) {
23                 result.add(candidates[i]);
24             }
25         }
26         if (logger.isTraceEnabled()) {
27             int numberFiltered = configurations.size() - result.size();
28             logger.trace("Filtered " + numberFiltered + " auto configuration class in "
29                     + TimeUnit.NANOSECONDS.toMillis(System.nanoTime() - startTime) + " ms");
30         }
31         return new ArrayList<>(result);
32     }
getAutoConfigurationImportFilters() 方法长这样:
1     protected List<AutoConfigurationImportFilter> getAutoConfigurationImportFilters() {
2         return SpringFactoriesLoader.loadFactories(AutoConfigurationImportFilter.class, this.beanClassLoader);
3     }
很熟悉吧?这个操作是从 META-INF/spring.factories 文件中加载一些类出来,前面只是加载类名。往上翻一点点最近的那张有关 spring.factories 内容的图中也可以看到 AutoConfigurationImportFilter 配置的信息,直接贴代码如下:
1 # Auto Configuration Import Filters
2 org.springframework.boot.autoconfigure.AutoConfigurationImportFilter=3 org.springframework.boot.autoconfigure.condition.OnBeanCondition,4 org.springframework.boot.autoconfigure.condition.OnClassCondition,5 org.springframework.boot.autoconfigure.condition.OnWebApplicationCondition
spring-boot-autoconfig 定义了三种类型的 Conditional ImportFilter,在 filter 方法中依此使用它们对候选配置进行过滤(candidate 是候选人的意思),如上贴出的 filter 方法 6~16 行的意思是经过三种 import filter 过滤后对应 boolean match[] 数组位置上为 true 的配置会被真正启用。在 java 中 boolean 数组初始化时所有元素都是 false,因此经过三个 import filter 的 match 方法相当于把三个结果进行了或操作,只要有一个中就行。
另一点要注意到的是,因为三个 OnXXXCondition 都在同一个 boolean match[] 数组上操作,所以同一个位置上的判断结果肯定是出自于对同一个自动装配类的判断,而本文中 RabbitAutoConfiguration 排名比较靠前,排第 3 位(数组下标为 2)。
接着进到上面 filter 方法的第 6 行主要看 filter#match 逻辑:
 1     @Override
 2     public boolean[] match(String[] autoConfigurationClasses, AutoConfigurationMetadata autoConfigurationMetadata) {
 3         ConditionEvaluationReport report = ConditionEvaluationReport.find(this.beanFactory);
 4         ConditionOutcome[] outcomes = getOutcomes(autoConfigurationClasses, autoConfigurationMetadata);
 5         boolean[] match = new boolean[outcomes.length];
 6         for (int i = 0; i < outcomes.length; i++) {
 7             match[i] = (outcomes[i] == null || outcomes[i].isMatch());
 8             if (!match[i] && outcomes[i] != null) {
 9                 logOutcome(autoConfigurationClasses[i], outcomes[i]);
10                 if (report != null) {
11                     report.recordConditionEvaluation(autoConfigurationClasses[i], this, outcomes[i]);
12                 }
13             }
14         }
15         return match;
16     }
ConditionOutcome[] 中已经是处理过的结果了,我们要进到更底层的方法去看 condition 是怎么被处理的。RabbitAutoConfiguration 类上的 @ConditionOnClass({ RabbitTemplate.class, Channel.class}) 里面有两个类,我们要看一下 OnClassCondition 类是怎么处理这种多个 class 条件的。关键代码如下:
 1         private ConditionOutcome getOutcome(String candidates) {
 2             try {
 3                 if (!candidates.contains(",")) {
 4                     return getOutcome(candidates, this.beanClassLoader);
 5                 }
 6                 for (String candidate : StringUtils.commaDelimitedListToStringArray(candidates)) {
 7                     ConditionOutcome outcome = getOutcome(candidate, this.beanClassLoader);
 8                     if (outcome != null) {
 9                         return outcome;
10                     }
11                 }
12             }
13             catch (Exception ex) {
14                 // We‘ll get another chance later
15             }
16             return null;
17         }
多个 class 其实是逐个判断,getOutcome 递进代码如下:
1         private ConditionOutcome getOutcome(String className, ClassLoader classLoader) {
2             if (ClassNameFilter.MISSING.matches(className, classLoader)) {
3                 return ConditionOutcome.noMatch(ConditionMessage.forCondition(ConditionalOnClass.class)
4                         .didNotFind("required class").items(Style.QUOTE, className));
5             }
6             return null;
7         }
ClassNameFilter.MISSING.matches(className, classLoader) 里面的逻辑简单,就是使用了 Class.forName(className); API 进行全类名文件查找。
如果是匹配的话,返回 null。对应了前面贴出来的 filter#match 方法的第 7 行的短路或条件,如果 outcomes[i] == null 则 match[i] = true。
没有匹配会返回一些信息封装到 ConditionOutCome 的 ConditionMessage 里面。如果@ConditionOnClass 里面有多个 class,只要有任意一个 class 不存在,就不会匹配成功。不过就 RabbitAutoConfiguration 配置来说,只要 maven dependency 引入了 spring-boot-starter-amqp,那么 com.rabbitmq.client.Channel 和 org.springframework.amqp.rabbit.core.RabbitTemplate 会一起引入。
最后,经过 2.0.9.RELEASE 版本 和 2.1.0.RELEASE 版本的对比,我们知道:
(a) 在 2.0.9.RELEASE 及之前的版本,可以在 AutoConfigurationImportSelector 类的 String[] selectImports() 方法上打断点进去
(b) 2.1.0.RELEASE 版本及之后的版本,调试断点变为 AutoConfigurationImportSelector#getAutoConfigurationEntry() 方法
这些方法的最终目的都是从 spring-boot-autoconfig.jar 包的 META-INF 目录内加载 spring.factories 文件中配置,其中就包含有自动配置类的配置 org.springframework.boot.autoconfigure.EnableAutoConfiguration= xxx,yyy,zzz,....... 这些自动配置类在一定条件下(@Conditional注解派上用场)被启用,并且在配置bean时会使用到我们在项目classpath下的配置文件(如 yml)中的属性。
如此一来,只要我们在 pom 引入了相应的 jar 达成 @Conditional 条件,然后通常需要再配置一些 connection 属性(不管是连 redis,mysql,rabbitmq 都有 connection 这个概念)来供 spring autoconfig 的自动配置类在创建 connection 对象等相关对象时使用,那么 spring autoconfig 就能将这些 bean 创建后加入到 spring IOC 容器中,我们在代码里就可以通过 spring IOC 获取这些 bean 了。

  1 @Configuration
  2 @ConditionalOnClass({ RabbitTemplate.class, Channel.class })
  3 @EnableConfigurationProperties(RabbitProperties.class)
  4 @Import(RabbitAnnotationDrivenConfiguration.class)
  5 public class RabbitAutoConfiguration {
  6
  7     @Configuration
  8     @ConditionalOnMissingBean(ConnectionFactory.class)
  9     protected static class RabbitConnectionFactoryCreator {
 10
 11         @Bean
 12         public CachingConnectionFactory rabbitConnectionFactory(RabbitProperties properties,
 13                 ObjectProvider<ConnectionNameStrategy> connectionNameStrategy) throws Exception {
 14             PropertyMapper map = PropertyMapper.get();
 15             CachingConnectionFactory factory = new CachingConnectionFactory(
 16                     getRabbitConnectionFactoryBean(properties).getObject());
 17             map.from(properties::determineAddresses).to(factory::setAddresses);
 18             map.from(properties::isPublisherConfirms).to(factory::setPublisherConfirms);
 19             map.from(properties::isPublisherReturns).to(factory::setPublisherReturns);
 20             RabbitProperties.Cache.Channel channel = properties.getCache().getChannel();
 21             map.from(channel::getSize).whenNonNull().to(factory::setChannelCacheSize);
 22             map.from(channel::getCheckoutTimeout).whenNonNull().as(Duration::toMillis)
 23                     .to(factory::setChannelCheckoutTimeout);
 24             RabbitProperties.Cache.Connection connection = properties.getCache().getConnection();
 25             map.from(connection::getMode).whenNonNull().to(factory::setCacheMode);
 26             map.from(connection::getSize).whenNonNull().to(factory::setConnectionCacheSize);
 27             map.from(connectionNameStrategy::getIfUnique).whenNonNull().to(factory::setConnectionNameStrategy);
 28             return factory;
 29         }
 30
 31         private RabbitConnectionFactoryBean getRabbitConnectionFactoryBean(RabbitProperties properties)
 32                 throws Exception {
 33             PropertyMapper map = PropertyMapper.get();
 34             RabbitConnectionFactoryBean factory = new RabbitConnectionFactoryBean();
 35             map.from(properties::determineHost).whenNonNull().to(factory::setHost);
 36             map.from(properties::determinePort).to(factory::setPort);
 37             map.from(properties::determineUsername).whenNonNull().to(factory::setUsername);
 38             map.from(properties::determinePassword).whenNonNull().to(factory::setPassword);
 39             map.from(properties::determineVirtualHost).whenNonNull().to(factory::setVirtualHost);
 40             map.from(properties::getRequestedHeartbeat).whenNonNull().asInt(Duration::getSeconds)
 41                     .to(factory::setRequestedHeartbeat);
 42             RabbitProperties.Ssl ssl = properties.getSsl();
 43             if (ssl.isEnabled()) {
 44                 factory.setUseSSL(true);
 45                 map.from(ssl::getAlgorithm).whenNonNull().to(factory::setSslAlgorithm);
 46                 map.from(ssl::getKeyStoreType).to(factory::setKeyStoreType);
 47                 map.from(ssl::getKeyStore).to(factory::setKeyStore);
 48                 map.from(ssl::getKeyStorePassword).to(factory::setKeyStorePassphrase);
 49                 map.from(ssl::getTrustStoreType).to(factory::setTrustStoreType);
 50                 map.from(ssl::getTrustStore).to(factory::setTrustStore);
 51                 map.from(ssl::getTrustStorePassword).to(factory::setTrustStorePassphrase);
 52                 map.from(ssl::isValidateServerCertificate)
 53                         .to((validate) -> factory.setSkipServerCertificateValidation(!validate));
 54                 map.from(ssl::getVerifyHostname).to(factory::setEnableHostnameVerification);
 55             }
 56             map.from(properties::getConnectionTimeout).whenNonNull().asInt(Duration::toMillis)
 57                     .to(factory::setConnectionTimeout);
 58             factory.afterPropertiesSet();
 59             return factory;
 60         }
 61
 62     }
 63
 64     @Configuration
 65     @Import(RabbitConnectionFactoryCreator.class)
 66     protected static class RabbitTemplateConfiguration {
 67
 68         private final RabbitProperties properties;
 69
 70         private final ObjectProvider<MessageConverter> messageConverter;
 71
 72         private final ObjectProvider<RabbitRetryTemplateCustomizer> retryTemplateCustomizers;
 73
 74         public RabbitTemplateConfiguration(RabbitProperties properties,
 75                 ObjectProvider<MessageConverter> messageConverter,
 76                 ObjectProvider<RabbitRetryTemplateCustomizer> retryTemplateCustomizers) {
 77             this.properties = properties;
 78             this.messageConverter = messageConverter;
 79             this.retryTemplateCustomizers = retryTemplateCustomizers;
 80         }
 81
 82         @Bean
 83         @ConditionalOnSingleCandidate(ConnectionFactory.class)
 84         @ConditionalOnMissingBean
 85         public RabbitTemplate rabbitTemplate(ConnectionFactory connectionFactory) {
 86             PropertyMapper map = PropertyMapper.get();
 87             RabbitTemplate template = new RabbitTemplate(connectionFactory);
 88             MessageConverter messageConverter = this.messageConverter.getIfUnique();
 89             if (messageConverter != null) {
 90                 template.setMessageConverter(messageConverter);
 91             }
 92             template.setMandatory(determineMandatoryFlag());
 93             RabbitProperties.Template properties = this.properties.getTemplate();
 94             if (properties.getRetry().isEnabled()) {
 95                 template.setRetryTemplate(new RetryTemplateFactory(
 96                         this.retryTemplateCustomizers.orderedStream().collect(Collectors.toList())).createRetryTemplate(
 97                                 properties.getRetry(), RabbitRetryTemplateCustomizer.Target.SENDER));
 98             }
 99             map.from(properties::getReceiveTimeout).whenNonNull().as(Duration::toMillis)
100                     .to(template::setReceiveTimeout);
101             map.from(properties::getReplyTimeout).whenNonNull().as(Duration::toMillis).to(template::setReplyTimeout);
102             map.from(properties::getExchange).to(template::setExchange);
103             map.from(properties::getRoutingKey).to(template::setRoutingKey);
104             map.from(properties::getDefaultReceiveQueue).whenNonNull().to(template::setDefaultReceiveQueue);
105             return template;
106         }
107
108         private boolean determineMandatoryFlag() {
109             Boolean mandatory = this.properties.getTemplate().getMandatory();
110             return (mandatory != null) ? mandatory : this.properties.isPublisherReturns();
111         }
112
113         @Bean
114         @ConditionalOnSingleCandidate(ConnectionFactory.class)
115         @ConditionalOnProperty(prefix = "spring.rabbitmq", name = "dynamic", matchIfMissing = true)
116         @ConditionalOnMissingBean
117         public AmqpAdmin amqpAdmin(ConnectionFactory connectionFactory) {
118             return new RabbitAdmin(connectionFactory);
119         }
120
121     }
122
123     @Configuration
124     @ConditionalOnClass(RabbitMessagingTemplate.class)
125     @ConditionalOnMissingBean(RabbitMessagingTemplate.class)
126     @Import(RabbitTemplateConfiguration.class)
127     protected static class MessagingTemplateConfiguration {
128
129         @Bean
130         @ConditionalOnSingleCandidate(RabbitTemplate.class)
131         public RabbitMessagingTemplate rabbitMessagingTemplate(RabbitTemplate rabbitTemplate) {
132             return new RabbitMessagingTemplate(rabbitTemplate);
133         }
134
135     }
136
137 }
(代码还是比较多的,折叠了)
RabbitAutoConfiguration 类上面有几个注解,@ConditionOnClass 上面已经分析过了。@EnableConfigurationProperties(RabbitProperties.class) 这个注解的意思就是说我们在 yml 等文件里面配置的一些 KEY-VAL 对会被 RabbitProperties 这个类的属性利用(注入了),比如在创建 RabbitMQ Connection 时会从 RabbitProperties 类里面获取属性而不再是从文件中一个个读取或者是再用一些基础的 Properties 类来处理了。
RabbitAutoConfiguration 类里面没有任何多余的方法,只有三个静态内部类。它们之间的引用关系如下:
 1     @Configuration
 2     @ConditionalOnMissingBean(ConnectionFactory.class)
 3     protected static class RabbitConnectionFactoryCreator {...}
 4
 5     @Configuration
 6     @Import(RabbitConnectionFactoryCreator.class)
 7     protected static class RabbitTemplateConfiguration {...}
 8
 9     @Configuration
10     @ConditionalOnClass(RabbitMessagingTemplate.class)
11     @ConditionalOnMissingBean(RabbitMessagingTemplate.class)
12     @Import(RabbitTemplateConfiguration.class)
13     protected static class MessagingTemplateConfiguration {...}
后面的类会 @Import 前面的类作为依赖配置。每个内部类里面都有一些被 @Bean 注解 和 派生的 @Conditional 注解标记的方法,在合适的条件下这些方法会产生对应的 bean。
说到底自动装配其实是 spring boot autoconfig 工具包替我们提前写好了一些 bean 装配的动作,让我们在编码时只需要写一些配置文件就能为运行时传入 KEY-VAL 对从而构建相应的 bean 来完成特定的功能。
首先要再次重申的是,spring framework 中任何注解都只是一个标记的作用,想要让被注解标记的类最终被 IOC 识别就需要让该类能被 spring IOC 执行包扫描的时候能扫描到,假设你在某个类上标记了 @Import 注解,但是该类没有被 spring IOC 扫描路径扫描到,那么这么做就没有任何意义;或者说即使在包扫描时该类被“扫描过”,但是由于没有任何标记(包括 @Component、@Configuration 等),它也不会被 IOC 解析为 bean definition。
NOTE:在 spring boot 中放置 main application class 是有讲究的,官方文档提到:将 @SpringBootApplicaiton 标记的项目 main applicaiton class 放在项目的根目录下。比如你的项目根目录结构是 com.DEMO.A,com.DEMO.B,com.DEMO.C 等等,那么你的 main application class 全类名就应该是 com.DEMO.YourMainApplicationName。因为标记 @SpringBootApplication 默认会扫描本包和本包的子包下所有的标记类。没错,spring boot 又帮你默认扫描了一些路径。
spring boot 官网文档 main class locating 相关说明:https://docs.spring.io/spring-boot/docs/current/reference/html/using-spring-boot.html#using-boot-locating-the-main-class

那么如果你用了非主流的目录结构,有些类就是没有和 main application class 在同一个根目录下,或者即使在同一个根目录下但是你就是不想用 @Component 这些注解来标记它们,这时候 @Import 注解就可以派上用场了:@Import 可以为你的 spring 项目引入那些没有被包扫描过程识别出来的 bean definition。
我们的类如果要起到某些特定的作用,只能实现 spring IOC 容器中为我们预定义好的接口类型。比如大家在学习 spring IOC 的时候都会接触过的 BeanPostProcessor 接口,写一个实现类并交由 spring IOC 管理后它就可以在 IOC 所有的 bean 实例化完成后进行一个后置处理过程,这些过程一般处于类实例化到服务器正式使用这个实例对外服务之间,比如预热数据之类的操作。
1 @Target(ElementType.TYPE)
2 @Retention(RetentionPolicy.RUNTIME)
3 @Documented
4 @Import(PackagesImportSelector.class)
5 public @interface PackagesImporter {
6     String[] packages();
7 }
 1 public class PackagesImportSelector implements DeferredImportSelector {
 2
 3     private List<String> clzList = new ArrayList<>(100);
 4
 5     @Override
 6     public String[] selectImports(AnnotationMetadata importingClassMetadata) {
 7         Map<String, Object> attributes = importingClassMetadata.getAnnotationAttributes(PackagesImporter.class.getName(), true);
 8         if (attributes == null) {
 9             return new String[0];
10         }
11         String[] packages = (String[]) attributes.get("packages");
12         if (packages == null) {
13             return new String[0];
14         }
15         scanPackages(packages);
16         return clzList.isEmpty() ? new String[0] : clzList.toArray(new String[0]);
17     }
18
19     private void scanPackages(String[] packages) {
20         for (String path : packages) {
21             doScanPackages(path);
22         }
23     }
24
25     private LinkedList<File> directories = new LinkedList<>();
26     private LinkedList<String> pathList = new LinkedList<>();
27     /**
28      * 递归处理子文件夹
29      */
30     private void doScanPackages(String path) {
31         URL resource = this.getClass().getClassLoader().getResource(path.replaceAll("\\.", "/"));
32         if (resource == null) {
33             return;
34         }
35         File file = new File(resource.getFile());
36         File[] files = file.listFiles();
37         if (files == null || files.length == 0) {
38             return;
39         }
40         for (File f : files) {
41             if (f.isDirectory()) {
42                 pathList.addLast(path);
43                 directories.addLast(f);
44             } else {
45                 // 先处理当前目录下的文件
46                 String fileName = f.getName();
47                 if (fileName.endsWith(".class")) {
48                     String fullClassName = path + "." + fileName.substring(0, fileName.indexOf("."));
49                     clzList.add(fullClassName);
50                 }
51             }
52         }
53         // 保证先处理平级的包。比如我的demo中,会先加载 ClassA、ClassB、ClassC,然后加载 ClassAA
54         while (!directories.isEmpty()) {
55             doScanPackages(pathList.removeFirst() + "." + directories.removeFirst().getName());
56         }
57
58     }
59 }
PackagesImportSelector 实现了将指定目录下所有的 .class 文件全部扫描到 IOC 中管理。在 doScanPackages 中实现了先扫描平级的 class 文件再扫描子目录 class 文件这个功能........(其实也没必要这样做,能扫描就行......)
1 @Configuration
2 @PackagesImporter(packages = {"code.dev.arch", "code.christ.model"})
3 public class MyConfig { // 被 @Configuration 注解也会生成一个 bean, 默认 bean name 和 @Component 规则一样——驼峰
4
5     public MyConfig() {
6         System.out.println("MyConfig 被 @Configuration 初始化了");
7     }
8
9 }
当然,把 @PackagesImporter 注解放到 main application class 类上也是可以的,因为 @SpringBootApplication 注解带有 @SpringBootConfiguration 注解,它只是对 @Configuration 做了二次包装。因此这也能解释为什么 spring 官方有些 demo 直接在 main application class 里面使用 @Bean 注解,就是因为启动类已经带了 @Configuration 注解所以该类下面的 @Bean 注解才能被识别。
demo中写了一个 NoConfigButNoteBean 类来验证这个用法。实际上在我使用的 intellij idea 上面,没有使用 @Configuration 或其他能托管到 spring IOC 的注解时,在类名上有灰色的标记,如下:
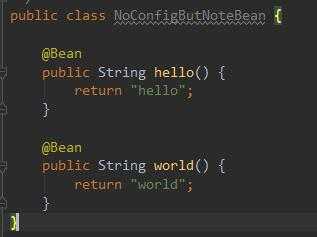
其他有标记托管的类会上成白色字体。这个是 IDE 特性,可以做一点小参考。
那么在不使用托管注解的情况下,hello world 怎么加入 spring IOC 呢?可以修改一下我们的自定义 import 注解,再添加一个包名,把 NoConfigButNoteBean 的包名放上去,这样就可以让 spring IOC 在处理 bean definition 时顺带处理类里面带 @Bean 的注解,当然这是 spring IOC bean definition 处理器的功能了,我们本次实现的只是扫描包下所有的类文件并上传所有的类文件全类名给 spring IOC。
有没有感觉 spring 就像一个老司机?每个公司或许都应该存在这样一个老司机,或者说每个 java 开发者第一个遇到的老司机就是 spring framework 吧。在某些方面,它强大可靠,可以解决你的燃眉之急。同时它也是一个宝库,有许多可以学习借鉴的地方。
由于 spring boot 自动装配这一块面试挺多会问到,所以没办法还是抽空写了一篇笔记,这样在面试的时候就可以简单带过然后把博客链接扔给面试官了(嗯~)。后续应该还有一篇笔记来讲 @Conditional 实战拓展的吧,也是另一个喜欢面试的点。应该会尽快抽空写出来。See ya~
spring boot 自动装配的实现原理和骚操作,不同版本实现细节调整,debug 到裂开......
标签:fir org 面试 驼峰 isp null from oca ack
原文地址:https://www.cnblogs.com/christmad/p/11729954.html