标签:mile 文件的 boot apache 格式 sha aos 问题: ima
目录
基于上篇博客,SpringBoot系列之日志框架介绍及其原理简介博客之后,本博客可以对日志框架的具体使用做一个比较详细的描述,以此作为一篇使用的手册,以此帮助学习Springboot者
@
简介一下日志级别,按照从低到高排序:trace < debug < info < warn < error,eg:假如日志级别为info,则只会打印info级别及其高级别的日志,所以在项目中,可以通过调高日志级别,打少点日志,反之,想打多点就调低日志级别
Springboot支持的日志级别有:TRACE, DEBUG, INFO, WARN, ERROR, FATAL, or OFF,然后默认的级别是info,写一个简单的测试类验证这个问题:
import org.junit.jupiter.api.Test;
import org.slf4j.Logger;
import org.slf4j.LoggerFactory;
import org.springframework.boot.test.context.SpringBootTest;

@SpringBootTest
class SpringbootLoggerApplicationTests {

    Logger LOG = LoggerFactory.getLogger(this.getClass());

    @Test
    void contextLoads() {
        LOG.trace("this is trace log infomation....");
        LOG.debug("this is debug log infomation....");
        LOG.info("this is info log infomation....");
        LOG.warn("this is warn log infomation....");
        LOG.error("this is error log infomation....");
    }

}
日志打印:
2019-11-16 18:50:07.513  INFO 19152 --- [           main] c.e.s.s.SpringbootLoggerApplicationTests : this is info log infomation....
2019-11-16 18:50:07.513  WARN 19152 --- [           main] c.e.s.s.SpringbootLoggerApplicationTests : this is warn log infomation....
2019-11-16 18:50:07.513 ERROR 19152 --- [           main] c.e.s.s.SpringbootLoggerApplicationTests : this is error log infomation....
可以看出只打印了info及其高级别的日志,可是我们并没有配置什么,说明了Springboot已经做了自动配置,默认日志级别为info的
Springboot日志级别可以设置root根级的,也可以设置对应包下面的日志级别,如下示例:
# root日志级别为info
logging.level.root=info
# 指定org.springframework.web包级别为debug
logging.level.org.springframework.web=debug
# 指定org.hibernate包级别为error
logging.level.org.hibernate=error
# 指定com.example.springboot.springbootlogger包下面的统一用debug级别
logging.level.com.example.springboot.springbootlogger=debugSpringboot还提供了日志级别进行分组设置的功能,官方说法是“能够将相关记录器组合在一起,以便可以同时配置它们,这通常很有用。例如,您通常可以更改所有 Tomcat 相关记录器的日志记录级别,但您无法轻松记住顶级包。”,意思就是我们可以自己定义一个分组,然后自己设置整个分组的级别,主要原因是我们很难记得那些包名
# 日志分组设置
logging.group.tomcat=org.apache.catalina, org.apache.coyote, org.apache.tomcat
# 设置整个组的级别为trace
logging.level.tomcat=TRACE
Springboot已经有的分组,没有的分组就得自己设置
|Name| loggers |
|--|--|
| web | org.springframework.core.codec, org.springframework.http, org.springframework.web, org.springframework.boot.actuate.endpoint.web, org.springframework.boot.web.servlet.ServletContextInitializerBeans|
|sql |org.springframework.jdbc.core, org.hibernate.SQL, org.jooq.tools.LoggerListener|
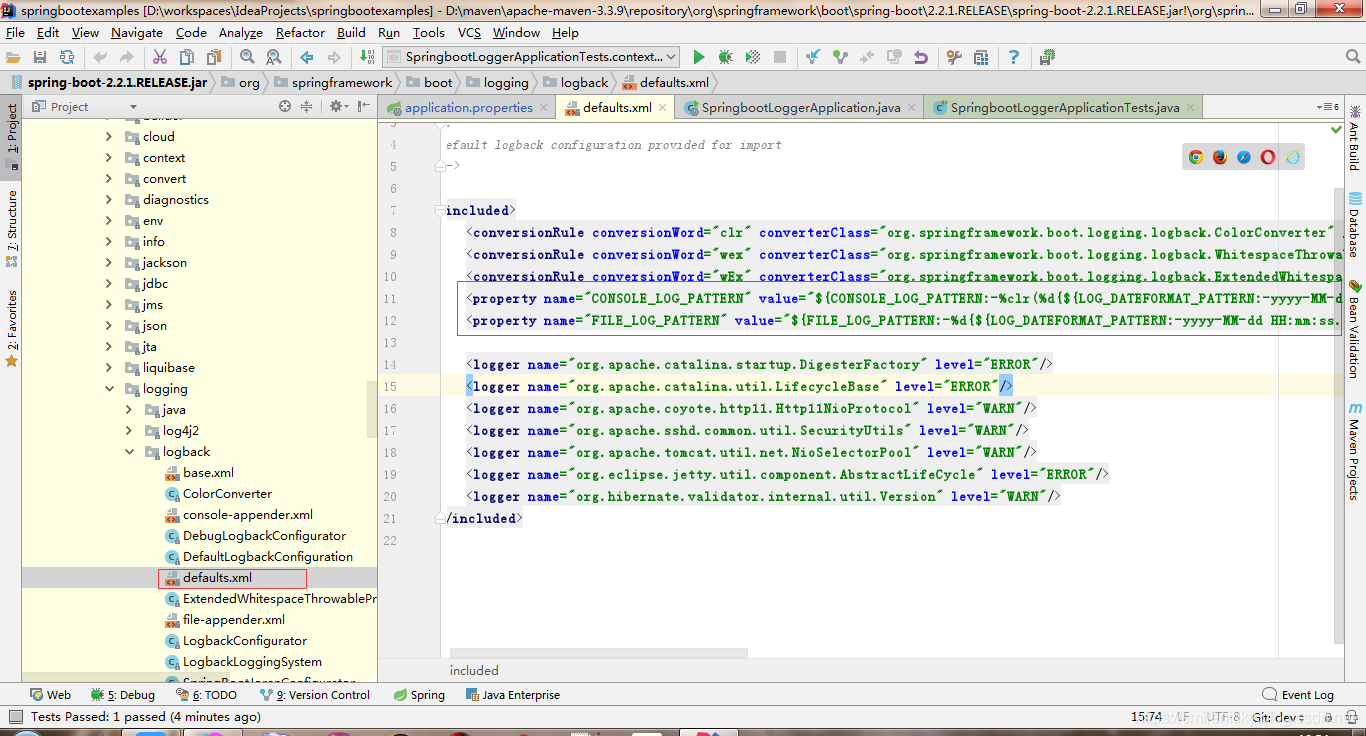
从前面的学习可以知道,Springboot默认使用logback进行日志打印的,所以可以在Springboot的jar包里找到默认的日志格式配置org.springframework.book.logging.logback的包下面找到default.xml,也就是我们不在application.properties配置的话,就加载默认的格式

2019-03-05 10:57:51.112  INFO 45469 --- [           main] org.apache.catalina.core.StandardEngine  : Starting Servlet Engine: Apache Tomcat/7.0.52
2019-03-05 10:57:51.253  INFO 45469 --- [ost-startStop-1] o.a.c.c.C.[Tomcat].[localhost].[/]       : Initializing Spring embedded WebApplicationContext
2019-03-05 10:57:51.253  INFO 45469 --- [ost-startStop-1] o.s.web.context.ContextLoader            : Root WebApplicationContext: initialization completed in 1358 ms
2019-03-05 10:57:51.698  INFO 45469 --- [ost-startStop-1] o.s.b.c.e.ServletRegistrationBean        : Mapping servlet: 'dispatcherServlet' to [/]
2019-03-05 10:57:51.702 INFO 45469 --- [ost-startStop-1] o.s.b.c.embedded.FilterRegistrationBean : Mapping filter: 'hiddenHttpMethodFilter' to: [/*]application.perperties也可以加上自己的自定义配置,本博客使用boot2.2.1
# 定义控制台日志打印格式
logging.pattern.console=%d{yyyy-MM-dd} {%thread} %-5level %logger{50} - %msg%n
# 定义归档日志文件日志格式
logging.pattern.file=%d{yyyy-MM-dd} {%thread} %-5level %logger{50} - %msg%n
注意,日志格式介绍:
- %d:日期;
- %thread:线程名;
- %-5level:日志级别从左显示5个字符长度,列如:DEBUG;
- %logger{50}:java类名,例如:com.muses.taoshop.MyTest,50表示字符长度;
- %msg:日志内容;%n:换行
对于在控制台打印的日志,还可以加上必要的颜色,具体用法是开启spring.output.ansi.enabled,ANSI配置可以参考官方文档:https://docs.spring.io/spring-boot/docs/2.2.1.RELEASE/api//org/springframework/boot/ansi/AnsiOutput.Enabled.html
其实主要如下属性:
application.properties开启
spring.output.ansi.enabled=always具体用法是%clr(${param}){color}
logging.pattern.console=%clr(%d{yyyy-MM-dd HH24:mm:ss.SSS}){green} {%thread} %-5level %logger{50} - %msg%n
Springboot支持的颜色有:
而对于日志归档文件的,我们也可以通过源码看到默认配置为10M的,也就是文件超过10M就自动进行归档,不需要我们自己配置


也可以在application.properties加上默认的配置
# 可以指定目录,也可以不指定,不指定的情况就在项目根目录下面创建日志文件
logging.file.name=springboot.log
# window系统在当前项目的磁盘根目录创建springboot/log文件夹,默认日志文件是spring.log
#logging.file.path=/springboot/log
logging.file.name=springboot.log,可以指定目录,也可以不指定,不指定的情况就在项目根目录下面创建日志文件
logging.file.path=/springboot/log,window系统在当前项目的磁盘根目录创建springboot/log文件夹,默认日志文件是spring.log
对于Springboot怎么配置日志参数,具体可以参考Springboot官网,引用官网的logging配置,官网链接:https://docs.spring.io/spring-boot/docs/2.2.1.RELEASE/reference/html/spring-boot-features.html#boot-features-logging

启用调试模式后,将配置一系列核心记录器(embedded container, Hibernate, and Spring Boot)以输出更多信息。启用调试模式不会将应用程序配置为使用 DEBUG 级别,记录所有消息。
$ java -jar myapp.jar --debug当然也可以在配置文件库开启,将debug设置为TRUE就可以
debug=trueok,本博客只是对日志框架的基本使用进行介绍,详细的比如自定义logback配置等等,请参考我这个专栏的系列博客:https://smilenicky.blog.csdn.net/category_9195353.html
附录:
logging manual:SpringBoot日志官方手册
example source:日志配置github代码下载链接
标签:mile 文件的 boot apache 格式 sha aos 问题: ima
原文地址:https://www.cnblogs.com/mzq123/p/11877160.html