标签:命令 发送消息 aliyun export ceshi netcat memory and 配置环境
? (1) Flume提供一个分布式的,可靠的,对大数据量的日志进行高效收集、聚集、移动的服务,Flume只能在Unix环境下运行。
? (2) Flume基于流式架构,容错性强,也很灵活简单。
? (3) Flume、Kafka用来实时进行数据收集,Spark、Flink用来实时处理数据,impala用来实时查询。
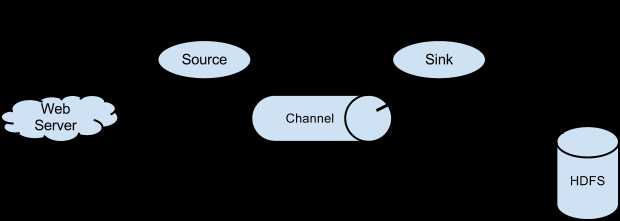
? 用于采集数据,Source是产生数据流的地方,同时Source会将产生的数据流传输到Channel,这个有点类似于Java IO部分的Channel。
? 用于桥接Sources和Sinks,类似于一个队列。
? 从Channel收集数据,将数据写到目标源(可以是下一个Source,也可以是HDFS或者HBase)。
? 传输单元,Flume数据传输的基本单元,以事件的形式将数据从源头送至目的地。
? source监控某个文件或数据流,数据源产生新的数据,拿到该数据后,将数据封装在一个Event中,并put到channel后commit提交,channel队列先进先出,sink去channel队列中拉取数据,然后写入到HDFS或其他目标源中。
? 将flume的gz包上传到/opt/soft/目录下;
[root@bigdata111 conf]# rz? 若不支持rz命令,则用yum安装lrzsz命令:
? 查询含有rz的yum源,由结果可见,yum源中含有lrzsz.x86_64包;
[root@bigdata111 soft]# yum search rzsz
已加载插件:fastestmirror
Loading mirror speeds from cached hostfile
 * base: mirrors.tuna.tsinghua.edu.cn
 * extras: mirrors.aliyun.com
 * updates: mirrors.aliyun.com
============================================================================================================================= N/S matched: rzsz ==============================================================================================================================
lrzsz.x86_64 : The lrz and lsz modem communications programs

  名称和简介匹配 only,使用“search all”试试。
? 安装rz命令
[root@bigdata111 soft]# yum -y install lrzsz? 将flume解压到/opt/module/目录下,并改短名字flume-1.8.0:
[root@bigdata111 soft]# tar -zvxf apache-flume-1.8.0-bin.tar.gz -C /opt/module
[root@bigdata111 module]# mv apache-flume-1.8.0-bin flume-1.8.0? 切换到/opt/module/flume-1.8.0/conf目录,将flume-env.sh.template文件名改为:flume-env.sh
[root@bigdata111 module]# mv flume-env.sh.template flume-env.sh? 查询JAVA_HOME的值;
[root@bigdata111 conf]# echo $JAVA_HOME
/opt/module/jdk1.8.0_144
? 编辑flume-env.sh,将文件内容中的JAVA_HOME的值修改为上面查到的;
export JAVA_HOME=/opt/module/jdk1.8.0_144? 在/etc/profile末尾添加flume的家路径
export FLUME_HOME=/opt/module/flume-1.8.0
export PATH=$PATH:$FLUME_HOME/bin? 在xshell客户端下,输入flu,按tab键,看是否能够自动补全:flume-ng
? 如果可以自动补全,则代表安装flume成功,否则失败。
[root@bigdata112 opt]# flume-ng
Error: Unknown or unspecified command ''

Usage: /opt/module/flume-1.8.0/bin/flume-ng <command> [options]...

commands:
  help                      display this help text
  agent                     run a Flume agent
  avro-client               run an avro Flume client
  version                   show Flume version info
............? 利用scp命令,配置其他两台机器;
? 首先,将flume目录分发到bigdata112,bigdata113
[root@bigdata111 ~]# scp -r /opt/module/flume-1.8.0/ root@bigdata112:/opt/module/
[root@bigdata111 ~]# scp -r /opt/module/flume-1.8.0/ root@bigdata113:/opt/module/
? 其次,将/etc/profile环境变量文件分发到bigdata112,bigdata113
[root@bigdata111 ~]# scp -r /etc/profile root@bigdata112:/etc/
[root@bigdata111 ~]# scp -r /etc/profile root@bigdata113:/etc/
? 最后,在bigdata112,bigdata113上分别刷新环境变量
[root@bigdata112 opt]# source /etc/profile
[root@bigdata113 opt]# source /etc/profile? 目标:Flume监控一端Console,另一端Console发送消息,使被监控端实时显示。
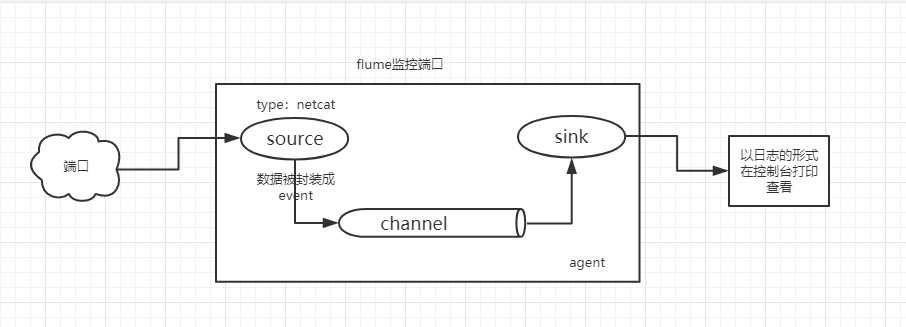
[root@bigdata111 conf]# yum -y install telnet? 在flume根目录下,新建一个myconf目录,用于存放自定义conf配置文件;
? 新建flume-telnet.conf文件,文件内容如下:
# 定义agent
# <自定义agent名>.sources=<自定义source名称>
a1.sources = r1
# <自定义agent名>.sinks=<自定义sink名称>
a1.sinks = k1
# <自定义agent名>.channels=<自定义channel名称>
a1.channels = c1

# 定义source
# <agent名>.sources.<source名称>.type = 源类型
a1.sources.r1.type = netcat
# <agent名>.sources.<source名称>.bind = 数据来源服务器
a1.sources.r1.bind = bigdata111
# <agent名>.sources.<source名称>.port = 自定义未被占用的端口
a1.sources.r1.port = 44445

# 定义sink
# <agent名>.sinks.<sink名称>.type = 下沉到目标源的类型
a1.sinks.k1.type = logger

# 定义channel
# <agent名>.channels.<channel名称>.type = channel的类型
a1.channels.c1.type = memory
# <agent名>.channels.<channel名称>.capacity = 最大容量
a1.channels.c1.capacity = 1000
# transactionCapacity<=capacity
a1.channels.c1.transactionCapacity = 1000

# 双向链接
# <agent名>.sources.<source名称>.channels = channel名称
a1.sources.r1.channels = c1
# <agent名>.sinks.<sink名称>.channel = channel名称
a1.sinks.k1.channel = c1[root@bigdata111 conf]# flume-ng agent --conf /opt/module/flume-1.8.0/conf/ --name a1 --conf-file /opt/module/flume-1.8.0/conf/flume-telnet.conf -Dflume.root.logger==INFO,console? 可以简写为:
[root@bigdata111 conf]# flume-ng agent --c /opt/module/flume-1.8.0/conf/ --n a1 --f /opt/module/flume-1.8.0/conf/flume-telnet.conf -Dflume.root.logger==INFO,console? 通过其他机器向bigdata111的44445端口发送数据
[root@bigdata112 ~]# telnet bigdata111 44445
Trying 192.168.1.111...
Connected to bigdata111.
Escape character is '^]'.
echo aaaa
OK
echo aaaa
OK
echo bbbbbbbbb
OK
运行结果如图:

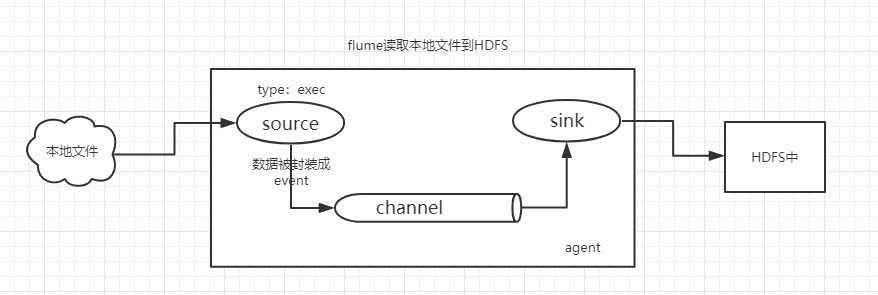
? 创建flume-hdfs配置文件
# 1 agent  若同时运行两个agent,则agent名字需要改变,比如下面a2
a2.sources = r2
a2.sinks = k2
a2.channels = c2

# 2 source
# 因监控linux本地文件,执行shell命令,所以type为exec;
a2.sources.r2.type = exec
# 监控的文件路径
a2.sources.r2.command = tail -F /opt/test.log
a2.sources.r2.shell = /bin/bash -c

# 3 sink
# 数据下沉到目标源hdfs
a2.sinks.k2.type = hdfs
# 如果集群为HA模式,则路径为active的namenode地址,普通分布式集群,直接写namenode所在地址即可。
a2.sinks.k2.hdfs.path = hdfs://bigdata111:9000/flume/%Y%m%d/%H
#上传文件的前缀
a2.sinks.k2.hdfs.filePrefix = logs-
#是否按照时间滚动文件夹
a2.sinks.k2.hdfs.round = true
#多少时间单位创建一个新的文件夹
a2.sinks.k2.hdfs.roundValue = 1
#重新定义时间单位
a2.sinks.k2.hdfs.roundUnit = hour
#是否使用本地时间戳
a2.sinks.k2.hdfs.useLocalTimeStamp = true
#积攒多少个Event才flush到HDFS一次
a2.sinks.k2.hdfs.batchSize = 1000
#设置文件类型,可支持压缩
a2.sinks.k2.hdfs.fileType = DataStream
#多久生成一个新的文件
a2.sinks.k2.hdfs.rollInterval = 600
#设置每个文件的滚动大小
a2.sinks.k2.hdfs.rollSize = 134217700
#文件的滚动与Event数量无关
a2.sinks.k2.hdfs.rollCount = 0
#最小副本数
a2.sinks.k2.hdfs.minBlockReplicas = 1

# 定义channel
a2.channels.c2.type = memory
a2.channels.c2.capacity = 1000
a2.channels.c2.transactionCapacity = 1000

# 双向链接绑定
a2.sources.r2.channels = c2
a2.sinks.k2.channel = c2
[root@bigdata111 flume-1.8.0]# flume-ng agent --conf /opt/module/flume-1.8.0/conf/ --name a2 --conf-file /opt/module/flume-1.8.0/myconf/flume-hdfs.conf [root@bigdata111 opt]# echo kjalksdjglkajsdg2333333333333333asdgasdgasdg >> test.log
[root@bigdata111 opt]# echo kjalksdjglkajsdg2333333333333333asdgasdgasdg >> test.log
[root@bigdata111 opt]# echo kjalksdjglkajsdg2333333333333333asdgasdgasdg >> test.log
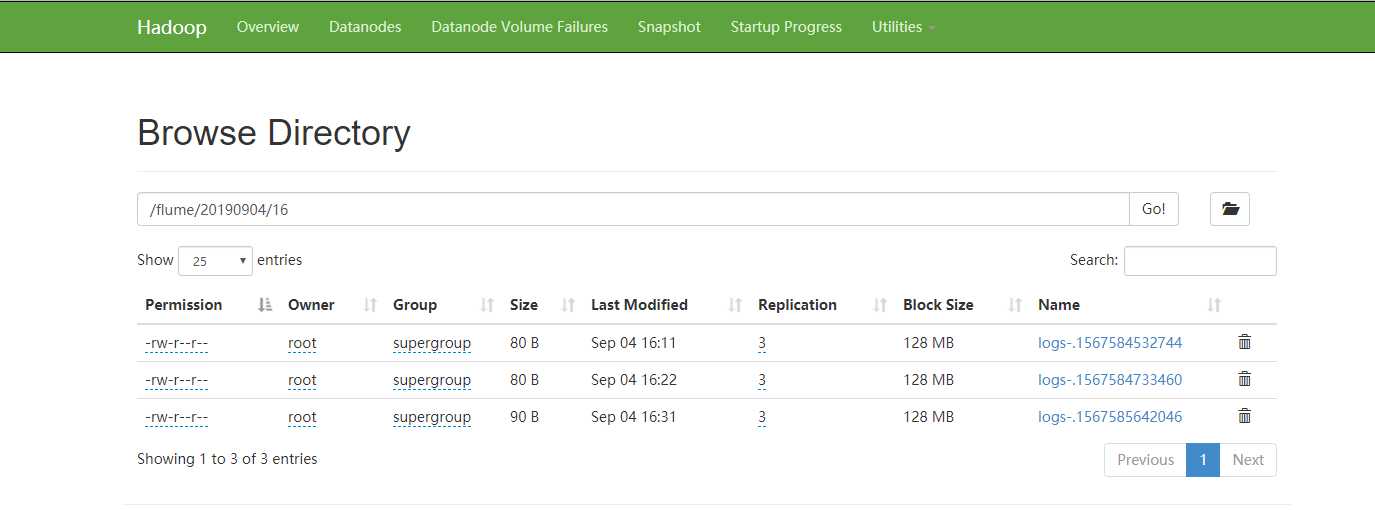
[root@bigdata111 opt]# echo kjalksdjglkajsdg2333333333333333asdgasdgasdg >> test.log? 运行结果:
? 目标:使用flume监听整个目录的文件

? 创建agent配置文件,命名为:flume-dir.conf,文件内容如下:
#1 Agent
a3.sources = r3
a3.sinks = k3
a3.channels = c3

#2 source
#监控目录的类型
a3.sources.r3.type = spooldir
#监控目录的路径
a3.sources.r3.spoolDir = /opt/module/flume1.8.0/upload
#哪个文件上传hdfs,然后给这个文件添加一个后缀
a3.sources.r3.fileSuffix = .COMPLETED
a3.sources.r3.fileHeader = true
#忽略所有以.tmp结尾的文件,不上传(可选)
a3.sources.r3.ignorePattern = ([^ ]*\.tmp)

# 3 sink
a3.sinks.k3.type = hdfs
a3.sinks.k3.hdfs.path = hdfs://bigdata111:9000/flume/%H
#上传文件的前缀
a3.sinks.k3.hdfs.filePrefix = upload-
#是否按照时间滚动文件夹
a3.sinks.k3.hdfs.round = true
#多少时间单位创建一个新的文件夹
a3.sinks.k3.hdfs.roundValue = 1
#重新定义时间单位
a3.sinks.k3.hdfs.roundUnit = hour
#是否使用本地时间戳
a3.sinks.k3.hdfs.useLocalTimeStamp = true
#积攒多少个Event才flush到HDFS一次
a3.sinks.k3.hdfs.batchSize = 100
#设置文件类型,可支持压缩
a3.sinks.k3.hdfs.fileType = DataStream
#多久生成一个新的文件
a3.sinks.k3.hdfs.rollInterval = 600
#设置每个文件的滚动大小大概是128M
a3.sinks.k3.hdfs.rollSize = 134217700
#文件的滚动与Event数量无关
a3.sinks.k3.hdfs.rollCount = 0
#最小副本数
a3.sinks.k3.hdfs.minBlockReplicas = 1

# Use a channel which buffers events in memory
a3.channels.c3.type = memory
a3.channels.c3.capacity = 1000
a3.channels.c3.transactionCapacity = 100

# Bind the source and sink to the channel
a3.sources.r3.channels = c3
a3.sinks.k3.channel = c3
? 温馨提示:
? 1) 不要在监控目录中创建并持续修改文件
? 2) 上传完成的文件会以.COMPLETED结尾
? 3) 被监控文件夹每500毫秒扫描一次文件变动
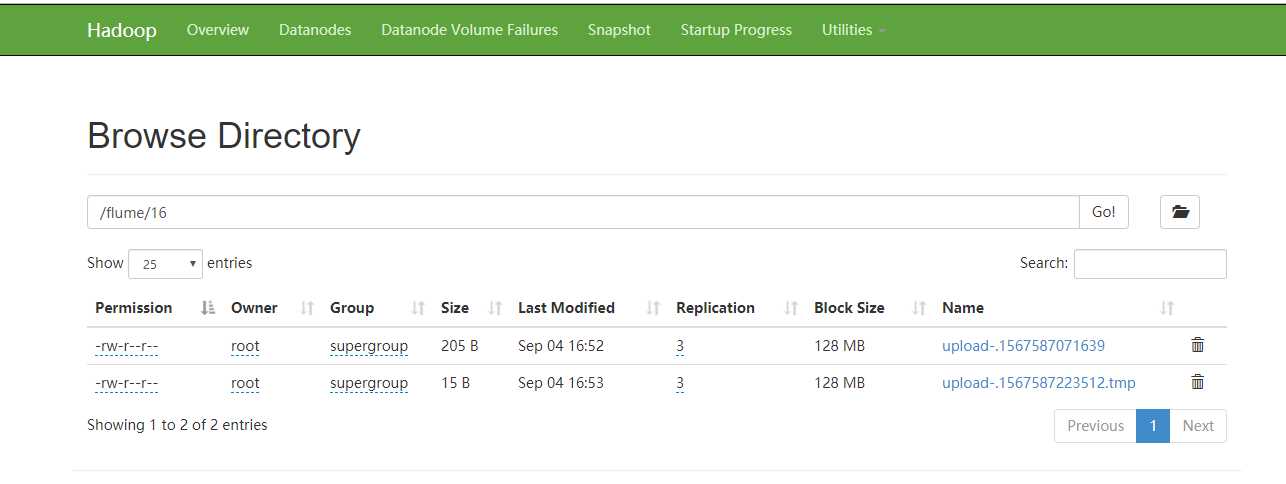
[root@bigdata111 myconf]# flume-ng agent --conf /opt/module/flume-1.8.0/conf/ --name a3 --conf-file /opt/module/flume-1.8.0/myconf/flume-dir.conf[root@bigdata111 opt]# mkdir upload
[root@bigdata111 opt]# ls
module soft test.log upload
[root@bigdata111 opt]# mv test.log upload/
[root@bigdata111 opt]# ls
module soft upload
[root@bigdata111 opt]# vi test1.log
[root@bigdata111 opt]# mv test1.log upload/? 运行如图:
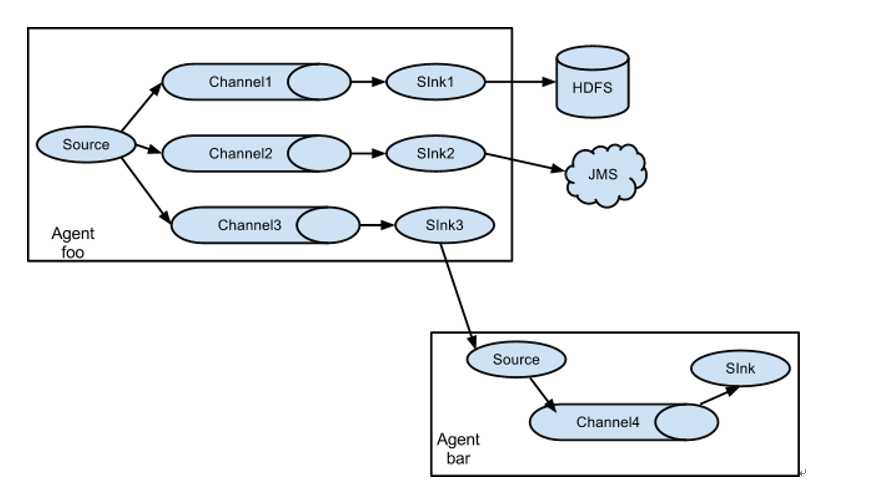
扇出:数据用于多个地方。(简单理解:一个数据源对应多个channel,sink,并且输出到多个目标源)
例子01示意图:
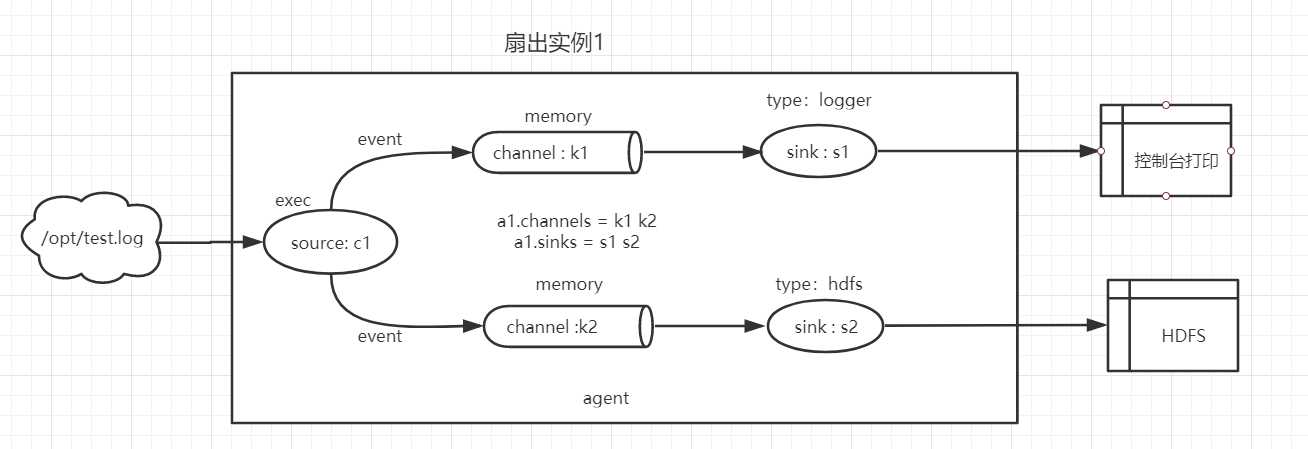
目标:在flume1里面接收数据,然后数据下沉到两个不同目标源(控制台和HDFS)
? 在myconf目录下,新建一个flume-fanout1.conf文件,内容配置如下:
# 定义agent
a1.sources=c1
a1.channels=k1 k2
a1.sinks=s1 s2

# 定义source
a1.sources.c1.type=exec
a1.sources.c1.command=tail -F /opt/test.log
a1.sources.c1.shell=/bin/bash -c

# 将数据流复制给多个channel
a1.sources.r1.selector.type=replicating

# 定义channel1
a1.channels.k1.type=memory
a1.channels.k1.capacity = 1000
a1.channels.k1.transactionCapacity=1000

# 定义channel2
a1.channels.k2.type=memory
a1.channels.k2.capacity = 1000
a1.channels.k2.transactionCapacity=1000

# 定义sink1
a1.sinks.s1.type=logger

# 定义sink2
a1.sinks.s2.type=hdfs
a1.sinks.s2.hdfs.path = hdfs://bigdata111:9000/flume/%Y%m%d/%H
# 上传文件的前缀
a1.sinks.s2.hdfs.filePrefix = logs-
# 是否按照时间滚动文件夹
a1.sinks.s2.hdfs.round = true
# 多少时间单位创建一个新的文件夹
a1.sinks.s2.hdfs.roundValue = 1
# 重新定义时间单位
a1.sinks.s2.hdfs.roundUnit = hour
# 是否使用本地时间戳
a1.sinks.s2.hdfs.useLocalTimeStamp = true
# 积攒多少个Event才flush到HDFS一次
a1.sinks.s2.hdfs.batchSize = 1000
# 设置文件类型,可支持压缩
a1.sinks.s2.hdfs.fileType = DataStream
# 多久生成一个新的文件
a1.sinks.s2.hdfs.rollInterval = 600
# 设置每个文件的滚动大小
a1.sinks.s2.hdfs.rollSize = 134217700
# 文件的滚动与Event数量无关
a1.sinks.s2.hdfs.rollCount = 0
# 最小副本数
a1.sinks.s2.hdfs.minBlockReplicas = 1

# 双向链接
a1.sources.c1.channels = k1 k2
a1.sinks.s1.channel=k1
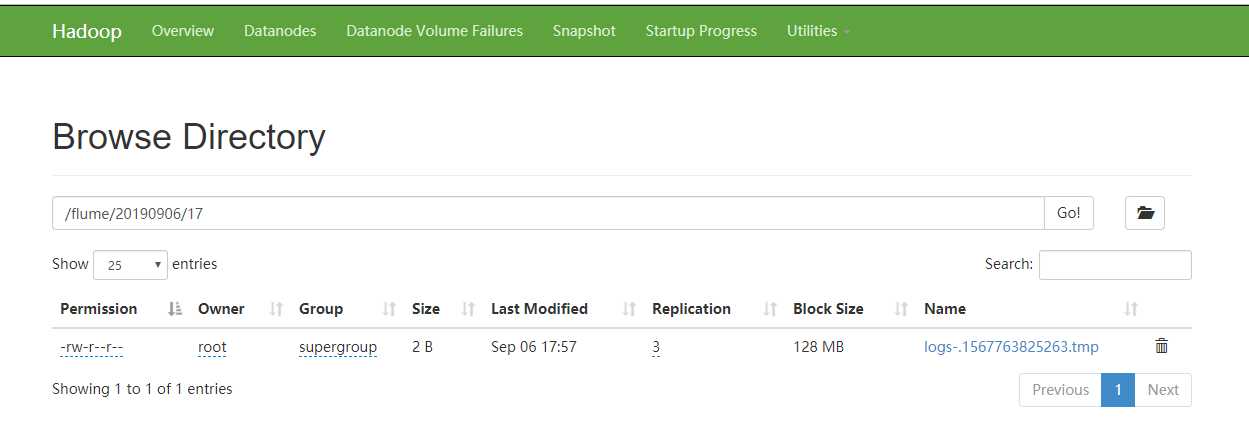
a1.sinks.s2.channel=k2[root@bigdata111 myconf]# flume-ng agent --conf /opt/module/flume-1.8.0/conf/ --name a1 --conf-file /opt/module/flume-1.8.0/myconf/flume-fanout1.conf -Dflume.root.logger==INFO,console? 切换到/opt/目录下,新建test.log文件,然后动态添加内容,观察控制台输出以及web的hdfs文件
[root@bigdata111 opt]# touch test.log
[root@bigdata111 opt]# touch test.log
[root@bigdata111 opt]# echo 'china' >>test.log
[root@bigdata111 opt]# echo 'hello world' >>test.log
[root@bigdata111 opt]# echo 'nihao' >> test.log
? 控制台输出如下:

? web页面结果:
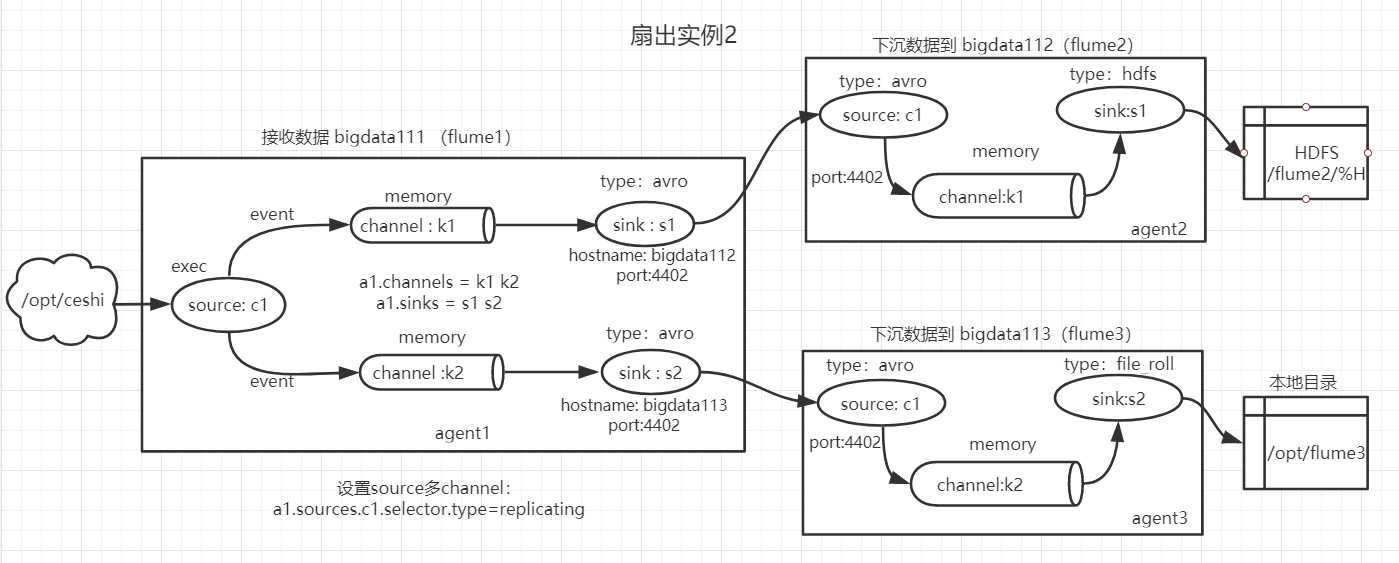
目标:flume1监控文件,然后将变动数据分别传给flume2和flume3,flume2的数据下沉到HDFS;flume3的数据下沉到本地文件;
? 在bigdata111上的myconf目录下,新建agent配置文件:flume-fanout1.conf;
? flume1用于监控某文件的变动,同时产生两个channel和两个sink,分别输送给flume2,flume3;
? 文件内容如下:
# 配置agent
a1.sources = c1
a1.channels = k1 k2
a1.sinks = s1 s2

# 定义source
a1.sources.c1.type=exec
a1.sources.c1.command=tail -F /opt/test.log
a1.sources.c1.shell=/bin/bash -c

# 将数据流复制给多个channel
a1.sources.c1.selector.type=replicating

# 定义channel1
a1.channels.k1.type=memory
a1.channels.k1.capacity = 1000
a1.channels.k1.transactionCapacity=1000

# 定义channel2
a1.channels.k2.type=memory
a1.channels.k2.capacity = 1000
a1.channels.k2.transactionCapacity=1000

# 定义sink1
a1.sinks.s1.type = avro
a1.sinks.s1.hostname = bigdata112
a1.sinks.s1.port = 4402

# 定义sink2
a1.sinks.s2.type = avro
a1.sinks.s2.hostname = bigdata113
a1.sinks.s2.port = 4402

# 双向链接
a1.sources.c1.channels = k1 k2
a1.sinks.s1.channel=k1
a1.sinks.s2.channel=k2? 在bigdata112的myconf目录下,新建agent配置文件:flume-fanout2.conf
? 接收flume1的event数据,然后产生一个channel和一个sink,最后将数据下沉到hdfs
? 文件内容如下:
# 配置agent 不同agent之间,agent名不相同,但是source,channel,sink名可以相同
a2.sources = c2
a2.channels = k2
a2.sinks = s2

# 定义source
a2.sources.c2.type=avro
a2.sources.c2.bind = bigdata112
a2.sources.c2.port = 4402

# 定义channel
a2.channels.k2.type=memory
a2.channels.k2.capacity = 1000
a2.channels.k2.transactionCapacity=1000

# 定义sink
a2.sinks.s2.type = hdfs
a2.sinks.s2.hdfs.path=hdfs://bigdata111:9000/flume2/%H
#上传文件的前缀
a2.sinks.s2.hdfs.filePrefix = flume2-
#是否按照时间滚动文件夹
a2.sinks.s2.hdfs.round = true
#多少时间单位创建一个新的文件夹
a2.sinks.s2.hdfs.roundValue = 1
#重新定义时间单位
a2.sinks.s2.hdfs.roundUnit = hour
#是否使用本地时间戳
a2.sinks.s2.hdfs.useLocalTimeStamp = true
#积攒多少个Event才flush到HDFS一次
a2.sinks.s2.hdfs.batchSize = 100
#设置文件类型,可支持压缩
a2.sinks.s2.hdfs.fileType = DataStream
#多久生成一个新的文件
a2.sinks.s2.hdfs.rollInterval = 600
#设置每个文件的滚动大小大概是128M
a2.sinks.s2.hdfs.rollSize = 134217700
#文件的滚动与Event数量无关
a2.sinks.s2.hdfs.rollCount = 0
#最小副本数
a2.sinks.s2.hdfs.minBlockReplicas = 1

# 双向链接
a2.sources.c2.channels = k2
a2.sinks.s2.channel=k2? 在bigdata113的myconf目录下,新建agent配置文件:flume-fanout3.conf
? 接收flume1的event数据,然后产生一个channel和一个sink,最后将数据下沉到本地/opt/flume3
? 文件内容如下:
# 配置agent
a3.sources = c3
a3.channels = k3
a3.sinks = s3

# 定义source
a3.sources.c3.type=avro
a3.sources.c3.bind = bigdata113
a3.sources.c3.port = 4402

# 定义channel
a3.channels.k3.type=memory
a3.channels.k3.capacity = 1000
a3.channels.k3.transactionCapacity=1000

# 定义sink
a3.sinks.s3.type = file_roll
# 提示:本地此目录必须先建好,程序不会自动创建该目录
a3.sinks.s3.sink.directory=/opt/flume3

# 双向链接
a3.sources.c3.channels = k3
a3.sinks.s3.channel=k3bigdata111:
[root@bigdata111 myconf]# flume-ng agent --conf /opt/module/flume-1.8.0/conf/ --name a1 --conf-file /opt/module/flume-1.8.0/myconf/flume-fanout1.conf -Dflume.root.logger==INFO,consolebigdata112:
[root@bigdata112 myconf]# flume-ng agent --conf /opt/module/flume-1.8.0/conf/ --name a2 --conf-file /opt/module/flume-1.8.0/myconf/flume-fanout2.conf bigdata113:
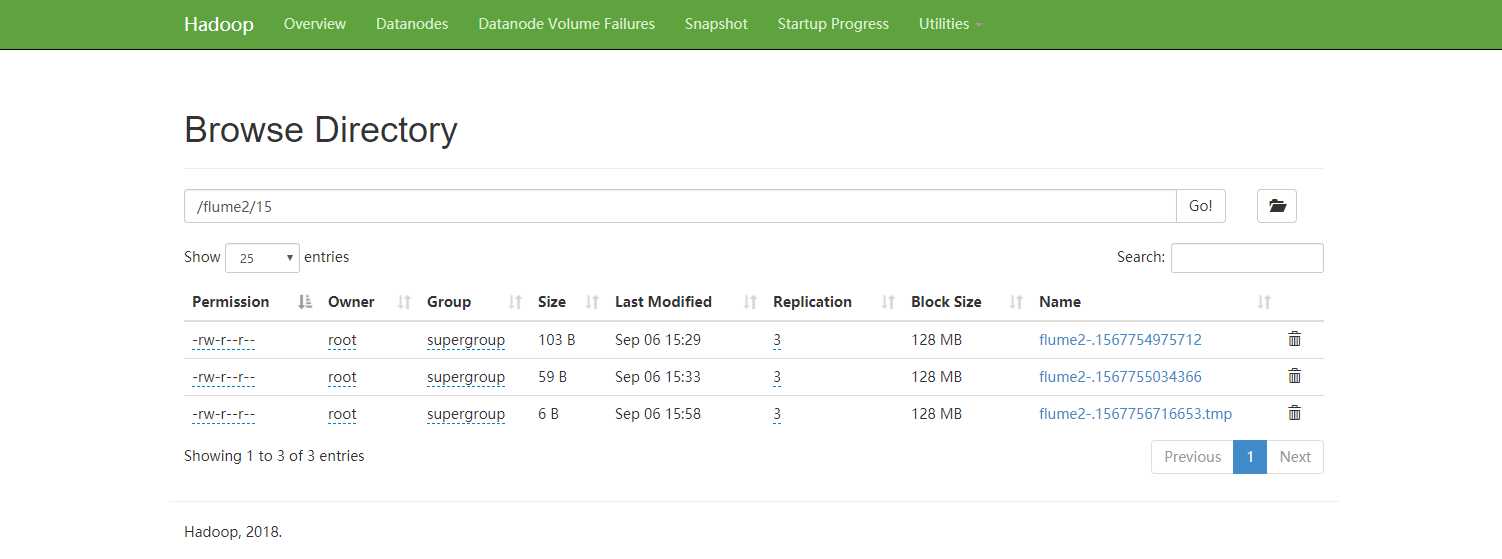
[root@bigdata113 myconf]# flume-ng agent --conf /opt/module/flume-1.8.0/conf/ --name a3 --conf-file /opt/module/flume-1.8.0/myconf/flume-fanout3.conf ? 运行结果如图:
? bigdata112:
? bigdata113:

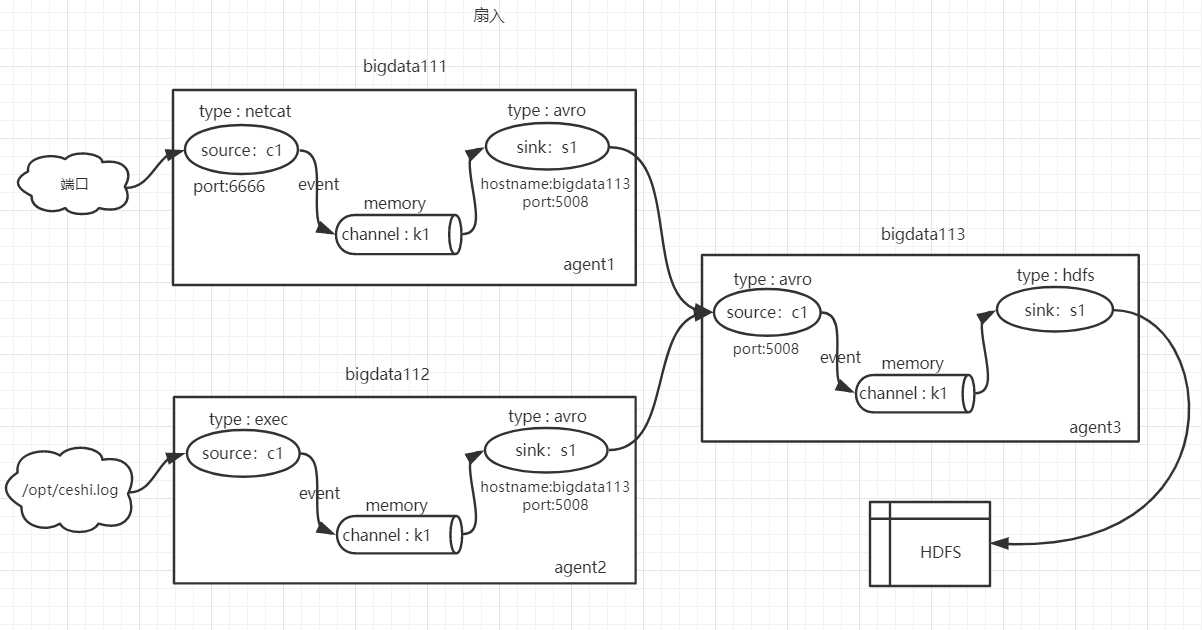
? flume1(agent1)监控端口数据变化,将数据sink到flume3(agent3);
? 在myconf目录下新建agent文件:flume-fanin-1.conf
? 配置内容如下:
# 配置agent
a1.sources = c1
a1.channels = k1
a1.sinks = s1

# 配置source
a1.sources.c1.type = netcat
a1.sources.c1.bind = bigdata111
a1.sources.c1.port = 6666

# 配置sink
a1.sinks.s1.type=avro
a1.sinks.s1.hostname=bigdata113
a1.sinks.s1.port=5008

# 配置channel
a1.channels.k1.type=memory
a1.channels.k1.capacity=1000
a1.channels.k1.transactionCapacity=1000

# 双向绑定
a1.sources.c1.channels = k1
a1.sinks.s1.channel = k1? flume2(agent2)监控本地文件变化,将数据sink到flume3(agent3);
? 在myconf目录下新建agent文件:flume-fanin-2.conf
? 配置内容如下:
# 配置agent
a2.sources = c1
a2.channels = k1
a2.sinks = s1

# 配置source
a2.sources.c1.type = exec
a2.sources.c1.command = tail -F /opt/ceshi.log
a2.sources.c1.shell=/bin/bash -c

# 配置sink
a2.sinks.s1.type=avro
a2.sinks.s1.hostname=bigdata113
a2.sinks.s1.port=5008

# 配置channel
a2.channels.k1.type=memory
a2.channels.k1.capacity=1000
a2.channels.k1.transactionCapacity=1000

# 双向绑定
a2.sources.c1.channels = k1
a2.sinks.s1.channel = k1? flume3(agent3)接收flume1和flume2的数据,将数据sink到HDFS ;
? 在myconf目录下新建agent文件:flume-fanin-3.conf
? 配置内容如下:
# 配置agent
a3.sources = c1
a3.channels = k1
a3.sinks = s1

# 配置source
a3.sources.c1.type = avro
a3.sources.c1.bind = bigdata113
a3.sources.c1.port = 5008

# 配置sink
a3.sinks.s1.type=hdfs
a3.sinks.s1.hdfs.path=hdfs://bigdata111:9000/flume3/%H
# 上传文件的前缀
a3.sinks.s1.hdfs.filePrefix = flume3-
# 是否按照时间滚动文件夹
a3.sinks.s1.hdfs.round = true
# 多少时间单位创建一个新的文件夹
a3.sinks.s1.hdfs.roundValue = 1
# 重新定义时间单位
a3.sinks.s1.hdfs.roundUnit = hour
# 是否使用本地时间戳
a3.sinks.s1.hdfs.useLocalTimeStamp = true
# 积攒多少个Event才flush到HDFS一次
a3.sinks.s1.hdfs.batchSize = 1000
# 设置文件类型,可支持压缩
a3.sinks.s1.hdfs.fileType = DataStream
# 多久生成一个新的文件
a3.sinks.s1.hdfs.rollInterval = 600
# 设置每个文件的滚动大小大概是128M
a3.sinks.s1.hdfs.rollSize = 134217700
# 文件的滚动与Event数量无关
a3.sinks.s1.hdfs.rollCount = 0
# 最小冗余数
a3.sinks.s1.hdfs.minBlockReplicas = 1

# 配置channel
a3.channels.k1.type=memory
a3.channels.k1.capacity=1000
a3.channels.k1.transactionCapacity=1000

# 双向绑定
a3.sources.c1.channels = k1
a3.sinks.s1.channel = k1flume1:
[root@bigdata111 myconf]# flume-ng agent -c ../conf/ -n a1 -f flume-fanout1.conf -Dflume.root.logger==INFO,consoleflume2:
[root@bigdata112 myconf]# flume-ng agent -c ../conf/ -n a2 -f flume-fanout2.conf flume3:
[root@bigdata113 myconf]# flume-ng agent -c ../conf/ -n a3 -f flume-fanout3.conf 新开xshell选项卡,链接bigdata111服务器,然后执行telnet命令:
[root@bigdata111 ~]# telnet bigdata111 6666
Trying 192.168.1.111...
Connected to bigdata111.
Escape character is '^]'.
english
OK
chinese
OK
hello
OK
.net
OK
php
OK
java
OK
新开xshell选项卡,链接bigdata112服务器,然后向/opt/ceshi.log添加新内容:
[root@bigdata112 ~]# cd /opt/
[root@bigdata112 opt]# ls
ceshi.log  ha  module  soft  zookeeper.out
[root@bigdata112 opt]# cat ceshi.log
start-log-in
end-log
[root@bigdata112 opt]# echo `date` >> ceshi.log
[root@bigdata112 opt]# echo "end-log" >> ceshi.log
[root@bigdata112 opt]# cat ceshi.log
start-log-in
end-log
2019年 09月 07日 星期六 23:36:03 CST
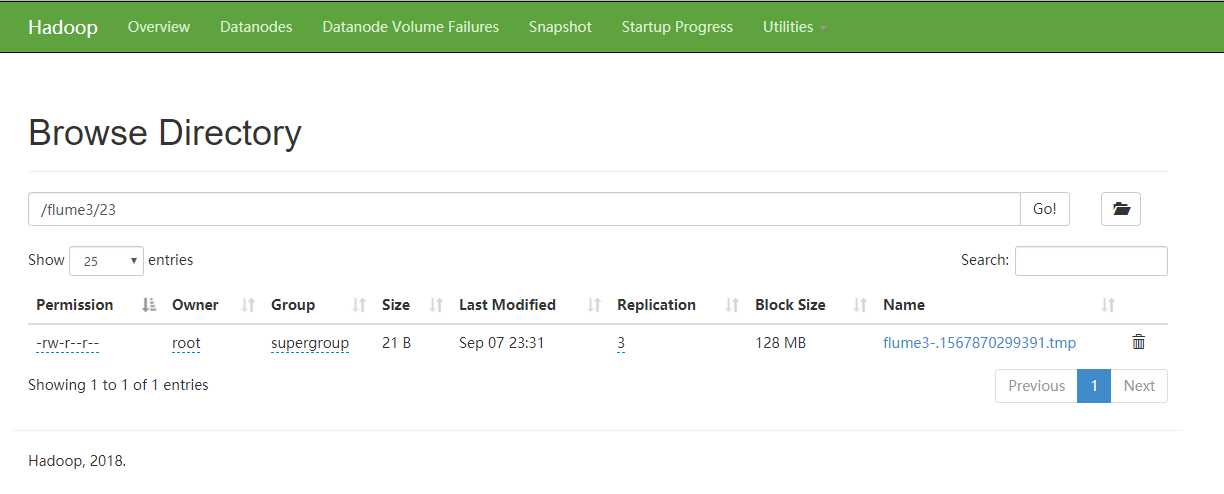
end-log? web页面结果:
? hdfs的文件内容:

标签:命令 发送消息 aliyun export ceshi netcat memory and 配置环境
原文地址:https://www.cnblogs.com/ShadowFiend/p/11910284.html