标签:buffer sign registry home index 样式 插入 post run
1.简单的说 Node.js 就是运行在服务端的 JavaScript。
2.NPM是随同NodeJS一起安装的包管理工具(新版的nodejs已经集成了npm),能解决NodeJS代码部署上的很多问题,常见的使用场景有以下几种:
允许用户从NPM服务器下载别人编写的第三方包到本地使用。
允许用户从NPM服务器下载并安装别人编写的命令行程序到本地使用。
允许用户将自己编写的包或命令行程序上传到NPM服务器供别人使用。
3.webpack
webpack 是一个现代 JavaScript 应用程序的静态模块打包器(module bundler)。当 webpack 处理应用程序时,它会递归地构建一个依赖关系图(dependency graph),其中包含应用程序需要的每个模块,然后将所有这些模块打包成一个或多个 bundle。
4.vue-cli
是vue脚手架,它是一个专门为单页面应用快速搭建繁杂的脚手架,它可以轻松的创建新的应用程序而且可用于自动生成vue和webpack的项目模板。
下载地址:https://nodejs.org/dist/v4.4.3/node-v4.4.3-x64.msi
下载完成安装即可。会自动修改path环境变量,也无需配置。
C:\Users\Administrator>node -v
v4.4.3

C:\Users\Administrator>npm -v
2.15.1
(1)新建一个JS,命名为server.js。内容如下:
var http = require(‘http‘);

http.createServer(function (request, response) {

    // 发送 HTTP 头部
    // HTTP 状态值: 200 : OK
    // 内容类型: text/plain
    response.writeHead(200, {‘Content-Type‘: ‘text/plain‘});

    // 发送响应数据 "Hello World"
    response.end(‘Hello World\n‘);
}).listen(8888);

// 终端打印如下信息
console.log(‘Server running at http://127.0.0.1:8888/‘);
第一行请求(require)Node.js 自带的 http 模块,并且把它赋值给 http 变量。
接下来我们调用 http 模块提供的函数: createServer 。这个函数会返回 一个对象,这个对象有一个叫做 listen 的方法,这个方法有一个数值参数, 指定这个 HTTP 服务器监听的端口号。
(2)使用node启动上面服务:
C:\Users\Administrator\Desktop\nodetest> node server.js
Server running at http://127.0.0.1:8888/
(3)访问测试:

补充:此处为nodejs的模块用法
一个 Node.js 文件就是一个模块,这个文件可能是JavaScript 代码、JSON 或者编译过的C/C++ 扩展。
比如:
(1)创建模块: hello.js
exports.world = function() {
    console.log(‘hello.js! Hello World‘);
}
(2)引用模块: main.js
var hello = require(‘./hello‘);
hello.world();
代码 require(‘./hello‘) 引入了当前目录下的 hello.js 文件(./ 为当前目录,node.js 默认后缀为 js)。
Node.js 提供了 exports 和 require 两个对象,其中 exports 是模块公开的接口,require 用于从外部获取一个模块的接口,即所获取模块的 exports 对象。
(3)执行main.js进行测试
E:\HBuilderSpace\vue\node>node ./main.js
hello.js! Hello World
有时候我们只是想把一个对象封装到模块中,格式如下:
module.exports = function() {
  // ...
}
(1)hello.js
//hello.js
function Hello() {
    var name;
    this.setName = function(thyName) {
        name = thyName;
    };
    this.sayHello = function() {
        console.log(‘Hello ‘ + name);
    };
};
module.exports = Hello;
(2)main.js
//main.js
var Hello = require(‘./hello‘);
hello = new Hello();
hello.setName(‘BYVoid‘);
hello.sayHello();
(3)执行main.js
E:\HBuilderSpace\vue\node>node ./main.js
Hello BYVoid
模块接口的唯一变化是使用 module.exports = Hello 代替了exports.world = function(){}。 在外部引用该模块时,其接口对象就是要输出的 Hello 对象本身,而不是原先的 exports。
注意:服务端的模块放在哪里?
一开始我们使用http模块语法如下:
var http = require("http");

...

http.createServer(...);
Node.js 中自带了一个叫做 http 的模块,我们在我们的代码中请求它并把返回值赋给一个本地变量。
这把我们的本地变量变成了一个拥有所有 http 模块所提供的公共方法的对象。
Node.js 的 require 方法中的文件查找策略如下:由于 Node.js 中存在 4 类模块(原生模块和3种文件模块),尽管 require 方法极其简单,但是内部的加载却是十分复杂的,其加载优先级也各自不同。
npm常用命令如下:
npm 的包安装分为本地安装(local)、全局安装(global)两种
语法:
npm install express          # 本地安装
npm install express -g   # 全局安装
本地安装
1. 将安装包放在 ./node_modules 下(运行 npm 命令时所在的目录),如果没有 node_modules 目录,会在当前执行 npm 命令的目录下生成 node_modules 目录。
2. 可以通过 require() 来引入本地安装的包。
全局安装
1. 将安装包放在 /usr/local 下或者你 node 的安装目录。
2. 可以直接在命令行里使用。
例如: 第一行输出了模块的版本号及安装位置。
C:\Users\Administrator>npm install express
express@4.17.1 node_modules\express
├── escape-html@1.0.3
├── content-type@1.0.4
├── array-flatten@1.1.1
├── statuses@1.5.0
├── utils-merge@1.0.1
├── cookie-signature@1.0.6
├── encodeurl@1.0.2
├── methods@1.1.2
├── merge-descriptors@1.0.1
├── content-disposition@0.5.3
├── cookie@0.4.0
├── fresh@0.5.2
├── range-parser@1.2.1
├── parseurl@1.3.3
├── vary@1.1.2
├── serve-static@1.14.1
├── etag@1.8.1
├── path-to-regexp@0.1.7
├── safe-buffer@5.1.2
├── setprototypeof@1.1.1
├── depd@1.1.2
├── qs@6.7.0
├── finalhandler@1.1.2 (unpipe@1.0.0)
├── on-finished@2.3.0 (ee-first@1.1.1)
├── proxy-addr@2.0.5 (forwarded@0.1.2, ipaddr.js@1.9.0)
├── debug@2.6.9 (ms@2.0.0)
├── send@0.17.1 (destroy@1.0.4, ms@2.1.1, mime@1.6.0, http-errors@1.7.3)
├── type-is@1.6.18 (media-typer@0.3.0, mime-types@2.1.25)
├── accepts@1.3.7 (negotiator@0.6.2, mime-types@2.1.25)
└── body-parser@1.19.0 (bytes@3.1.0, raw-body@2.4.0, http-errors@1.7.2, iconv-lite@0.4.24)
我们到 C:\Users\Administrator 目录下可以看到:

补充:npm install 还有两种用法
npm install moduleName # 安装模块到项目目录下

npm install -g moduleName # -g 的意思是将模块安装到全局,具体安装到磁盘哪个位置,要看 npm config prefix 的位置。

npm install -save moduleName # -save 的意思是将模块安装到项目目录下,并在package文件的dependencies节点写入依赖。

npm install -save-dev moduleName # -save-dev 的意思是将模块安装到项目目录下,并在package文件的devDependencies节点写入依赖。
2.查看安装信息
npm list 查看本地模块
npm list -g查看全局模块
例如:
C:\Users\Administrator
└─┬ express@4.17.1
  ├─┬ accepts@1.3.7
...

C:\Users\Administrator\AppData\Roaming\npm
└─┬ cnpm@6.1.0
  ├── auto-correct@1.0.0
也可以加上模块名称查看版本,例如:
C:\Users\Administrator>npm list express
C:\Users\Administrator
└── express@4.17.1


C:\Users\Administrator>npm list -g cnpm
C:\Users\Administrator\AppData\Roaming\npm
└── cnpm@6.1.0
卸载本地模块:
C:\Users\Administrator>npm uninstall express
unbuild express@4.17.1

C:\Users\Administrator>npm ls
C:\Users\Administrator
└── (empty)
卸载之后对应的目录也会删掉。
卸载全局模块:
C:\Users\Administrator>npm uninstall -g cnpm
unbuild cnpm@6.1.0

C:\Users\Administrator>npm list -g
C:\Users\Administrator\AppData\Roaming\npm
└── (empty)
npm update express
npm search express
国内直接使用 npm 的官方镜像是非常慢的,这里推荐使用淘宝 NPM 镜像。
安装cnpm全局模块:
npm install -g cnpm --registry=https://registry.npm.taobao.org
之后接可以使用 cnpm 命令来安装模块了:
cnpm install [name]
由于我在cnpm安装webpack的时候报错,所以我选择安装最新版本的nde.js。下载地址
webpack中文文档:https://www.webpackjs.com/concepts/
cnpm install webpack -g
在webpack 3中,webpack本身和它的CLI以前都是在同一个包中,但在第4版中,他们已经将两者分开来更好地管理它们。所以我先用cnpm下载好该模块:
cnpm install webpack-cli -g
(1)创建1个目录webpack并进入该目录
(2)用npm进行生成项目信息,并把信息存放到 package.json文件中
E:\HBuilderSpace\vue\webpack>npm init -y
Wrote to E:\HBuilderSpace\vue\webpack\package.json:

{
  "name": "webpack",
  "version": "1.0.0",
  "description": "",
  "main": "index.js",
  "scripts": {
    "test": "echo \"Error: no test specified\" && exit 1"
  },
  "keywords": [],
  "author": "",
  "license": "ISC"
}
(3)安装webpack,由于只在开发环境下会用到,这里用了`--save-dev`标识
cnpm install --save-dev webpack
安装完成文件如下:
E:\HBuilderSpace\vue\webpack>ls
node_modules  package.json
node_modules 用来存放我们通过npm命令安装的软件。
package.json 文件记录该项目的元信息,以及一些依赖包信息。
可视化查看结如下;

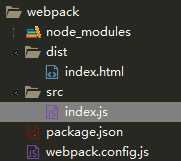
1.目录结构如下:
2.dist/index.html内容:
<!-- dist/index.html -->
<!DOCTYPE html>
<html>

    <head>
        <meta charset="utf-8">
        <title></title>
        <script type="text/javascript" src="bundle.js">
        </script>
    </head>

    <body>
    </body>

</html>
3.src/index.js
// src/index.js
document.write("Hello Webpack!!!");
4.根目录webpack.config.js
// webpack.config.js
const path = require(‘path‘);

module.exports = {
  entry: ‘./src/index.js‘,
  output: {
    filename: ‘bundle.js‘,
    path: path.resolve(__dirname, ‘dist‘)
  }
};
稍微解释一下。第一行是引入了pat模块,是nodejs的语法。
moudle.exports:
entry:入口起点(entry point)指示 webpack 应该使用哪个模块,来作为构建其内部依赖图的开始。进入入口起点后,webpack 会找出有哪些模块和库是入口起点(直接和间接)依赖的
output :告诉 webpack 在哪里输出它所创建的 bundles,以及如何命名这些文件,默认值为 ./dist。基本上,整个应用程序结构,都会被编译到你指定的输出路径的文件夹中。你可以通过在配置中指定一个 output 字段,来配置这些处理过程。
5.根目录下执行webpack命令
E:\HBuilderSpace\vue\webpack>webpack

E:\HBuilderSpace\vue\webpack>"node"  "C:\Users\liqiang\AppData\Roaming\npm\\node_modules\webpack\bin\webpack.js"
Hash: 4d5355ed6a56b418d74b
Version: webpack 4.41.2
Time: 1693ms
Built at: 2019-11-25 22:58:33
    Asset       Size  Chunks             Chunk Names
bundle.js  964 bytes       0  [emitted]  main
Entrypoint main = bundle.js
[0] ./src/index.js 52 bytes {0} [built]
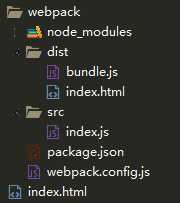
6.生成的目录结构如下:(会生成bundle.js文件)
7.直接访问index.html即可:

Webpack 本身只能处理 JavaScript 模块,如果要处理其他类型的文件,就需要使用 loader 进行转换。
所以如果我们需要在应用中添加 css 文件,就需要使用到 css-loader 和 style-loader,他们做两件不同的事情,css-loader 会遍历 CSS 文件,然后找到 url() 表达式然后处理他们,style-loader 会把原来的 CSS 代码插入页面中的一个 style 标签中。
(1)安装loader模块
E:\HBuilderSpace\vue\webpack>cnpm install css-loader style-loader --save-dev
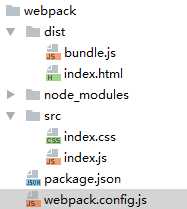
(2)src下新建index.css文件
目录结构:
内容:
body {
    color: yellow;
    font-size: 40px;
}
(3)修改index.js引入css模块
// src/index.js
require("!style-loader!css-loader!./index.css");

document.write("Hello Webpack!!!");
(4)执行webpack后测试:

上面使用的是内联的loader,import 语句中显式指定 loader,! 将资源中的 loader 分开。
补充:webpack推荐使用的是配置的loader,如下:
(1)修改index.js
// src/index.js
require("./index.css");

document.write("Hello Webpack!!!");
(2)修改webpack.config.js引入css的loader(注意顺序也是先style后css)
// webpack.config.js
const path = require(‘path‘);

module.exports = {
    entry: ‘./src/index.js‘,
    output: {
        filename: ‘bundle.js‘,
        path: path.resolve(__dirname, ‘dist‘),
    },
    module: {
        rules: [
            {
                test: /\.css$/, use: [‘style-loader‘, ‘css-loader‘]
            }
        ]
    }
}
;
补充:引入sass
E:\HBuilderSpace\vue\webpack>cnpm install sass-loader --save-dev
(2)src下新建index.scss
body {
  color: yellow;
  font-size: 40px;
  h1 {
    background-color: red;
  }
}
// src/index.js
require("./index.scss");

document.write("Hello Webpack!!!<br/><h1>标题</h1>");
(4)修改webpack.config.js
// webpack.config.js
const path = require(‘path‘);

module.exports = {
    entry: ‘./src/index.js‘,
    output: {
        filename: ‘bundle.js‘,
        path: path.resolve(__dirname, ‘dist‘),
    },
    module: {
        rules: [
            {
                test: /\.css$/, use: [‘style-loader‘, ‘css-loader‘]
            }, {
                test: /\.scss$/, use: [‘style-loader‘, ‘css-loader‘, ‘sass-loader‘]
            }
        ]
    }
}
;
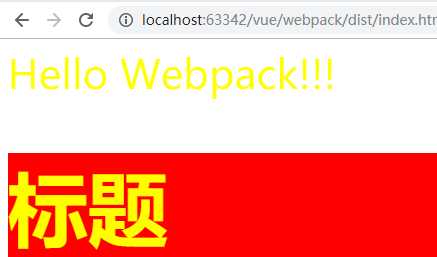
插件在 webpack 的配置信息 plugins 选项中指定,用于完成一些 loader 不能完成的工。webpack 自带一些插件,你可以通过 cnpm 安装一些插件。
由于插件可以携带参数/选项,你必须在 webpack 配置中,向 plugins 属性传入 new 实例。
比如我们可以安装内置的 BannerPlugin 插件,用于在文件头部输出一些注释信息。
修改webpack.config.js
// webpack.config.js
const path = require(‘path‘);
const webpack=require(‘webpack‘);

module.exports = {
    entry: ‘./src/index.js‘,
    output: {
        filename: ‘bundle.js‘,
        path: path.resolve(__dirname, ‘dist‘),
    },
    module: {
        rules: [
            {
                test: /\.css$/, use: [‘style-loader‘, ‘css-loader‘]
            }, {
                test: /\.scss$/, use: [‘style-loader‘, ‘css-loader‘, ‘sass-loader‘]
            }
        ]
    },
    plugins:[
        new webpack.BannerPlugin(‘头部注释‘)
    ]
}
;
重新webpack之后查看bundle.js会加上头部注释:
/*! 头部注释 */!function(t){var e={};function n(r){if(e[r])return e[r].exports;var o=e[r]={i:r,l:!1,exports:{}};return t[r].call(o.exports,o,o.exports,n),o.l=!0,o.exports}n.m=t,n.c=e,n.d=function(t,e,r){n.o(t,e)||Object.defineProperty(t,e,{enumerable:!0,get:r})},n.r=function(t){"undefined"!=typeof Symbol&&Symbol.toStringTag&&Object.defineProperty(t,Symbol.toStringTag,{value:"Module"}),Object.defineProperty(t,"__esModule",{value:!0})},n.t=function(t,e){if(1&e&&(t=n(t)),8&e)return t;if(4&e&&"object"==typeof t&&t&&t.__esModule)return t;var r=Object.create(null);if(n.r(r),Object.defineProperty(r,"default",{enumerable:!0,value:t}),2&e&&"string"!=typeof t)for(var o in t)n.d(r,o,function(e){return t[e]}.bind(null,o));return r},n.n=function(t){var e=t&&t.__esModule?function(){return t.default}:function(){return t};return n.d(e,"a",e),e},n.o=function(t,e){return Object.prototype.hasOwnProperty.call(t,e)},n.p="",n(n.s=0)}([function(t,e,n){n(1),document.write("Hello Webpack!!!<br/><h1>标题</h1>")},function(t,e,n){var r=n(2);"string"==typeof r&&(r=[[t.i,r,""]]);var o={insert:"head",singleton:!1};n(4)(r,o);r.locals&&(t.exports=r.locals)},function(t,e,n){(t.exports=n(3)(!1)).push([t.i,"body{color:yellow;font-size:40px}body h1{background-color:red}\n",""])},function(t,e,n){"use strict";t.exports=function(t){var e=[];return e.toString=function(){return this.map((function(e){var n=function(t,e){var n=t[1]||"",r=t[3];if(!r)return n;if(e&&"function"==typeof btoa){var o=(a=r,u=btoa(unescape(encodeURIComponent(JSON.stringify(a)))),c="sourceMappingURL=data:application/json;charset=utf-8;base64,".concat(u),"/*# ".concat(c," */")),i=r.sources.map((function(t){return"/*# sourceURL=".concat(r.sourceRoot).concat(t," */")}));return[n].concat(i).concat([o]).join("\n")}var a,u,c;return[n].join("\n")}(e,t);return e[2]?"@media ".concat(e[2],"{").concat(n,"}"):n})).join("")},e.i=function(t,n){"string"==typeof t&&(t=[[null,t,""]]);for(var r={},o=0;o<this.length;o++){var i=this[o][0];null!=i&&(r[i]=!0)}for(var a=0;a<t.length;a++){var u=t[a];null!=u[0]&&r[u[0]]||(n&&!u[2]?u[2]=n:n&&(u[2]="(".concat(u[2],") and (").concat(n,")")),e.push(u))}},e}},function(t,e,n){"use strict";var r,o={},i=function(){return void 0===r&&(r=Boolean(window&&document&&document.all&&!window.atob)),r},a=function(){var t={};return function(e){if(void 0===t[e]){var n=document.querySelector(e);if(window.HTMLIFrameElement&&n instanceof window.HTMLIFrameElement)try{n=n.contentDocument.head}catch(t){n=null}t[e]=n}return t[e]}}();function u(t,e){for(var n=[],r={},o=0;o<t.length;o++){var i=t[o],a=e.base?i[0]+e.base:i[0],u={css:i[1],media:i[2],sourceMap:i[3]};r[a]?r[a].parts.push(u):n.push(r[a]={id:a,parts:[u]})}return n}function c(t,e){for(var n=0;n<t.length;n++){var r=t[n],i=o[r.id],a=0;if(i){for(i.refs++;a<i.parts.length;a++)i.parts[a](r.parts[a]);for(;a<r.parts.length;a++)i.parts.push(b(r.parts[a],e))}else{for(var u=[];a<r.parts.length;a++)u.push(b(r.parts[a],e));o[r.id]={id:r.id,refs:1,parts:u}}}}function s(t){var e=document.createElement("style");if(void 0===t.attributes.nonce){var r=n.nc;r&&(t.attributes.nonce=r)}if(Object.keys(t.attributes).forEach((function(n){e.setAttribute(n,t.attributes[n])})),"function"==typeof t.insert)t.insert(e);else{var o=a(t.insert||"head");if(!o)throw new Error("Couldn‘t find a style target. This probably means that the value for the ‘insert‘ parameter is invalid.");o.appendChild(e)}return e}var l,f=(l=[],function(t,e){return l[t]=e,l.filter(Boolean).join("\n")});function d(t,e,n,r){var o=n?"":r.css;if(t.styleSheet)t.styleSheet.cssText=f(e,o);else{var i=document.createTextNode(o),a=t.childNodes;a[e]&&t.removeChild(a[e]),a.length?t.insertBefore(i,a[e]):t.appendChild(i)}}function p(t,e,n){var r=n.css,o=n.media,i=n.sourceMap;if(o&&t.setAttribute("media",o),i&&btoa&&(r+="\n/*# sourceMappingURL=data:application/json;base64,".concat(btoa(unescape(encodeURIComponent(JSON.stringify(i))))," */")),t.styleSheet)t.styleSheet.cssText=r;else{for(;t.firstChild;)t.removeChild(t.firstChild);t.appendChild(document.createTextNode(r))}}var v=null,h=0;function b(t,e){var n,r,o;if(e.singleton){var i=h++;n=v||(v=s(e)),r=d.bind(null,n,i,!1),o=d.bind(null,n,i,!0)}else n=s(e),r=p.bind(null,n,e),o=function(){!function(t){if(null===t.parentNode)return!1;t.parentNode.removeChild(t)}(n)};return r(t),function(e){if(e){if(e.css===t.css&&e.media===t.media&&e.sourceMap===t.sourceMap)return;r(t=e)}else o()}}t.exports=function(t,e){(e=e||{}).attributes="object"==typeof e.attributes?e.attributes:{},e.singleton||"boolean"==typeof e.singleton||(e.singleton=i());var n=u(t,e);return c(n,e),function(t){for(var r=[],i=0;i<n.length;i++){var a=n[i],s=o[a.id];s&&(s.refs--,r.push(s))}t&&c(u(t,e),e);for(var l=0;l<r.length;l++){var f=r[l];if(0===f.refs){for(var d=0;d<f.parts.length;d++)f.parts[d]();delete o[f.id]}}}}}]);
对比 Node.js 模块,webpack 模块能够以各种方式表达它们的依赖关系:
(1)ES2015 import 语句
(2)CommonJS require() 语句
(3)AMD define 和 require 语句
(4)css/sass/less 文件中的 @import 语句。
(5)样式(url(...))或 HTML 文件(<img src=...>)中的图片链接(image url)
支持的模块:
webpack 通过 loader 可以支持各种语言和预处理器编写模块。loader 描述了 webpack 如何处理 非 JavaScript(non-JavaScript) _模块_,并且在 bundle 中引入这些依赖。 webpack 社区已经为各种流行语言和语言处理器构建了 loader,包括:CoffeeScript、TypeScript、ESNext (Babel)、Sass、Less、Stylus
如果不想每次修改模块后都重新编译,那么可以启动监听模式。开启监听模式后,没有变化的模块会在编译后缓存到内存中,而不会每次都被重新编译,所以监听模式的整体速度是很快的。
webpack --watch
使用 webpack-dev-server 开发服务,这样我们就能通过 localhost:8080 启动一个 express 静态资源 web 服务器,并且会以监听模式自动运行 webpack,在浏览器打开 http://localhost:8080/ 或 http://localhost:8080/webpack-dev-server/ 可以浏览项目中的页面和编译后的资源输出,并且通过一个 socket.io 服务实时监听它们的变化并自动刷新页面。
(1)安装
cnpm install webpack-dev-server -g
(2)webpack.config.js增加如下配置:
    devServer: {
        contentBase: ‘./dist‘
    }
(3)运行启动
E:\HBuilderSpace\vue\webpack>webpack-dev-server

E:\HBuilderSpace\vue\webpack>"node"  "C:\Users\Administrator\AppData\Roaming\npm\\node_modules\webpack-dev-server\bin\webpack-dev-server.js"
i ?wds?: Project is running at http://localhost:8080/
i ?wds?: webpack output is served from /
i ?wds?: Content not from webpack is served from ./dist
(4)修改JS或者CSS会立即更新
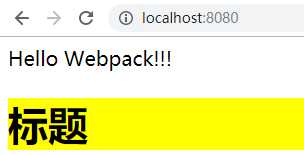
(5)去修改没有被入口文件托管的文件,比如index.html文件,就算我们修改html文件的内容,页面也不会自动更新。解决办法,
    devServer: {
        contentBase: ‘./dist‘,
        watchContentBase: true
    }
加上watchContentBase属性为true即可。
cnpm install -g @vue/cli
查看版本:
E:\HBuilderSpace>vue -V

E:\HBuilderSpace>"node"  "C:\Users\Administrator\AppData\Roaming\npm\\node_modules\@vue\cli\bin\vue.js" -V
@vue/cli 4.0.5
两种方式,第一种是命令行创建,第二种是图形化界面创建。
1.创建项目
E:\HBuilderSpace>vue create vue-demo

E:\HBuilderSpace>"node"  "C:\Users\Administrator\AppData\Roaming\npm\\node_modules\@vue\cli\bin\vue.js" create vue-demo
?  Your connection to the default npm registry seems to be slow.
   Use https://registry.npm.taobao.org for faster installation? No


Vue CLI v4.0.5
? Please pick a preset:
  default (babel, eslint)
> Manually select features
按键盘上下键可以选择默认(default)还是手动(Manually),如果选择default,一路回车执行下去就行了。我们选择手动选择,便于选择自己需要的模块:
? Check the features needed for your project:
 (*) Babel
 ( ) TypeScript
 ( ) Progressive Web App (PWA) Support
 (*) Router
 (*) Vuex
 (*) CSS Pre-processors
>(*) Linter / Formatter
 ( ) Unit Testing
 ( ) E2E Testing
选择所需的模块:空格键是选中与取消,A键是全选。我选择了五个模块,回车之后选择自己的配置:
路由使用history模式;css预处理使用 ass/SCSS (with dart-sass)--node-sass是自动编译实时的,dart-sass需要保存后才会生效;下面的选项用 Airbnb 语法规则; 语法检测选择保存后检查 Lint on save;把babel,postcss,eslint这些配置文件放哪,这里随便选,我选择放在独立文件夹 In dedicated config files
? Use history mode for router? (Requires proper server setup for index fallback in production) Yes
? Pick a CSS pre-processor (PostCSS, Autoprefixer and CSS Modules are supported by default): Sass/SCSS (with dart-sass)
? Pick a linter / formatter config: Airbnb
? Pick additional lint features: (Press <space> to select, <a> to toggle all, <i> to invert selection)Lint on save
? Where do you prefer placing config for Babel, PostCSS, ESLint, etc.? In dedicated config files
? Save this as a preset for future projects? (y/N)
最后一个是是否要将上面的配置保存为一个默认的配置便于下次使用,如果有需要就输入y然后起个名字就可以了。
点击回车之后开始下载等待下载依赖模块。下载完成之后会提示如下:
....
found 0 vulnerabilities

?  Running completion hooks...

??  Generating README.md...

??  Successfully created project vue-demo.
??  Get started with the following commands:

 $ cd vue-demo
 $ npm run serve
2.目录查看:
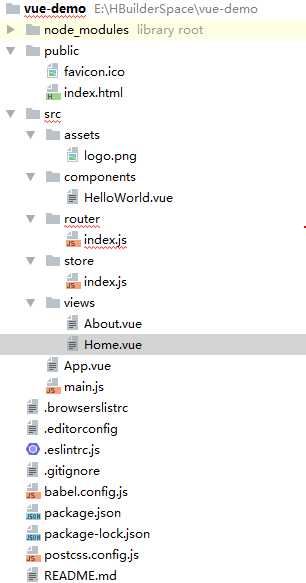
上面public目录、src目录、package.json是三个重要的文件。public下index.html是主界面,src下存放模块以及相关的vue模块。
package.json是描述文件,内容如下:其定义了名称版本以及开发依赖等。其中的 scripts 定义了三个命令。 调用方式都是 npm run + name,比如启动服务调用: npm run serve
{
  "name": "vue-demo",
  "version": "0.1.0",
  "private": true,
  "scripts": {
    "serve": "vue-cli-service serve",
    "build": "vue-cli-service build",
    "lint": "vue-cli-service lint"
  },
  "dependencies": {
    "core-js": "^3.3.2",
    "vue": "^2.6.10",
    "vue-router": "^3.1.3",
    "vuex": "^3.0.1"
  },
  "devDependencies": {
    "@vue/cli-plugin-babel": "^4.0.0",
    "@vue/cli-plugin-eslint": "^4.0.0",
    "@vue/cli-plugin-router": "^4.0.0",
    "@vue/cli-plugin-vuex": "^4.0.0",
    "@vue/cli-service": "^4.0.0",
    "@vue/eslint-config-airbnb": "^4.0.0",
    "babel-eslint": "^10.0.3",
    "eslint": "^5.16.0",
    "eslint-plugin-vue": "^5.0.0",
    "sass": "^1.19.0",
    "sass-loader": "^8.0.0",
    "vue-template-compiler": "^2.6.10"
  }
}
public/index.html、App.vue和main.js是程序的入口。
index.html内容如下:
<!DOCTYPE html>
<html lang="en">
  <head>
    <meta charset="utf-8">
    <meta http-equiv="X-UA-Compatible" content="IE=edge">
    <meta name="viewport" content="width=device-width,initial-scale=1.0">
    <link rel="icon" href="<%= BASE_URL %>favicon.ico">
    <title>vue-demo</title>
  </head>
  <body>
    <noscript>
      <strong>We‘re sorry but vue-demo doesn‘t work properly without JavaScript enabled. Please enable it to continue.</strong>
    </noscript>
    <div id="app"></div>
    <!-- built files will be auto injected -->
  </body>
</html>
main.js如下:(引入了Vue模块、路由模块、App主页面模块、管理模块store)
import Vue from ‘vue‘;
import App from ‘./App.vue‘;
import router from ‘./router‘;
import store from ‘./store‘;

Vue.config.productionTip = false;

new Vue({
  router,
  store,
  render: h => h(App),
}).$mount(‘#app‘);
App.vue内容如下:
<template>
  <div id="app">
    <div id="nav">
      <router-link to="/">Home</router-link> |
      <router-link to="/about">About</router-link>|
      <router-link to="/test">test</router-link>
    </div>
    <router-view/>
  </div>
</template>

<style lang="scss">
#app {
  font-family: ‘Avenir‘, Helvetica, Arial, sans-serif;
  -webkit-font-smoothing: antialiased;
  -moz-osx-font-smoothing: grayscale;
  text-align: center;
  color: #2c3e50;
}

#nav {
  padding: 30px;

  a {
    font-weight: bold;
    color: #2c3e50;

    &.router-link-exact-active {
      color: #42b983;
    }
  }
}
</style>
3.启动项目
接下来进入到vue-demo目录,运行npm run serve 运行服务即可。启动之后访问即可:
  App running at:
  - Local:   http://localhost:8080/
  - Network: http://192.168.0.232:8080/

  Note that the development build is not optimized.
  To create a production build, run npm run build.
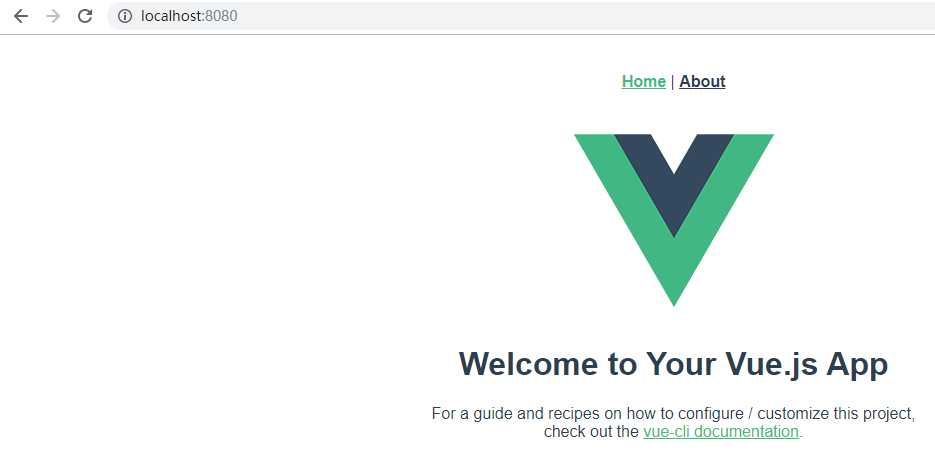
4.修改项目:增加1个路由叫test。
(1)修改App.vue第六行增加路由:
<router-link to="/test">test</router-link>
(2)修改router/index.js增加1个路由
const routes = [
  {
    path: ‘/‘,
    name: ‘home‘,
    component: Home,
  },
  {
    path: ‘/about‘,
    name: ‘about‘,
    // route level code-splitting
    // this generates a separate chunk (about.[hash].js) for this route
    // which is lazy-loaded when the route is visited.
    component: () => import(/* webpackChunkName: "about" */ ‘../views/About.vue‘),
  },
  {
    path: ‘/test‘,
    name: ‘test‘,
    // route level code-splitting
    // this generates a separate chunk (about.[hash].js) for this route
    // which is lazy-loaded when the route is visited.
    component: () => import(/* webpackChunkName: "about" */ ‘../views/Test.vue‘),
  },
];
(3)views目录增加Test.vue
<template>
  <div class="test">
    <h1>这是Test</h1>
  </div>
</template>
(4)结果:

E:\HBuilderSpace>vue ui

E:\HBuilderSpace>"node"  "C:\Users\Administrator\AppData\Roaming\npm\\node_modules\@vue\cli\bin\vue.js" ui
??  Starting GUI...
??  Ready on http://localhost:8000
运行之后会启动一个服务,并且浏览器自动打开访问。如下:

接下来创建项目:
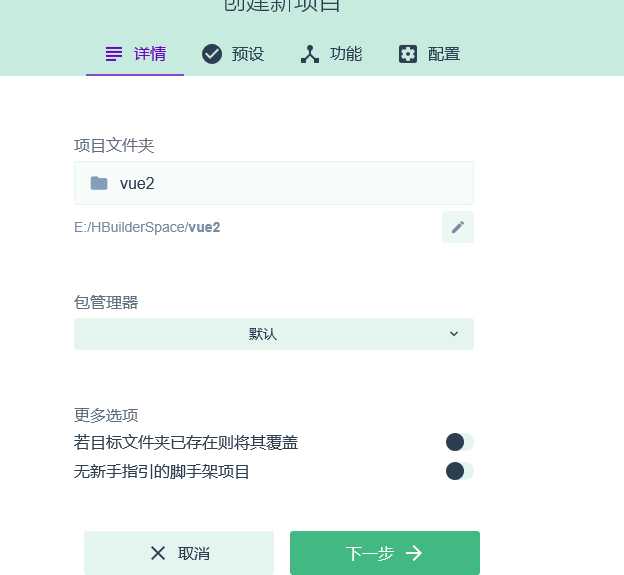
选择模板:选择我们已经上面建好的模板。(如果自定义的话和上面一样选择对应的选项即可)
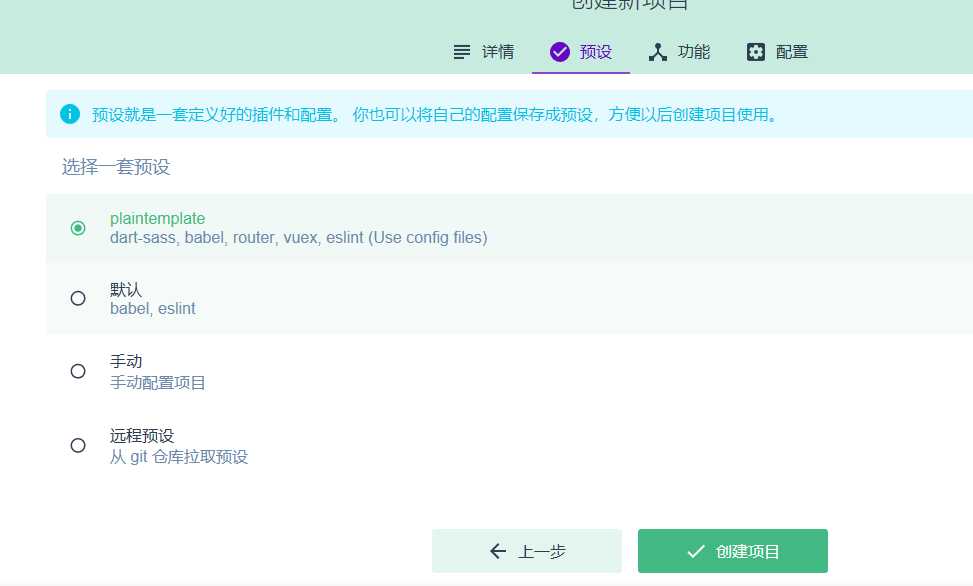
创建成功如下:

到任务重启动服务:
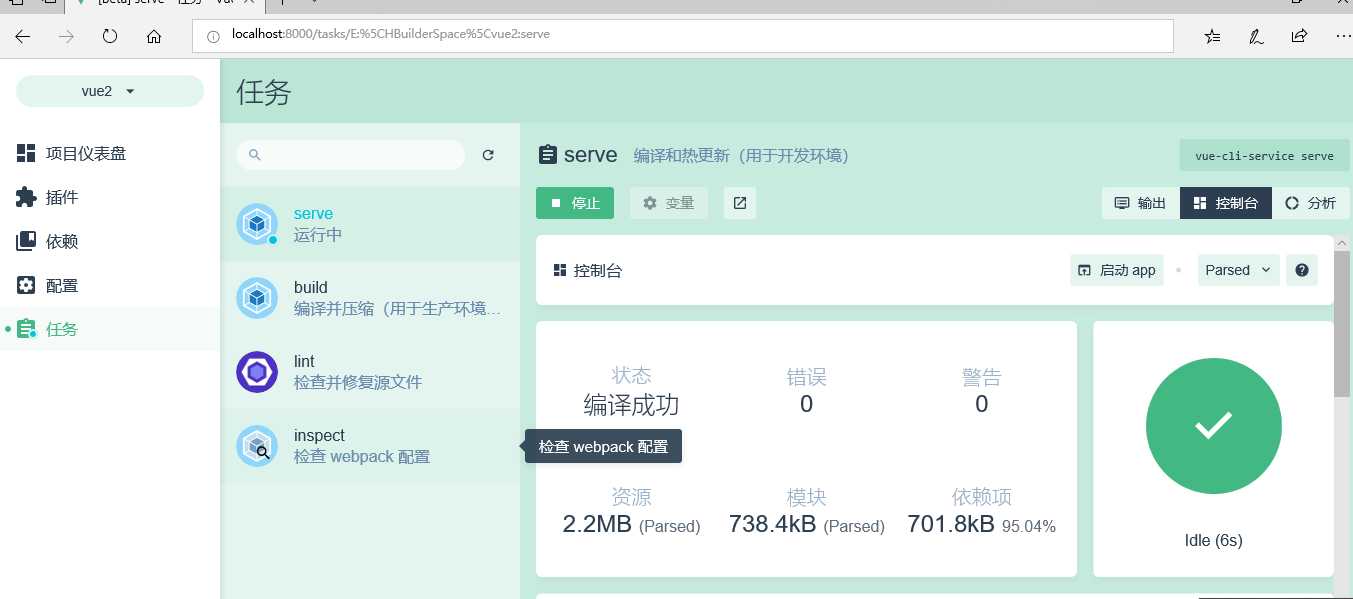
访问测试:
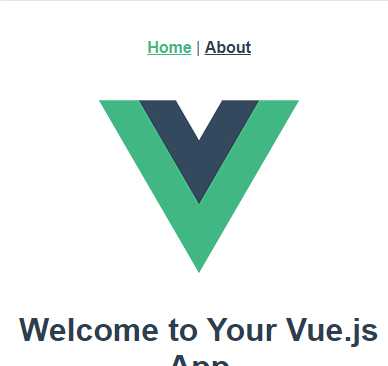
vue-cli安装以及创建一个简单的项目(一)(Node\npm\webpack简单使用)
标签:buffer sign registry home index 样式 插入 post run
原文地址:https://www.cnblogs.com/qlqwjy/p/11925074.html