标签:single VID 直接 升级 body ams ISE 存储方式 res
上篇文章我们介绍了如何扩展Ocelot网关,并实现数据库存储,然后测试了网关的路由功能,一切都是那么顺利,但是有一个问题未解决,就是如果网关配置信息发生变更时如何生效?以及我使用其他数据库存储如何快速实现?本篇就这两个问题展开讲解,用到的文档及源码将会在GitHub上开源,每篇的源代码我将用分支的方式管理,本篇使用的分支为
course2。
附文档及源码下载地址:[https://github.com/jinyancao/CtrAuthPlatform/tree/course2]
上一篇我们实现了网关的配置信息从数据库中提取,项目发布时可以把我们已有的网关配置都设置好并启动,但是正式项目运行时,网关配置信息随时都有可能发生变更,那如何在不影响项目使用的基础上来更新配置信息呢?这篇我将介绍2种方式来实现网关的动态更新,一是后台服务定期提取最新的网关配置信息更新网关配置,二是网关对外提供安全接口,由我们需要更新时,调用此接口进行更新,下面就这两种方式,我们来看下如何实现。
1、定时服务方式
网关的灵活性是设计时必须考虑的,实现定时服务的方式我们需要配置是否开启和更新周期,所以我们需要扩展配置类AhphOcelotConfiguration,增加是否启用服务和更新周期2个字段。
namespace Ctr.AhphOcelot.Configuration
{
    /// <summary>
    /// 金焰的世界
    /// 2018-11-11
    /// 自定义配置信息
    /// </summary>
    public class AhphOcelotConfiguration
    {
        /// <summary>
        /// 数据库连接字符串,使用不同数据库时自行修改,默认实现了SQLSERVER
        /// </summary>
        public string DbConnectionStrings { get; set; }

        /// <summary>
        /// 金焰的世界
        /// 2018-11-12
        /// 是否启用定时器,默认不启动
        /// </summary>
        public bool EnableTimer { get; set; } = false;

        /// <summary>
        /// 金焰的世界
        /// 2018-11.12
        /// 定时器周期,单位(毫秒),默认30分钟自动更新一次
        /// </summary>
        public int TimerDelay { get; set; } = 30*60*1000;
    }
}
配置文件定义完成,那如何完成后台任务随着项目启动而一起启动呢?IHostedService接口了解一下,我们可以通过实现这个接口,来完成我们后台任务,然后通过Ioc容器注入即可。
新建DbConfigurationPoller类,实现IHostedService接口,详细代码如下。
using Microsoft.Extensions.Hosting;
using Ocelot.Configuration.Creator;
using Ocelot.Configuration.Repository;
using Ocelot.Logging;
using System;
using System.Collections.Generic;
using System.Linq;
using System.Text;
using System.Threading;
using System.Threading.Tasks;

namespace Ctr.AhphOcelot.Configuration
{
    /// <summary>
    /// 金焰的世界
    /// 2018-11-12
    /// 数据库配置信息更新策略
    /// </summary>
    public class DbConfigurationPoller : IHostedService, IDisposable
    {
        private readonly IOcelotLogger _logger;
        private readonly IFileConfigurationRepository _repo;
        private readonly AhphOcelotConfiguration _option;
        private Timer _timer;
        private bool _polling;
        private readonly IInternalConfigurationRepository _internalConfigRepo;
        private readonly IInternalConfigurationCreator _internalConfigCreator;
        public DbConfigurationPoller(IOcelotLoggerFactory factory,
            IFileConfigurationRepository repo,
            IInternalConfigurationRepository internalConfigRepo,
            IInternalConfigurationCreator internalConfigCreator,
            AhphOcelotConfiguration option)
        {
            _internalConfigRepo = internalConfigRepo;
            _internalConfigCreator = internalConfigCreator;
            _logger = factory.CreateLogger<DbConfigurationPoller>();
            _repo = repo;
            _option = option;
        }

        public void Dispose()
        {
            _timer?.Dispose();
        }

        public Task StartAsync(CancellationToken cancellationToken)
        {
            if (_option.EnableTimer)
            {//判断是否启用自动更新
                _logger.LogInformation($"{nameof(DbConfigurationPoller)} is starting.");
                _timer = new Timer(async x =>
                {
                    if (_polling)
                    {
                        return;
                    }
                    _polling = true;
                    await Poll();
                    _polling = false;
                }, null, _option.TimerDelay, _option.TimerDelay);
            }
            return Task.CompletedTask;
        }

        public Task StopAsync(CancellationToken cancellationToken)
        {
            if (_option.EnableTimer)
            {//判断是否启用自动更新
                _logger.LogInformation($"{nameof(DbConfigurationPoller)} is stopping.");
                _timer?.Change(Timeout.Infinite, 0);
            }
            return Task.CompletedTask;
        }

        private async Task Poll()
       {
            _logger.LogInformation("Started polling");

            var fileConfig = await _repo.Get();

            if (fileConfig.IsError)
            {
                _logger.LogWarning($"error geting file config, errors are {string.Join(",", fileConfig.Errors.Select(x => x.Message))}");
                return;
            }
            else
            {
                var config = await _internalConfigCreator.Create(fileConfig.Data);
                if (!config.IsError)
                {
                    _internalConfigRepo.AddOrReplace(config.Data);
                }
            }
            _logger.LogInformation("Finished polling");
        }
    }
}
项目代码很清晰,就是项目启动时,判断配置文件是否开启定时任务,如果开启就根据启动定时任务去从数据库中提取最新的配置信息,然后更新到内部配置并生效,停止时关闭并释放定时器,然后再注册后台服务。
//注册后端服务
builder.Services.AddHostedService<DbConfigurationPoller>();
现在我们启动网关项目和测试服务项目,配置网关启用定时器,代码如下。
public void ConfigureServices(IServiceCollection services)
{
    services.AddOcelot().AddAhphOcelot(option=>
    {
       option.DbConnectionStrings = "Server=.;Database=Ctr_AuthPlatform;User ID=sa;Password=bl123456;";
       option.EnableTimer = true; //启用定时任务
       option.TimerDelay = 10*000;//周期10秒
    });
}启动后使用网关地址访问http://localhost:7777/ctr/values,可以得到正确地址。
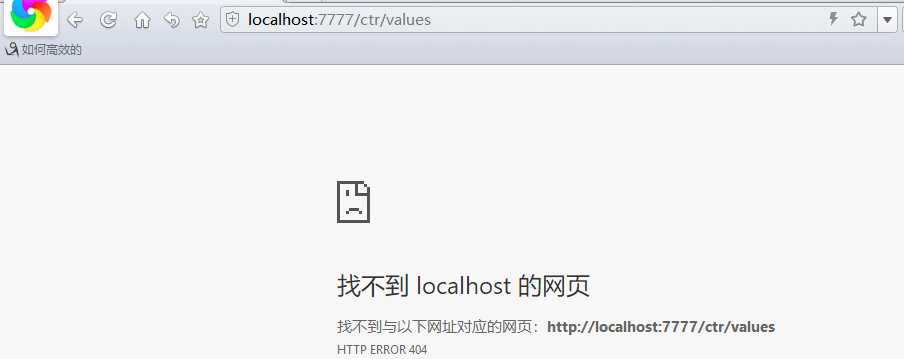
然后我们在数据库执行网关路由修改命令,等10秒后再刷新页面,发现原来的路由失效,新的路由成功。
UPDATE AhphReRoute SET UpstreamPathTemplate=‘/cjy/values‘ where ReRouteId=1

看到这个结果是不是很激动,只要稍微改造下我们的网关项目就实现了网关配置信息的自动更新功能,剩下的就是根据我们项目后台管理界面配置好具体的网关信息即可。
2、接口更新的方式
对于良好的网关设计,我们应该是可以随时控制网关启用哪种配置信息,这时我们就需要把网关的更新以接口的形式对外进行暴露,然后后台管理界面在我们配置好网关相关信息后,主动发起配置更新,并记录操作日志。
我们再回顾下Ocelot源码,看是否帮我们实现了这个接口,查找法Ctrl+F搜索看有哪些地方注入了IFileConfigurationRepository这个接口,惊喜的发现有个FileConfigurationController控制器已经实现了网关配置信息预览和更新的相关方法,查看源码可以发现代码很简单,跟我们之前写的更新方式一模一样,那我们如何使用这个方法呢?
using System;
using System.Threading.Tasks;
using Microsoft.AspNetCore.Authorization;
using Microsoft.AspNetCore.Mvc;
using Ocelot.Configuration.File;
using Ocelot.Configuration.Setter;

namespace Ocelot.Configuration
{
    using Repository;

    [Authorize]
    [Route("configuration")]
    public class FileConfigurationController : Controller
    {
        private readonly IFileConfigurationRepository _repo;
        private readonly IFileConfigurationSetter _setter;
        private readonly IServiceProvider _provider;

        public FileConfigurationController(IFileConfigurationRepository repo, IFileConfigurationSetter setter, IServiceProvider provider)
        {
            _repo = repo;
            _setter = setter;
            _provider = provider;
        }

        [HttpGet]
        public async Task<IActionResult> Get()
        {
            var response = await _repo.Get();

            if(response.IsError)
            {
                return new BadRequestObjectResult(response.Errors);
            }

            return new OkObjectResult(response.Data);
        }

        [HttpPost]
        public async Task<IActionResult> Post([FromBody]FileConfiguration fileConfiguration)
        {
            try
            {
                var response = await _setter.Set(fileConfiguration);

                if (response.IsError)
                {
                    return new BadRequestObjectResult(response.Errors);
                }

                return new OkObjectResult(fileConfiguration);
            }
            catch(Exception e)
            {
                return new BadRequestObjectResult($"{e.Message}:{e.StackTrace}");
            }
        }
    }
}
从源码中可以发现控制器中增加了授权访问,防止非法请求来修改网关配置,Ocelot源码经过升级后,把不同的功能进行模块化,进一步增强项目的可配置性,减少冗余,管理源码被移到了Ocelot.Administration里,详细的源码也就5个文件组成,代码比较简单,就不单独讲解了,就是配置管理接口地址,并使用IdentityServcer4进行认证,正好也符合我们我们项目的技术路线,为了把网关配置接口和网关使用接口区分,我们需要配置不同的Scope进行区分,由于本篇使用的IdentityServer4会在后续篇幅有完整介绍,本篇就直接列出实现代码,不做详细的介绍。现在开始改造我们的网关代码,来集成后台管理接口,然后测试通过授权接口更改配置信息且立即生效。
public void ConfigureServices(IServiceCollection services)
{
    Action<IdentityServerAuthenticationOptions> options = o =>
    {
        o.Authority = "http://localhost:6611"; //IdentityServer地址
        o.RequireHttpsMetadata = false;
        o.ApiName = "gateway_admin"; //网关管理的名称,对应的为客户端授权的scope
    };
    services.AddOcelot().AddAhphOcelot(option =>
    {
        option.DbConnectionStrings = "Server=.;Database=Ctr_AuthPlatform;User ID=sa;Password=bl123456;";
        //option.EnableTimer = true;//启用定时任务
        //option.TimerDelay = 10 * 000;//周期10秒
    }).AddAdministration("/CtrOcelot", options);
}
注意,由于
Ocelot.Administration扩展使用的是OcelotMiddlewareConfigurationDelegate中间件配置委托,所以我们扩展中间件AhphOcelotMiddlewareExtensions需要增加扩展代码来应用此委托。
private static async Task<IInternalConfiguration> CreateConfiguration(IApplicationBuilder builder)
{
    //提取文件配置信息
    var fileConfig = await builder.ApplicationServices.GetService<IFileConfigurationRepository>().Get();
    var internalConfigCreator = builder.ApplicationServices.GetService<IInternalConfigurationCreator>();
    var internalConfig = await internalConfigCreator.Create(fileConfig.Data);
    //如果配置文件错误直接抛出异常
    if (internalConfig.IsError)
    {
        ThrowToStopOcelotStarting(internalConfig);
    }
    //配置信息缓存,这块需要注意实现方式,因为后期我们需要改造下满足分布式架构,这篇不做讲解
    var internalConfigRepo = builder.ApplicationServices.GetService<IInternalConfigurationRepository>();
    internalConfigRepo.AddOrReplace(internalConfig.Data);
    //获取中间件配置委托(2018-11-12新增)
    var configurations = builder.ApplicationServices.GetServices<OcelotMiddlewareConfigurationDelegate>();
    foreach (var configuration in configurations)
    {
        await configuration(builder);
    }
    return GetOcelotConfigAndReturn(internalConfigRepo);
}新建IdeitityServer认证服务,并配置服务端口6666,并添加二个测试客户端,一个设置访问scope为gateway_admin,另外一个设置为其他,来分别测试认证效果。
using System;
using System.Collections.Generic;
using System.Linq;
using System.Threading.Tasks;
using IdentityServer4.Models;
using Microsoft.AspNetCore.Builder;
using Microsoft.AspNetCore.Hosting;
using Microsoft.AspNetCore.Http;
using Microsoft.AspNetCore.Mvc;
using Microsoft.Extensions.Configuration;
using Microsoft.Extensions.DependencyInjection;

namespace Ctr.AuthPlatform.TestIds4
{
    public class Startup
    {
        public Startup(IConfiguration configuration)
        {
            Configuration = configuration;
        }

        public IConfiguration Configuration { get; }

        // This method gets called by the runtime. Use this method to add services to the container.
        public void ConfigureServices(IServiceCollection services)
        {
            services.AddIdentityServer()
                .AddDeveloperSigningCredential()
                .AddInMemoryApiResources(Config.GetApiResources())
                .AddInMemoryClients(Config.GetClients());
        }

        // This method gets called by the runtime. Use this method to configure the HTTP request pipeline.
        public void Configure(IApplicationBuilder app, IHostingEnvironment env)
        {
            if (env.IsDevelopment())
            {
                app.UseDeveloperExceptionPage();
            }

            app.UseIdentityServer();
        }
    }

    public class Config
    {
        // scopes define the API resources in your system
        public static IEnumerable<ApiResource> GetApiResources()
        {
            return new List<ApiResource>
            {
                new ApiResource("api1", "My API"),
                new ApiResource("gateway_admin", "My admin API")
            };
        }

        // clients want to access resources (aka scopes)
        public static IEnumerable<Client> GetClients()
        {
            // client credentials client
            return new List<Client>
            {
                new Client
                {
                    ClientId = "client1",
                    AllowedGrantTypes = GrantTypes.ClientCredentials,

                    ClientSecrets =
                    {
                        new Secret("secret1".Sha256())
                    },
                    AllowedScopes = { "api1" }
                },
                new Client
                {
                    ClientId = "client2",
                    AllowedGrantTypes = GrantTypes.ClientCredentials,

                    ClientSecrets =
                    {
                        new Secret("secret2".Sha256())
                    },
                    AllowedScopes = { "gateway_admin" }
                }
            };
        }
    }
}
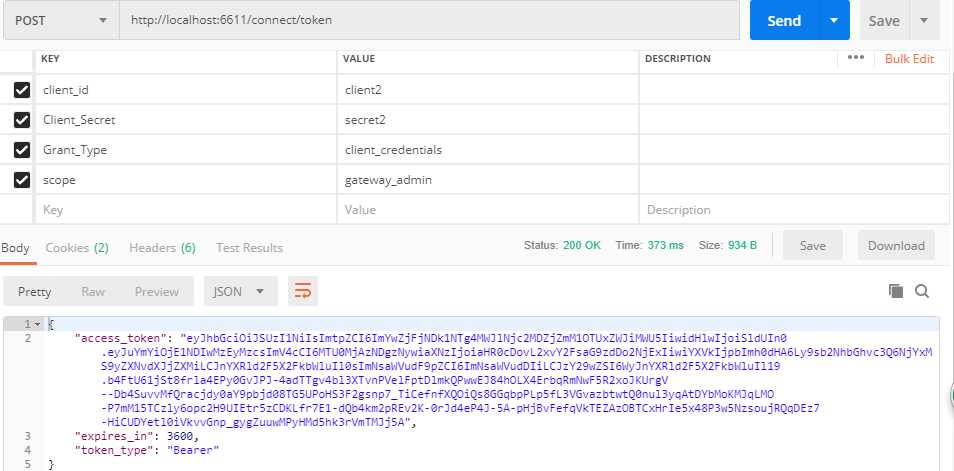
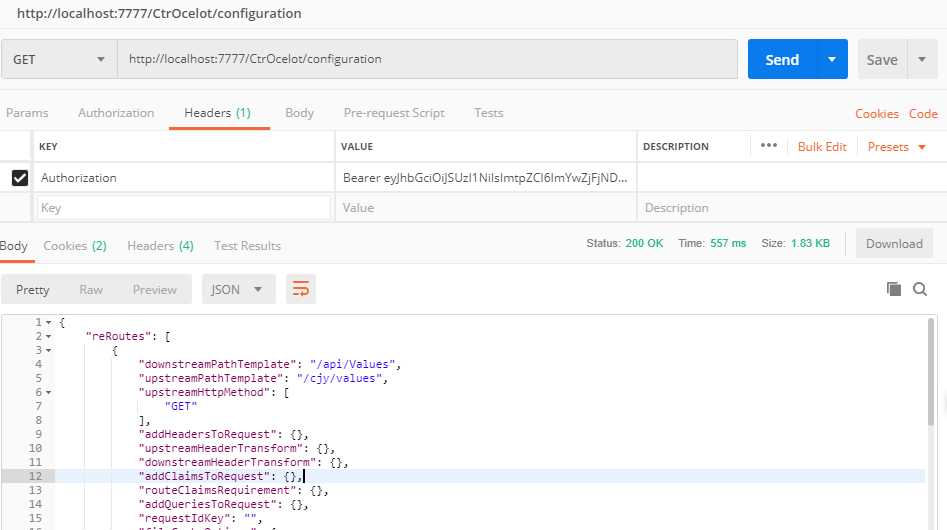
配置好认证服务器后,我们使用PostMan来测试接口调用,首先使用有权限的client2客户端,获取access_token,然后使用此access_token访问网关配置接口。

访问http://localhost:7777/CtrOcelot/configuration可以得到我们数据库配置的结果。
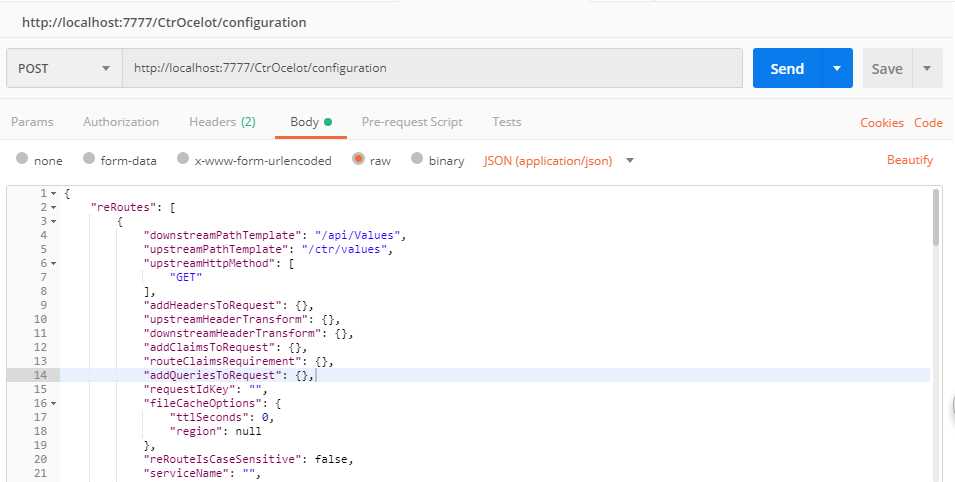
我们再使用POST的方式修改配置信息,使用PostMan测试如下,请求后返回状态200(成功),然后测试修改前和修改后路由地址,发现立即生效,可以分别访问http://localhost:7777/cjy/values和http://localhost:7777/cjy/values验证即可。然后使用client1获取access_token,请求配置地址,提示401未授权,为预期结果,达到我们最终目的。
到此,我们网关就实现了2个方式更新配置信息,大家可以根据实际项目的情况从中选择适合自己的一种方式使用即可。
我们实际项目应用过程中,经常会根据不同的项目类型选择不同的数据库,这时网关也要配合项目需求来适应不同数据库的切换,本节就以mysql为例讲解下我们的扩展网关怎么实现数据库的切换及应用,如果有其他数据库使用需求可以根据本节内容进行扩展。
在【.NET Core项目实战-统一认证平台】第三章 网关篇-数据库存储配置信息(1)中介绍了网关的数据库初步设计,里面有我的设计的概念模型,现在使用mysql数据库,直接生成mysql的物理模型,然后生成数据库脚本,详细的生成方式请见上一篇,一秒搞定。是不是有点小激动,原来可以这么方便。
新建MySqlFileConfigurationRepository实现IFileConfigurationRepository接口,需要NuGet中添加MySql.Data.EntityFrameworkCore。
using Ctr.AhphOcelot.Configuration;
using Ctr.AhphOcelot.Model;
using Dapper;
using MySql.Data.MySqlClient;
using Ocelot.Configuration.File;
using Ocelot.Configuration.Repository;
using Ocelot.Responses;
using System;
using System.Collections.Generic;
using System.Text;
using System.Threading.Tasks;

namespace Ctr.AhphOcelot.DataBase.MySql
{
    /// <summary>
    /// 金焰的世界
    /// 2018-11-12
    /// 使用MySql来实现配置文件仓储接口
    /// </summary>
    public class MySqlFileConfigurationRepository : IFileConfigurationRepository
    {
        private readonly AhphOcelotConfiguration _option;
        public MySqlFileConfigurationRepository(AhphOcelotConfiguration option)
        {
            _option = option;
        }

        /// <summary>
        /// 从数据库中获取配置信息
        /// </summary>
        /// <returns></returns>
        public async Task<Response<FileConfiguration>> Get()
        {
            #region 提取配置信息
            var file = new FileConfiguration();
            //提取默认启用的路由配置信息
            string glbsql = "select * from AhphGlobalConfiguration where IsDefault=1 and InfoStatus=1";
            //提取全局配置信息
            using (var connection = new MySqlConnection(_option.DbConnectionStrings))
            {
                var result = await connection.QueryFirstOrDefaultAsync<AhphGlobalConfiguration>(glbsql);
                if (result != null)
                {
                    var glb = new FileGlobalConfiguration();
                    //赋值全局信息
                    glb.BaseUrl = result.BaseUrl;
                    glb.DownstreamScheme = result.DownstreamScheme;
                    glb.RequestIdKey = result.RequestIdKey;
                    if (!String.IsNullOrEmpty(result.HttpHandlerOptions))
                    {
                        glb.HttpHandlerOptions = result.HttpHandlerOptions.ToObject<FileHttpHandlerOptions>();
                    }
                    if (!String.IsNullOrEmpty(result.LoadBalancerOptions))
                    {
                        glb.LoadBalancerOptions = result.LoadBalancerOptions.ToObject<FileLoadBalancerOptions>();
                    }
                    if (!String.IsNullOrEmpty(result.QoSOptions))
                    {
                        glb.QoSOptions = result.QoSOptions.ToObject<FileQoSOptions>();
                    }
                    if (!String.IsNullOrEmpty(result.ServiceDiscoveryProvider))
                    {
                        glb.ServiceDiscoveryProvider = result.ServiceDiscoveryProvider.ToObject<FileServiceDiscoveryProvider>();
                    }
                    file.GlobalConfiguration = glb;

                    //提取所有路由信息
                    string routesql = "select T2.* from AhphConfigReRoutes T1 inner join AhphReRoute T2 on T1.ReRouteId=T2.ReRouteId where AhphId=@AhphId and InfoStatus=1";
                    var routeresult = (await connection.QueryAsync<AhphReRoute>(routesql, new { result.AhphId }))?.AsList();
                    if (routeresult != null && routeresult.Count > 0)
                    {
                        var reroutelist = new List<FileReRoute>();
                        foreach (var model in routeresult)
                        {
                            var m = new FileReRoute();
                            if (!String.IsNullOrEmpty(model.AuthenticationOptions))
                            {
                                m.AuthenticationOptions = model.AuthenticationOptions.ToObject<FileAuthenticationOptions>();
                            }
                            if (!String.IsNullOrEmpty(model.CacheOptions))
                            {
                                m.FileCacheOptions = model.CacheOptions.ToObject<FileCacheOptions>();
                            }
                            if (!String.IsNullOrEmpty(model.DelegatingHandlers))
                            {
                                m.DelegatingHandlers = model.DelegatingHandlers.ToObject<List<string>>();
                            }
                            if (!String.IsNullOrEmpty(model.LoadBalancerOptions))
                            {
                                m.LoadBalancerOptions = model.LoadBalancerOptions.ToObject<FileLoadBalancerOptions>();
                            }
                            if (!String.IsNullOrEmpty(model.QoSOptions))
                            {
                                m.QoSOptions = model.QoSOptions.ToObject<FileQoSOptions>();
                            }
                            if (!String.IsNullOrEmpty(model.DownstreamHostAndPorts))
                            {
                                m.DownstreamHostAndPorts = model.DownstreamHostAndPorts.ToObject<List<FileHostAndPort>>();
                            }
                            //开始赋值
                            m.DownstreamPathTemplate = model.DownstreamPathTemplate;
                            m.DownstreamScheme = model.DownstreamScheme;
                            m.Key = model.RequestIdKey;
                            m.Priority = model.Priority ?? 0;
                            m.RequestIdKey = model.RequestIdKey;
                            m.ServiceName = model.ServiceName;
                            m.UpstreamHost = model.UpstreamHost;
                            m.UpstreamHttpMethod = model.UpstreamHttpMethod?.ToObject<List<string>>();
                            m.UpstreamPathTemplate = model.UpstreamPathTemplate;
                            reroutelist.Add(m);
                        }
                        file.ReRoutes = reroutelist;
                    }
                }
                else
                {
                    throw new Exception("未监测到任何可用的配置信息");
                }
            }
            #endregion
            if (file.ReRoutes == null || file.ReRoutes.Count == 0)
            {
                return new OkResponse<FileConfiguration>(null);
            }
            return new OkResponse<FileConfiguration>(file);
        }

        //由于数据库存储可不实现Set接口直接返回
        public async Task<Response> Set(FileConfiguration fileConfiguration)
        {
            return new OkResponse();
        }
    }
}实现代码后如何扩展到我们的网关里呢?只需要在注入时增加一个扩展即可。在ServiceCollectionExtensions类中增加如下代码。
/// <summary>
/// 扩展使用Mysql存储。
/// </summary>
/// <param name="builder"></param>
/// <returns></returns>
public static IOcelotBuilder UseMySql(this IOcelotBuilder builder)
{
    builder.Services.AddSingleton<IFileConfigurationRepository, MySqlFileConfigurationRepository>();
    return builder;
}
然后修改网关注入代码。
public void ConfigureServices(IServiceCollection services)
{
    Action<IdentityServerAuthenticationOptions> options = o =>
    {
        o.Authority = "http://localhost:6611"; //IdentityServer地址
        o.RequireHttpsMetadata = false;
        o.ApiName = "gateway_admin"; //网关管理的名称,对应的为客户端授权的scope
    };
    services.AddOcelot().AddAhphOcelot(option =>
                                       {
                                           option.DbConnectionStrings = "Server=localhost;Database=Ctr_AuthPlatform;User ID=root;Password=bl123456;";
                                           //option.EnableTimer = true;//启用定时任务
                                           //option.TimerDelay = 10 * 000;//周期10秒
                                       })
        .UseMySql()
        .AddAdministration("/CtrOcelot", options);
}
最后把mysql数据库插入sqlserver一样的路由测试信息,然后启动测试,可以得到我们预期的结果。为了方便大家测试,附mysql插入测试数据脚本如下。
#插入全局测试信息
insert into AhphGlobalConfiguration(GatewayName,RequestIdKey,IsDefault,InfoStatus)
values(‘测试网关‘,‘test_gateway‘,1,1);

#插入路由分类测试信息
insert into AhphReRoutesItem(ItemName,InfoStatus) values(‘测试分类‘,1);

#插入路由测试信息
insert into AhphReRoute values(1,1,‘/ctr/values‘,‘[ "GET" ]‘,‘‘,‘http‘,‘/api/Values‘,‘[{"Host": "localhost","Port": 9000 }]‘,‘‘,‘‘,‘‘,‘‘,‘‘,‘‘,‘‘,0,1);

#插入网关关联表
insert into AhphConfigReRoutes values(1,1,1);
如果想扩展其他数据库实现,直接参照此源码即可。
本篇我们介绍了2种动态更新配置文件的方法,实现访问不同,各有利弊,正式使用时可以就实际情况选择即可,都能达到我们的预期目标,也介绍了Ocelot扩展组件的使用和IdentityServer4的基础入门信息。然后又扩展了我们mysql数据库的存储方式,增加到了我们网关的扩展里,随时可以根据项目实际情况进行切换。
网关的存储篇已经全部介绍完毕,有兴趣的同学可以在此基础上继续拓展其他需求,下一篇我们将介绍使用redis来重写Ocelot里的所有缓存,为我们后续的网关应用打下基础。
【.NET Core项目实战-统一认证平台】第四章 网关篇-数据库存储配置(2)
标签:single VID 直接 升级 body ams ISE 存储方式 res
原文地址:https://www.cnblogs.com/lhxsoft/p/11945201.html