标签:console spl line tle 需要 状态 背景色 span tom
注释:自定义导航需要自备相应图片
一、设置自定义顶部导航
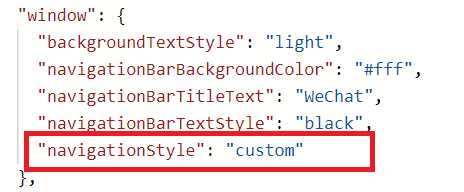
Navigation是小程序的顶部导航组件,当页面配置navigationStyle设置为custom的时候可以使用此组件替代原生导航栏。
1.全局顶部导航自定义,在app.json的“window”里添加"navigationStyle": "custom"

2.只在某一个页面自定义顶部导航,在该页面的json文件里添加"navigationStyle": "custom"

二、获取手机屏幕数据,app.js
//app.js
const Utils = require(‘./utils/utils‘)
App({
  onLaunch: function () {
    // 获取屏幕参数
    try {
      const res = wx.getSystemInfoSync()
      if (res.platform == ‘ios‘) {
        this.globalData.platform = ‘ios‘
      } else if (res.platform == ‘android‘) {
        this.globalData.platform = ‘android‘
      }
      // 导航高度
      let navHeight = res.statusBarHeight
      // 屏幕宽度/高度,单位px
      this.globalData.screenWidth = res.screenWidth
      this.globalData.screenHeight = res.screenHeight
      // 状态栏的高度,单位px
      this.globalData.statusBarHeight = res.statusBarHeight
      // 设备像素比
      this.globalData.pixelRatio = res.pixelRatio
      // 可使用窗口宽度,单位px
      this.globalData.winWidth = res.windowWidth
      // 安卓时,胶囊距离状态栏8px,iOS距离4px
      if (res.system.indexOf(‘Android‘) !== -1) {
        this.globalData.navHeight = navHeight + 14 + 32
        this.globalData.navTitleTop = navHeight + 8
        // 视窗高度 顶部有占位栏时
        this.globalData.winHeight = res.screenHeight - navHeight - 14 - 32
        // tab主页视窗高度
        this.globalData.winHeightTab = res.windowHeight - navHeight - 14 - 32
      } else {
        this.globalData.navHeight = navHeight + 12 + 32
        this.globalData.navTitleTop = navHeight + 4
        // 视窗高度 顶部有占位栏时
        this.globalData.winHeight = res.screenHeight - navHeight - 12 - 32
        // tab主页视窗高度
        this.globalData.winHeightTab = res.windowHeight - navHeight - 12 - 32
      }
      console.log(wx.getSystemInfoSync(), this.globalData.winHeightTab)
    } catch (e) {
      console.log(e)
    }
  },
  globalData: {
    platform: ‘ios‘,
    pixelRatio: 2,
    statusBarHeight: 20,
    navHeight: 64,
    navTitleTop: 26,
    winHeight: 655,
    winWidth: 750,
    screenWidth: 375,
    screenHeight: 812
  }
})
三、封装导航组件,根目录创建components/navbar文件夹,创建Component
<!--navbar.wxml-->
<view>
  <view class="nav-bar {{isWhite==‘true‘?‘nav-bar-white‘:‘‘}}" style="height: {{navHeight}}px;background-color:{{navColor}};" catchtap="toTop">
    <text class="navbar-title" style="top:{{navTitleTop}}px;color:{{navTitleColor}};">{{navTitle}}</text>
    <view wx:if="{{noArrow==‘false‘&&isArrowWhite==‘false‘&&isNavHome==‘false‘}}" catchtap="navBack" class="navbar-icon-wrap" style="top:{{navTitleTop}}px;">
      <image class="navbar-icon" src="../../images/arrow_left.png"></image>
    </view>
    <view wx:if="{{isArrowWhite==‘true‘&&isNavHome==‘false‘&&noArrow==‘false‘}}"  catchtap="navBack" class="navbar-icon-wrap" style="top:{{navTitleTop}}px;">
      <image src="../../images/arrow_left_white.png" class="navbar-icon"></image>
    </view>
    <view wx:if="{{isNavHome==‘true‘&&isArrowWhite==‘false‘&&noArrow==‘false‘}}" catchtap="navHome" class="navbar-icon-wrap" style="top:{{navTitleTop}}px;">
      <image src="../../images/Home@3x.png" class="navbar-icon"></image>
    </view>
    <view wx:if="{{isNavHome==‘true‘&&isArrowWhite==‘true‘&&noArrow==‘false‘}}"  catchtap="navHome" class="navbar-icon-wrap" style="top:{{navTitleTop}}px;">
      <image src="../../images/Home@3x_white.png" class="navbar-icon"></image>
    </view>
  </view>
  <view wx:if="{{isWhite==‘true‘}}" class="nav-bar-place" style="height: {{navHeight}}px;background-color:{{navColor}};"></view>
</view>
// navbar.js
const app = getApp()
Component({
  /**
   * 组件的属性列表
   */
  properties: {
    navHeight: {
      type: Number,
      value: 20
    },
    navTitleTop: {
      type: Number,
      value: 26
    },
    navTitle: { // 导航标题 可以为空
      type: String,
      value: ‘‘
    },
    navTitleColor: { // 导航标题颜色 默认黑色
      type: String,
      value: ‘#000‘
    },
    isWhite: { // 是否为白底
      type: String,
      value: ‘true‘
    },
    noArrow: { // 取消返回箭头
      type: String,
      value: ‘false‘
    },
    isArrowWhite: {//白色箭头
      type: String,
      value: ‘false‘
    },
    isNavHome: { // 返回首页
      type: String,
      value: ‘false‘
    },
    navColor: { // 导航栏背景色 默认白色
      type: String
    },
    backPath: { // 返回页面路径
      type: String,
      default: ‘‘
    },
    backDelta: { // 返回页面层数
      type: Number,
      default: 1
    }
  },

  /**
   * 组件的初始数据
   */
  data: {
    navHeight: 0,
    navTitleTop: 0
  },
  attached() {
    // 在组件实例进入页面节点树时执行
    // 获取顶部导航高度
    this.setData({
      navHeight: app.globalData.navHeight,
      navTitleTop: app.globalData.navTitleTop
    })
  },
  /**
   * 组件的方法列表
   */
  methods: {
    // 回到首页
    navHome:function(){
      wx.switchTab({
        url: ‘/pages/index/index‘
      })
    },
    // 回到顶部
    toTop: function () {
      wx.pageScrollTo({
        scrollTop: 0,
        duration: 300
      })
      this.triggerEvent(‘scrollEvent‘, {}) // 可绑定点击标题栏时的事件
    },
    // 返回上一页
    navBack: function () {
      if (this.properties.backPath === ‘‘) {
        wx.navigateBack({
          delta: this.properties.backDelta
        })
      } else {
        wx.redirectTo({
          url: this.properties.backPath
        })
      }
      this.triggerEvent(‘backEvent‘, {}) // 可绑定点击返回时的事件
    }
  }
})
/* navbar.wxss */
/*自定义导航栏*/
.nav-bar {
  position: fixed;
  top: 0;
  left: 0;
  width: 100%;
  z-index: 999999;
}

.nav-bar-white {
  background-color: #fff;
}

.navbar-title {
  position: absolute;
  height: 32px;
  line-height: 32px;
  /* width: 100%; */
  width: 320rpx;
  text-align: center;

  font-size: 16px;
  color: #000;
  overflow: hidden;
  white-space: nowrap;
  text-overflow: ellipsis;
  left: 28%;
}

.navbar-icon-wrap {
  position: absolute;
  left: 9px;
  width: 44px;
  height: 32px;
  display: flex;
  justify-content: center;
  align-items: center;
}

.navbar-icon {
  width: 44px;
  height: 32px;
}

.navbar-scan {
  width: 28px;
  height: 28px;
}
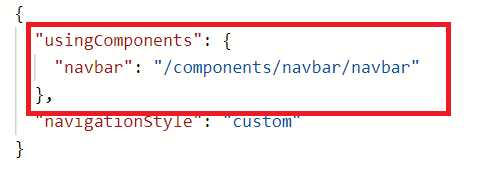
四、引入组件

五、使用组件(根据属性可以自由配置导,这里例举几个样式,也可以根据自己需求更改组件)
<navbar navTitle="顶部导航demo" style="width:200rpx;"></navbar>

——————————————————————————————————————————————————————————
<navbar navTitle="无返回顶部导航" noArrow="true"></navbar>

——————————————————————————————————————————————————————————
<navbar navTitle="透明导航" isWhite="false" isArrowWhite=‘true‘ navTitleColor="#fff"></navbar>

——————————————————————————————————————————————————————————
<navbar navTitle="主页按钮导航" isNavHome=‘true‘ isArrowWhite=‘false‘ noArrow=‘false‘></navbar>

标签:console spl line tle 需要 状态 背景色 span tom
原文地址:https://www.cnblogs.com/jing-zhe/p/11963603.html