标签:des style blog http io color os ar 使用
从本篇开始,将深入CI框架的内部,一步步去探索这个框架的实现、结构和设计。
Common.php文件定义了一系列的全局函数(一般来说,全局函数具有最高的加载优先权,因此大多数的框架中BootStrap引导文件都会最先引入全局函数,以便于之后的处理工作)。
打开Common.php中,第一行代码就非常诡异:
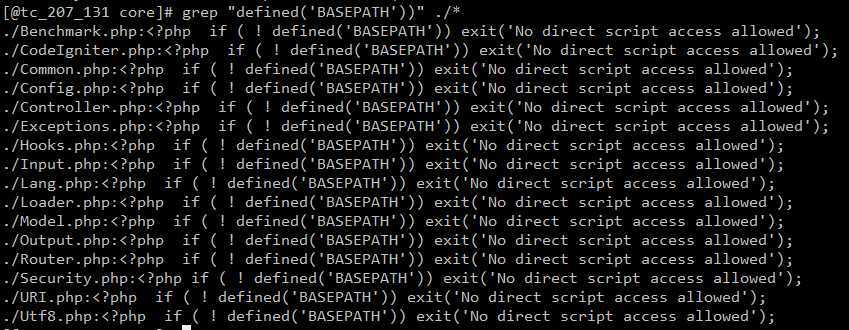
if ( ! defined(‘BASEPATH‘)) exit(‘No direct script access allowed‘);
上一篇(CI框架源码阅读笔记2 一切的入口 index.php)中,我们已经知道,BASEPATH是在入口文件中定义的常量。这里做这个判断的原因是:避免直接访问文件,而必须由index.php入口文件进入。其实不仅是Common.php,System中所有文件,几乎都要引入这个常量的判断,避免直接的脚本访问:

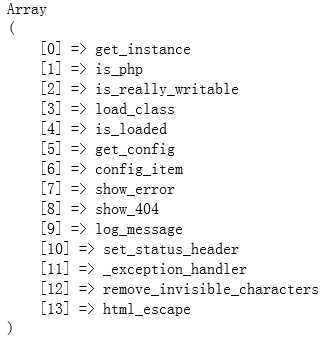
本文件中定义的函数如下(查看方式 print_r(get_defined_functions())):

CI中所有全局函数的定义方式都为:
if ( ! function_exists(‘func_name‘)){
    function func_name(){
     //function body
    }
}
这样做,是为了防止定义重名函数(之后如果我们要定义系统的全局函数,也都将使用这种定义方式)。下面,一个个展开来看:
这个函数的命名很明显,就是判断当前环境的PHP版本是否是特定的PHP版本(或者高于该版本)
该函数内部有一个static的$_is_php数组变量,用于缓存结果(因为在特定的运行环境中,PHP的版本是已知的且是不变的,所以通过缓存的方式,避免每次调用时都去进行version_compare。这种方式,与一般的分布式缓存(如Redis)的处理思维是一致的,不同的是,这里是使用static数组的方式,而分布式缓存大多使用内存缓存)。
为什么要定义这个函数呢?这是因为,CI框架中有一些配置依赖于PHP的版本和行为(如magic_quotes,PHP 5.3版本之前,该特性用于指定是否开启转义,而PHP5.3之后,该特性已经被废弃)。这就好比是针对不同的浏览器进行Css Hack一样(这里仅仅是比喻,实际上,PHP并没有太多的兼容性问题)。
具体的实现源码:
function is_php($version = ‘5.0.0‘)
{
    static $_is_php;
    $version = (string)$version;

    if ( ! isset($_is_php[$version]))
    {
        $_is_php[$version] = (version_compare(PHP_VERSION, $version) < 0) ? FALSE : TRUE;
    }
    return $_is_php[$version];
}
这个函数用于判断文件或者目录是否真实可写,一般情况下,通过内置函数is_writable()返回的结果是比较可靠的,但是也有一些例外,比如:
(a). Windows中,如果对文件或者目录设置了只读属性,则is_writable返回结果是true,但是却无法写入。
(b). Linux系统中,如果开启了Safe Mode,则也会影响is_writable的结果
因此,本函数的处理是:
如果是一般的Linux系统且没有开启safe mode,则直接调用is_writable
否则:
如果是目录,则尝试在目录中创建一个文件来检查目录是否可写
如果是文件,则尝试以写入模式打开文件,如果无法打开,则返回false
注意,即使是使用fopen检查文件是否可写,也一定记得调用fclose关闭句柄,这是一个好的习惯。
该函数的源码:
function is_really_writable($file)
{
    // If we‘re on a Unix server with safe_mode off we call is_writable
    if (DIRECTORY_SEPARATOR == ‘/‘ AND @ini_get("safe_mode") == FALSE)
    {
        return is_writable($file);
    }

    // For windows servers and safe_mode "on" installations we‘ll actually write a file then read it
    if (is_dir($file))
    {
        $file = rtrim($file, ‘/‘).‘/‘.md5(mt_rand(1,100).mt_rand(1,100));

        if (($fp = @fopen($file, FOPEN_WRITE_CREATE)) === FALSE)
        {
            return FALSE;
        }

        fclose($fp);
        @chmod($file, DIR_WRITE_MODE);
        @unlink($file);
        return TRUE;
    }
    elseif ( ! is_file($file) OR ($fp = @fopen($file, FOPEN_WRITE_CREATE)) === FALSE)
    {
        return FALSE;
    }

    fclose($fp);
    return TRUE;
}
这个函数有几个特殊的地方需要重点关注:
(1). 注意这个函数的签名,function &load_class( $class,$directory,$prefix).看到前面那个特殊的&符号没?没错,这个函数返回的是一个class实例的引用. 对该实例的任何改变,都会影响下一次函数调用的结果。
(2). 这个函数也有一个内部的static变量缓存已经加载的类的实例,实现方式类似于单例模式(Singleton)
(3). 函数优先查找APPPATH和BASEPATH中查找类,然后才从$directory中查找类,这意味着,如果directory中存在着同名的类(指除去前缀之后同名),CI加载的实际上是该扩展类。这也意味着,可以对CI的核心进行修改或者扩展。
下面是该函数的源码:
function &load_class($class, $directory = ‘libraries‘, $prefix = ‘CI_‘)
{
    /* 缓存加载类的实例 */
    static $_classes = array();
    if (isset($_classes[$class]))
    {
        return $_classes[$class];
    }
    $name = FALSE;

    /* 先查找系统目录 */
    foreach (array(APPPATH, BASEPATH) as $path)
    {
        if (file_exists($path.$directory.‘/‘.$class.‘.php‘))
        {
            $name = $prefix.$class;
            if (class_exists($name) === FALSE)
            {
                require($path.$directory.‘/‘.$class.‘.php‘);
            }
            break;
        }

    }

    /*  查找之后并没有立即实例化,而是接着查找扩展目录 */
    if (file_exists(APPPATH.$directory.‘/‘.config_item(‘subclass_prefix‘).$class.‘.php‘))
    {
        $name = config_item(‘subclass_prefix‘).$class;
        if (class_exists($name) === FALSE)
        {
            require(APPPATH.$directory.‘/‘.config_item(‘subclass_prefix‘).$class.‘.php‘);

        }
    }

    /* 没有找到任何文件 */
    if ($name === FALSE)
    {
        exit(‘Unable to locate the specified class: ‘.$class.‘.php‘);
    }

    /*  将$class计入已加载的类列表  */
    is_loaded($class);

    /* 取得实例化 */
    $_classes[$class] = new $name();

    return $_classes[$class];
}
这个函数用于追踪所有已加载的class。代码比较简洁,没有太多可讲的地方,这里直接贴出源码:
function &is_loaded($class = ‘‘)
{
    static $_is_loaded = array();

    if ($class != ‘‘)
    {
       $_is_loaded[strtolower($class)] = $class;
    }
    return $_is_loaded;
}
这个函数用于加载主配置文件(即位于config/目录下的config.php文件,如果定义了针对特定ENVIRONMENT的config.php文件,则是该文件)。该函数的签名为:
function &get_config($replace = array())
有几个需要注意的点:
(1). 函数只加载主配置文件,而不会加载其他配置文件(这意味着,如果你添加了其他的配置文件,在框架预备完毕之前,不会读取你的配置文件)。在Config组件实例化之前,所有读取主配置文件的工作都由该函数完成。
(2). 该函数支持动态运行的过程中修改Config.php中的条目(配置信息只可能修改一次,因为该函数也有static变量做缓存,若缓存存在,则直接返回配置)
(3). Return $_config[0] = & $config。是config文件中$config的引用,防止改变Config的配置之后,由于该函数的缓存原因,无法读取最新的配置。
这里还有一点无法理解,作者使用了$_config数组来缓存config,而只使用了$_config[0],那么问题来了,为什么不用单一变量代替,即:$_config = & $config; 如果有知道原因的童鞋,麻烦告知一声。
该函数的实现源码:
function &get_config($replace = array())
{
    static $_config;

    if (isset($_config))
    {
        return $_config[0];
    }

    if ( ! defined(‘ENVIRONMENT‘) OR ! file_exists($file_path = APPPATH.‘config/‘.ENVIRONMENT.‘/config.php‘))
    {
        $file_path = APPPATH.‘config/config.php‘;
    }

    if ( ! file_exists($file_path))
    {
        exit(‘The configuration file does not exist.‘);
    }

    require($file_path);

    if ( ! isset($config) OR ! is_array($config))
    {
        exit(‘Your config file does not appear to be formatted correctly.‘);
    }

    if (count($replace) > 0)
    {
        foreach ($replace as $key => $val)
        {
            if (isset($config[$key]))
            {
                $config[$key] = $val;
            }
        }
    }

    return $_config[0] =& $config;
}
这个函数调用了load_config,并获取相应的设置条目。代码比较简洁。不做过多的解释,同样只贴出源码:
function config_item($item)
{
    static $_config_item = array();

    if ( ! isset($_config_item[$item]))
    {
        $config =& get_config();

        if ( ! isset($config[$item]))
        {
            return FALSE;
        }
        $_config_item[$item] = $config[$item];
    }

    return $_config_item[$item];
}
这是CI定义的可以用来展示错误信息的函数,该函数使用了Exceptions组件(之后我们将看到,CI中都是通过Exceptions组件来管理错误的)来处理错误。
例如,我们可以在自己的应用程序控制器中调用该函数展示错误信息:
Show_error(“trigger error info”);
CI框架的错误输出还算是比较美观:

注意该函数不仅仅是显示错误,而且会终止代码的执行(exit)
该函数的源码:
function show_error($message, $status_code = 500, $heading = ‘An Error Was Encountered‘)
{
    $_error =& load_class(‘Exceptions‘, ‘core‘);
    echo $_error->show_error($heading, $message, ‘error_general‘, $status_code);
    exit;
}
没有太多解释的东西,返回404页面
源码:
function show_404($page = ‘‘, $log_error = TRUE)
{
    $_error =& load_class(‘Exceptions‘, ‘core‘);
    $_error->show_404($page, $log_error);
    exit;
}
调用Log组件记录log信息,类似Debug。需要注意的是,如果主配置文件中log_threshold被设置为0,则不会记录任何Log信息,该函数的源码:
function log_message($level = ‘error‘, $message, $php_error = FALSE)
{
    static $_log;

    if (config_item(‘log_threshold‘) == 0)
    {
        return;
    }

    $_log =& load_class(‘Log‘);
    $_log->write_log($level, $message, $php_error);
}
CI框架允许你设置HTTP协议的头信息(具体的HTTP状态码和对应含义可以参考:http://blog.csdn.net/ohmygirl/article/details/6922313)。设置方法为:
$this->output->set_status_header(“401”,“lalalala”);(CI的Output组件暴露了set_status_header()对外接口,该接口即是调用set_status_header函数)
值得注意的是,现在很多服务器内部扩展加入了自定义的状态码,如nginx:
ngx_string(ngx_http_error_495_page),   /* 495, https certificate error */
ngx_string(ngx_http_error_496_page),   /* 496, https no certificate */
ngx_string(ngx_http_error_497_page),   /* 497, http to https */
ngx_string(ngx_http_error_404_page),   /* 498, canceled */
ngx_null_string,                       /* 499, client has closed connection */
所以你在查看服务器的error_log时,如果看到了比较诡异的错误状态码,不要惊慌,这不是bug. 这也说明,如果你要自定义自己的状态码和状态码描述文案,可以在该函数的内部$stati变量中添加自定义的状态码和文案。更多详细的内容,可以查看header函数的manual。
源码:
function set_status_header($code = 200, $text = ‘‘)
{
    /* 所有的已定义状态码和描述文本 */
    $stati = array(
     /* 2xx 成功 */
        200    => ‘OK‘,
        201    => ‘Created‘,
        202    => ‘Accepted‘,
        203    => ‘Non-Authoritative Information‘,
        204    => ‘No Content‘,
        205    => ‘Reset Content‘,
        206    => ‘Partial Content‘,
        /* 3xx 重定向 */
        300    => ‘Multiple Choices‘,
        301    => ‘Moved Permanently‘,
        302    => ‘Found‘,
        304    => ‘Not Modified‘,
        305    => ‘Use Proxy‘,
        307    => ‘Temporary Redirect‘,
        /* 4xx 客户端错误 */
        400    => ‘Bad Request‘,
        401    => ‘Unauthorized‘,
        403    => ‘Forbidden‘,
        404    => ‘Not Found‘,
        405    => ‘Method Not Allowed‘,
        406    => ‘Not Acceptable‘,
        407    => ‘Proxy Authentication Required‘,
        408    => ‘Request Timeout‘,
        409    => ‘Conflict‘,
        410    => ‘Gone‘,
        411    => ‘Length Required‘,
        412    => ‘Precondition Failed‘,
        413    => ‘Request Entity Too Large‘,
        414    => ‘Request-URI Too Long‘,
        415    => ‘Unsupported Media Type‘,
        416    => ‘Requested Range Not Satisfiable‘,
        417    => ‘Expectation Failed‘,
        /* 5xx 服务器端错误 */
        500    => ‘Internal Server Error‘,
        501    => ‘Not Implemented‘,
        502    => ‘Bad Gateway‘,
        503    => ‘Service Unavailable‘,
        504    => ‘Gateway Timeout‘,
        505    => ‘HTTP Version Not Supported‘
    );

    /* 状态码为空或者不是数字,直接抛出错误并退出 */
    if ($code == ‘‘ OR ! is_numeric($code))
    {
        show_error(‘Status codes must be numeric‘, 500);
    }

    if (isset($stati[$code]) AND $text == ‘‘)
    {
        $text = $stati[$code];
    }

    /* 设置的状态码不在已定义的数组中 */
    if ($text == ‘‘)
    {
        show_error(‘No status text available.  Please check your status code number or supply your own message text.‘, 500);
    }

    $server_protocol = (isset($_SERVER[‘SERVER_PROTOCOL‘])) ? $_SERVER[‘SERVER_PROTOCOL‘] : FALSE;

    /* PHP以CGI模式运行 */
    if (substr(php_sapi_name(), 0, 3) == ‘cgi‘)
    {
        header("Status: {$code} {$text}", TRUE);
    }
    elseif ($server_protocol == ‘HTTP/1.1‘ OR $server_protocol == ‘HTTP/1.0‘)/* 检查HTTP协议 */
    {
        header($server_protocol." {$code} {$text}", TRUE, $code);
    }
    else
    {
        header("HTTP/1.1 {$code} {$text}", TRUE, $code);/*  默认为HTTP/1.1 */
    }
}
先看函数的签名:
function _exception_handler($severity, $message, $filepath, $line);
$ severity :发生错误的错误码。整数
$message :错误信息。
$filepath :发生错误的文件
$line :错误的行号
这个函数会根据当前设置的error_reporting的设置和配置文件中threshold的设置来决定PHP错误的显示和记录。在CI中,这个函数是作为set_error_handler的callback, 来代理和拦截PHP的错误信息(PHP手册中明确指出:以下级别的错误不能由用户定义的函数来处理:
E_ERROR、
E_PARSE、 E_CORE_ERROR、
E_CORE_WARNING、
E_COMPILE_ERROR、
E_COMPILE_WARNING,和在 调用 set_error_handler() 函数所在文件中产生的大多数
E_STRICT 。同样,如果在set_error_handler调用之前发生的错误,也无法被_exception_handler捕获,因为在这之前,_exception_handler尚未注册)。
再看源码实现:
if ($severity == E_STRICT){
    return;
}
E_STRICT是PHP5中定义的错误级别,是严格语法模式的错误级别,并不包含在E_STRICT. 由于E_STRICT级别的错误可能会很多,因此,CI的做法是,忽略这类错误。
函数中实际处理和记录错误信息的是Exception组件:
$_error =& load_class(‘Exceptions‘, ‘core‘);
然后根据当前的error_reporting设置,决定是显示错误(show_php_error)还是记录错误日志(log_exception):
if (($severity & error_reporting()) == $severity)
{
    $_error->show_php_error($severity, $message, $filepath, $line);
}
注意,这里是位运算&而不是逻辑运算&&, 由于PHP中定义的错误常量都是整数,而且是2的整数幂(如
1 E_ERROR
2 E_WARNING
4 E_PARSE
8 E_NOTICE
16 E_CORE_ERROR
...
),因此可以用&方便判断指定的错误级别是否被设置,而在设置的时候,可以通过|运算:
/* 显示E_ERROR,E_WARNING,E_PARSE错误 */
error_reporting(E_ERROR | E_WARNING | E_PARSE);

/* 显示除了E_NOTICE之外的错误 */
error_reporting(E_ALL & ~E_NOTICE | E_STRICE);
这与Linux的权限设置rwx的设计思想是一致的(r:4 w:2 x:1)
有时候仅仅显示错误是不够的,还需要记录错误信息到文件:
如果主配置文件config.php中$config[‘log_threshold‘] == 0,则不记录到文件:
if (config_item(‘log_threshold‘) == 0)
{
    return;
}
否者,记录错误信息到文件(这之中,调用组件Exception去写文件,Exception组件中会调用log_message函数,最终通过Log组件记录错误信息到文件。模块化的一个最大特点是每个组件都负责专门的职责,而模块可能还会暴露接口被其他组件调用。)
最后,贴上完整的源码:
function _exception_handler($severity, $message, $filepath, $line)
{
    if ($severity == E_STRICT)
    {
               return;
    }
    $_error =& load_class(‘Exceptions‘, ‘core‘);

    if (($severity & error_reporting()) == $severity)
    {
               $_error->show_php_error($severity, $message, $filepath, $line);
    }
    if (config_item(‘log_threshold‘) == 0)
    {
               return;
    }
    $_error->log_exception($severity, $message, $filepath, $line);
}
这个函数的含义非常明确,就是去除字符串中的不可见字符。这些不可见字符包括:
ASCII码表中的00-31,127(保留09,10,13,分别为tab,换行和回车换行,这些虽然不可见,但却是格式控制字符)。然后通过正则替换去除不可见字符:
do{
    $str = preg_replace($non_displayables, ‘‘, $str, -1, $count);
}
while ($count);
理论上将,preg_replace会替换所有的满足正则表达式的部分,这里使用while循环的理由是:可以去除嵌套的不可见字符。如 %%0b0c。如果只执行一次替换的话,剩余的部分%0c依然是不可见字符,所以要迭代去除($count返回替换的次数)。
完整的函数源码:
function remove_invisible_characters($str, $url_encoded = TRUE)
{
    $non_displayables = array();

    if ($url_encoded)
    {
        $non_displayables[] = ‘/%0[0-8bcef]/‘;    // url encoded 00-08, 11, 12, 14, 15
        $non_displayables[] = ‘/%1[0-9a-f]/‘;       // url encoded 16-31
    }

    $non_displayables[] = ‘/[\x00-\x08\x0B\x0C\x0E-\x1F\x7F]+/S‘;     // 00-08, 11, 12, 14-31, 127

    do
    {
        $str = preg_replace($non_displayables, ‘‘, $str, -1, $count);
    }while ($count);

    return $str;
}
这个函数,实际上是数组中的元素递归调用htmlspecialchars。
函数实现源码:
function html_escape($var)
{
    if (is_array($var))
    {
        return array_map(‘html_escape‘, $var);
    }
    else
    {
        return htmlspecialchars($var, ENT_QUOTES, config_item(‘charset‘));
    }
}
总结一下,Common.php是在各组件加载之前定义的一系列全局函数。这些全局函数的作用是获取配置、跟踪加载class、安全性过滤等。而这么做的目的之一,就是避免组件之间的过多依赖。
PHP引用:http://www.cnblogs.com/xiaochaohuashengmi/archive/2011/09/10/2173092.html
HTTP协议:http://www.cnblogs.com/TankXiao/archive/2012/02/13/2342672.html
标签:des style blog http io color os ar 使用
原文地址:http://blog.csdn.net/ohmygirl/article/details/40630185