标签:get src 调用 hub section 网站 sch block utf-8

人生苦短,我用 Python
前文传送门:
小白学 Python 爬虫(2):前置准备(一)基本类库的安装
小白学 Python 爬虫(3):前置准备(二)Linux基础入门
小白学 Python 爬虫(4):前置准备(三)Docker基础入门
小白学 Python 爬虫(6):前置准备(五)爬虫框架的安装
小白学 Python 爬虫(10):Session 和 Cookies
小白学 Python 爬虫(11):urllib 基础使用(一)
小白学 Python 爬虫(12):urllib 基础使用(二)
小白学 Python 爬虫(13):urllib 基础使用(三)
小白学 Python 爬虫(14):urllib 基础使用(四)
小白学 Python 爬虫(15):urllib 基础使用(五)
小白学 Python 爬虫(16):urllib 实战之爬取妹子图
小白学 Python 爬虫(17):Requests 基础使用
小白学 Python 爬虫(18):Requests 进阶操作
前面两篇我们介绍了 Requests 的使用,原本是想再来一个实战的,正准备搞事情的时候想起来上次实战还给自己挖了一个坑, Xpath 还没介绍,还是乖乖的先介绍解析库吧。
XPath ,全称 XML Path Language ,即 XML 路径语言,它是一门在 XML 文档中查找信息的语言。它最初是用来搜寻 XML 文档的,但是它同样适用于 HTML 文档的搜索。
首先,还是敬上 Xpath 的官方网站:https://www.w3.org/TR/xpath/all/ 。
其次,再敬上两个还不错的学习地址:
w3school:https://www.w3school.com.cn/xpath/index.asp
菜鸟教程:https://www.runoob.com/xpath/xpath-tutorial.html
下面列出了最有用的路径表达式:
| 表达式 | 描述 |
|---|---|
| nodename | 选取此节点的所有子节点。 |
| / | 从根节点选取。 |
| // | 从匹配选择的当前节点选择文档中的节点,而不考虑它们的位置。 |
| . | 选取当前节点。 |
| .. | 选取当前节点的父节点。 |
| @ | 选取属性。 |
注意,在使用 Xpath 之前,需要先确保安装好 lxml 库,如果没有安装,可以参考前面的前置准备进行安装。
首先需要引入 lxml 库的 etree 模块,接着引入 Requests 模块,小编这里直接以自己的博客站用作示例。
from lxml import etree
import requests

response = requests.get('https://www.geekdigging.com/')
html_str = response.content.decode('UTF-8')
html = etree.HTML(html_str)
result = etree.tostring(html, encoding = 'UTF-8').decode('UTF-8')
print(result)
结果如下:

可以看到结果是成功爬取,这里我们首先使用 requests 获取首页的源代码 byte 数据流,接着使用 decode() 进行解码,解码后将字符串传入 etree.HTML() 构建了一个 lxml.etree._Element 对象,接着我们对这个对象做了 tostring() 转换字符串并且进行打印。
注意: 这里使用 tostring() 进行转化字符串的时候,一定需要添加参数 encoding ,否则中文将会显示为 Unicode 编码。
我们构建完成了 Element 对象,接着我们就可以开始愉快的 Xpath 学习了。
我们会用 // 开头的 XPath 规则来选取所有符合要求的节点。示例(依然采用上面的 html ):
result_1 = html.xpath('//*')
print(result_1)
结果如下:
[<Element html at 0x2a2810ea088>, <Element head at 0x2a2810e0788>, <Element meta at 0x2a2810d8048>, <Element meta at 0x2a2810d8088>, <Element meta at 0x2a280124188>,......结果太长仅截取部分。
这里使用 * 代表匹配所有节点,也就是整个 HTML 文本中的所有节点都会被获取。可以看到,返回形式是一个列表,每个元素是 Element 类型,其后跟了节点的名称,如 html 、 head 、 meta 等,所有节点都包含在列表中了。
当然,在这里匹配也可以指定节点的名称,例如获取所有的 meta 节点:
result_2 = html.xpath('//meta')
print(result_2)
结果如下:
[<Element meta at 0x1fc9107a2c8>, <Element meta at 0x1fc9107a6c8>, <Element meta at 0x1fc91ff8188>, <Element meta at 0x1fc91ff8108>, <Element meta at 0x1fc91ff8088>, <Element meta at 0x1fc91fc2d88>, <Element meta at 0x1fc91e73988>, <Element meta at 0x1fc91ff81c8>, <Element meta at 0x1fc91f93f08>, <Element meta at 0x1fc9203d2c8>, <Element meta at 0x1fc9203d308>, <Element meta at 0x1fc9203d348>, <Element meta at 0x1fc9203d408>, <Element meta at 0x1fc9203db08>, <Element meta at 0x1fc9203d388>, <Element meta at 0x1fc9203d3c8>, <Element meta at 0x1fc92025c08>, <Element meta at 0x1fc92025b88>, <Element meta at 0x1fc92025c48>, <Element meta at 0x1fc92025cc8>]这里要选取所有 meta 节点,可以使用 // ,然后直接加上节点名称即可,调用时直接使用 xpath() 方法即可。由于返回的是一个列表,所有要获取特定的某个 meta 的时候,可以直接在 [] 中加索引,例如 [0] 。
获取子节点一般可以使用 / 或者 // 来获取子节点或者孙子节点。
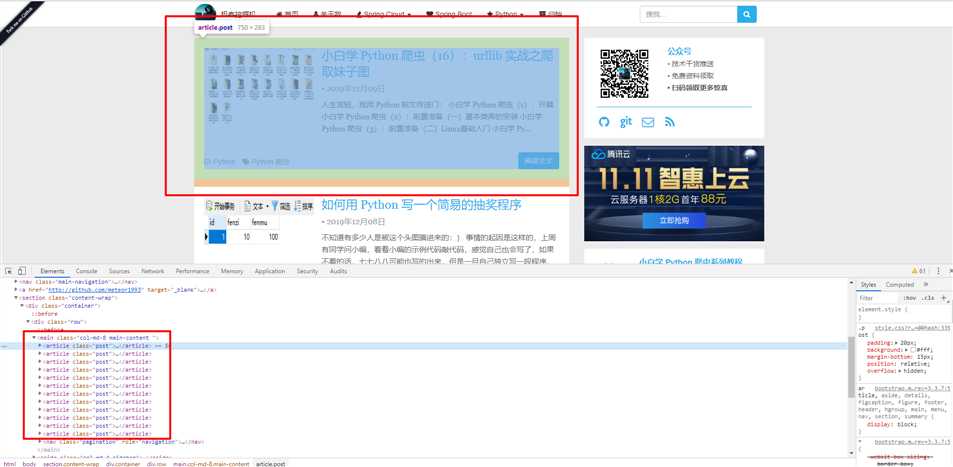
比如现在想获取所有的文章内容的块,如下:

红框所标识的内容,可以看到 DOM 结构为 <main> 下面的 <article> ,那么这个语句可以这么写:
result_3 = html.xpath('//main/article')
print(result_3)
结果如下:
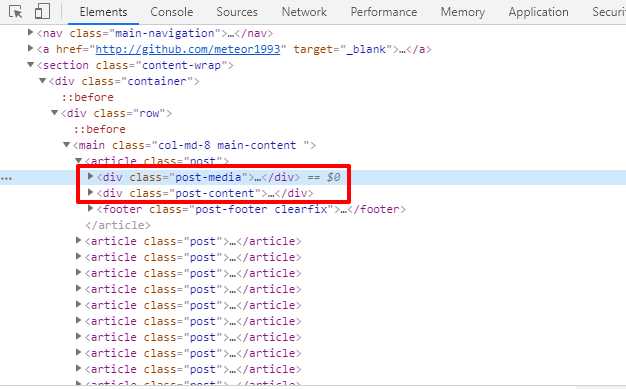
[<Element article at 0x225ef371c08>, <Element article at 0x225ef372208>, <Element article at 0x225ef3727c8>, <Element article at 0x225ef372d88>, <Element article at 0x225ef373388>, <Element article at 0x225ef373948>, <Element article at 0x225ef373f08>, <Element article at 0x225ef374508>, <Element article at 0x225ef374ac8>, <Element article at 0x225ef3750c8>, <Element article at 0x225ef375688>, <Element article at 0x225ef375c48>]此处的 / 是用于获取子节点,如果想要获取孙子节点,如 <article> 下面的 <div> ,如下图:

则可以这么写:
result_4 = html.xpath('//main//div')
print(result_4)
结果就不贴了,太长了。
我们可以通过 / 和 // 来查找子节点,那么肯定有语法可以查找父节点,不然只能向下查询不能向上查询就有点就有点太傻了。
父节点的查找是通过 .. 来实现的,比如我们先找到一篇文章的图片,现在要向上查找它的 <a> ,如下图:

这里我们通过 alt 属性为 小白学 Python 爬虫(16):urllib 实战之爬取妹子图 的 <img> ,然后获取它的父节点 <a> ,并且打印他的 href 属性,代码如下:
result_5 = html.xpath('//img[@alt="小白学 Python 爬虫(16):urllib 实战之爬取妹子图"]/../@href')
print(result_5)
结果如下:
['/2019/12/09/1691033431/']同时我们获取父节点还可以使用 parent:: 。
result_6 = html.xpath('//img[@alt="小白学 Python 爬虫(16):urllib 实战之爬取妹子图"]/parent::*/@href')
print(result_6)在选取节点的时候,我们可以使用 @ 符号进行属性过滤。
比如我们在选取 <div> 的时候,可以使用 class 为 container 的 <div> 。而在首页的 <section> 的子节点中, class 为 container 的 <div> 只有一个,代码如下:
result_7 = html.xpath('//section/div[@class="container"]')
print(result_7)
运行结果如下:
[<Element div at 0x251501c2c88>]本系列的所有代码小编都会放在代码管理仓库 Github 和 Gitee 上,方便大家取用。
标签:get src 调用 hub section 网站 sch block utf-8
原文地址:https://www.cnblogs.com/babycomeon/p/12047313.html