标签:bsp inf 工具 app support metadata stat 技术 cer
1 @SpringBootApplication
2 public class DemoApplication {
3     public static void main(String[] args) {
4
5         SpringApplication.run(DemoApplication.class, args);
6     }
7 }
每次我们直接直接启动这个启动类,SpringBoot就启动成功了,并且帮我们配置了好多自动配置类。
其中最重要是 @SpringBootApplication 这个注解,我们点进去看一下。
 1 @Target(ElementType.TYPE)
 2 @Retention(RetentionPolicy.RUNTIME)
 3 @Documented
 4 @Inherited
 5 @SpringBootConfiguration
 6 @EnableAutoConfiguration
 7 @ComponentScan(excludeFilters = {
 8         @Filter(type = FilterType.CUSTOM, classes = TypeExcludeFilter.class),
 9         @Filter(type = FilterType.CUSTOM, classes = AutoConfigurationExcludeFilter.class) })
10 public @interface SpringBootApplication {
@SpringBootConfiguration : Spring Boot的配置类,标注在某个类上,表示这是一个Spring Boot的配置类
@EnableAutoConfiguration: 开启自动配置类,SpringBoot的精华所在。
@ComponentScan包扫描
以前我们需要配置的东西,Spring Boot帮我们自动配置;@EnableAutoConfiguration告诉SpringBoot开启自动配置功能;这样自动配置才能生效;
1 @Target(ElementType.TYPE)
2 @Retention(RetentionPolicy.RUNTIME)
3 @Documented
4 @Inherited
5 @AutoConfigurationPackage
6 @Import(AutoConfigurationImportSelector.class)
7 public @interface EnableAutoConfiguration {
@AutoConfigurationPackage:自动配置包
@Import: 导入自动配置的组件
1     static class Registrar implements ImportBeanDefinitionRegistrar, DeterminableImports {
2
3         @Override
4         public void registerBeanDefinitions(AnnotationMetadata metadata,
5                 BeanDefinitionRegistry registry) {
6             register(registry, new PackageImport(metadata).getPackageName());
7         }
它其实是注册了一个Bean的定义。
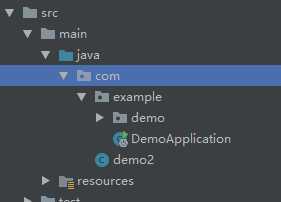
new PackageImport(metadata).getPackageName(),它其实返回了当前主程序类的 同级以及子级 的包组件。

以上图为例,DemoApplication是和demo包同级,但是demo2这个类是DemoApplication的父级,和example包同级
也就是说,DemoApplication启动加载的Bean中,并不会加载demo2,这也就是为什么,我们要把DemoApplication放在项目的最高级中。

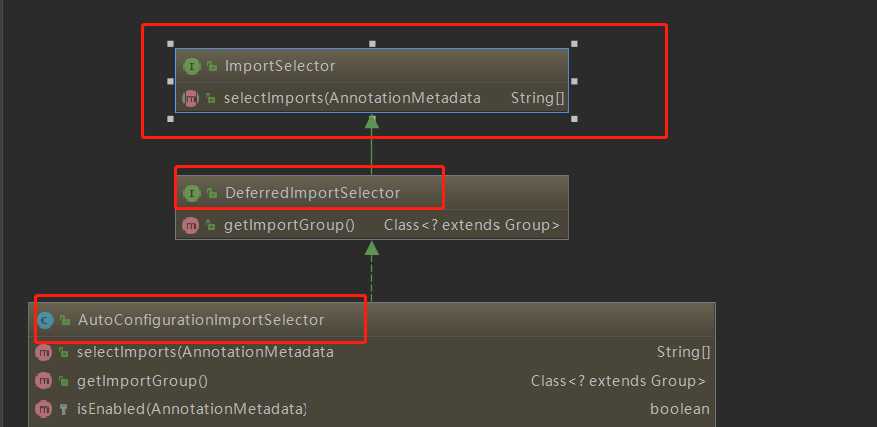
可以从图中看出 AutoConfigurationImportSelector 继承了 DeferredImportSelector 继承了 ImportSelector
ImportSelector有一个方法为:selectImports。
 1 @Override
 2     public String[] selectImports(AnnotationMetadata annotationMetadata) {
 3         if (!isEnabled(annotationMetadata)) {
 4             return NO_IMPORTS;
 5         }
 6         AutoConfigurationMetadata autoConfigurationMetadata = AutoConfigurationMetadataLoader
 7                 .loadMetadata(this.beanClassLoader);
 8         AnnotationAttributes attributes = getAttributes(annotationMetadata);
 9         List<String> configurations = getCandidateConfigurations(annotationMetadata,
10                 attributes);
11         configurations = removeDuplicates(configurations);
12         Set<String> exclusions = getExclusions(annotationMetadata, attributes);
13         checkExcludedClasses(configurations, exclusions);
14         configurations.removeAll(exclusions);
15         configurations = filter(configurations, autoConfigurationMetadata);
16         fireAutoConfigurationImportEvents(configurations, exclusions);
17         return StringUtils.toStringArray(configurations);
18     }
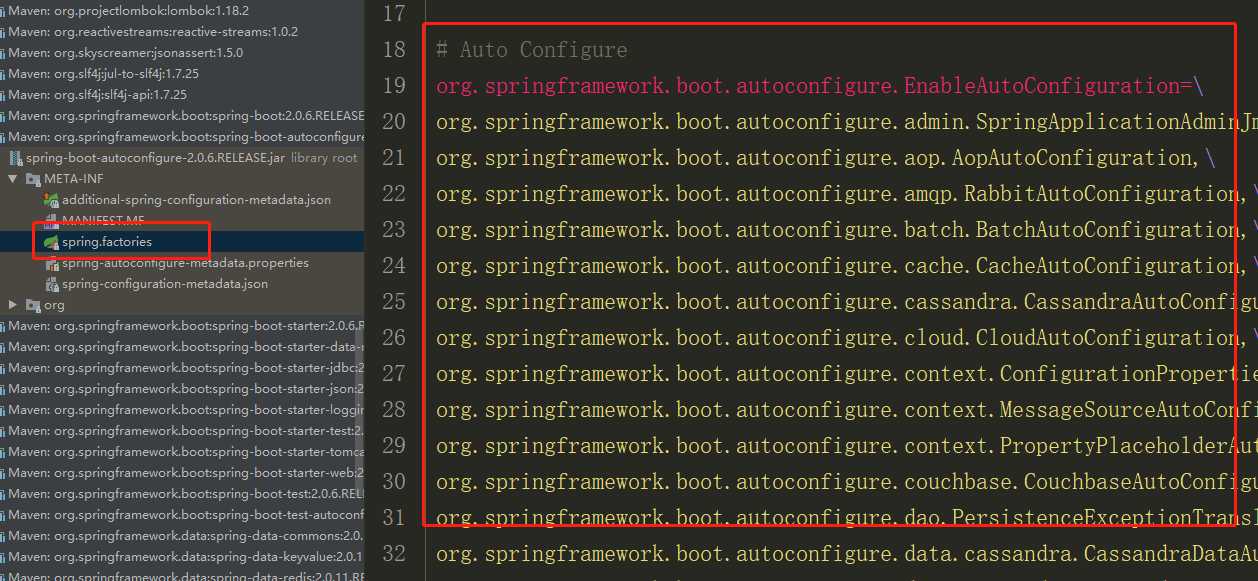
可以看到第九行,它其实是去加载 public static final String FACTORIES_RESOURCE_LOCATION = "META-INF/spring.factories";外部文件。这个外部文件,有很多自动配置的类。如下:

我们以RedisTemplate为例:
 1 @Configuration
 2 @ConditionalOnClass(RedisOperations.class)
 3 @EnableConfigurationProperties(RedisProperties.class)
 4 @Import({ LettuceConnectionConfiguration.class, JedisConnectionConfiguration.class })
 5 public class RedisAutoConfiguration {
 6
 7     @Bean
 8     @ConditionalOnMissingBean(name = "redisTemplate")
 9     public RedisTemplate<Object, Object> redisTemplate(
10             RedisConnectionFactory redisConnectionFactory) throws UnknownHostException {
11         RedisTemplate<Object, Object> template = new RedisTemplate<>();
12         template.setConnectionFactory(redisConnectionFactory);
13         return template;
14     }
15
16     @Bean
17     @ConditionalOnMissingBean
18     public StringRedisTemplate stringRedisTemplate(
19             RedisConnectionFactory redisConnectionFactory) throws UnknownHostException {
20         StringRedisTemplate template = new StringRedisTemplate();
21         template.setConnectionFactory(redisConnectionFactory);
22         return template;
23     }
24
25 }
我们每次在Spring中使用Redis,都会使用到RedisTemplate这个工具类,但是他默认给我们返回的这个工具类,可能不是很符合我们的要求。比如:我们想要开启事务,或者想要改变它默认的序列化。
这时候该如何去做呢?
根据前面的分析,只要我们在容器中放入一个RedisTemplate Bean即可。
 1 @Bean("redisTemplate")
 2     public RedisTemplate<Object, Object> myRedisTemplate(
 3             RedisConnectionFactory redisConnectionFactory) {
 4         RedisTemplate<Object, Object> template = new RedisTemplate<>();
 5         template.setConnectionFactory(redisConnectionFactory);
 6         // 修改序列化为Jackson
 7         template.setDefaultSerializer(new GenericJackson2JsonRedisSerializer());
 8         // 开启事务
 9         template.setEnableTransactionSupport(true);
10         return template;
11     }
我们自己定义我们的RedisTemplate模板,修改序列化,开启事务等操作。
我们将我们自己的Bean加入到IoC容器中以后,他就会默认的覆盖掉原来的RedisTemplate,达到定制的效果。
我们在以Kafka为例:
假设我们想要消费的对象不是字符串,而是一个对象呢?比如Person对象,或者其他Object类呢?
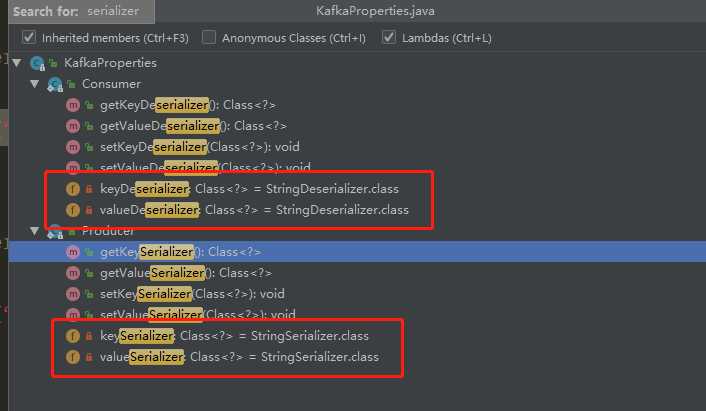
1:我们首先去查找KafkaAutoConfiguration(xxxAutoConfiguration),看看是否有关于Serializer属性的配置
2:假设没有我们就去KafkaProperties文件查找是否有Serializer的配置

然后直接在application.properties修改默认序列化就好,连Bean都不需要自己重写。
类似这种,可以使用Spring提供的Json序列化,也可以自动使用第三方框架提供的序列化,比如Avro, Protobuff等
1 spring.kafka.producer.key-serializer=org.springframework.kafka.support.serializer.JsonSerializer
2 spring.kafka.producer.value-serializer=org.springframework.kafka.support.serializer.JsonSerializer
3 spring.kafka.consumer.key-deserializer=com.example.common.MyJson
4 spring.kafka.consumer.value-deserializer=com.example.common.MyJson
后记:
标签:bsp inf 工具 app support metadata stat 技术 cer
原文地址:https://www.cnblogs.com/jiligalaer/p/12070584.html