标签:date 消息路由 cluster entity 其他属性 红色 bit 时间 设置
1、交换机
2、RabbitMQ整合springCloud
蓝色区域===生产者
红色区域===Server:又称Broker,接受客户端的连接,实现AMQP实体服务
绿色区域===消费者
黄色区域===就是我们的交换机以及队列
由生产者投递信息到RabbitMQ Server里面某一个交换机对应的队列中,消费者则是从对应的队列中获取信息
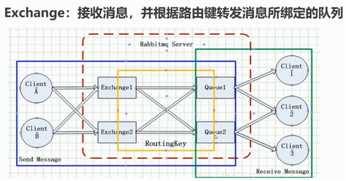
交换机属性:
Name:交换机名称
Type:交换机类型 direct、topic、fanout、headers
Durability:是否需要持久化,true为持久化
Auto Delete:当最后一个绑定到Exchange上的队列删除后,自动删除该Exchange
Internal:当前Exchange是否用于RabbitMQ内部使用,默认为False
Arguments:扩展参数,用于扩展AMQP协议,定制化使用
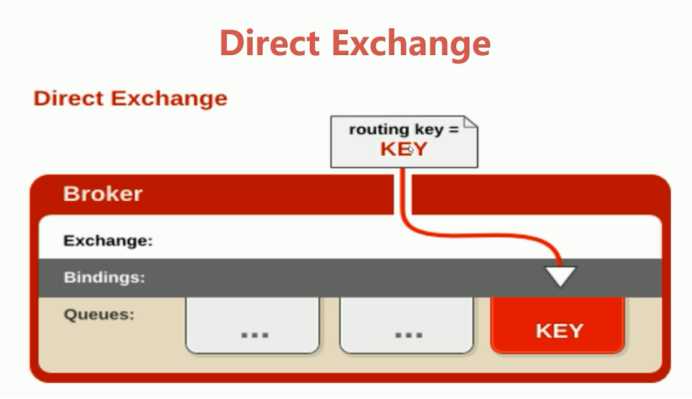
直连交换机Direct Exchange(完全匹配路由key)
所有发送到Direct Exchange的消息会被转发到RouteKey中指定的Queue
注意:Direct模式可以使用RabbitMQ自带的Exchange:default Exchange,
所以不需要将Exchange进行任何绑定(binding)操作,消息传递时,RouteKey必须完全匹配才会被队列接收,否则该消息会被抛弃;
消费端代码
 1 package com.yuan.rabbitmqapi.exchange.direct;
 2
 3 import com.rabbitmq.client.Channel;
 4 import com.rabbitmq.client.Connection;
 5 import com.rabbitmq.client.ConnectionFactory;
 6 import com.rabbitmq.client.QueueingConsumer;
 7
 8
 9 public class Consumer4DirectExchange {
10     public static void main(String[] args) throws Exception {
11
12
13         ConnectionFactory connectionFactory = new ConnectionFactory() ;
14
15         connectionFactory.setHost("192.168.238.129");
16         connectionFactory.setPort(5672);
17         connectionFactory.setVirtualHost("/");
18
19         connectionFactory.setAutomaticRecoveryEnabled(true);
20         connectionFactory.setNetworkRecoveryInterval(3000);
21         Connection connection = connectionFactory.newConnection();
22
23         Channel channel = connection.createChannel();
24         //4 声明
25         //交换机名称
26         String exchangeName = "test_direct_exchange";
27         //交换机类型
28         String exchangeType = "direct";
29         //队列名
30         String queueName = "test_direct_queue";
31         //访问规则
32         String routingKey = "test.direct";
33
34         //表示声明了一个交换机
35         channel.exchangeDeclare(exchangeName, exchangeType, true, false, false, null);
36         //表示声明了一个队列
37         channel.queueDeclare(queueName, false, false, false, null);
38         //建立一个绑定关系:
39         channel.queueBind(queueName, exchangeName, routingKey);
40
41         //durable 是否持久化消息
42         QueueingConsumer consumer = new QueueingConsumer(channel);
43         //参数:队列名称、是否自动ACK、Consumer
44         channel.basicConsume(queueName, true, consumer);
45         //循环获取消息
46         while(true){
47             //获取消息,如果没有消息,这一步将会一直阻塞
48             QueueingConsumer.Delivery delivery = consumer.nextDelivery();
49             String msg = new String(delivery.getBody());
50             System.out.println("收到消息:" + msg);
51         }
52     }
53 }
生产端代码
 1 package com.yuan.rabbitmqapi.exchange.direct;
 2
 3 import com.rabbitmq.client.Channel;
 4 import com.rabbitmq.client.Connection;
 5 import com.rabbitmq.client.ConnectionFactory;
 6
 7
 8 public class Producer4DirectExchange {
 9     public static void main(String[] args) throws Exception {
10
11         //1 创建ConnectionFactory
12         ConnectionFactory connectionFactory = new ConnectionFactory();
13         connectionFactory.setHost("192.168.238.129");
14         connectionFactory.setPort(5672);
15         connectionFactory.setVirtualHost("/");
16
17         //2 创建Connection
18         Connection connection = connectionFactory.newConnection();
19         //3 创建Channel
20         Channel channel = connection.createChannel();
21         //4 声明
22         String exchangeName = "test_direct_exchange";
23         String routingKey = "test.direct";
24 //        String routingKey = "test.direct111"; //收不到
25         //5 发送
26
27         String msg = "Hello World RabbitMQ 4  Direct Exchange Message 111 ... ";
28         channel.basicPublish(exchangeName, routingKey , null , msg.getBytes());
29
30     }
31 }
启动消费端

创建队列
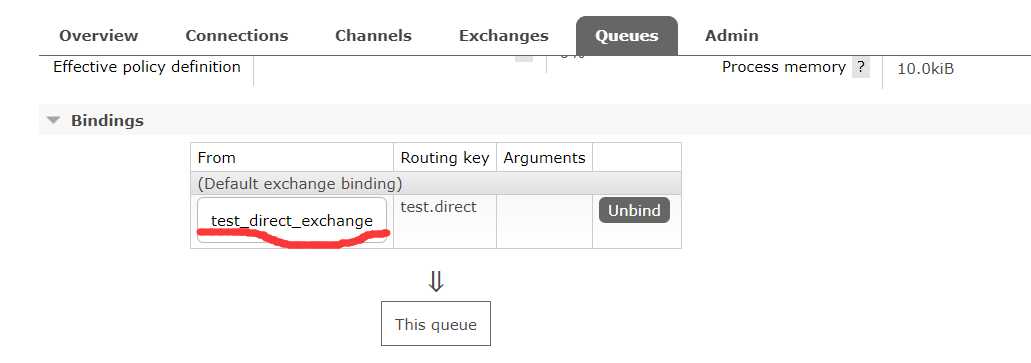
交换机
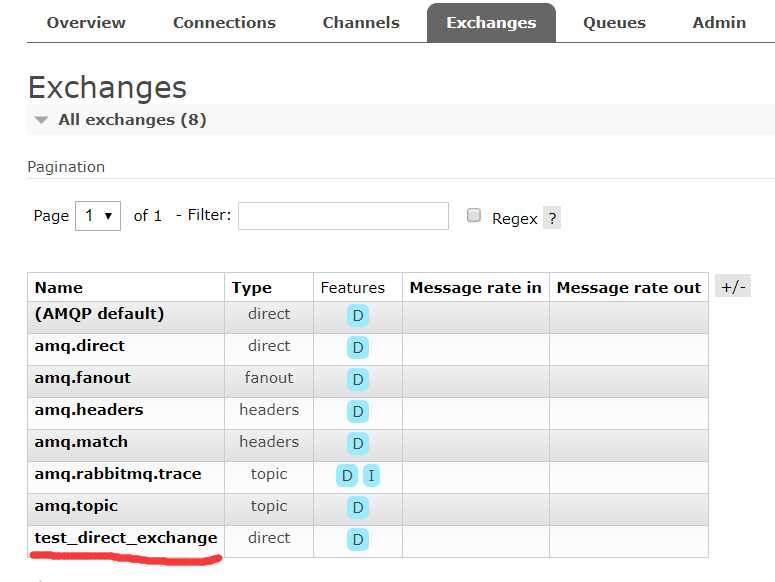
进入交换机,里面也绑定了对应的队列
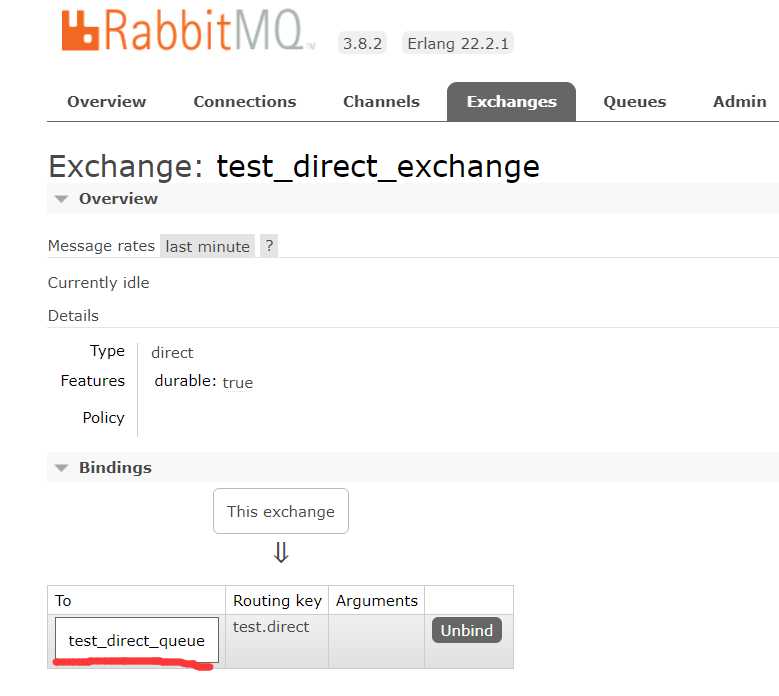
完了之后停掉消费端,先启动生产端 将信息投递到队列中,如果生产端和消费端的队列名不一致,消费端则拿不到信息


主题交换机Topic Exchange(匹配路由规则的交换机)
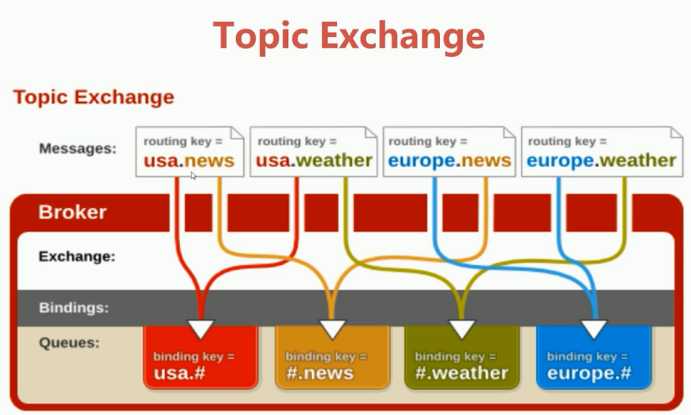
所有发送到Topic Exchange的消息被转发到所有关系RouteKey中指定Topic的Queue上;
Exchange将RouteKey和某Topic进行模糊匹配,此时队列需要绑定一个Topic;
注意:可以使用通配符进行模糊匹配
符号:“#” 匹配一个或者多个词
符号:“*” 匹配不多不少一个词
列如:
“log.#” 能够匹配到 “log.info.oa”
“log.*” 能够匹配到 “log.err”
消费端代码
 1 package com.yuan.rabbitmqapi.exchange.topic;
 2
 3 import com.rabbitmq.client.Channel;
 4 import com.rabbitmq.client.Connection;
 5 import com.rabbitmq.client.ConnectionFactory;
 6 import com.rabbitmq.client.QueueingConsumer;
 7
 8
 9 public class Consumer4TopicExchange {
10     public static void main(String[] args) throws Exception {
11
12
13         ConnectionFactory connectionFactory = new ConnectionFactory() ;
14
15         connectionFactory.setHost("192.168.238.129");
16         connectionFactory.setPort(5672);
17         connectionFactory.setVirtualHost("/");
18
19         connectionFactory.setAutomaticRecoveryEnabled(true);
20         connectionFactory.setNetworkRecoveryInterval(3000);
21         Connection connection = connectionFactory.newConnection();
22
23         Channel channel = connection.createChannel();
24         //4 声明
25         String exchangeName = "test_topic_exchange";
26         String exchangeType = "topic";
27         String queueName = "test_topic_queue";
28         String routingKey = "user.#";
29 //        String routingKey = "user.*";
30         // 1 声明交换机
31         channel.exchangeDeclare(exchangeName, exchangeType, true, false, false, null);
32         // 2 声明队列
33         channel.queueDeclare(queueName, false, false, false, null);
34         // 3 建立交换机和队列的绑定关系:
35         channel.queueBind(queueName, exchangeName, routingKey);
36
37         //durable 是否持久化消息
38         QueueingConsumer consumer = new QueueingConsumer(channel);
39         //参数:队列名称、是否自动ACK、Consumer
40         channel.basicConsume(queueName, true, consumer);
41         //循环获取消息
42         while(true){
43             //获取消息,如果没有消息,这一步将会一直阻塞
44             QueueingConsumer.Delivery delivery = consumer.nextDelivery();
45             String msg = new String(delivery.getBody());
46             System.out.println("收到消息:" + msg);
47         }
48     }
49 }
生产端代码
 1 package com.yuan.rabbitmqapi.exchange.topic;
 2
 3 import com.rabbitmq.client.Channel;
 4 import com.rabbitmq.client.Connection;
 5 import com.rabbitmq.client.ConnectionFactory;
 6
 7
 8 public class Producer4TopicExchange {
 9     public static void main(String[] args) throws Exception {
10
11         //1 创建ConnectionFactory
12         ConnectionFactory connectionFactory = new ConnectionFactory();
13         connectionFactory.setHost("192.168.238.129");
14         connectionFactory.setPort(5672);
15         connectionFactory.setVirtualHost("/");
16
17         //2 创建Connection
18         Connection connection = connectionFactory.newConnection();
19         //3 创建Channel
20         Channel channel = connection.createChannel();
21         //4 声明
22         String exchangeName = "test_topic_exchange";
23         String routingKey1 = "user.save";
24         String routingKey2 = "user.update";
25         String routingKey3 = "user.delete.abc";
26         //5 发送
27
28         String msg = "Hello World RabbitMQ 4 Topic Exchange Message ...";
29         channel.basicPublish(exchangeName, routingKey1 , null , msg.getBytes());
30         channel.basicPublish(exchangeName, routingKey2 , null , msg.getBytes());
31         channel.basicPublish(exchangeName, routingKey3 , null , msg.getBytes());
32         channel.close();
33         connection.close();
34     }
35 }
启动消费端,查看队列及交换机
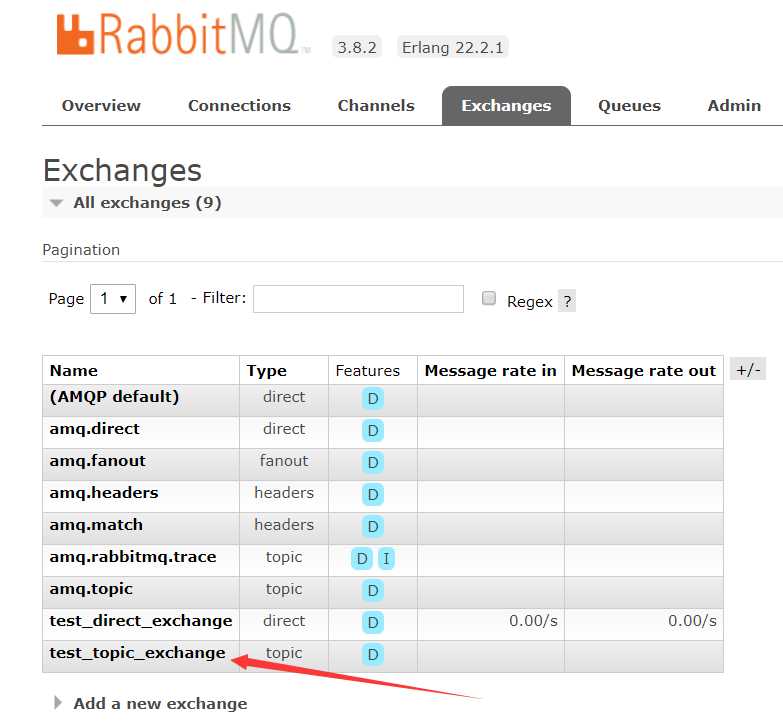
这里我们还可以点击交换机进去看它的一个绑定规则
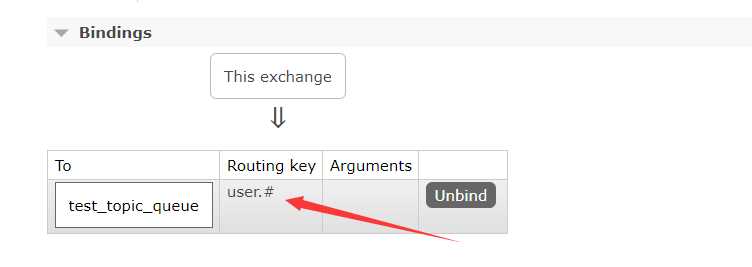
测试“log.#” 能够匹配到 “log.info.oa”
消费端代码
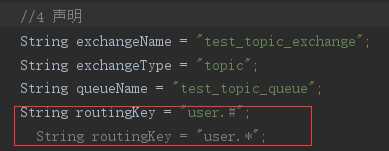
先启动生产端,再启动消费端

“log.*” 能够匹配到 “log.err”

它的绑定规则改变了
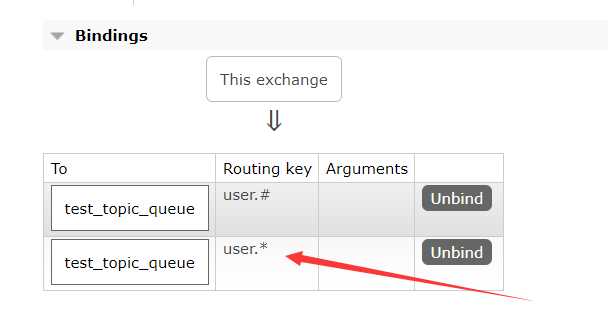
后台只会收到了两条信息

输出交换机Fanout Exchange(不做路由)
不处理路由键,只需要简单的将队列绑定到交换机上;
发送到交换机的消息都会被转发到与该交换机绑定的所有队列上;
Fanout交换机转发消息是最快的
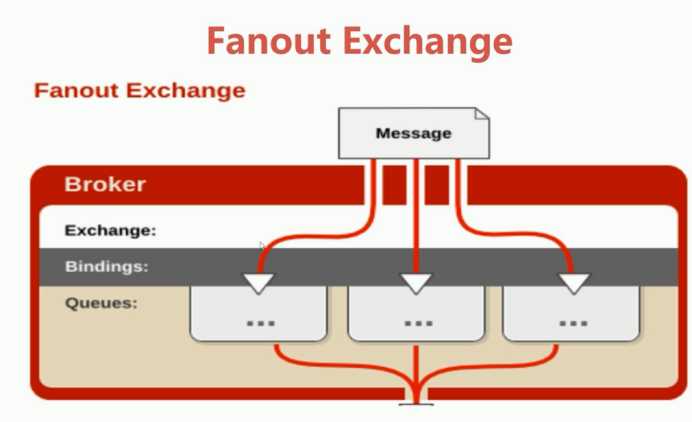
消费端代码
 1 package com.yuan.rabbitmqapi.exchange.fanout;
 2
 3 import com.rabbitmq.client.Channel;
 4 import com.rabbitmq.client.Connection;
 5 import com.rabbitmq.client.ConnectionFactory;
 6 import com.rabbitmq.client.QueueingConsumer;
 7
 8
 9 public class Consumer4FanoutExchange {
10     public static void main(String[] args) throws Exception {
11
12         ConnectionFactory connectionFactory = new ConnectionFactory() ;
13
14         connectionFactory.setHost("192.168.238.129");
15         connectionFactory.setPort(5672);
16         connectionFactory.setVirtualHost("/");
17
18         connectionFactory.setAutomaticRecoveryEnabled(true);
19         connectionFactory.setNetworkRecoveryInterval(3000);
20         Connection connection = connectionFactory.newConnection();
21
22         Channel channel = connection.createChannel();
23         //4 声明
24         String exchangeName = "test_fanout_exchange";
25         String exchangeType = "fanout";
26         String queueName = "test_fanout_queue";
27         String routingKey = "";    //不设置路由键
28         channel.exchangeDeclare(exchangeName, exchangeType, true, false, false, null);
29         channel.queueDeclare(queueName, false, false, false, null);
30         channel.queueBind(queueName, exchangeName, routingKey);
31
32         //durable 是否持久化消息
33         QueueingConsumer consumer = new QueueingConsumer(channel);
34         //参数:队列名称、是否自动ACK、Consumer
35         channel.basicConsume(queueName, true, consumer);
36         //循环获取消息
37         while(true){
38             //获取消息,如果没有消息,这一步将会一直阻塞
39             QueueingConsumer.Delivery delivery = consumer.nextDelivery();
40             String msg = new String(delivery.getBody());
41             System.out.println("收到消息:" + msg);
42         }
43     }
44 }
生产端
 1 package com.yuan.rabbitmqapi.exchange.fanout;
 2
 3 import com.rabbitmq.client.Channel;
 4 import com.rabbitmq.client.Connection;
 5 import com.rabbitmq.client.ConnectionFactory;
 6
 7
 8 public class Producer4FanoutExchange {
 9     public static void main(String[] args) throws Exception {
10
11         //1 创建ConnectionFactory
12         ConnectionFactory connectionFactory = new ConnectionFactory();
13         connectionFactory.setHost("192.168.238.129");
14         connectionFactory.setPort(5672);
15         connectionFactory.setVirtualHost("/");
16
17         //2 创建Connection
18         Connection connection = connectionFactory.newConnection();
19         //3 创建Channel
20         Channel channel = connection.createChannel();
21         //4 声明
22         String exchangeName = "test_fanout_exchange";
23         //5 发送
24         for(int i = 0; i < 10; i ++) {
25             String msg = "Hello World RabbitMQ 4 FANOUT Exchange Message ...";
26             channel.basicPublish(exchangeName, "", null , msg.getBytes());
27         }
28         channel.close();
29         connection.close();
30     }
31 }

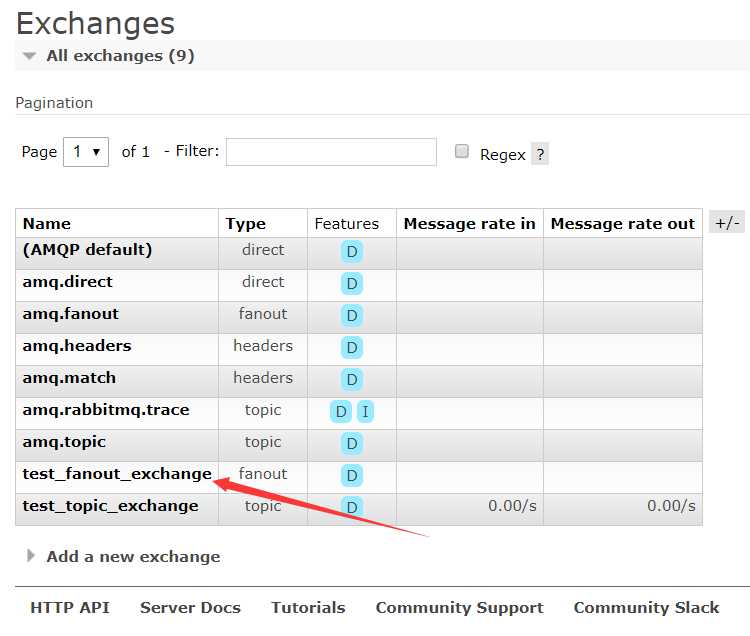
Binding-绑定
Exchange和Exchange、Queue之间的连接关系;
Binding中可以包含RoutingKey或者参数
Queue-消息队列
消息队列,实际存储消息数据
Durability:是否持久化
Durable:是,Transient:否
Auto delete:如选yes,代表当最后一个监听被移除之后,该Queue会自动被删除
Message-消息
服务器和应用程序之间传递的数据
本质上就是一段数据,由Properties和Payload(Body)组成
常用属性:delivery model、headers(自定义属性)
Message-其他属性
content_type、content_encoding、priority
correlation_id、reply_to、expiration、message_id
Timestamp、type、user_id、app_id、cluster_id
Virtual host-虚拟主机
虚拟地址,用于进行逻辑隔离,最上层的消息路由
一个Virtual Host里面可以有若干个Exchange和Queue
同一个Virtual Host里面不能有相同名称的Exchange或Queue
小结:
RabbitMQ的概念、安装与使用、管控台操作;
结合RabbitMQ的特性、Exchange、Queue、Binding、RoutingKey、Message进行核心API的讲解
注意一点,在发送消息的时候对template进行配置mandatory=true保证监听有效
生产端还可以配置其他属性,比如发送重试,超时时间、次数、间隔等
消费端核心配置
u 首先配置手工确认模式,用于ACK的手工处理,这样我们可以保证消息的可靠性送达,或者在消费端消费失败的时候可以做到重回队列、根据业务记录日志等处理
u 可以设置消费端的监听个数和最大个数,用于控制消费端的并发情况
@RabbitListener注解的使用
消费端监听@RabbitListener注解,这个对于在实际工作中非常的好用
u @RabbitListener是一个组合注解,里面可以注解配置(@QueueBinding、@Queue、@Exchange)直接通过这个组合注解一次性搞定消费端交换机、队列、绑定、路由、并且配置监听功能等
相关代码
rabbitmq-common子项目
 1 package com.yuan.rabbitmqcommon.entity;
 2
 3 import java.io.Serializable;
 4
 5
 6 public class Order implements Serializable {
 7
 8     private String id;
 9     private String name;
10
11     public Order() {
12     }
13     public Order(String id, String name) {
14         super();
15         this.id = id;
16         this.name = name;
17     }
18     public String getId() {
19         return id;
20     }
21     public void setId(String id) {
22         this.id = id;
23     }
24     public String getName() {
25         return name;
26     }
27     public void setName(String name) {
28         this.name = name;
29     }
30
31
32 }
rabbitmq-springcloud-consumer子项目
Pom依赖
 1 <?xml version="1.0" encoding="UTF-8"?>
 2 <project xmlns="http://maven.apache.org/POM/4.0.0" xmlns:xsi="http://www.w3.org/2001/XMLSchema-instance"
 3          xsi:schemaLocation="http://maven.apache.org/POM/4.0.0 https://maven.apache.org/xsd/maven-4.0.0.xsd">
 4     <modelVersion>4.0.0</modelVersion>
 5     <parent>
 6         <groupId>org.springframework.boot</groupId>
 7         <artifactId>spring-boot-starter-parent</artifactId>
 8         <version>2.2.2.RELEASE</version>
 9         <relativePath/> <!-- lookup parent from repository -->
10     </parent>
11     <groupId>com.yuan</groupId>
12     <artifactId>rabbitmq-springcloud-consumer</artifactId>
13     <version>0.0.1-SNAPSHOT</version>
14     <name>rabbitmq-springcloud-consumer</name>
15     <description>Demo project for Spring Boot</description>
16
17     <properties>
18         <java.version>1.8</java.version>
19     </properties>
20
21     <dependencies>
22         <dependency>
23             <groupId>org.springframework.boot</groupId>
24             <artifactId>spring-boot-starter</artifactId>
25         </dependency>
26
27         <dependency>
28             <groupId>com.yuan</groupId>
29             <artifactId>rabbitmq-common</artifactId>
30             <version>0.0.1-SNAPSHOT</version>
31         </dependency>
32
33         <dependency>
34             <groupId>org.springframework.boot</groupId>
35             <artifactId>spring-boot-starter-test</artifactId>
36             <scope>test</scope>
37             <exclusions>
38                 <exclusion>
39                     <groupId>org.junit.vintage</groupId>
40                     <artifactId>junit-vintage-engine</artifactId>
41                 </exclusion>
42             </exclusions>
43         </dependency>
44
45         <dependency>
46             <groupId>org.springframework.boot</groupId>
47             <artifactId>spring-boot-starter-amqp</artifactId>
48         </dependency>
49         <dependency>
50             <groupId>junit</groupId>
51             <artifactId>junit</artifactId>
52             <version>4.12</version>
53             <scope>test</scope>
54         </dependency>
55     </dependencies>
56
57     <build>
58         <plugins>
59             <plugin>
60                 <groupId>org.springframework.boot</groupId>
61                 <artifactId>spring-boot-maven-plugin</artifactId>
62             </plugin>
63         </plugins>
64     </build>
65
66 </project>
Yml配置
 1 spring.rabbitmq.addresses=192.168.238.129:5672
 2 spring.rabbitmq.username=guest
 3 spring.rabbitmq.password=guest
 4 spring.rabbitmq.virtual-host=/
 5 spring.rabbitmq.connection-timeout=15000
 6
 7 server.port=80
 8 server.servlet.context-path=/
 9
10 spring.rabbitmq.listener.simple.acknowledge-mode=manual
11 spring.rabbitmq.listener.simple.concurrency=5
12 spring.rabbitmq.listener.simple.max-concurrency=10
13
14 spring.rabbitmq.listener.order.queue.name=queue-2
15 spring.rabbitmq.listener.order.queue.durable=true
16 spring.rabbitmq.listener.order.exchange.name=exchange-2
17 spring.rabbitmq.listener.order.exchange.durable=true
18 spring.rabbitmq.listener.order.exchange.type=topic
19 spring.rabbitmq.listener.order.exchange.ignoreDeclarationExceptions=true
20 spring.rabbitmq.listener.order.key=springboot.*
RabbitReceiver
 1 package com.yuan.rabbitmqspringcloudconsumer.conusmer;
 2
 3 import com.yuan.rabbitmqcommon.entity.Order;
 4 import com.rabbitmq.client.Channel;
 5 import org.springframework.amqp.rabbit.annotation.*;
 6 import org.springframework.amqp.support.AmqpHeaders;
 7 import org.springframework.messaging.Message;
 8 import org.springframework.messaging.handler.annotation.Headers;
 9 import org.springframework.messaging.handler.annotation.Payload;
10 import org.springframework.stereotype.Component;
11
12 import java.util.Map;
13
14 @Component
15 public class RabbitReceiver {
16
17
18    @RabbitListener(bindings = @QueueBinding(
19          value = @Queue(value = "queue-1",
20          durable="true"),
21          exchange = @Exchange(value = "exchange-1",
22          durable="true",
23          type= "topic",
24          ignoreDeclarationExceptions = "true"),
25          key = "springboot.*"
26          )
27    )
28    @RabbitHandler
29    public void onMessage(Message message, Channel channel) throws Exception {
30       System.err.println("--------------------------------");
31       System.err.println("消费端Payload: " + message.getPayload());
32       Long deliveryTag = (Long)message.getHeaders().get(AmqpHeaders.DELIVERY_TAG);
33       //手工ACK
34       channel.basicAck(deliveryTag, false);
35    }
36
37
38    /**
39     *
40     *     spring.rabbitmq.listener.order.queue.name=queue-2
41       spring.rabbitmq.listener.order.queue.durable=true
42       spring.rabbitmq.listener.order.exchange.name=exchange-1
43       spring.rabbitmq.listener.order.exchange.durable=true
44       spring.rabbitmq.listener.order.exchange.type=topic
45       spring.rabbitmq.listener.order.exchange.ignoreDeclarationExceptions=true
46       spring.rabbitmq.listener.order.key=springboot.*
47     * @param order
48     * @param channel
49     * @param headers
50     * @throws Exception
51     */
52    @RabbitListener(bindings = @QueueBinding(
53          value = @Queue(value = "${spring.rabbitmq.listener.order.queue.name}",
54          durable="${spring.rabbitmq.listener.order.queue.durable}"),
55          exchange = @Exchange(value = "${spring.rabbitmq.listener.order.exchange.name}",
56          durable="${spring.rabbitmq.listener.order.exchange.durable}",
57          type= "${spring.rabbitmq.listener.order.exchange.type}",
58          ignoreDeclarationExceptions = "${spring.rabbitmq.listener.order.exchange.ignoreDeclarationExceptions}"),
59          key = "${spring.rabbitmq.listener.order.key}"
60          )
61    )
62    @RabbitHandler
63    public void onOrderMessage(@Payload Order order,
64          Channel channel,
65          @Headers Map<String, Object> headers) throws Exception {
66       System.err.println("---------------------------------");
67       System.err.println("消费端order: " + order.getId());
68       Long deliveryTag = (Long)headers.get(AmqpHeaders.DELIVERY_TAG);
69       //手工ACK
70       channel.basicAck(deliveryTag, false);
71    }
72
73
74 }
MainConfig.java
package com.yuan.rabbitmqspringcloudconsumer;

import org.springframework.context.annotation.ComponentScan;
import org.springframework.context.annotation.Configuration;

@Configuration
@ComponentScan({"com.yuan.rabbitmqspringcloudconsumer.*"})
public class MainConfig {

}
rabbitmq-springcloud-producer子项目
Pom依赖
 1 <?xml version="1.0" encoding="UTF-8"?>
 2 <project xmlns="http://maven.apache.org/POM/4.0.0" xmlns:xsi="http://www.w3.org/2001/XMLSchema-instance"
 3          xsi:schemaLocation="http://maven.apache.org/POM/4.0.0 https://maven.apache.org/xsd/maven-4.0.0.xsd">
 4     <modelVersion>4.0.0</modelVersion>
 5     <parent>
 6         <groupId>org.springframework.boot</groupId>
 7         <artifactId>spring-boot-starter-parent</artifactId>
 8         <version>2.2.2.RELEASE</version>
 9         <relativePath/> <!-- lookup parent from repository -->
10     </parent>
11     <artifactId>rabbitmq-springcloud-producer</artifactId>
12
13     <properties>
14         <java.version>1.8</java.version>
15     </properties>
16
17     <dependencies>
18         <dependency>
19             <groupId>org.springframework.boot</groupId>
20             <artifactId>spring-boot-starter</artifactId>
21         </dependency>
22
23         <dependency>
24             <groupId>org.springframework.boot</groupId>
25             <artifactId>spring-boot-starter-test</artifactId>
26             <scope>test</scope>
27             <exclusions>
28                 <exclusion>
29                     <groupId>org.junit.vintage</groupId>
30                     <artifactId>junit-vintage-engine</artifactId>
31                 </exclusion>
32             </exclusions>
33         </dependency>
34
35         <dependency>
36             <groupId>com.yuan</groupId>
37             <artifactId>rabbitmq-common</artifactId>
38             <version>0.0.1-SNAPSHOT</version>
39         </dependency>
40         <dependency>
41             <groupId>org.springframework.boot</groupId>
42             <artifactId>spring-boot-starter-amqp</artifactId>
43         </dependency>
44         <dependency>
45             <groupId>junit</groupId>
46             <artifactId>junit</artifactId>
47             <version>4.12</version>
48             <scope>test</scope>
49         </dependency>
50     </dependencies>
51
52     <build>
53         <plugins>
54             <plugin>
55                 <groupId>org.springframework.boot</groupId>
56                 <artifactId>spring-boot-maven-plugin</artifactId>
57             </plugin>
58         </plugins>
59     </build>
60
61 </project>
Yml配置
1 spring.rabbitmq.addresses=192.168.238.129:5672
2 spring.rabbitmq.username=guest
3 spring.rabbitmq.password=guest
4 spring.rabbitmq.virtual-host=/
5 spring.rabbitmq.connection-timeout=15000
6
7 spring.rabbitmq.publisher-confirms=true
8 spring.rabbitmq.publisher-returns=true
9 spring.rabbitmq.template.mandatory=true
RabbitSender
 1 package com.yuan.rabbitmqspringcloudproducer.producer;
 2
 3 import com.yuan.rabbitmqcommon.entity.Order;
 4 import org.springframework.amqp.rabbit.connection.CorrelationData;
 5 import org.springframework.amqp.rabbit.core.RabbitTemplate;
 6 import org.springframework.amqp.rabbit.core.RabbitTemplate.ConfirmCallback;
 7 import org.springframework.amqp.rabbit.core.RabbitTemplate.ReturnCallback;
 8 import org.springframework.beans.factory.annotation.Autowired;
 9 import org.springframework.messaging.Message;
10 import org.springframework.messaging.MessageHeaders;
11 import org.springframework.messaging.support.MessageBuilder;
12 import org.springframework.stereotype.Component;
13
14 import java.util.Map;
15
16
17 @Component
18 public class RabbitSender {
19
20    //自动注入RabbitTemplate模板类
21    @Autowired
22    private RabbitTemplate rabbitTemplate;
23
24    //回调函数: confirm确认
25    final ConfirmCallback confirmCallback = new ConfirmCallback() {
26       @Override
27       public void confirm(CorrelationData correlationData, boolean ack, String cause) {
28          System.err.println("correlationData: " + correlationData);
29          System.err.println("ack: " + ack);
30          if(!ack){
31             System.err.println("异常处理....");
32          }
33       }
34    };
35
36    //回调函数: return返回
37    final ReturnCallback returnCallback = new ReturnCallback() {
38       @Override
39       public void returnedMessage(org.springframework.amqp.core.Message message, int replyCode, String replyText,
40             String exchange, String routingKey) {
41          System.err.println("return exchange: " + exchange + ", routingKey: "
42             + routingKey + ", replyCode: " + replyCode + ", replyText: " + replyText);
43       }
44    };
45
46    //发送消息方法调用: 构建Message消息
47    public void send(Object message, Map<String, Object> properties) throws Exception {
48       MessageHeaders mhs = new MessageHeaders(properties);
49       Message msg = MessageBuilder.createMessage(message, mhs);
50       rabbitTemplate.setConfirmCallback(confirmCallback);
51       rabbitTemplate.setReturnCallback(returnCallback);
52       //id + 时间戳 全局唯一
53       CorrelationData correlationData = new CorrelationData("1234567890");
54       rabbitTemplate.convertAndSend("exchange-1", "springboot.abc", msg, correlationData);
55    }
56
57    //发送消息方法调用: 构建自定义对象消息
58    public void sendOrder(Order order) throws Exception {
59       rabbitTemplate.setConfirmCallback(confirmCallback);
60       rabbitTemplate.setReturnCallback(returnCallback);
61       //id + 时间戳 全局唯一
62       CorrelationData correlationData = new CorrelationData("0987654321");
63       rabbitTemplate.convertAndSend("exchange-2", "springboot.def", order, correlationData);
64    }
65
66 }
MainConfig
 1 package com.yuan.rabbitmqspringcloudproducer;
 2
 3 import org.springframework.context.annotation.ComponentScan;
 4 import org.springframework.context.annotation.Configuration;
 5
 6 @Configuration
 7 @ComponentScan({"com.yuan.rabbitmqspringcloudproducer.*"})
 8 public class MainConfig {
 9
10 }
测试代码
 1 package com.yuan.rabbitmqspringcloudproducer;
 2
 3 import com.yuan.rabbitmqcommon.entity.Order;
 4 import com.yuan.rabbitmqspringcloudproducer.producer.RabbitSender;
 5 import org.junit.jupiter.api.Test;
 6 import org.junit.runner.RunWith;
 7 import org.springframework.beans.factory.annotation.Autowired;
 8 import org.springframework.boot.test.context.SpringBootTest;
 9 import org.springframework.test.context.junit4.SpringRunner;
10
11 import java.text.SimpleDateFormat;
12 import java.util.Date;
13 import java.util.HashMap;
14 import java.util.Map;
15
16 @RunWith(SpringRunner.class)
17 @SpringBootTest
18 class RabbitmqSpringcloudProducerApplicationTests {
19
20     @Autowired
21     private RabbitSender rabbitSender;
22
23     private static SimpleDateFormat simpleDateFormat = new SimpleDateFormat("yyyy-MM-dd HH:mm:ss.SSS");
24
25     @Test
26     public void testSender1() throws Exception {
27         Map<String, Object> properties = new HashMap<>();
28         properties.put("number", "12345");
29         properties.put("send_time", simpleDateFormat.format(new Date()));
30         rabbitSender.send("Hello RabbitMQ For Spring Boot!", properties);
31     }
32
33     @Test
34     public void testSender2() throws Exception {
35         Order order = new Order("001", "第一个订单");
36         rabbitSender.sendOrder(order);
37     }
38
39 }
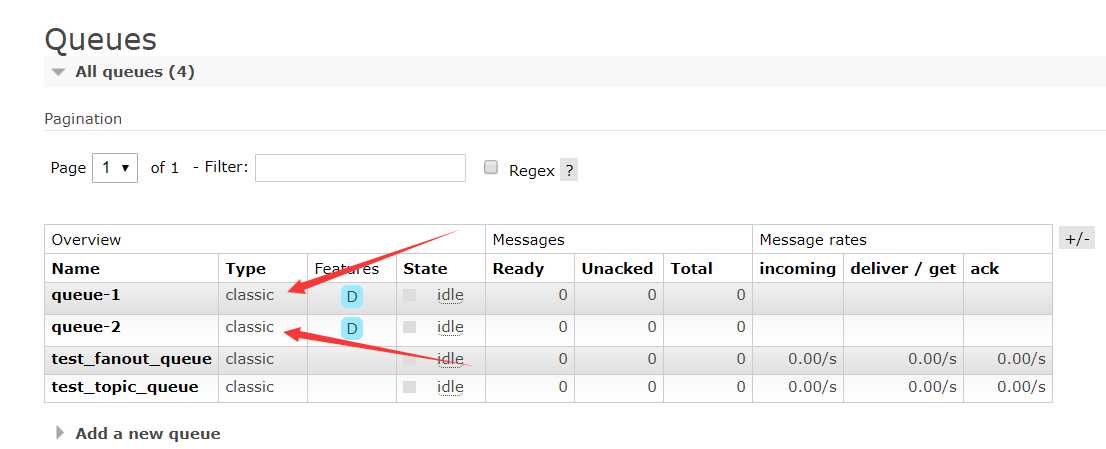
启动消费端,创建队列。。
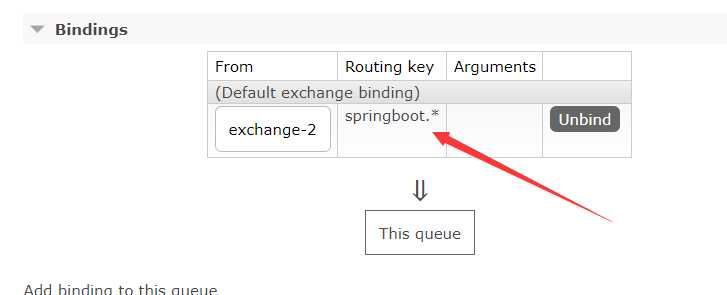
绑定规则
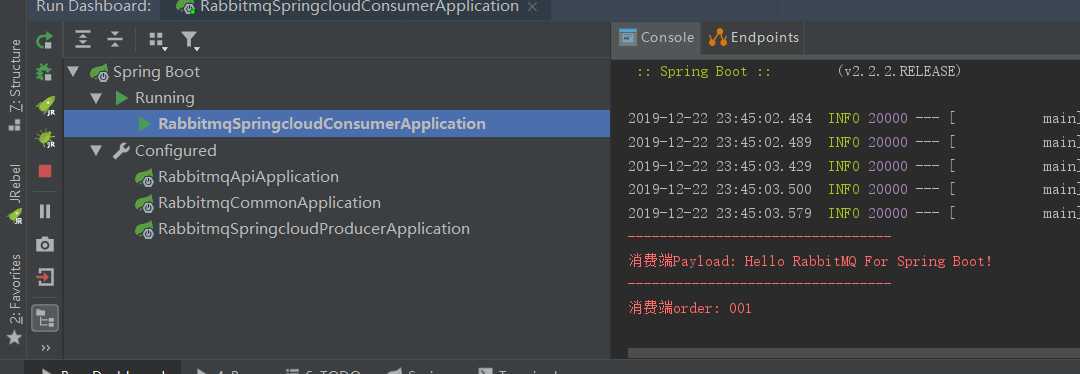
分别运行测试的两个方法
testSender1
消费端后台成功接收到信息

testSender2
RabbitMQ交换机、RabbitMQ整合springCloud
标签:date 消息路由 cluster entity 其他属性 红色 bit 时间 设置
原文地址:https://www.cnblogs.com/ly-0919/p/12077491.html