标签:-- 不同的 show 操作 span bin desktop tle 阈值操作
在opencv中提供了阈值操作,给定阈值进行分割图像
import cv2
import numpy as np
import matplotlib.pyplot as plt

img_gray=cv2.imread("c:\\Users\\Administrator\\Desktop\\123\\cat2.jpg",cv2.IMREAD_GRAYSCALE)

#>127--->255    <127----->0
ret, thresh1 = cv2.threshold(img_gray, 127, 255, cv2.THRESH_BINARY)
#thresh1的反转
ret, thresh2 = cv2.threshold(img_gray, 127, 255, cv2.THRESH_BINARY_INV)
#截断值 >127---变为等于255
ret, thresh3 = cv2.threshold(img_gray, 127, 255, cv2.THRESH_TRUNC)
#大于127不变,小于等于127变为0---to zero
ret, thresh4 = cv2.threshold(img_gray, 127, 255, cv2.THRESH_TOZERO)
#thresh4的反转
ret, thresh5 = cv2.threshold(img_gray, 127, 255, cv2.THRESH_TOZERO_INV)

titles = [‘original‘, ‘binary‘,‘binaty_inv‘,‘trunc‘,‘tozero‘,‘tozero_inv‘]
images = [img_cat2,thresh1,thresh2,thresh3,thresh4,thresh5]

for i in range(6):
    plt.subplot(2,3,i+1),plt.imshow(images[i],‘gray‘)
    plt.title(titles[i])
    plt.xticks([]),plt.yticks([])
plt.show()

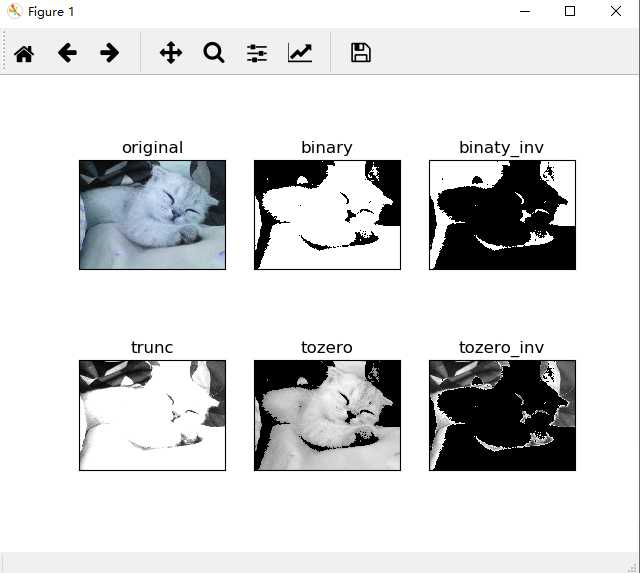
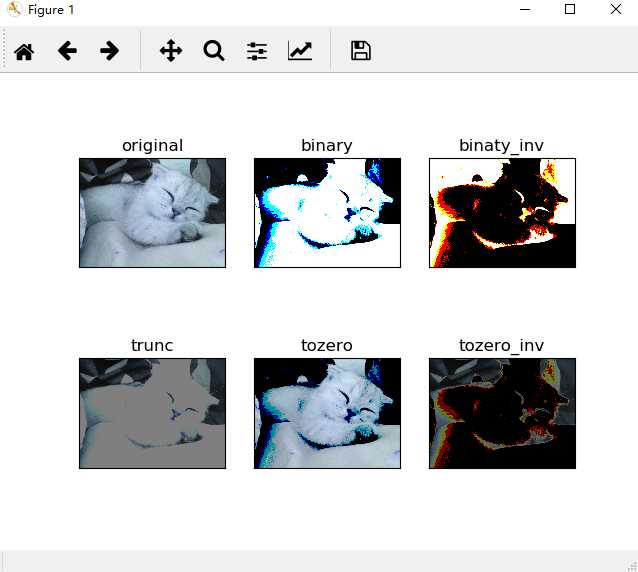
上图为读灰度图得到的结果,下图为读原图得到的结果。

上面给了五种方式,上图第一个为原图。改变 cv2.threshold(img_gray, 127, 255, cv2.THRESH_BINARY_INV)的参数可得到不同的结果
1、cv2.threshold(img_gray, 127, 255, cv2.THRESH_BINARY):像素值大于127的值变为255,小于127的变为0。
2、cv2.threshold(img_gray, 127, 255, cv2.THRESH_BINARY_INV):与1正好相反。
3、ret, thresh3 = cv2.threshold(img_gray, 127, 255, cv2.THRESH_TRUNC):像数值大于127变为255,小于127变为不变。
4、ret, thresh4 = cv2.threshold(img_gray, 127, 255, cv2.THRESH_TOZERO):像数值大于127不变,小于127变为0。
5、ret, thresh5 = cv2.threshold(img_gray, 127, 255, cv2.THRESH_TOZERO_INV):与4相反,像数值大于127变为0,小于127不变。
标签:-- 不同的 show 操作 span bin desktop tle 阈值操作
原文地址:https://www.cnblogs.com/oldhuang/p/12120600.html