标签:gcc flag 前言 ++ register char license off 实验
前面介绍了linux异常处理体系结构、linux中断管理一、linux中断管理二、linux中断管理三、接下来写一篇使用中断的例子。在2440这块开发板里面有四个按键,将四个按键注册为中断方式,然后在应用层上面将四个按键的值读取出来,并且打印出来。
int request_irq(unsigned int irq, irq_handler_t handler,unsigned long irqflags, const char devname, void dev_id)
参数介绍:
- irq: 中断号,也就是要注册哪个中断
- handler: 中断处理函数
- irqflags: 中断触发方式,高电平触发、低电平触发、上升沿触发等触发方式
- devname: 中断名称
- dev_id:传递给中断服务函数的参数
void free_irq(unsigned int irq, void *dev_id)
参数介绍:
- irq: 中断号,也就是要释放哪个中断
- dev_id: 和注册时的dev_id同一个参数。不过释放时的作用是找到相应的action节点释放掉相应的action节点,在【中断管理(二)】里有介绍
从原理图来看,四个按键对应的是EINT0、EINT2、EINT9、EINT11 的GPIO口
#include <linux/device.h>
#include <linux/interrupt.h>
#include <linux/module.h>
#include <linux/kernel.h>
#include <linux/fs.h>
#include <linux/init.h>
#include <linux/delay.h>
#include <linux/irq.h>
#include <asm/uaccess.h>
#include <asm/irq.h>
#include <asm/io.h>
#include <asm/arch/regs-gpio.h>
#include <linux/cdev.h>
/* 申请一个等待队列节点 */
DECLARE_WAIT_QUEUE_HEAD (button_waitq);
/* 事件触发标志 */
int ev_press;
/* 用一个结构体来描述一个按键,抽象的或许不是很好 */
struct but_irq_desc{
/* 中断名称 */
char *button_nane;
/* 按键的状态,1松开,0按下 */
unsigned char key_state;
/* 按键所接的GPIO口 */
unsigned long pin;
/* 按键的中断号 */
unsigned int irq;
};
struct but_irq_desc but_irq_descs[4]={
{
.button_nane="button1",
.key_state = 1,
.pin = S3C2410_GPF0,
.irq=IRQ_EINT0,
},
{
.button_nane="button2",
.key_state = 1,
.pin = S3C2410_GPF2,
.irq=IRQ_EINT2,
},
{
.button_nane="button3",
.key_state = 1,
.pin = S3C2410_GPG3,
.irq=IRQ_EINT11,
},
{
.button_nane="button4",
.key_state = 1,
.pin = S3C2410_GPG11,
.irq=IRQ_EINT19,
},
};
static struct cdev *button_cdev;
static struct class *button_class;
struct file_operations *button_fops;
/* 中断处理函数 */
static irqreturn_t button_irq(int irq, void * dev_id)
{
/* 获取这个按键的结构体 */
struct but_irq_desc *btndesc = (struct but_irq_desc *)dev_id;
unsigned int pinval;
/* 读取按键的电平 */
pinval = s3c2410_gpio_getpin(btndesc->pin);
/* 如果是高电平*/
if(pinval){
/* 按键松开 */
btndesc->key_state = 1;
}else{
btndesc->key_state = 0;
/* 按键按下 */
}
/* 唤醒该等待队列节点里的进程 */
wake_up_interruptible(&button_waitq);
/* 将标志置1 */
ev_press = 1;
return IRQ_HANDLED;
}
int button_open (struct inode * inode, struct file *file){
int i;
/* 注册驱动,中断为上升沿和下降沿触发 */
for(i=0; i<4; i++){
request_irq(but_irq_descs[i].irq, button_irq,
IRQF_TRIGGER_RISING| IRQF_TRIGGER_FALLING, but_irq_descs[i].button_nane,(void*)(&but_irq_descs[i]));
}
return 0;
}
int button_release (struct inode *inode, struct file * file){
int i;
/* 释放中断 */
for(i=0; i<4; i++){
free_irq(but_irq_descs[i].irq,(void*)(&but_irq_descs[i]));
}
return 0;
}
/* 驱动读函数 */
ssize_t button_read(struct file *file, char __user *buf, size_t size, loff_t * offset){
unsigned char key_val[4];
if(size!=4){
return -EINVAL;
}
/* 等待按键按下,如果按键按下,则这个进程会被唤醒(以后有时间系一章等待队列的源码分析) */
/* 如果ev_press等于1的时候则这个进程不会被挂起,等于0的时候这个进程才会被挂起 */
wait_event_interruptible(button_waitq, ev_press);
key_val[0] = but_irq_descs[0].key_state;
key_val[1] = but_irq_descs[1].key_state;
key_val[2] = but_irq_descs[2].key_state;
key_val[3] = but_irq_descs[3].key_state;
/* 将四个按键值返回给应用层 */
copy_to_user(buf, key_val, 4);
/* 将标志置0将进程挂起,等待下一次唤醒 */
ev_press = 0;
return 4;
}
static dev_t dev_id;
/* 模块入口函数 */
static int __init my_button_init(void){
/* 分配一个file_operations 结构体 */
button_fops = kmalloc(sizeof(struct file_operations), GFP_KERNEL);
/* 初始化接口函数 */
button_fops->open = button_open;
button_fops->release = button_release;
button_fops->read = button_read;
/* 动态分配一个设备号 */
alloc_chrdev_region(&dev_id, 0, 1, "my_button");
/* 分配一个cdev结构体 */
button_cdev = cdev_alloc();
/* 将cdev结构体和 fops结构体绑定*/
cdev_init(button_cdev, button_fops);
/* 将驱动注册到内核中 */
cdev_add(button_cdev, dev_id,1);
/* 创建一个class */
button_class = class_create(THIS_MODULE, "my_button");
/* 根据class内容创建一个设备节点 my_button*/
class_device_create(button_class, NULL, dev_id, NULL,"my_button");
return 0;
}
/* 模块出口函数 */
static void __exit my_button_exit(void){
/* 销毁设别节点 */
class_device_destroy(button_class, dev_id);
/* 销毁设备节点 */
class_destroy(button_class);
/* 释放cdev结构体空间 */
cdev_del(button_cdev);
/* 注销设备号 */
unregister_chrdev_region(dev_id,1);
/* 释放fops空间 */
kfree(button_fops);
}
/* 声明模块入口 */
module_init(my_button_init);
/* 声明模块出口 */
module_exit(my_button_exit);
/* 遵循GPL协议 */
MODULE_LICENSE("GPL");KERN_DIR = ~/linux/kernel_source/linux-2.6.22.6
all:
make -C $(KERN_DIR) M=`pwd` modules
clean:
make -C $(KERN_DIR) M=`pwd` modules clean
-rm -rf modules.order
obj-m += button_int.o#include <sys/types.h>
#include <sys/stat.h>
#include <fcntl.h>
#include <unistd.h>
#include <stdio.h>
int main(int argc, char **argv){
int fd;
char data[4]={0};
/*打开设备节点*/
fd = open("/dev/my_button",O_RDONLY);
if(fd<0){
printf("open my_button failed\r\n ");
exit(1);
}
while(1){
/* 读按键值 */
if(read(fd,data,4)<0){
exit(1);
}else{
/* 打印按键值 */
printf("btn0 = %d, btn1 = %d, btn2 = %d, btn3 = %d\r\n", data[0],data[1],data[2],data[3]);
}
}
return 0;
}1.使用
make命令编译内核模块
2.使用arm-linux-gcc交叉编译器编译应用程序
3.将编译好内核模块和应用程序放到开发板的根文件系统里
4.使用insmod xxx.ko命令插入内核模块
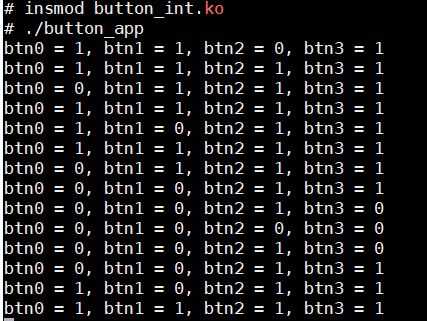
5.运行应用层序测试
app的read函数是一个阻塞函数,当有按键按下时这个进程会被唤醒,返回四个按键的值。对应的按键按下时值是0,松开时值是1,如下图:

标签:gcc flag 前言 ++ register char license off 实验
原文地址:https://www.cnblogs.com/gulan-zmc/p/12130433.html