标签:aml class 而在 选项 padding col 显示 其他 ros
显然,只使用StackPanel面板还不饿能帮助用户创建出实用的用户界面。要设计出最终使用的用户界面,StackPanel面板还需要与其他更强大的布局容器协作。只有这样才能组装成完整的窗口。
最复杂的布局容器是Grid面板,后面几章会进行介绍。在介绍Grid面板之前,有必要首先看一下WrapPanel和DockPanel面板,它们是WPF提供的两个更简单的布局容器。这两个布局容器通过不同的布局行为对StackPanel面板进行补充。
一、WrapPanel面板
WrapPanel面板在可能的空间中,以一次一行或一列的方式布置控件。默认情况下,WrapPanel.Orientation的属性设置为Horizontal;控件从左向右进行排列,再在下一行中排列。但可将WrapPenel.Orientation的属性设置为Vertical,从而在多个列中放置元素。
下面的示例中定义了一系列具有不同对齐方式的按钮,并将这些按钮放到一个WrapPanel面板中:
<Window x:Class="WrapPanelLayout.MainWindow"
        xmlns="http://schemas.microsoft.com/winfx/2006/xaml/presentation"
        xmlns:x="http://schemas.microsoft.com/winfx/2006/xaml"
        Title="MainWindow" Height="350" Width="525">
    <WrapPanel Margin="5">
        <Button VerticalAlignment="Top">Top Button</Button>
        <Button MinHeight="60">Tall Button</Button>
        <Button  VerticalAlignment="Bottom">Bottom Button</Button>
        <Button>Stretch Button</Button>
        <Button VerticalAlignment="Center">Center Button</Button>
    </WrapPanel>
</Window>
下图显示了如何对这些阿牛进行换行以适应WrapPanel面板的当前尺寸(WrapPanel面板的当前尺寸是由包含它的窗口的尺寸决定的)。正如这个示例所演示的,WrapPanel面板水平地创建了一系列假想的行,每一行的高度都被设置所包含元素中最高元素的高度。其他控件可能被拉伸以适应这一高度,或根据VerticalAlignment属性的设置进行对齐。
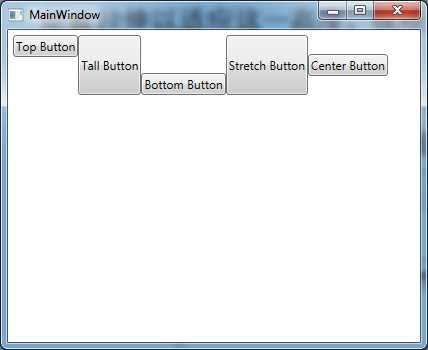
当窗口大小进行变化时,有几个按钮被挤到第二行中。因为第二行没有包含特别高的按钮,所以第二行的高度保持最小按钮的高度。因此,在该行中不必关系各按钮的VerticalAlignment属性的设置。

WrapPanel面板是唯一一个不能通过灵活使用Grid面板代替的面板。
二、DockPanel面板
DockPanel面吧是更有趣的布局选项。它沿着一条外边缘来拉伸所包含的控件。理解该面板最简便的方式是,考虑一下位于许多Windows应用程序窗口顶部的工具栏,这些工具栏停靠到窗口顶部。与StackPanel面板类似,被停靠的元素选择它们的布局的一方面。例如,如果将一个阿牛停靠在DockPanel面板顶部,该按钮被拉伸至DockPanel面板的整个宽度,但根据内容和MinHeight属性为其设置所需的高度。而如果将一个按钮停靠到容器左边,该按钮的高度将被拉伸以适应容器的高度,而其宽度可以根据需要自由添加。
这里很明显的问题是:子元素如何选择停靠的边?答案是通过Dock附加属性,可将该属性设置为Left、Right、Top或Bottom。放在DockPanel面板中的每个元素都会自动捕获该属性。
下面的示例在DockPanel面板的每条边上都停靠一个按钮:
<Window x:Class="DockPanelLayout.MainWindow"
        xmlns="http://schemas.microsoft.com/winfx/2006/xaml/presentation"
        xmlns:x="http://schemas.microsoft.com/winfx/2006/xaml"
        Title="MainWindow" Height="350" Width="525">
    <DockPanel LastChildFill="True">
        <Button DockPanel.Dock="Top">Top Button</Button>
        <Button DockPanel.Dock="Bottom">Bottom Button</Button>
        <Button DockPanel.Dock="Left">Left Button</Button>
        <Button DockPanel.Dock="Right">Right Button</Button>
        <Button>Content Button</Button>
    </DockPanel>
</Window>
该例还将DockPanel面板的LastChildFill属性设置为True,该设置告诉DockPanel面板使最后一个元素占满剩余空间。效果如下图所示:
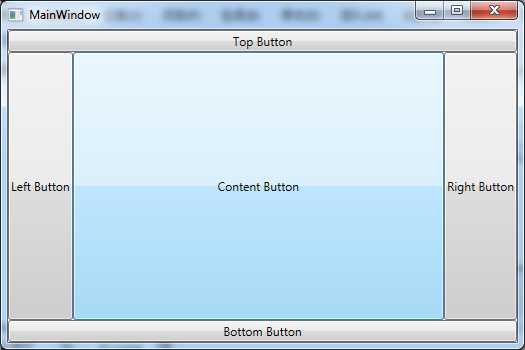
显然,当停靠控件时,停靠顺序很重要。在这个示例中,顶部和底部按钮充满了DockPanel面板的整个边缘,这是因为这两个按钮首先停靠。接着停靠左边和右边的按钮时,这两个按钮将位于顶部按钮和底部按钮之间。如果改变这一顺序,那么左边和右边的按钮将充满整个面板的边缘,二顶部和底部的按钮则变窄一些,因为它们将在左边和右边的两个按钮之间进行停靠。
可将多个元素停靠到同一边缘。这种情况下,元素按标记中声明的顺序停靠到边缘。而且,如果不喜欢空间分割或拉伸行为,可修改Margin属性、HorizontalAlignment属性以及VerticalAlignment属性,就像使用StackPanel面板进行布局时所介绍的那样。下面对前面示例进行修改:
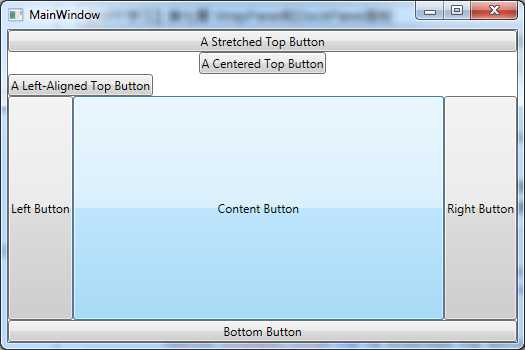
<Window x:Class="DockPanelLayout.MainWindow"
        xmlns="http://schemas.microsoft.com/winfx/2006/xaml/presentation"
        xmlns:x="http://schemas.microsoft.com/winfx/2006/xaml"
        Title="MainWindow" Height="350" Width="525">
    <DockPanel LastChildFill="True">
        <Button DockPanel.Dock="Top">A Stretched Top Button</Button>
        <Button DockPanel.Dock="Top" HorizontalAlignment="Center">A Centered Top Button</Button>
        <Button DockPanel.Dock="Top" HorizontalAlignment="Left">A Left-Aligned Top Button</Button>
        <Button DockPanel.Dock="Bottom">Bottom Button</Button>
        <Button DockPanel.Dock="Left">Left Button</Button>
        <Button DockPanel.Dock="Right">Right Button</Button>
        <Button>Content Button</Button>
    </DockPanel>
</Window>
修改后效果图如下所示:
三、嵌套布局
很少单独使用StackPanel、WrapPanel和DockPanel面板。相反,它们通常用来设置一部分用户界面的布局。例如,可使用DockPanel面板在窗口的合适区域放置不同的StackPanel和WrapPanel面板容器。
例如,假设希望创建一个标准对话框,在其右下角具有两个按钮,并且在窗口的剩余部分是一块较大的内容区域。在WPF中可采用几种方法完成这一布局,但最简答的方法如下:
(1)创建水平StackPanel面板,用于将按钮放置在一起。
(2)在DockPanel面板中方式StackPanel面板,将其停靠到窗口底部。
(3)将DockPanel.LastChildFill属性设置为true,以使用窗口剩余的部分填充其它内容。
(4)设置边距属性,提供一定的空间。
下面是最终的标记:
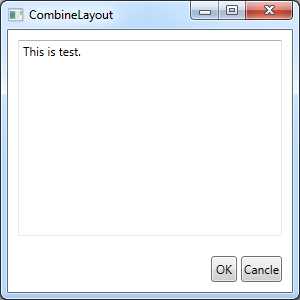
<Window x:Class="DockPanelLayout.CombineLayout"
        xmlns="http://schemas.microsoft.com/winfx/2006/xaml/presentation"
        xmlns:x="http://schemas.microsoft.com/winfx/2006/xaml"
        Title="CombineLayout" Height="300" Width="300">
    <DockPanel LastChildFill="True">
        <StackPanel DockPanel.Dock="Bottom" HorizontalAlignment="Right" Orientation="Horizontal">
            <Button Margin="10,10,2,10" Padding="3">OK</Button>
            <Button Margin="2,10,10,10">Cancle</Button>
        </StackPanel>
        <TextBox DockPanel.Dock="Top" Margin="10">This is test.</TextBox>
    </DockPanel>
</Window>
最终效果图如下所示:
【WPF学习】第七章 WrapPanel和DockPanel面板
标签:aml class 而在 选项 padding col 显示 其他 ros
原文地址:https://www.cnblogs.com/Peter-Luo/p/12163961.html