标签:实现 onclick 测试 bsp pow hide https UNC data
交叉冲印滤镜又叫做正片负冲滤镜,关于它的原理我一直没找到,希望有大佬给我甩个链接。
我用的测试图像在这里
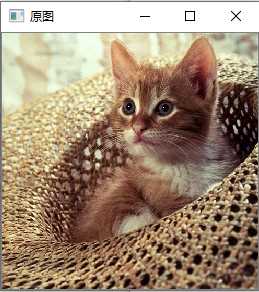


我实现的交叉冲印是使用上图这样的点运算来实现的,下面是我的代码

void punchFilter(Mat src) {
    int width = src.rows;
    int height = src.cols;
    int gray, value;
    int rMap[256], gMap[256], bMap[256];
    for (int i = 0; i < 256; i++){
        value = i < 128 ? i : 256 - i;
        gray = (int)pow(value, 3) / 16384; // value的3次方再除以16384
        rMap[i] = i < 128 ? gray : 256 - gray;
        gray = (int)pow(value, 2) / 128; // value的2次方再除以128
        gMap[i] = i < 128 ? gray : 256 - gray;
        bMap[i] = i / 2 + 0x25;//0x25 = 37
    }

    for (int j = 0; j < width - 1; j++) {
        uchar* data = src.ptr<uchar>(j);
        for (int i = 0; i < height - 1; i++) {
            int b = bMap[data[i * 3]];
            int g = gMap[data[i * 3 + 1]];
            int r = rMap[data[i * 3 + 2]];
            data[i * 3] = min(255, max(0, b));
            data[i * 3 + 1] = min(255, max(0, g));
            data[i * 3 + 2] = min(255, max(0, r));
        }
    }
    imshow("交叉冲印滤镜", src);
}
效果图是这样的
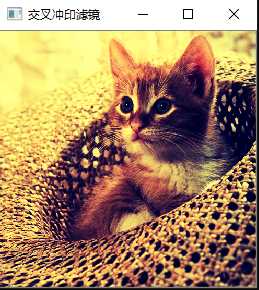
这是怀旧风格滤镜,对原像素点的R、G、B进行变换

void recall(Mat src) {
    int width = src.rows;
    int height = src.cols;

    Mat img(src.size(), CV_8UC3);

    int x, y;
    for (y = 0; y < height;y++) {
        uchar* P0 = src.ptr<uchar>(y);
        uchar* P1 = img.ptr<uchar>(y);
        for (x = 0; x < width; x++) {
            float R = P0[3 * x + 2];
            float G = P0[3 * x + 1];
            float B = P0[3 * x];
            float newR = 0.393 * R + 0.769 * G + 0.189 * B;
            float newG = 0.349 * R + 0.686 * G + 0.168 * B;
            float newB = 0.272 * R + 0.534 * G + 0.131 * B;
            if (newR < 0) newR = 0;
            if (newR > 255) newR = 255;
            if (newG < 0) newG = 0;
            if (newG > 255) newG = 255;
            if (newB < 0) newB = 0;
            if (newB > 255) newB = 255;
            P1[3 * x] = (uchar)newB;
            P1[3 * x + 1] = (uchar)newG;
            P1[3 * x + 2] = (uchar)newR;
        }
    }
    imshow("怀旧滤镜实现", img);
}
效果图:
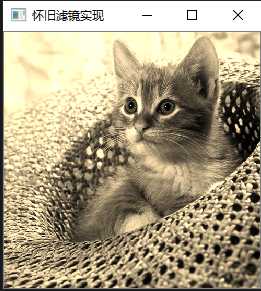
好像有点问题啊,图片不发黄啊

实现代码:
void light(int X, int Y, int K, int R, Mat src) {
    int width = src.rows;
    int height = src.cols;
    double distance;
    int x, y;
    Mat img;
    vector<Mat> m(3);
    split(src, m);
    for (y = 0; y < width ; y++) {
        for (x = 0; x < height; x++) {
            distance = sqrt((X - x) * (X - x) + (Y - y) * (Y - y));
            if (distance < R) {
                int temp = K * (0 > 1 - distance / R ? 0 : 1 - distance / R);
                if (temp > 255) temp = 255;
                int a = m[0].at<uchar>(x, y) + temp;
                m[0].at<uchar>(x, y) = MIN(255, MAX(0, a));
                a = m[1].at<uchar>(x, y) + temp;
                m[1].at<uchar>(x, y) = MIN(255, MAX(0, a));
                a = m[2].at<uchar>(x, y) + temp;
                m[2].at<uchar>(x, y) = MIN(255, MAX(0, a));
            }
        }
    }
    merge(m, img);
    imshow("光照滤镜实现", img);
}
效果图:
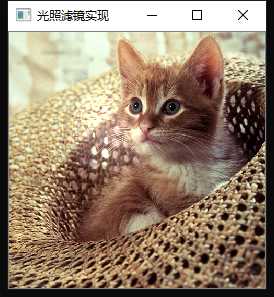
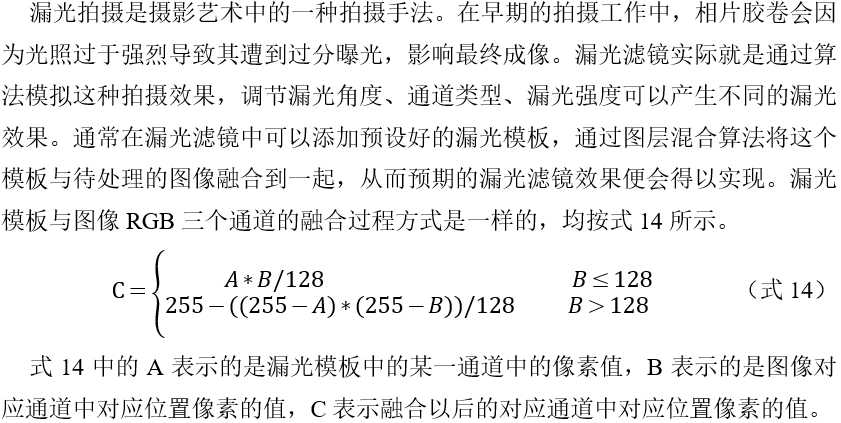
代码如下:
void leak(Mat src1, Mat src)
{
    int width = src1.cols, height = src1.rows;
    float newB;
    float newG;
    float newR;
    Mat img(src1.size(), CV_8UC3);
    for (int y = 0; y < height; y++)
    {
        uchar* P0 = src.ptr<uchar>(y);
        uchar* P1 = src1.ptr<uchar>(y);
        uchar* P3 = img.ptr<uchar>(y);
        for (int x = 0; x < width; x++)
        {

            if (P1[3 * x] <= 128)
            {
                newB = P0[3 * x] * P1[3 * x] / 128;
            }
            else
                newB = 255 - ((255 - P0[3 * x]) * (255 - P1[3 * x])) / 128;
            if (newB > 255)
            {
                newB = 255;
            }
            if (P1[3 * x + 1] <= 128)
            {
                newG = P0[3 * x + 1] * P1[3 * x + 1] / 128;
            }
            else
                newG = 255 - ((255 - P0[3 * x + 1]) * (255 - P1[3 * x + 1])) / 128;
            if (newG > 255)
            {
                newG = 255;
            }
            if (P1[3 * x + 2] <= 128)
            {
                newR = P0[3 * x + 2] * P1[3 * x + 2] / 128;
            }
            else
                newR = 255 - ((255 - P0[3 * x + 2]) * (255 - P1[3 * x + 2])) / 128;
            if (newR > 255)
            {
                newR = 255;
            }
            P3[3 * x] = newB;
            P3[3 * x + 1] = newG;
            P3[3 * x + 2] = newR;


        }imshow("漏光滤镜", img);
    }
}
漏光模板,用PS随便拉个前景色就好了
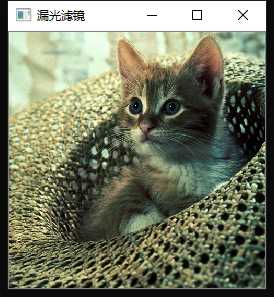

其实自己写的部分也没有多少,大部分还是在网上拼拼凑凑,终于得到了我想要的结果而已.
经过课设发现自己对于数字图像这块还是学习还是不够的,趁着寒假努力点吧.
最后附上整个项目的代码:
#include <opencv2/opencv.hpp>
#include "opencv2/highgui/highgui.hpp"
#include "opencv2/imgproc/imgproc.hpp"
#include <stdio.h>
#include <iostream>

using namespace cv;
using namespace std;
//交叉冲印
void punchFilter(Mat src);
//怀旧风格滤镜
void recall(Mat src);
//光照效果滤镜
void light(int X, int Y, int K, int R, Mat src);//XY是光源坐标,K光照系数,R光照半径
//漏光滤镜
void leak(Mat src, Mat msak);

int main(int argc, char** argv) {
    while (1) {
        cout << "请选择显示的滤镜效果" << endl;
        cout << "1、交叉冲印滤镜" << endl;
        cout << "2、怀旧风格滤镜" << endl;
        cout << "3、光照效果滤镜" << endl;
        cout << "4、漏光滤镜" << endl;
        int choice;
        cin >> choice;
        switch (choice) {
        case 1: {
            Mat src = imread(argv[1]);
            Mat p_temp(src.rows, src.cols, CV_8UC3, src.data);
            imshow("原图", src);
            punchFilter(p_temp);
            break;
        }
        case 2: {
            Mat src = imread(argv[1]);
            Mat r_temp(src.rows, src.cols, CV_8UC3, src.data);
            imshow("原图", src);
            recall(r_temp);
            break;
        }
        case 3: {
            Mat src = imread(argv[1]);
            Mat l_temp(src.rows, src.cols, CV_8UC3, src.data);
            int X, Y, K, R;
            cout << "请输入光源坐标(x,y),光照系数,光照半径" << endl;
            cin >> X >> Y >> K >> R;
            imshow("原图", src);
            light(X, Y, K, R, l_temp);
            break;
        }
        case 4: {
            Mat src = imread(argv[1]);
            Mat leak_temp(src.rows, src.cols, CV_8UC3, src.data);
            Mat mask = imread("C:\\Users\\18704\\Desktop\\mask.png");
            imshow("原图", src);
            leak(leak_temp, mask);
        }
        default:{
            cout << "无效字符,请重新输入" << endl;
            break;
        }
    }
    waitKey(0);
    }
    return 0;
}


void punchFilter(Mat src) {
    int width = src.rows;
    int height = src.cols;
    int gray, value;
    int rMap[256], gMap[256], bMap[256];
    for (int i = 0; i < 256; i++){
        value = i < 128 ? i : 256 - i;
        gray = (int)pow(value, 3) / 16384; // value的3次方再除以16384
        rMap[i] = i < 128 ? gray : 256 - gray;
        gray = (int)pow(value, 2) / 128; // value的2次方再除以128
        gMap[i] = i < 128 ? gray : 256 - gray;
        bMap[i] = i / 2 + 0x25;//0x25 = 37
    }

    for (int j = 0; j < width - 1; j++) {
        uchar* data = src.ptr<uchar>(j);
        for (int i = 0; i < height - 1; i++) {
            int b = bMap[data[i * 3]];
            int g = gMap[data[i * 3 + 1]];
            int r = rMap[data[i * 3 + 2]];
            data[i * 3] = min(255, max(0, b));
            data[i * 3 + 1] = min(255, max(0, g));
            data[i * 3 + 2] = min(255, max(0, r));
        }
    }
    imshow("交叉冲印滤镜", src);
}

void recall(Mat src) {
    int width = src.rows;
    int height = src.cols;

    Mat img(src.size(), CV_8UC3);

    int x, y;
    for (y = 0; y < height;y++) {
        uchar* P0 = src.ptr<uchar>(y);
        uchar* P1 = img.ptr<uchar>(y);
        for (x = 0; x < width; x++) {
            float R = P0[3 * x + 2];
            float G = P0[3 * x + 1];
            float B = P0[3 * x];
            float newR = 0.393 * R + 0.769 * G + 0.189 * B;
            float newG = 0.349 * R + 0.686 * G + 0.168 * B;
            float newB = 0.272 * R + 0.534 * G + 0.131 * B;
            if (newR < 0) newR = 0;
            if (newR > 255) newR = 255;
            if (newG < 0) newG = 0;
            if (newG > 255) newG = 255;
            if (newB < 0) newB = 0;
            if (newB > 255) newB = 255;
            P1[3 * x] = (uchar)newB;
            P1[3 * x + 1] = (uchar)newG;
            P1[3 * x + 2] = (uchar)newR;
        }
    }
    imshow("怀旧滤镜实现", img);
}

void light(int X, int Y, int K, int R, Mat src) {
    int width = src.rows;
    int height = src.cols;
    double distance;
    int x, y;
    Mat img;
    vector<Mat> m(3);
    split(src, m);
    for (y = 0; y < width ; y++) {
        for (x = 0; x < height; x++) {
            distance = sqrt((X - x) * (X - x) + (Y - y) * (Y - y));
            if (distance < R) {
                int temp = K * (0 > 1 - distance / R ? 0 : 1 - distance / R);
                if (temp > 255) temp = 255;
                int a = m[0].at<uchar>(x, y) + temp;
                m[0].at<uchar>(x, y) = MIN(255, MAX(0, a));
                a = m[1].at<uchar>(x, y) + temp;
                m[1].at<uchar>(x, y) = MIN(255, MAX(0, a));
                a = m[2].at<uchar>(x, y) + temp;
                m[2].at<uchar>(x, y) = MIN(255, MAX(0, a));
            }
        }
    }
    merge(m, img);
    imshow("光照滤镜实现", img);
}

void leak(Mat src1, Mat src)
{
    int width = src1.cols, height = src1.rows;
    float newB;
    float newG;
    float newR;
    Mat img(src1.size(), CV_8UC3);
    for (int y = 0; y < height; y++)
    {
        uchar* P0 = src.ptr<uchar>(y);
        uchar* P1 = src1.ptr<uchar>(y);
        uchar* P3 = img.ptr<uchar>(y);
        for (int x = 0; x < width; x++)
        {

            if (P1[3 * x] <= 128)
            {
                newB = P0[3 * x] * P1[3 * x] / 128;
            }
            else
                newB = 255 - ((255 - P0[3 * x]) * (255 - P1[3 * x])) / 128;
            if (newB > 255)
            {
                newB = 255;
            }
            if (P1[3 * x + 1] <= 128)
            {
                newG = P0[3 * x + 1] * P1[3 * x + 1] / 128;
            }
            else
                newG = 255 - ((255 - P0[3 * x + 1]) * (255 - P1[3 * x + 1])) / 128;
            if (newG > 255)
            {
                newG = 255;
            }
            if (P1[3 * x + 2] <= 128)
            {
                newR = P0[3 * x + 2] * P1[3 * x + 2] / 128;
            }
            else
                newR = 255 - ((255 - P0[3 * x + 2]) * (255 - P1[3 * x + 2])) / 128;
            if (newR > 255)
            {
                newR = 255;
            }
            P3[3 * x] = newB;
            P3[3 * x + 1] = newG;
            P3[3 * x + 2] = newR;


        }imshow("漏光滤镜", img);
    }
}

opencv 交叉冲印,怀旧风格,光照效果,漏光滤镜的c++实现
标签:实现 onclick 测试 bsp pow hide https UNC data
原文地址:https://www.cnblogs.com/lumping-boy/p/12164045.html