标签:data scipt south 用户组 mon 第一个 text 进程终止 exception
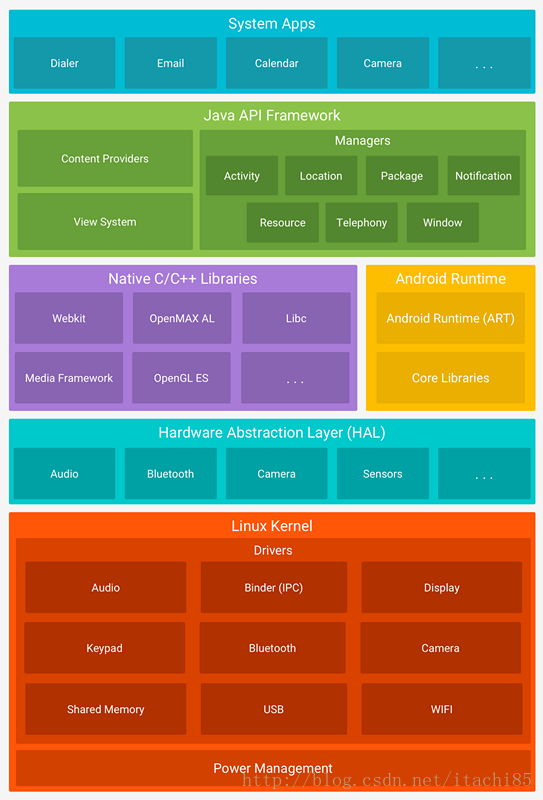
首先贴一张Android系统架构图方便理解整个Android架构,这可以让我们从整体上对整个启动流程有个大概认知。
可以看出整个架构由5部分构成,从下到上分别为:
1. Linux内核层
Android 的核心系统服务基于Linux 内核,在此基础上添加了部分Android专用的驱动。系统的安全性、内存管理、进程管理、网络协议栈和驱动模型等都依赖于该内核。
2. 硬件抽象层(HAL)
硬件抽象层是位于操作系统内核与硬件电路之间的接口层,其目的在于将硬件抽象化,为了保护硬件厂商的知识产权,它隐藏了特定平台的硬件接口细节,为操作系统提供虚拟硬件平台,使其具有硬件无关性,可在多种平台上进行移植。 HAL 由多个库模块组成,每个模块都为特定类型的硬件组件实现了一个接口,例如相机或蓝牙模块。 当框架 API 调用设备硬件时,Android 系统为该硬件组件加载库模块。
3. 系统运行库层(Native)
系统运行库层分为两部分,分别是C/C++程序库和Android运行时库。 C/C++程序库被Android中不同的部分使用 runtime库主要是Java核心库(提供了Java语言核心功能因此开发者可以使用Java编写应用)和ART(Android 5.0 之前是Dalvik)该虚拟机不同于JVM是专门用于移动设备的虚拟机 允许在有限的内存内运行多个虚拟机实例 并且每个应用都是独立的linux进程这样可以防止虚拟机崩溃时不会导致所有的进程被关闭。ART和Dalvik的区别是 后者在应用每次启动时才会通过即时编译把字节码转化为机器码 (这会影响应用运行效率)ART则是在应用第一次安装的时候就会把字节码文件转换为机器码 这样虽然会在安装时耗时增加 但app每次启动的时间会减少
4. 应用框架层(Java Framework)
应用框架层为开发人员提供了可以开发应用程序所需要的API,我们平常开发应用程序都是调用的这一层所提供的API,当然也包括系统的应用。这一层的是由Java代码编写的,可以称为Java Framework
该层包含以下内容:
Android系统的启动流程大致分为三个阶段:
本文主要分析Android系统层面的启动
当电源键被按下后会去加载Bootloader,这个程序会把OS拉活,然后就会进入OS的启动过程。
Android底层是基于Linux内核的并做了一些扩展,添加一些驱动比如binder。Linux内核的启动流程是先启动idle线程(整个Linux系统的初始线程 pid=0)然后idle线程会启动init和kthread线程。init线程是负责启动Android系统并且是Android系统其他进程的父进程。kthread线程则负责创建并管理Linux系统内核线程。
1、ildle进程
主要是完成Linux系统的启动然后完成一些初始化任务之后会进入一个死循环,不断判断是否有新的进程需要启动如果没有则会让cpu和系统时钟进入休眠状态 当有新进程需要创建时在唤醒cpu
2、kthread进程
主要负责创建Linux系统内核相关线程 并始终运行在内核线程中 作为内核线程中其他线程的父类 负责内核线程的调度和管理
3、init进程
它是Linux系统第一个用户进程,主要工作分为两部分。首先会完成内核的创建和初始化这部分内容跟Linux内核相关, 其次就是用户空间的创建和启动这部分内容跟Android系统的启动相关
init进程第一阶段做的主要工作是挂载分区,创建设备节点和一些关键目录,初始化日志输出系统,启用SELinux安全策略
init进程第二阶段主要工作是初始化属性系统,解析SELinux的匹配规则,处理子进程终止信号,启动系统属性服务,可以说每一项都很关键,如果说第一阶段是为属性系统,SELinux做准备,那么第二阶段就是真正去把这些落实的。
其实init进程在完成第二阶段工作的时候就已经涉及到Android系统层面的启动了 因为init进程会去加载init.rc配置文件然后启动Zygote进程。
Init的启动入口是在其main函数中
int main(int argc, char** argv) {
    ......
    bool is_first_stage = (getenv("INIT_SECOND_STAGE") == nullptr);
    if (is_first_stage) {
        boot_clock::time_point start_time = boot_clock::now();
        umask(0);
        //创建和挂载启动所需要的文件目录
        mount("tmpfs", "/dev", "tmpfs", MS_NOSUID, "mode=0755");
        mkdir("/dev/pts", 0755);
        mkdir("/dev/socket", 0755);
        mount("devpts", "/dev/pts", "devpts", 0, NULL);
        #define MAKE_STR(x) __STRING(x)
        mount("proc", "/proc", "proc", 0, "hidepid=2,gid=" MAKE_STR(AID_READPROC));
        chmod("/proc/cmdline", 0440);
        gid_t groups[] = { AID_READPROC };
        setgroups(arraysize(groups), groups);
        mount("sysfs", "/sys", "sysfs", 0, NULL);
        mount("selinuxfs", "/sys/fs/selinux", "selinuxfs", 0, NULL);
        mknod("/dev/kmsg", S_IFCHR | 0600, makedev(1, 11));
        mknod("/dev/random", S_IFCHR | 0666, makedev(1, 8));
        mknod("/dev/urandom", S_IFCHR | 0666, makedev(1, 9));
        ......
       // Set up SELinux, loading the SELinux policy.启动SELinux
        selinux_initialize(true);
        ......
    }
    ......
    //对属性服务进行初始化
    property_init();
    ......

    epoll_fd = epoll_create1(EPOLL_CLOEXEC);
    if (epoll_fd == -1) {
        PLOG(ERROR) << "epoll_create1 failed";
        exit(1);
    }
    //用于设置子进程信号处理函数,如果子进程异常退出,init进程会调用该函
    //数中设置的信号处理函数进行处理。
    signal_handler_init();
    ......
    //启动属性服务
    start_property_service();
    ......
    if (bootscript.empty()) {
        //解析init.rc配置文件
        parser.ParseConfig("/init.rc");
        parser.set_is_system_etc_init_loaded(
                parser.ParseConfig("/system/etc/init"));
        parser.set_is_vendor_etc_init_loaded(
                parser.ParseConfig("/vendor/etc/init"));
        parser.set_is_odm_etc_init_loaded(parser.ParseConfig("/odm/etc/init"));
    }
    ......
    while (true) {
        ......
        if (!(waiting_for_prop || ServiceManager::GetInstance().IsWaitingForExec())) {
            am.ExecuteOneCommand();
        }
        if (!(waiting_for_prop || ServiceManager::GetInstance().IsWaitingForExec())) {
            //重启死去的服务
            restart_processes();
        }
        ......
    }
    return 0;
}我们注意下init.rc文件,它的路径为:system/core/rootdir/init.rc。它是一个非常重要的配置文件,是由Android初始化语言编写的脚本。Android8.0对该文件进行来拆分,每个服务对应一个rc文件,启动Zygote的脚本在init.zygoteXX.rc中定义,代表多少位处理器。这里以64位为例。
service zygote /system/bin/app_process64 -Xzygote /system/bin --zygote --start-system-server
    class main
    priority -20
    user root
    group root readproc
    socket zygote stream 660 root system
    onrestart write /sys/android_power/request_state wake
    onrestart write /sys/power/state on
    onrestart restart audioserver
    onrestart restart cameraserver
    onrestart restart media
    onrestart restart netd
    onrestart restart wificond
writepid /dev/cpuset/foreground/tasks我们只需要知道上面的命令就是创建名为zygote的进程即可。实际创建是通过app_process64完成的,对应的文件为app_main.cpp,创建完成后会调用zygote的mian函数。
int main(int argc, char* const argv[])
{
...

    AppRuntime runtime(argv[0], computeArgBlockSize(argc, argv));//1
...

 // Parse runtime arguments.  Stop at first unrecognized option.
    bool zygote = false;
    bool startSystemServer = false;
    bool application = false;
    String8 niceName;
    String8 className;

    ++i;  // Skip unused "parent dir" argument.
    while (i < argc) {
        const char* arg = argv[i++];
        if (strcmp(arg, "--zygote") == 0) {
            zygote = true;//2
            niceName = ZYGOTE_NICE_NAME;
        } else if (strcmp(arg, "--start-system-server") == 0) {
            startSystemServer = true;
        } else if (strcmp(arg, "--application") == 0) {
            application = true;
        } else if (strncmp(arg, "--nice-name=", 12) == 0) {
            niceName.setTo(arg + 12);
        } else if (strncmp(arg, "--", 2) != 0) {
            className.setTo(arg);
            break;
        } else {
            --i;
            break;
        }
    }
...

 if (zygote) {
        runtime.start("com.android.internal.os.ZygoteInit", args, zygote);//3
    } else if (className) {
        runtime.start("com.android.internal.os.RuntimeInit", args, zygote);
    } else {
        fprintf(stderr, "Error: no class name or --zygote supplied.\n");
        app_usage();
        LOG_ALWAYS_FATAL("app_process: no class name or --zygote supplied.");
    }
首先在注释1处声明了一个AppRuntime类型的runtime,然后在注释2处将zygote置为true,最后在注释3处用runtime.start()启动zygote。
之前我们跟踪到zygote进程的启动,zygote可以看做是Android系统所有进程的父进程,DVM和ART、应用程序进程以及运行系统的关键服务SystemServer进程都是由Zygote进程通过fork创建的。Zygote预加载初始化核心库类,让DVM和ART虚拟机共享代码、降低内存占用和启动时间,因此只要Zygote装载好了这些类和资源后,新的进程就不需要在装载这些类和资源了,它们共享Zygote进程的资源和类。
那接下来我们看下AppRuntime的start方法
frameworks/base/core/jni/AndroidRuntime.cpp
void AndroidRuntime::start(const char* className, const Vector<String8>& options, bool zygote)
{
...
 /* start the virtual machine */
    JniInvocation jni_invocation;
    jni_invocation.Init(NULL);
    JNIEnv* env;
    //1 启动Java虚拟机
    if (startVm(&mJavaVM, &env, zygote) != 0) {
        return;
    }
    onVmCreated(env);

    /*
     * Register android functions.
     *
     */
    if (startReg(env) < 0) {//2 注册jni方法
        ALOGE("Unable to register all android natives\n");
        return;
    }
/*
     * We want to call main() with a String array with arguments in it.
     * At present we have two arguments, the class name and an option string.
     * Create an array to hold them.
     */
    jclass stringClass;
    jobjectArray strArray;
    jstring classNameStr;

    stringClass = env->FindClass("java/lang/String");
    assert(stringClass != NULL);
    strArray = env->NewObjectArray(options.size() + 1, stringClass, NULL);
    assert(strArray != NULL);
 //从app_main传过来的参数classname值为:“com.android.internal.os.ZygoteInit”
    classNameStr = env->NewStringUTF(className);
    assert(classNameStr != NULL);
    env->SetObjectArrayElement(strArray, 0, classNameStr);

    for (size_t i = 0; i < options.size(); ++i) {
        jstring optionsStr = env->NewStringUTF(options.itemAt(i).string());
        assert(optionsStr != NULL);
        env->SetObjectArrayElement(strArray, i + 1, optionsStr);
    }

    /*
     * Start VM.  This thread becomes the main thread of the VM, and will
     * not return until the VM exits.
     */
    char* slashClassName = toSlashClassName(className != NULL ? className : "");
    jclass startClass = env->FindClass(slashClassName);
    if (startClass == NULL) {
        ALOGE("JavaVM unable to locate class '%s'\n", slashClassName);
        /* keep going */
    } else {
        jmethodID startMeth = env->GetStaticMethodID(startClass, "main",
            "([Ljava/lang/String;)V");//3 找到ZygoteInit的main函数,该函数是要启动的函数
        if (startMeth == NULL) {
            ALOGE("JavaVM unable to find main() in '%s'\n", className);
            /* keep going */
        } else {
            env->CallStaticVoidMethod(startClass, startMeth, strArray);//4 通过Jni调用ZygoteInit的main函数

#if 0
            if (env->ExceptionCheck())
                threadExitUncaughtException(env);
#endif
        }
    }
在start方法中我们看到先是在注释1处启动虚拟机然后在注释2处注册jni.之后就是通过传入的类名找到要启动的class最终在注释3处将其赋值给startMeth(此时表示要启动ZygoteInit的main函数),最终的启动是在注释4处。
我们看下ZygoteInit的main函数
   public static void main(String argv[]) {
   ...
           ZygoteServer zygoteServer = new ZygoteServer();//1 构造zygoteServer实例

...
boolean startSystemServer = false;
            String socketName = "zygote";
            String abiList = null;
            boolean enableLazyPreload = false;
            for (int i = 1; i < argv.length; i++) {
                if ("start-system-server".equals(argv[i])) {
                    startSystemServer = true;
                } else if ("--enable-lazy-preload".equals(argv[i])) {
                    enableLazyPreload = true;
                } else if (argv[i].startsWith(ABI_LIST_ARG)) {
                    abiList = argv[i].substring(ABI_LIST_ARG.length());
                } else if (argv[i].startsWith(SOCKET_NAME_ARG)) {
                    socketName = argv[i].substring(SOCKET_NAME_ARG.length());
                } else {
                    throw new RuntimeException("Unknown command line argument: " + argv[i]);
                }
            }
            zygoteServer.registerServerSocket(socketName);//2 注册服务端的scoket
             if (startSystemServer) {//通过fork启动SystemServer进程
                Runnable r = forkSystemServer(abiList, socketName, zygoteServer);//3

                // {@code r == null} in the parent (zygote) process, and {@code r != null} in the
                // child (system_server) process.
                if (r != null) {
                    r.run();//此处调用的run方法是MethodAndArgsCaller类的run 该类是RuntimeInit的一个静态内部类
                    return;
                }
            }

            Log.i(TAG, "Accepting command socket connections");

            // The select loop returns early in the child process after a fork and
            // loops forever in the zygote.
            caller = zygoteServer.runSelectLoop(abiList);//4等待客户端请求 fork进程

        } catch (Throwable ex) {
            Log.e(TAG, "System zygote died with exception", ex);
            throw ex;
        } finally {

            zygoteServer.closeServerSocket();
        }
在注释1处构造了一个zygoteServer实例,之后在注释2处注册服务端的scoket,这里scoket的类型是loaclscoket它是Android对Linuxscoket的一种封装。Local Socket 是Linux提供的一种基于Socket的进程间通信方式,对Server端来讲,唯一的区别就是bind到一个本地的文件描述符(fd)而不是某个IP地址和端口号。Android里很多地方用到了Local Socket做进程间的通信。scoket创建完成后就等待用来相应客户端fork的请求,即在注释3处通过fork启动SystemServer进程,在注释4处等待客户端fork进程的请求。
总结来说ZygoteInit主要做了两件事:
1、注册了服务端的scoket
2、fork进程 启动SystemServer进程
此处说下zygoteinit这个类 Android8.0发生了一些改动。之前在main函数会先预加载(preload)一些东西然后注册服务端socket。在8.0版本预加载的操作放在了静态代码块中,下面是preload的静态代码块。preload主要做了两件事 preloadClasses(); preloadResources();
preloadClassess 将framework.jar里的preloaded-classes 定义的所有class load到内存里,preloaded-classes 编译Android后可以在framework/base下找到。而preloadResources 将系统的Resource(不是在用户apk里定义的resource)load到内存。
资源preload到Zygoted的进程地址空间,所有fork的子进程将共享这份空间而无需重新load, 这大大减少了应用程序的启动时间,但反过来增加了系统的启动时间。通过对preload 类和资源数目进行调整可以加快系统启动。
static void preload(TimingsTraceLog bootTimingsTraceLog) {
        Log.d(TAG, "begin preload");
        bootTimingsTraceLog.traceBegin("BeginIcuCachePinning");
        beginIcuCachePinning();
        bootTimingsTraceLog.traceEnd(); // BeginIcuCachePinning
        bootTimingsTraceLog.traceBegin("PreloadClasses");
        preloadClasses();
        bootTimingsTraceLog.traceEnd(); // PreloadClasses
        bootTimingsTraceLog.traceBegin("PreloadResources");
        preloadResources();
        bootTimingsTraceLog.traceEnd(); // PreloadResources
        Trace.traceBegin(Trace.TRACE_TAG_DALVIK, "PreloadAppProcessHALs");
        nativePreloadAppProcessHALs();
        Trace.traceEnd(Trace.TRACE_TAG_DALVIK);
        Trace.traceBegin(Trace.TRACE_TAG_DALVIK, "PreloadOpenGL");
        preloadOpenGL();
        Trace.traceEnd(Trace.TRACE_TAG_DALVIK);
        preloadSharedLibraries();
        preloadTextResources();
        // Ask the WebViewFactory to do any initialization that must run in the zygote process,
        // for memory sharing purposes.
        WebViewFactory.prepareWebViewInZygote();
        endIcuCachePinning();
        warmUpJcaProviders();
        Log.d(TAG, "end preload");

        sPreloadComplete = true;
    }
上面我们总结了ZygoteInit会先注册一个五福段的Scoket,我们来看下具体是如何注册的。
void registerServerSocket(String socketName) {
        if (mServerSocket == null) {
            int fileDesc;
            final String fullSocketName = ANDROID_SOCKET_PREFIX + socketName; //1
            try {
                String env = System.getenv(fullSocketName);
                fileDesc = Integer.parseInt(env);
            } catch (RuntimeException ex) {
                throw new RuntimeException(fullSocketName + " unset or invalid", ex);
            }

            try {
                FileDescriptor fd = new FileDescriptor();
                fd.setInt$(fileDesc);

                mServerSocket = new LocalServerSocket(fd);//2
            } catch (IOException ex) {
                throw new RuntimeException(
                        "Error binding to local socket '" + fileDesc + "'", ex);
            }
        }
    }
注释1处的fullSocketName是该scoket的全名,在注释2处new了一个LocalServerSocket实例并传入文件描述符fd最后赋值给mServerSocket,它就是我们启动的scoket。当Zygote进程将SystemServer进程启动后, 就会在这个服务端的Socket上来等待ActivityManagerService请求Zygote进程来创建新的应用程序进程。
在创建完scoket之后便通过fork方式创建SystemServer进程,具体看main函数的注释3。最后在注释4处调用runSelectLoop函数。先看下注释3处是如何创建SystemServer进程,具体是通过forkSystemServer方法
 private static Runnable forkSystemServer(String abiList, String socketName,
            ZygoteServer zygoteServer) {

        /* Containers run without this capability, so avoid setting it in that case */
        if (!SystemProperties.getBoolean(PROPERTY_RUNNING_IN_CONTAINER, false)) {
            capabilities |= posixCapabilitiesAsBits(OsConstants.CAP_BLOCK_SUSPEND);
        }
        /* Hardcoded command line to start the system server
          */
        String args[] = {
            "--setuid=1000",
            "--setgid=1000",
            "--setgroups=1001,1002,1003,1004,1005,1006,1007,1008,1009,1010,1018,1021,1023,1032,3001,3002,3003,3006,3007,3009,3010",
            "--capabilities=" + capabilities + "," + capabilities,
            "--nice-name=system_server", //代表进程名
            "--runtime-args",
            "com.android.server.SystemServer", //启动的类名
        };
        ZygoteConnection.Arguments parsedArgs = null;

        int pid;

        try {
            parsedArgs = new ZygoteConnection.Arguments(args);
            ZygoteConnection.applyDebuggerSystemProperty(parsedArgs);//1//将启动的参数解析成parsedArgs
            ZygoteConnection.applyInvokeWithSystemProperty(parsedArgs);

            /* Request to fork the system server process
            */
            pid = Zygote.forkSystemServer(
                    parsedArgs.uid, parsedArgs.gid,
                    parsedArgs.gids,
                    parsedArgs.debugFlags,
                    null,
                    parsedArgs.permittedCapabilities,
                    parsedArgs.effectiveCapabilities);//2 fork System Server进程
        } catch (IllegalArgumentException ex) {
            throw new RuntimeException(ex);
        }

        /* For child process
        */
        if (pid == 0) {//pid=0代表fork成功 并在子线程中启动system server进程
            if (hasSecondZygote(abiList)) {
                waitForSecondaryZygote(socketName);
            }

            zygoteServer.closeServerSocket();
            return handleSystemServerProcess(parsedArgs);//3启动system server进程 system server在这个函数进行初始化

        }

        return null;
    }
首先是构造一个字符串数组来设置用户和用户组id然后在注释1处将其解析成parsedArgs。在注释2处通过fork创建SystemServer进程并传入一些参数
启动system server进程,进程的最终创建是通过native方法nativeForkSystemServer完成的。
最后在注释3处启动了system server进程。
接下来看下注释4处的runSelectLoop作用 runSelectLoop函数如下所示
    Runnable runSelectLoop(String abiList) {
        ArrayList<FileDescriptor> fds = new ArrayList<FileDescriptor>();
        ArrayList<ZygoteConnection> peers = new ArrayList<ZygoteConnection>();
//mServerSocket 就是之前注册的server scoket ,在这里得到它的fd并放到fd列表中
        fds.add(mServerSocket.getFileDescriptor());
        peers.add(null);

        while (true) {
            //遍历Fds列表把其中的信息放到pollFds 中
            StructPollfd[] pollFds = new StructPollfd[fds.size()];
            for (int i = 0; i < pollFds.length; ++i) {
                pollFds[i] = new StructPollfd();
                pollFds[i].fd = fds.get(i);
                pollFds[i].events = (short) POLLIN;
            }
            try {
                Os.poll(pollFds, -1);
            } catch (ErrnoException ex) {
                throw new RuntimeException("poll failed", ex);
            }
            for (int i = pollFds.length - 1; i >= 0; --i) {
                if ((pollFds[i].revents & POLLIN) == 0) {
                    continue;
                }
//i=0表示服务端Socket与客户端连接上,也就是当前Zygote进程与ActivityManagerService建立了连接
                if (i == 0) {
                    ZygoteConnection newPeer = acceptCommandPeer(abiList);
                    peers.add(newPeer);
                    //将ZygoteConnection的fd添加到fds列表中 以便接受AMS发送的创建应用的请求
                    fds.add(newPeer.getFileDesciptor());
                } else {
                    //如果i>0表示有创建新应用进程的请求
                    try {
                        ZygoteConnection connection = peers.get(i);
                        //根据请求创建新的应用进程
                        final Runnable command = connection.processOneCommand(this);

                        if (mIsForkChild) {
                            // We're in the child. We should always have a command to run at this
                            // stage if processOneCommand hasn't called "exec".
                            if (command == null) {
                                throw new IllegalStateException("command == null");
                            }

                            return command;
                        } else {
                            // We're in the server - we should never have any commands to run.
                            if (command != null) {
                                throw new IllegalStateException("command != null");
                            }

                            // We don't know whether the remote side of the socket was closed or
                            // not until we attempt to read from it from processOneCommand. This shows up as
                            // a regular POLLIN event in our regular processing loop.
                            if (connection.isClosedByPeer()) {
                                connection.closeSocket();
                                peers.remove(i);
                                fds.remove(i);
                            }
                        }
                    } catch (Exception e) {
                        if (!mIsForkChild) {
                            // We're in the server so any exception here is one that has taken place
                            // pre-fork while processing commands or reading / writing from the
                            // control socket. Make a loud noise about any such exceptions so that
                            // we know exactly what failed and why.

                            Slog.e(TAG, "Exception executing zygote command: ", e);

                            // Make sure the socket is closed so that the other end knows immediately
                            // that something has gone wrong and doesn't time out waiting for a
                            // response.
                            ZygoteConnection conn = peers.remove(i);
                            conn.closeSocket();

                            fds.remove(i);
                        } else {
                            // We're in the child so any exception caught here has happened post
                            // fork and before we execute ActivityThread.main (or any other main()
                            // method). Log the details of the exception and bring down the process.
                            Log.e(TAG, "Caught post-fork exception in child process.", e);
                            throw e;
                        }
                    }
                }
            }
        }
    }
新进程的创建是通过processOneCommand完成的。下面贴下processOneCommand函数
 Runnable processOneCommand(ZygoteServer zygoteServer) {
 ...
   //创建应用进程
        pid = Zygote.forkAndSpecialize(parsedArgs.uid, parsedArgs.gid, parsedArgs.gids,
                parsedArgs.debugFlags, rlimits, parsedArgs.mountExternal, parsedArgs.seInfo,
                parsedArgs.niceName, fdsToClose, fdsToIgnore, parsedArgs.instructionSet,
                parsedArgs.appDataDir);
 ...
Zygote的forkAndSpecialize函数最终是通过native方法完成进程创建。
 int pid = nativeForkAndSpecialize(
                  uid, gid, gids, debugFlags, rlimits, mountExternal, seInfo, niceName, fdsToClose,
                  fdsToIgnore, instructionSet, appDataDir);
好了,到此init和zygote进程的创建和启动流程以及它过程中都做了哪些事我们都梳理了一遍。现在简单总结下:
1、init进程
zygote启动流程简单总结:首先通过AndroidRunTime.start来启动zygoteinit的main函数,在main函数中通过ZygoteServer注册了scoket并通过runSelectLoop进行监听AMS是否有启动新进程的请求,如果有就通过native方法创建新进程。并且创建了systemserver进程。
我们知道在zygote进程当中创建并启动system server进程。那么接下来我们一起看下system server进程启动过程都干了什么。
我们知道system server进程的启动是通过handleSystemServerProcess该函数位于com.android.internal.os.ZygoteInit
 private static Runnable handleSystemServerProcess(ZygoteConnection.Arguments parsedArgs) {
 ...

        if (parsedArgs.invokeWith != null) {
            String[] args = parsedArgs.remainingArgs;
            // If we have a non-null system server class path, we'll have to duplicate the
            // existing arguments and append the classpath to it. ART will handle the classpath
            // correctly when we exec a new process.
            if (systemServerClasspath != null) {
                String[] amendedArgs = new String[args.length + 2];
                amendedArgs[0] = "-cp";
                amendedArgs[1] = systemServerClasspath;
                System.arraycopy(args, 0, amendedArgs, 2, args.length);
                args = amendedArgs;
            }

            WrapperInit.execApplication(parsedArgs.invokeWith,
                    parsedArgs.niceName, parsedArgs.targetSdkVersion,
                    VMRuntime.getCurrentInstructionSet(), null, args);

            throw new IllegalStateException("Unexpected return from WrapperInit.execApplication");
        } else {
            ClassLoader cl = null;
            if (systemServerClasspath != null) {
                cl = createPathClassLoader(systemServerClasspath, parsedArgs.targetSdkVersion);

                Thread.currentThread().setContextClassLoader(cl);
            }

            /*
             * Pass the remaining arguments to SystemServer.
             */
            return ZygoteInit.zygoteInit(parsedArgs.targetSdkVersion, parsedArgs.remainingArgs, cl);//1
        }
 }
可以看出最后调用ZygoteInit.zygoteInit
public static final Runnable zygoteInit(int targetSdkVersion, String[] argv, ClassLoader classLoader) {
        if (RuntimeInit.DEBUG) {
            Slog.d(RuntimeInit.TAG, "RuntimeInit: Starting application from zygote");
        }

        Trace.traceBegin(Trace.TRACE_TAG_ACTIVITY_MANAGER, "ZygoteInit");
        RuntimeInit.redirectLogStreams();

        RuntimeInit.commonInit();
        ZygoteInit.nativeZygoteInit(); //调用native方法对Zygote进行init
        return RuntimeInit.applicationInit(targetSdkVersion, argv, classLoader); //1
    }
ZygoteInit.zygoteInit调用RuntimeInit.applicationInit
protected static Runnable applicationInit(int targetSdkVersion, String[] argv,
            ClassLoader classLoader) {
            ...
               nativeSetExitWithoutCleanup(true);

        // We want to be fairly aggressive about heap utilization, to avoid
        // holding on to a lot of memory that isn't needed.
        VMRuntime.getRuntime().setTargetHeapUtilization(0.75f);
        VMRuntime.getRuntime().setTargetSdkVersion(targetSdkVersion);

        final Arguments args = new Arguments(argv);

        // The end of of the RuntimeInit event (see #zygoteInit).
        Trace.traceEnd(Trace.TRACE_TAG_ACTIVITY_MANAGER);

        // Remaining arguments are passed to the start class's static main
        return findStaticMain(args.startClass, args.startArgs, classLoader);//1
    }
RuntimeInit.applicationInit又会调用findStaticMain方法
    private static Runnable findStaticMain(String className, String[] argv,
            ClassLoader classLoader) {
        Class<?> cl;

        try {
            cl = Class.forName(className, true, classLoader);//1
        } catch (ClassNotFoundException ex) {
            throw new RuntimeException(
                    "Missing class when invoking static main " + className,
                    ex);
        }

        Method m;
        try {
            m = cl.getMethod("main", new Class[] { String[].class });//2
        } catch (NoSuchMethodException ex) {
            throw new RuntimeException(
                    "Missing static main on " + className, ex);
        } catch (SecurityException ex) {
            throw new RuntimeException(
                    "Problem getting static main on " + className, ex);
        }

        int modifiers = m.getModifiers();//3
        if (! (Modifier.isStatic(modifiers) && Modifier.isPublic(modifiers))) {
            throw new RuntimeException(
                    "Main method is not public and static on " + className);
        }

        /*
         * This throw gets caught in ZygoteInit.main(), which responds
         * by invoking the exception's run() method. This arrangement
         * clears up all the stack frames that were required in setting
         * up the process.
         */
        return new MethodAndArgsCaller(m, argv);
    }
注释2处根据传入的类名获取Class对象,注释2处则获取该类的main方法。注释3处获取main方法的修饰判断是否符合要求(必须是pubilc static)最终返回一个MethodAndArgsCaller对象。
它是RuntimeInit类的 一个静态内部类并且实现了runnable接口。
 static class MethodAndArgsCaller implements Runnable {
        /** method to call */
        private final Method mMethod;

        /** argument array */
        private final String[] mArgs;

        public MethodAndArgsCaller(Method method, String[] args) {
            mMethod = method;
            mArgs = args;
        }

        public void run() {//1
            try {

                mMethod.invoke(null, new Object[] { mArgs });//2
            } catch (IllegalAccessException ex) {
                throw new RuntimeException(ex);
            } catch (InvocationTargetException ex) {
                Throwable cause = ex.getCause();
                if (cause instanceof RuntimeException) {
                    throw (RuntimeException) cause;
                } else if (cause instanceof Error) {
                    throw (Error) cause;
                }
                throw new RuntimeException(ex);
            }
        }
    }
首先看下在它的run方法中的注释2处执行了传进来的main方法,这个其实就是SystemServer的main方法。那么还剩一个问题是它的run函数(注释1)在哪里执行的呢? 你是否还记得ZygoteInit类的main函数中有如下调用
    public static void main(String argv[]) {
...
 if (startSystemServer) {
                Runnable r = forkSystemServer(abiList, socketName, zygoteServer);//创建SystemServer进程

                // {@code r == null} in the parent (zygote) process, and {@code r != null} in the
                // child (system_server) process.
                if (r != null) {
                    r.run();//1
                    return;
                }
            }
我们看forkSystemServer返回了一个runnable对象然后如果它不为空就调用它的run方法。其实这个runnable就是一个MethodAndArgsCaller实例。由此我们就进入到了SystemServer类的main方法中。
  /**
     * The main entry point from zygote.
     */
    public static void main(String[] args) {
        new SystemServer().run();
    }
该main方法非常简单就是调用自身的run方法。
 private void run() {
        try {
        //手机时间早于1970 会重新设置为1970
            if (System.currentTimeMillis() < EARLIEST_SUPPORTED_TIME) {
                Slog.w(TAG, "System clock is before 1970; setting to 1970.");
                SystemClock.setCurrentTimeMillis(EARLIEST_SUPPORTED_TIME);
            }
...
 // Prepare the main looper thread (this thread).
            android.os.Process.setThreadPriority(
                android.os.Process.THREAD_PRIORITY_FOREGROUND);
            android.os.Process.setCanSelfBackground(false);
            Looper.prepareMainLooper();//1准备主线程looper


            // Initialize native services.
            System.loadLibrary("android_servers");//2初始化native相关服务

            // Check whether we failed to shut down last time we tried.
            // This call may not return.
            performPendingShutdown();

            // Initialize the system context.
            createSystemContext();//3初始化系统context

            // Create the system service manager.
            mSystemServiceManager = new SystemServiceManager(mSystemContext);//4创建system service manager
            mSystemServiceManager.setRuntimeRestarted(mRuntimeRestart);
            LocalServices.addService(SystemServiceManager.class, mSystemServiceManager);
            // Prepare the thread pool for init tasks that can be parallelized
            SystemServerInitThreadPool.get();
        } finally {
            traceEnd();  // InitBeforeStartServices
        }

        // Start services.
        try {
            traceBeginAndSlog("StartServices");
            //5启动各种服务
            startBootstrapServices();
            startCoreServices();
            startOtherServices();
            SystemServerInitThreadPool.shutdown();
        } catch (Throwable ex) {
            Slog.e("System", "******************************************");
            Slog.e("System", "************ Failure starting system services", ex);
            throw ex;
        } finally {
            traceEnd();
        }
        ...

        // Loop forever.
        Looper.loop();//6
        throw new RuntimeException("Main thread loop unexpectedly exited");
run方法信息量还是很大的,先看下注释1处初始化主线程的looper,注释2初始化了native相关服务,注释3初始化system context,注释4创建system service manager,注释5则先后初始化了各种服务,注释6调用了Looper.loop()。
注释3处system context其实最终是返回contextimpl实例。注释4处创建的SystemServiceManager主要是用在稍后初始化各种服务时用来启动的服务的。
一个Service启动需要的几个步骤:
1. 初始化Service 对象,获得IBinder对象。
2. 启动后台线程,并进入Loop等待。
3. 将自己注册到Service Manager, 让其他进程通过名字可以获得远程调用必须的IBinder的对象。
注释5处先后启动了多种系统服务,这些服务分为3类:引导服务、系统服务、其他服务。毫无疑问,这么多服务之间是有依赖关系的,比如说,ActivityManager Service 在WindowManager Service 初始化完成之前是不能启动应用的。那如何控制这些先后顺序的?这里由System server的启动线程通过SystemReady()接口来完成。每个系统服务必须实现一个SystemReady() 接口,当被调用,表明系统已经OK, 该服务可以访问(直接或间接)其他服务的资源。 最后一个被调到的服务就是AcitivyManager Service. AM的SystemReady()。
系统的启动方式有两种:
  private void startBootstrapServices() {
          mPowerManagerService = mSystemServiceManager.startService(PowerManagerService.class);
}
public <T extends SystemService> T startService(Class<T> serviceClass) {
try {
try {
Constructor<T> constructor = serviceClass.getConstructor(Context.class);
service = constructor.newInstance(mContext);
} catch (InstantiationException ex) {
throw new RuntimeException("Failed to create service " + name
+ ": service could not be instantiated", ex);
} catch (IllegalAccessException ex) {
throw new RuntimeException("Failed to create service " + name
+ ": service must have a public constructor with a Context argument", ex);
} catch (NoSuchMethodException ex) {
throw new RuntimeException("Failed to create service " + name
+ ": service must have a public constructor with a Context argument", ex);
} catch (InvocationTargetException ex) {
throw new RuntimeException("Failed to create service " + name
+ ": service constructor threw an exception", ex);
}
startService(service);//1
return service;
} finally {
Trace.traceEnd(Trace.TRACE_TAG_SYSTEM_SERVER);
}可以看出首先会用反射得到一个service实例然后调用同名startService方法
private final ArrayList<SystemService> mServices = new ArrayList<SystemService>();

 public void startService(@NonNull final SystemService service) {
        // Register it.
        mServices.add(service);//1
        // Start it.
        long time = SystemClock.elapsedRealtime();
        try {
            service.onStart();//2
        } catch (RuntimeException ex) {
            throw new RuntimeException("Failed to start service " + service.getClass().getName()
                    + ": onStart threw an exception", ex);
        }
        warnIfTooLong(SystemClock.elapsedRealtime() - time, service, "onStart");
    }
startService首先会把当前的service添加到一个名为mServices的list中
之后便调用service.onStart()来启动service。
以上就是通过SystemServiceManager.startService启动系统服务的过程,总结来说就是通过反射来构造service然后再调用其onStart()来启动。
  mPackageManagerService = PackageManagerService.main(mSystemContext, installer,
                mFactoryTestMode != FactoryTest.FACTORY_TEST_OFF, mOnlyCore);
调用了PackageManagerService的main函数
 public static PackageManagerService main(Context context, Installer installer,
            boolean factoryTest, boolean onlyCore) {
        // Self-check for initial settings.
        PackageManagerServiceCompilerMapping.checkProperties();

        PackageManagerService m = new PackageManagerService(context, installer,
                factoryTest, onlyCore);//1
        m.enableSystemUserPackages();
        ServiceManager.addService("package", m);//2
        final PackageManagerNative pmn = m.new PackageManagerNative();
        ServiceManager.addService("package_native", pmn);
        return m;
    }
在注释1处构造了一个 PackageManagerService实例,然后在注释2处添加到ServiceManager启动。
ServiceManager它是用来管理系统中各种Service的,由它管理的服务都实现了IBinder,所以在ServiceManager中注册的服务是用于进程间通信的:用于系统C/S架构中的Binder通信机制。客户端要使用某个Service,需要先到ServiceManager中查询Service的信息,然后根据该信息与Service所在的Server进程建立通信,这样客户端就可以使用Service了。
至此SystemServer的启动流程完成,我们来简单总结下:
1、zygote会通过forkSystemServe来创建SystemServer进程。
2、之后通过handleSystemServerProcess来启动SystemServer进程。
3、启动过程是通过反射调用SystemServer的main函数。
4、SystemServer的main函数会调用run方法,在run方法中初始化了主线程的looper、系统的context等,之后启动了引导、核心、其他等三类系统服务。
SystemServer的startOtherServices()方法的最后调用了AMS的systemReady
这个调用会启动launcher进程。
launcher通俗讲就是我们开机看到的桌面,它向我们展示安装完成的app的图标。并且当我们按下对应的图标时启动相应的app。好了 我们看下launcher启动入口。
    private void startOtherServices() {
    ...
      mActivityManagerService.systemReady(() -> {//1
            Slog.i(TAG, "Making services ready");
            traceBeginAndSlog("StartActivityManagerReadyPhase");
            mSystemServiceManager.startBootPhase(
                    SystemService.PHASE_ACTIVITY_MANAGER_READY);
            traceEnd();
            traceBeginAndSlog("StartObservingNativeCrashes");
            try {
                mActivityManagerService.startObservingNativeCrashes();
            } catch (Throwable e) {
                reportWtf("observing native crashes", e);
            }
            traceEnd();

           //...
        }, BOOT_TIMINGS_TRACE_LOG);
    }
在startOtherServices中注释1处调用ActivityManagerService(AMS)的systemReady方法。
  public void systemReady(final Runnable goingCallback, TimingsTraceLog traceLog) {
  ...
          startHomeActivityLocked(currentUserId, "systemReady");
  ...
  }
省略无关内容,我们看在systemReady调用startHomeActivityLocked方法。
 boolean startHomeActivityLocked(int userId, String reason) {
        if (mFactoryTest == FactoryTest.FACTORY_TEST_LOW_LEVEL
                && mTopAction == null) {
            // We are running in factory test mode, but unable to find
            // the factory test app, so just sit around displaying the
            // error message and don't try to start anything.
            return false;
        }
        Intent intent = getHomeIntent();//1
        ActivityInfo aInfo = resolveActivityInfo(intent, STOCK_PM_FLAGS, userId);
        if (aInfo != null) {
            intent.setComponent(new ComponentName(aInfo.applicationInfo.packageName, aInfo.name));
            // Don't do this if the home app is currently being
            // instrumented.
            aInfo = new ActivityInfo(aInfo);
            aInfo.applicationInfo = getAppInfoForUser(aInfo.applicationInfo, userId);
            ProcessRecord app = getProcessRecordLocked(aInfo.processName,
                    aInfo.applicationInfo.uid, true);
            if (app == null || app.instr == null) {
                intent.setFlags(intent.getFlags() | Intent.FLAG_ACTIVITY_NEW_TASK);
                final int resolvedUserId = UserHandle.getUserId(aInfo.applicationInfo.uid);
                // For ANR debugging to verify if the user activity is the one that actually
                // launched.
                final String myReason = reason + ":" + userId + ":" + resolvedUserId;
                mActivityStarter.startHomeActivityLocked(intent, aInfo, myReason);//2
            }
        } else {
            Slog.wtf(TAG, "No home screen found for " + intent, new Throwable());
        }

        return true;
    }
startHomeActivityLocked方法中在注释1处调用
getHomeIntent,该方法返回一个intent实例,该实例是启动launcher的intent。该intent的action和Category是匹配launcher的manifest的。
   Intent getHomeIntent() {
        Intent intent = new Intent(mTopAction, mTopData != null ? Uri.parse(mTopData) : null);//mTopAction = Intent.ACTION_MAIN
        intent.setComponent(mTopComponent);
        intent.addFlags(Intent.FLAG_DEBUG_TRIAGED_MISSING);
        if (mFactoryTest != FactoryTest.FACTORY_TEST_LOW_LEVEL) {
            intent.addCategory(Intent.CATEGORY_HOME);//该intent的Category是Intent.CATEGORY_HOME
        }
        return intent;
    }
下面贴下manifest文件
    <application
        android:backupAgent="com.android.launcher3.LauncherBackupAgent"
        android:fullBackupOnly="true"
        android:fullBackupContent="@xml/backupscheme"
        android:hardwareAccelerated="true"
        android:icon="@drawable/ic_launcher_home"
        android:label="@string/derived_app_name"
        android:theme="@style/LauncherTheme"
        android:largeHeap="@bool/config_largeHeap"
        android:restoreAnyVersion="true"
        android:supportsRtl="true" >

        <!--
        Main launcher activity. When extending only change the name, and keep all the
        attributes and intent filters the same
        -->
        <activity
            android:name="com.android.launcher3.Launcher"
            android:launchMode="singleTask"
            android:clearTaskOnLaunch="true"
            android:stateNotNeeded="true"
            android:windowSoftInputMode="adjustPan"
            android:screenOrientation="nosensor"
            android:configChanges="keyboard|keyboardHidden|navigation"
            android:resizeableActivity="true"
            android:resumeWhilePausing="true"
            android:taskAffinity=""
            android:enabled="true">
            <intent-filter>
                <action android:name="android.intent.action.MAIN" />
                <category android:name="android.intent.category.HOME" />
                <category android:name="android.intent.category.DEFAULT" />
                <category android:name="android.intent.category.MONKEY"/>
                <category android:name="android.intent.category.LAUNCHER_APP" />
            </intent-filter>
        </activity>
看出launcher的action和category是和上面的intent相符合的。
startHomeActivityLocked方法中的注释2调用了startHomeActivityLocked方法把获得的intent传入来启动launcher。
launcher启动完成后我们就在看到了桌面程序,上面显示了安装完成的app的图标。
我们在此简单总结下launcher的启动流程:
1、首先systemserver在启动其他系统服务时会调用AMS的systemReady方法
2、systemReady方法中调用startHomeActivityLocked,在这个方法中我们会构造出启动launcher的intent,然后通过startHomeActivityLocked去启动launcher。
systemserver启动launcher后会执行launcher的onCreate函数
 protected void onCreate(Bundle savedInstanceState) {

        super.onCreate(savedInstanceState);
        LauncherAppState app = LauncherAppState.getInstance(this);//1

        // Load configuration-specific DeviceProfile
        mDeviceProfile = app.getInvariantDeviceProfile().getDeviceProfile(this);

        if (isInMultiWindowModeCompat()) {//2
            Display display = getWindowManager().getDefaultDisplay();
            Point mwSize = new Point();
            display.getSize(mwSize);
            mDeviceProfile = mDeviceProfile.getMultiWindowProfile(this, mwSize);
        }
//3
        mOrientation = getResources().getConfiguration().orientation;
        mSharedPrefs = Utilities.getPrefs(this);
        mIsSafeModeEnabled = getPackageManager().isSafeMode();
        mModel = app.setLauncher(this);
        mModelWriter = mModel.getWriter(mDeviceProfile.isVerticalBarLayout());
        mIconCache = app.getIconCache();
        mAccessibilityDelegate = new LauncherAccessibilityDelegate(this);

        mDragController = new DragController(this);
        mAllAppsController = new AllAppsTransitionController(this);
        mStateTransitionAnimation = new LauncherStateTransitionAnimation(this, mAllAppsController);

        mAppWidgetManager = AppWidgetManagerCompat.getInstance(this);

        mAppWidgetHost = new LauncherAppWidgetHost(this);
        if (Utilities.ATLEAST_MARSHMALLOW) {
            mAppWidgetHost.addProviderChangeListener(this);
        }
        mAppWidgetHost.startListening();

        // If we are getting an onCreate, we can actually preempt onResume and unset mPaused here,
        // this also ensures that any synchronous binding below doesn't re-trigger another
        // LauncherModel load.
        mPaused = false;

        mLauncherView = LayoutInflater.from(this).inflate(R.layout.launcher, null);

        setupViews();//4

        mDeviceProfile.layout(this, false /* notifyListeners */);
        loadExtractedColorsAndColorItems();//5

        mPopupDataProvider = new PopupDataProvider(this);

        ((AccessibilityManager) getSystemService(ACCESSIBILITY_SERVICE))
                .addAccessibilityStateChangeListener(this);

        lockAllApps();

        restoreState(savedInstanceState);

        if (LauncherAppState.PROFILE_STARTUP) {
            Trace.endSection();
        }

        // We only load the page synchronously if the user rotates (or triggers a
        // configuration change) while launcher is in the foreground
        int currentScreen = PagedView.INVALID_RESTORE_PAGE;
        if (savedInstanceState != null) {
            currentScreen = savedInstanceState.getInt(RUNTIME_STATE_CURRENT_SCREEN, currentScreen);
        }

        if (!mModel.startLoader(currentScreen)) {//6
            // If we are not binding synchronously, show a fade in animation when
            // the first page bind completes.
            mDragLayer.setAlpha(0);
        } else {
            // Pages bound synchronously.
            mWorkspace.setCurrentPage(currentScreen);

            setWorkspaceLoading(true);
        }

        // For handling default keys
        //7
        mDefaultKeySsb = new SpannableStringBuilder();
        Selection.setSelection(mDefaultKeySsb, 0);

        mRotationEnabled = getResources().getBoolean(R.bool.allow_rotation);
        // In case we are on a device with locked rotation, we should look at preferences to check
        // if the user has specifically allowed rotation.
        if (!mRotationEnabled) {
            mRotationEnabled = Utilities.isAllowRotationPrefEnabled(getApplicationContext());
            mRotationPrefChangeHandler = new RotationPrefChangeHandler();
            mSharedPrefs.registerOnSharedPreferenceChangeListener(mRotationPrefChangeHandler);
        }

        if (PinItemDragListener.handleDragRequest(this, getIntent())) {
            // Temporarily enable the rotation
            mRotationEnabled = true;
        }

        // On large interfaces, or on devices that a user has specifically enabled screen rotation,
        // we want the screen to auto-rotate based on the current orientation
        setOrientation();

        setContentView(mLauncherView);

        // Listen for broadcasts
        IntentFilter filter = new IntentFilter();
        filter.addAction(Intent.ACTION_SCREEN_OFF);
        filter.addAction(Intent.ACTION_USER_PRESENT); // When the device wakes up + keyguard is gone
        registerReceiver(mReceiver, filter);
        mShouldFadeInScrim = true;

        getSystemUiController().updateUiState(SystemUiController.UI_STATE_BASE_WINDOW,
                Themes.getAttrBoolean(this, R.attr.isWorkspaceDarkText));

        if (mLauncherCallbacks != null) {
            mLauncherCallbacks.onCreate(savedInstanceState);
        }
    }
整个launcher的启动大致分为7步。
注释1处执行第一步创建LauncherAppState 对象。不同的手机显示的Launcher布局是一样的,但是其中真正显示的每个图标,
每个画面的像素点大小是不同的。Launcher需要根据手机的尺寸密度等参数,计算出更多的信息。第一步是将和手机硬件挂钩的参数都获取出来。
注释2处执行第二步,分屏模式也叫做多屏模式,在多屏模式的时候,Launcher的布局有很多的变化。此处检查当前是否处于分屏模式,若是则会做相应的处理。
注释3执行第三步统一创建对象,Launcher启动时需要用到的对象,在这里统一创建,为后面进行布局的显示进行铺垫。
注释4执行第四步生成桌面分布局,将桌面的各个部分都创建对象,绑定一些事件监听器等,这一步基本将桌面的各个UI子模块都定义完成。
注释5执行第五步,UI子模块的细节规划,各个模块的大小,真正的尺寸等等。这一步是采用第一步获取的方案,把第四步的模块细节进行完成
注释6执行第六步,生成布局。Launcher不是一张图片,因为不同的手机之间有区别。前五步完成不同手机的区别, 保证上至平板,下至翻盖机,不同的分辨率下都能够很好的显示。而手机桌面的变化重点是桌面图标布局不一样,手机中安装的软件不一样。第六步就是生成这种布局。
注释7第七步,横屏和CallBack等善后工作
至此launcher启动完成我们已经可以在桌面看到安装的app的icon,点击icon就会启动相应的应用。
其实在launcher内部我们看到的图标排列是通过Android自定义的recycleview实现的,当我们点击icon时会触发onclicklistener监听,而对点击事件的处理则是在launcher的onclick函数中(launcher实现了onclicklistener接口),launcher收到点击事件后会调用startAppShortcutOrInfoActivity启动对应的应用。
至此Android从启动到桌面显示,然后点击icon启动app的流程已经梳理完成。
标签:data scipt south 用户组 mon 第一个 text 进程终止 exception
原文地址:https://www.cnblogs.com/Robin132929/p/12158006.html