标签:根据 class path personal and repos toolbar type run
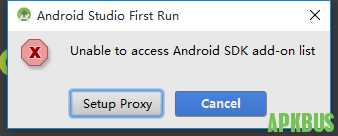
安装 android studio,碰到下面这个图片,直接跳过。

buildscript {
    ext.kotlin_version = '1.3.40'
    repositories {
        maven { url 'https://maven.aliyun.com/repository/google' }
        maven { url 'https://maven.aliyun.com/repository/jcenter' }
        maven { url 'https://maven.aliyun.com/repository/gradle-plugin' }
        google()
        jcenter()

    }
    dependencies {
        classpath 'com.android.tools.build:gradle:3.4.1'
        classpath "org.jetbrains.kotlin:kotlin-gradle-plugin:$kotlin_version"

        // NOTE: Do not place your application dependencies here; they belong
        // in the individual module build.gradle files
    }
}

allprojects {
    repositories {
        maven { url 'https://maven.aliyun.com/repository/google' }
        maven { url 'https://maven.aliyun.com/repository/jcenter' }
        maven { url 'https://maven.aliyun.com/repository/gradle-plugin' }
        google()
        jcenter()

    }
}

task clean(type: Delete) {
    delete rootProject.buildDir
}
然后重启 android studio,选择 file --> sync project with gradles files;(老版本的AS可能是tools ->Android->sync project with gradles files;)。
模拟器的选择:
因为是 amd 处理器,并且是 win7 的系统,所以选择 genymotion 模拟器,首先在 genymotion 官网上面注册,然后下载包含 virtualbox 的版本,安装之后,选择 personal use。
然后 genymotion --> settings 里面,
virtualbox 选项用来配置虚拟机存放的位置。
adb 选项用来配置 使用默认的 sdk,还是 android studio 的sdk。
misc 选项用来选择截屏存放的位置。
然后根据需要选择相应的虚拟机下载。
android studio 安装 genymotion 插件,直接到 https://www.genymotion.com/plugins/ 这里面点击 Or download and install manually the plugin genymotion-idea-plugin.jar (not recommended) 来下载,然后在 android studio 的 file --> setting --> plugins 点击齿轮图标,选择从硬盘安装,然后选择下载好的插件,安装完成直接,重启 android studio。
重启之后,view --> toolbar 勾选上,这时候就能看到 红色手机图标的 genymotion,点击图标。启动相应的虚拟机。
make project 后面的选项框中选择 app,然后 build 一下,之后点击 run 的图标,app 就可以在虚拟机中显示出来了。
标签:根据 class path personal and repos toolbar type run
原文地址:https://www.cnblogs.com/ramlife/p/12179434.html