标签:copyto self perm 数据库 provider for 核心 目的 over
一、JWT:JSON Web Token ( JWT)是一种开放的标准( RFC 7519 ), JWT 定义了一种紧凑且自包含的标准,该标准旨在将各个主体的信息包装为 JSON 对象。主体信息是通过数字签名进行和验证的。常使用 HMAC算法或 RSA (公钥/私钥 非对称性 密〉算法对 JWT 进行签名,安全性很高。
1)特点:
(1)紧凑型( compact):由于是加密后的字符串,JWT数据体积非常小,可通过POST请求参数或 HTTP 请求头发送。另外,数据体积小意味着传输速度很快。
(2)自包含(self-contained):JWT 包含了主体的所有信息,所以避免了每个请求都需要Uaa 服务验证身份,降低了服务器的负载。
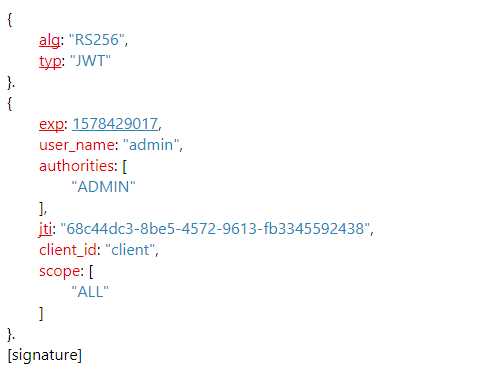
2)结构:包含3个部分,通过".(点)"分割。
(1)Header (头)。
(2)Payload (有效载荷〉。
(3)Signature (签名)。
大概样子如下:

解析后的样子:

二、JWT的应用场景。
1)认证:这是使用 JWT 最常见的场景。一旦用户登录成功获取 JWT 后,后续的每个请求将携带该 JWT 。该 JWT 包含了用户信息、权限点等信息,根据 JWT 含的信息,资源服务可以控制该 JWT 可以访问的资源范围。因为 JWT 开销很小,并且能够在不同的域中使用,单点登录是一个广泛使用 JWT 的场景。
2)信息交换:JWT 是在各方之间安全传输信息的一种方式,使用签名加密,安全性很高。另外,当使用 Header Payload算签名时,还可以验证内容是否被篡改。
三、JWT如何使用。
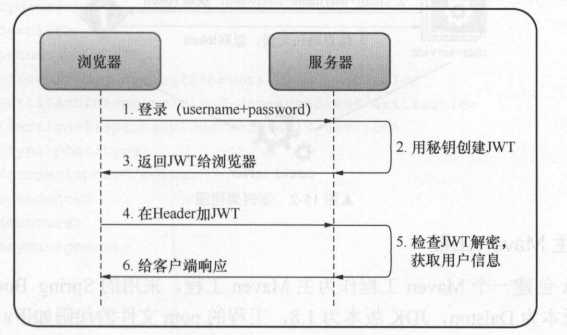
客户端通过提供用户名、密码向服务器请求获取JWT ,服务器判断用户名和密码正确无误之后,将用户信息和权限点经过加密以JWT形式返回给客户端。在以后的每次请求中获取到该 JWT 客户端都需要携带该JWT这样做的好处就是以后的请求都不需要通过 认证服务来判断该请求的用户以及该用户的权限。在微服务系统中,可以利用 JWT 实现单点登录。

四、具体的实现过程。(基本和上一章(Spring-Cloud之OAuth2开放授权-11)的代码一样,我这里只说核心修改的部分)
1、认证服务器修改部分
package com.cetc.config;

import com.zaxxer.hikari.HikariDataSource;
import org.springframework.beans.factory.annotation.Autowired;
import org.springframework.context.annotation.Bean;
import org.springframework.context.annotation.Configuration;
import org.springframework.core.io.ClassPathResource;
import org.springframework.http.HttpMethod;
import org.springframework.security.authentication.AuthenticationManager;
import org.springframework.security.oauth2.config.annotation.configurers.ClientDetailsServiceConfigurer;
import org.springframework.security.oauth2.config.annotation.web.configuration.AuthorizationServerConfigurerAdapter;
import org.springframework.security.oauth2.config.annotation.web.configuration.EnableAuthorizationServer;
import org.springframework.security.oauth2.config.annotation.web.configurers.AuthorizationServerEndpointsConfigurer;
import org.springframework.security.oauth2.config.annotation.web.configurers.AuthorizationServerSecurityConfigurer;
import org.springframework.security.oauth2.provider.ClientDetailsService;
import org.springframework.security.oauth2.provider.client.JdbcClientDetailsService;
import org.springframework.security.oauth2.provider.token.TokenStore;
import org.springframework.security.oauth2.provider.token.store.JdbcTokenStore;
import org.springframework.security.oauth2.provider.token.store.JwtAccessTokenConverter;
import org.springframework.security.oauth2.provider.token.store.JwtTokenStore;
import org.springframework.security.oauth2.provider.token.store.KeyStoreKeyFactory;

@Configuration
@EnableAuthorizationServer
public class AuthServerConfiguration extends AuthorizationServerConfigurerAdapter{

    @Autowired
    private AuthDetailsService authDetailsService;

    @Autowired
    private AuthenticationManager authenticationManager;

    @Autowired
    private ClientDetailsService clientDetailsService;

    @Bean
    public ClientDetailsService clientDetailsService(HikariDataSource dataSource) {
        //使用数据库的配置方式
        return new JdbcClientDetailsService(dataSource);
    }

    @Bean
    public TokenStore tokenStore() {
        //token也使用数据的方式,后面会将JWT的使用方式
        return new JwtTokenStore(jwtAccessTokenConverter());
    }

    @Bean
    protected JwtAccessTokenConverter jwtAccessTokenConverter() {
        ClassPathResource resource = new ClassPathResource("jwt/jwt.jks");
        KeyStoreKeyFactory keyStoreKeyFactory = new KeyStoreKeyFactory(resource, "auth_jwt".toCharArray());
        JwtAccessTokenConverter jwtAccessTokenConverter = new JwtAccessTokenConverter();
        jwtAccessTokenConverter.setKeyPair(keyStoreKeyFactory.getKeyPair("oauth2-jwt"));
        return jwtAccessTokenConverter;
    }

    @Override
    public void configure(AuthorizationServerSecurityConfigurer security) throws Exception {
        security
                //token获取方式
                .tokenKeyAccess("permitAll()")
                //检测加入权限
                .checkTokenAccess("isAuthenticated()")
                //允许表单认证
                .allowFormAuthenticationForClients();

    }

    @Override
    public void configure(ClientDetailsServiceConfigurer clients) throws Exception {
        //这里就是具体的授权管理过程了
        clients.withClientDetails(clientDetailsService);
    }

    @Override
    public void configure(AuthorizationServerEndpointsConfigurer endpoints) throws Exception {
        endpoints
                //这里使用的认证方式为security配置方式
                .authenticationManager(authenticationManager)
                //提供get和post的认证方式
                .allowedTokenEndpointRequestMethods(HttpMethod.POST, HttpMethod.GET)
                //这里一定要配置userDetailsService,不然刷新token会出错,refresh_token
                .userDetailsService(authDetailsService)
                .tokenStore(tokenStore()).tokenEnhancer(jwtAccessTokenConverter())
                //自定义认证页面
                .pathMapping("/oauth/confirm_access", "/oauth/confirm_access");
    }

}
2、资源服务器
package com.cetc.config;

import org.springframework.context.annotation.Bean;
import org.springframework.context.annotation.Configuration;
import org.springframework.core.io.ClassPathResource;
import org.springframework.security.config.annotation.web.builders.HttpSecurity;
import org.springframework.security.oauth2.config.annotation.web.configuration.EnableResourceServer;
import org.springframework.security.oauth2.config.annotation.web.configuration.ResourceServerConfigurerAdapter;
import org.springframework.security.oauth2.config.annotation.web.configurers.ResourceServerSecurityConfigurer;
import org.springframework.security.oauth2.provider.token.TokenStore;
import org.springframework.security.oauth2.provider.token.store.JwtAccessTokenConverter;
import org.springframework.security.oauth2.provider.token.store.JwtTokenStore;
import org.springframework.util.FileCopyUtils;

import java.io.IOException;
import java.util.Arrays;

@Configuration
@EnableResourceServer
public class ResourceServerConfiguration extends ResourceServerConfigurerAdapter{

    @Override
    public void configure(HttpSecurity http) throws Exception {
        http
            .csrf().disable()
            .authorizeRequests()
            .anyRequest().authenticated();
    }

    @Bean
    public JwtAccessTokenConverter jwtAccessTokenConverter() throws IOException {
        JwtAccessTokenConverter jwtAccessTokenConverter = new JwtAccessTokenConverter();
        ClassPathResource resource = new ClassPathResource("jwt/jwt.cert");
        jwtAccessTokenConverter.setVerifierKey(new String(FileCopyUtils.copyToByteArray(resource.getInputStream())));
        return jwtAccessTokenConverter;
    }

    @Bean
    public TokenStore tokenStore() throws IOException {
        return new JwtTokenStore(jwtAccessTokenConverter());
    }

    @Override
    public void configure(ResourceServerSecurityConfigurer resources) throws Exception {
        resources.tokenStore(tokenStore());
    }
}
3、第三方或者SSO客户端,不做修改。因为,JWT令牌是认证服务器给出的。解析JWT令牌的为资源服务器,所以SSO客户端只需要按原来的方式进行调用就可以了。
五、jks文件生成,上面使用jks文件为文件token密钥,所以我们在使用的时候需要自己加入。
1)生成jks文件
keytool -genkeypair -alias oauth2-jwt -keyalg RSA -keypass auth_jwt -storepass auth_jwt -keystore jwt.jks
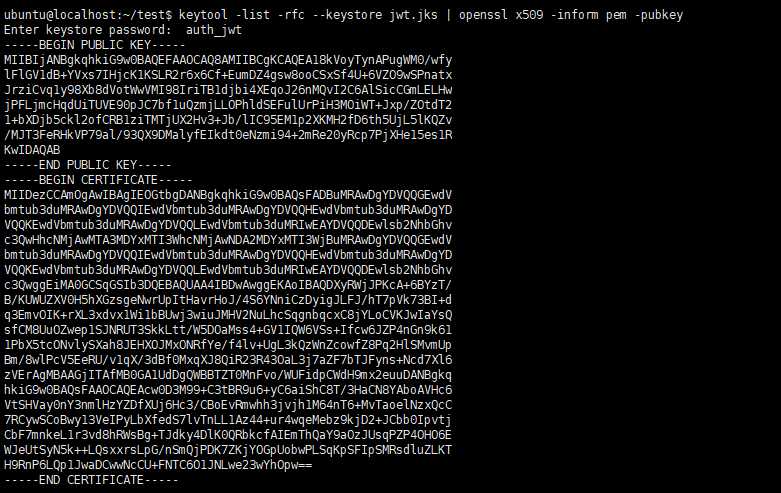
2)获取公钥,这里最好在linux服务器上面进行,本地安装OpenSSL过于麻烦
keytool -list -rfc --keystore jwt.jks | openssl x509 -inform pem -pubkey

赋值公钥到jwt.cert文件中

3)按照配置的指定路径放入jwt.jks和jwt.cert
六、测试资源服务器访问,启动Eureka-Server、Eureka-Client、Auth-Server-Jwt、Auth-Resource-Jwt端口为8670、8673、8697、8698.

1)添加客户端到数据库
![]()
2)获取令牌:
(1)获取授权码
oauth/authorize?response_type=code&client_id=&redirect_uri=

(2)获取令牌
oauth/token?client_id=&client_secret=&grant_type=authorization_code&redirect_uri=&code=


3)携带令牌访问资源服务器

七、JWT的基本使用就差不多这个样子了,JWT的目的是在较少认证服务器的访问。那么这个也存在问题就是如果用户权限修改或者其他部分修改,那么在令牌的使用就不是最新的,这里就会导致权限错误问题。当然这个问题可以通过配置网关,在网关处缓存,如果存在修改这清楚缓存,要求重新登录。
八、本编源码:https://github.com/lilin409546297/spring-cloud/tree/master/oauth2-jwt
标签:copyto self perm 数据库 provider for 核心 目的 over
原文地址:https://www.cnblogs.com/ll409546297/p/12187608.html