标签:简单 private autowire sse null 如何 schema getc interface
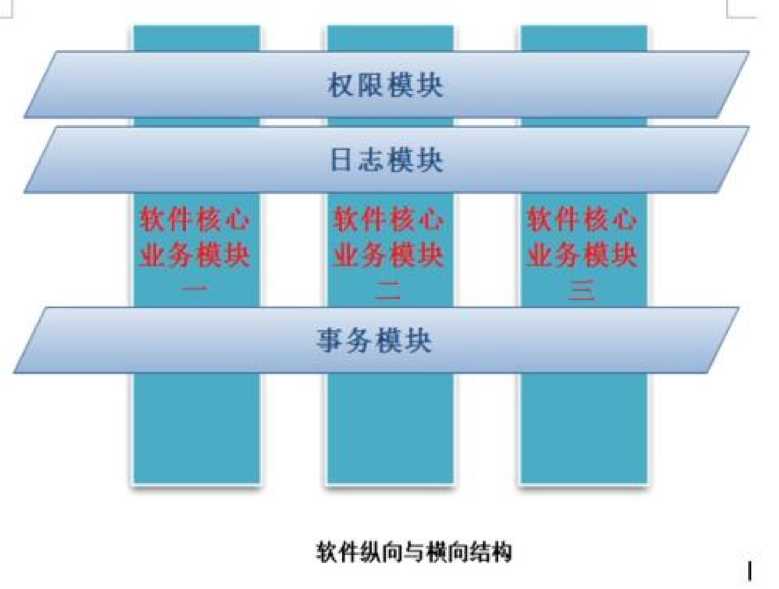
Spring-AOP 面向切面编程,它是对OOP的一种补充,OOP一般就是纵向关系,举个例子我们发一个用户信息的请求,正常情况下流程就是:身份验证 ——查询用户信息——日志记录(是情况而定)——返回信息,这个就是OOP面向对象编程,但如果有很多业务的话,那么身份验证,日志处理(一般AOP不会用于业务日志处理,否则以后运维的时候比较麻烦),会被调用很多次,这个时候可以引入AOP,他是面向切片处理,它会将程序横向截断,例如把权限模块进行抽离,实现解耦,如果后续权限需要调整只需要调整抽离出来的权限组件即可,画个图会更清楚一些,这个就是横向结构与纵向结构,权限模块,日志模块和事务模块与业务本身是没有关系的,因此进行剥离以便于未来的的高操作性以及维护性。

AOP实现的原理就是代理模式。
因此在学习AOP之前,我们有必要学习一下什么是代理模式,之前学习python的时候,经常会使用装饰器,那么在学习代理模式时,感觉跟装饰模式很像,因此先看一下这两者的区别
代理模式跟装饰模式在代码实现的角度来讲,都是对愿对象功能的一种增强,因此这两者边界有一些模糊,但存在既是合理的,如果一项,那设计模式也就不会给这两个不同名称了,在网上搜索到这么一段话:
Like Decorator, the Proxy pattern composes an object and provides an identical in- terface to clients. Unlike Decorator, the Proxy pattern is not concerned with attaching or detaching properties dynamically, and it‘s not designed for recursive composition. Its intent is to provide a stand-in for a subject when it‘s inconvenient or undesirable to access the subject directly because, for example, it lives on a remote machine, has restricted access, or is persistent.
In the Proxy pattern, the subject defines the key functionality, and the proxy provides (or refuses) access to it. In Decorator, the component provides only part of the functionality, and one or more decorators furnish the rest. Decorator addresses the situation where an object‘s total functionality can‘t be determined at compile time, at least not conveniently. That open-endedness makes recursive composition an essential part of Decorator. That isn‘t the case in Proxy, because Proxy focuses on one relationship—between the proxy and its subject—and that relationship can be expressed statically.
These differences are significant because they capture solutions to specific recurring problems in object-oriented design. But that doesn‘t mean these patterns can‘t be com- bined. You might envision a proxy-decorator that adds functionality to a proxy, or a decorator-proxy that embellishes a remote object. Although such hybrids might be useful (we don‘t have real examples handy), they are divisible into patterns that are useful.
第一段说的是代理模式,侧重于不能直接访问一个对象,只能通过代理来间接访问,比如对象在另外一台机器上,或者对象被持久化了,对象是受保护的。
第二段说的是装饰器模式是因为没法在编译器就确定一个对象的功能,需要运行时动态的给对象添加职责,所以只能把对象的功能拆成一一个个的小部分,动态组装
第三段说的是,这个两个设计模式是为了解决不同的问题而抽象总结出来的。是可以混用的。可以在代理的基础上在加一个装饰,也可以在装饰器的基础上在加一个代理。感兴趣的去看看dubbo源码,里面就是这么实现的。
两者之间本质区别应该就是装饰模式装饰完成之后,这个对象还是这个对象,只是功能增加了,但是代理模式不一样,代理之后会变成一个另一个的对象,增强的功能别人帮你实现了,别的区别找不到了,太多不靠谱的信息!!
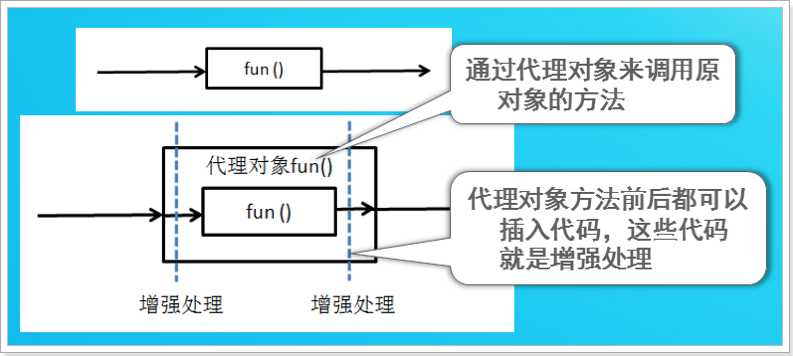
那我们来研究一下什么是代理模式,先来看一张图

代理模式主要分为静态代理与动态代理,我们先从比较简单的静态代理看起:
我们直接从代码来看,可能会更明白一点:
首先定义一个我们的User对象,这个就不再赘述了,写了太多遍了
package com.yang.bean;

public class User {
    private int id;
    private String name;

    public User(int id, String name) {
        this.id = id;
        this.name = name;
    }

    @Override
    public String toString() {
        return "User{" +
                "id=" + id +
                ", name=‘" + name + ‘\‘‘ +
                ‘}‘;
    }
}
接下来因为比较简单,也就不再搞controller蹭了,直接来写UserService,先来实现一个接口,只有两个方法,一个添加,一个删除
package com.yang.UserService;

import com.yang.bean.User;

// 定义接口
public interface UserService {
    void addUser(User user);

    void deleteUser(int userID);
}
接下来我们写这两个方法的实现类UserServiceImpl
package com.yang.UserService.Impl;

import com.yang.UserService.UserService;
import com.yang.bean.User;

// 基本业务层代码,没啥好说的
public class UserServiceImpl implements UserService {
    public void addUser(User user) {
        System.out.println("will add a user" + user);
    }

    public void deleteUser(int userID) {
        System.out.println("will delete user:" + userID);
    }
}
既然要搞代理,也即是要增强我们原始的业务代码,那么我们来写一下增强的实现代码
package com.yang.Transaction;

// 这个就是我们的事务类
public class Transaction {

    // 定义在方法之前调用的,也就是AOP中的前置通知
    public void before() {
        System.out.println("-----will do something before you---");
    }

    // 定义一个在方法之后调用的增强功能,也就是AOP中后置通知
    public void after() {
        System.out.println("-----will do something after you-----");
    }
}
写了这么多,那么我们来看一下代理类的实现
package com.yang.Transaction;

import com.yang.UserService.UserService;
import com.yang.bean.User;

// 这个旧市我们的代理类,可以发现他跟原始对象都是继承了UserService接口
public class ProxyUser implements UserService {

    private UserService us;
    private Transaction ts;

    // 初始化,需要把UserService以及事务类全部传进来
    public ProxyUser(UserService us, Transaction ts) {
        this.us = us;
        this.ts = ts;
    }

    // 重写方法,可以看出在原始对象的方法上下分别添加了我们的增强方法
    public void addUser(User user) {
        ts.before();
        us.addUser(user);
        ts.after();
    }

    public void deleteUser(int userID) {
        ts.before();
        us.deleteUser(userID);
        ts.after();
    }
}
代码书写完毕,我们来测一下
package com.yang.test;

import com.yang.Transaction.ProxyUser;
import com.yang.Transaction.Transaction;
import com.yang.UserService.Impl.UserServiceImpl;
import com.yang.UserService.UserService;
import com.yang.bean.User;

public class TestUser {

    // 没有嗲用TEST框架,直接使用main来调用
    public static void main(String[] args) {
        Transaction ts = new Transaction();
        UserService us = new UserServiceImpl();

        // 这个就是我们实例化出来的代理对象,可以看出跟以前的对象是不同的以前的对象是new UserServiceImpl(),接受都是使用UserService接口,这不就是多态
        UserService pu = new ProxyUser(us, ts);

        pu.addUser(new User(1, "ming"));
        pu.deleteUser(1);

    }
}
写完代码,我们发现我们却是没有修改原玩吗,而是使用代理帮助我们增强了功能,但是,这个如果后期要修改UserService接口,那不得麻烦死,因此是时候研究一下动态代理:
java动态代理又分为JDk动态代理以及CGLIB代理,它们两者的区别就是JDK代理只能为接口创建代理,CGLICB采用底层的字节码,为一个类创建子类,补足了JDK的不足,在此处我们来看一下JDK的代码,业务层的代码都是一样的名,我们直接来看代理类以及调用
代理类的实现
package com.yang.Transaction;

import java.lang.reflect.InvocationHandler;
import java.lang.reflect.Method;

public class ObjectInterceptor implements InvocationHandler {
    private Object target;
    private Transaction transaction;


    // 构造函数,传入代理的目标以及增强类
    public ObjectInterceptor(Object target, Transaction transaction) {
        this.target = target;
        this.transaction = transaction;
    }

    /**
     * Processes a method invocation on a proxy instance and returns
     * the result.  This method will be invoked on an invocation handler
     * when a method is invoked on a proxy instance that it is
     * associated with.
     *
     * @param proxy  the proxy instance that the method was invoked on
     * @param method the {@code Method} instance corresponding to
     *               the interface method invoked on the proxy instance.  The declaring
     *               class of the {@code Method} object will be the interface that
     *               the method was declared in, which may be a superinterface of the
     *               proxy interface that the proxy class inherits the method through.
     * @param args   an array of objects containing the values of the
     *               arguments passed in the method invocation on the proxy instance,
     *               or {@code null} if interface method takes no arguments.
     *               Arguments of primitive types are wrapped in instances of the
     *               appropriate primitive wrapper class, such as
     *               {@code java.lang.Integer} or {@code java.lang.Boolean}.
     * @return the value to return from the method invocation on the
     * proxy instance.  If the declared return type of the interface
     * method is a primitive type, then the value returned by
     * this method must be an instance of the corresponding primitive
     * wrapper class; otherwise, it must be a type assignable to the
     * declared return type.  If the value returned by this method is
     * {@code null} and the interface method‘s return type is
     * primitive, then a {@code NullPointerException} will be
     * thrown by the method invocation on the proxy instance.  If the
     * value returned by this method is otherwise not compatible with
     * the interface method‘s declared return type as described above,
     * a {@code ClassCastException} will be thrown by the method
     * invocation on the proxy instance.
     * @throws Throwable the exception to throw from the method
     *                   invocation on the proxy instance.  The exception‘s type must be
     *                   assignable either to any of the exception types declared in the
     *                   {@code throws} clause of the interface method or to the
     *                   unchecked exception types {@code java.lang.RuntimeException}
     *                   or {@code java.lang.Error}.  If a checked exception is
     *                   thrown by this method that is not assignable to any of the
     *                   exception types declared in the {@code throws} clause of
     *                   the interface method, then an
     *                   {@link UndeclaredThrowableException} containing the
     *                   exception that was thrown by this method will be thrown by the
     *                   method invocation on the proxy instance.
     * @see UndeclaredThrowableException
     */
    // InvocationHandler接口为我们定义的方法,传入的参数为 代理,代理方法,以及我们的参数
    public Object invoke(Object proxy, Method method, Object[] args) throws Throwable {
        this.transaction.before();
        method.invoke(this.target, args);
        this.transaction.after();
        // 我们这个没有输出,所以直接返回null
        return null;
    }
}
接下来我们看一下测试
package com.yang.test;

import com.yang.Transaction.ObjectInterceptor;
import com.yang.Transaction.Transaction;
import com.yang.Uservice.Impl.UserServiceImpl;
import com.yang.Uservice.UserService;
import com.yang.bean.User;

import java.lang.reflect.Proxy;

public class TestUser {

    public static void main(String[] args) {
        // 目标类
        Object target = new UserServiceImpl();
        // 我们的事务类
        Transaction transaction = new Transaction();

        // 代理类
        ObjectInterceptor objectInterceptor = new ObjectInterceptor(target, transaction);

        // 使用Proxy.newProxyInstance为我们返回代理类,从参数可以看出,他必须要实现接口,否则无法传值* Returns a proxy instance for the specified interfaces
        UserService userService = (UserService) Proxy.newProxyInstance(target.getClass().getClassLoader(), target.getClass().getInterfaces(), objectInterceptor);
        userService.addUser(new User(1,"ming"));
        userService.deleteUser(1);

    }
}
-----will do something before you---
will add a userUser{id=1, name=‘ming‘}
-----will do something after you-----
-----will do something before you---
will delete user:1
-----will do something after you-----
我们发现使用动态代理就算业务层代码发生了修改,我们也不必去重新写,那接下来看一下这个CGLICB的动态代理,直接看代理类以及测试接口
注意如果使用chlib需要导包
 <!--引入cglib包-->
        <dependency>
            <groupId>cglib</groupId>
            <artifactId>cglib</artifactId>
            <version>2.2</version>
        </dependency>
代理类
package yang.Transaction;

import net.sf.cglib.proxy.Enhancer;
import net.sf.cglib.proxy.MethodInterceptor;
import net.sf.cglib.proxy.MethodProxy;

import java.lang.reflect.Method;

public class CglibProxy implements MethodInterceptor {
    private Enhancer enhancer = new Enhancer();
    private Transaction transaction;


    // 构造函数,传入增强类
    public CglibProxy(Transaction transaction) {
        this.transaction = transaction;
    }

    // 设置被代理对象
    public Object getProxy(Class clazz){
        // 将目标类设置为父类
        enhancer.setSuperclass(clazz);
        enhancer.setCallback(this);
        return enhancer.create();
    }

    // object原对象, objects 参数,method调用方法
    public Object intercept(Object o, Method method, Object[] objects, MethodProxy methodProxy) throws Throwable {
        // 前置增强
        this.transaction.before();
        // 调用方法,可以从invokeSuper猜测出他这是通过反射调用父类的方法,正如我们所说的,cglib就是创建一个目标对象的子类
        Object invoke = methodProxy.invokeSuper(o, objects);
        // 后置增强
        this.transaction.after();
        return invoke;
    }
}
测试接口
package com.yang.test;

import yang.Transaction.CglibProxy;
import yang.Transaction.Transaction;
import yang.Uservice.Impl.UserServiceImpl;
import yang.bean.User;

public class TestUser {
    public static void main(String[] args) {
        // 实例化增强类
        Transaction transaction = new Transaction();
        // 创建我们的代理类
        CglibProxy cglibProxy = new CglibProxy(transaction);
        // 调用代理类方法,生成代理对象,从这里面可以看出,我们是直接使用类进行实现的,没有用到接口
        UserServiceImpl userService = (UserServiceImpl) cglibProxy.getProxy(UserServiceImpl.class);
        userService.addUser(new User(1, "ming"));
        userService.deleteUser(1);
    }
}
基本代理我们已经差不多讲清楚了,应该对代理模式有个比较清楚的认识了,接下来我们看一下spring的AOP的实现,AOP其实就是使用动态代理实现的,如果是接口的话,默认使用jdk,否否则才会使用cglib
接下来直接看使用bean来实现的
业务层除了UserService人为制造了一个bug,其他的都没变,因此业务层代码只看UserService。
UserService
package yang.UserService.Impl;

import yang.UserService.UserService;
import yang.bean.User;

// 基本业务层代码,没啥好说的
public class UserServiceImpl implements UserService {
    public void addUser(User user) {
        // 抛出异常
        System.out.println(1 / 0);
        System.out.println("will add a user" + user);
    }

    public void deleteUser(int userID) {
        System.out.println("will delete user:" + userID);
    }
}
接下来看一下引入的包pom
<dependencies>
        <dependency>
            <groupId>aopalliance</groupId>
            <artifactId>aopalliance</artifactId>
            <version>1.0</version>
        </dependency>
        <dependency>
            <groupId>org.aspectj</groupId>
            <artifactId>aspectjweaver</artifactId>
            <version>1.8.10</version>
        </dependency>
        <dependency>
            <groupId>org.springframework</groupId>
            <artifactId>spring-aspects</artifactId>
            <version>4.3.7.RELEASE</version>
        </dependency>

        <dependency>
            <groupId>org.springframework</groupId>
            <artifactId>spring-context</artifactId>
            <version>5.2.2.RELEASE</version>
        </dependency>

        <dependency>
            <groupId>org.springframework</groupId>
            <artifactId>spring-core</artifactId>
            <version>5.2.2.RELEASE</version>
        </dependency>

        <dependency>
            <groupId>org.springframework</groupId>
            <artifactId>spring-beans</artifactId>
            <version>5.2.2.RELEASE</version>
        </dependency>
        <dependency>
            <groupId>org.springframework</groupId>
            <artifactId>spring-context-support</artifactId>
            <version>5.2.2.RELEASE</version>
        </dependency>

        <dependency>
            <groupId>org.springframework</groupId>
            <artifactId>spring-expression</artifactId>
            <version>5.2.2.RELEASE</version>
        </dependency>

        <dependency>
            <groupId>org.springframework</groupId>
            <artifactId>spring-test</artifactId>
            <version>5.2.2.RELEASE</version>
        </dependency>

        <!--日志-->
        <dependency>
            <groupId>log4j</groupId>
            <artifactId>log4j</artifactId>
            <version>1.2.14</version>
        </dependency>

        <!--单元测试包-->
        <dependency>
            <groupId>junit</groupId>
            <artifactId>junit</artifactId>
            <version>4.12</version>
            <scope>test</scope>
        </dependency>


    </dependencies>
看一下我们的增强类
package yang.Transaction;

import org.aspectj.lang.ProceedingJoinPoint;

// 这个就是我们的事务类
public class Transaction {

    // 定义在方法之前调用的,也就是AOP中的前置通知
    public void before() {
        System.out.println("-----will do something before you---");
    }

    // 定义一个在方法之后调用的增强功能,也就是AOP中后置通知,如果出现错误不执行
    public void afterReturning() {
        System.out.println("-----will do something after you-----");
    }

    // 环绕增强,point就是切入点,可以让程序按照我们既定方针执行
    public Object aroundMethod(ProceedingJoinPoint point) {
        Object o = null;
        try {
            System.out.println("-----will do something before you---");
            o = point.proceed();
            System.out.println("-----will do something after you-----");
        } catch (Throwable e) {
            System.out.println("-----get error-----" + e.getMessage());
            e.printStackTrace();
        } finally {
            System.out.println("-----after all done ------------");
        }
        return o;
    }

    // 这个是出现错误执行的
    public void afterException() {
        System.out.println("-----get error-----");
    }

    // 这个是最终执行的,也就是相当于finally的方法
    public void after() {
        System.out.println("-----after all done ------------");
    }
}
我们来看一下spring的bean是如何实现的
<?xml version="1.0" encoding="UTF-8"?>
<beans xmlns="http://www.springframework.org/schema/beans"
       xmlns:xsi="http://www.w3.org/2001/XMLSchema-instance" xmlns:aop="http://www.springframework.org/schema/aop"
       xsi:schemaLocation="http://www.springframework.org/schema/beans http://www.springframework.org/schema/beans/spring-beans.xsd http://www.springframework.org/schema/aop https://www.springframework.org/schema/aop/spring-aop.xsd">

    <!--配置我们的通知对象-->
    <bean name="advice" class="yang.Transaction.Transaction" />

    <!--配置我们饿对象-->
    <bean name="userService" class="yang.UserService.Impl.UserServiceImpl" />

    <!--织入目标对象-->
    <aop:config>
        <!--
            切入点顾名思义就是从哪里切入程序的
            设置切入点execution一共有四个参数
            第一个:修饰符,可忽略不写
            第二个:返回值类型,填写*代表所有
            第三个:全限定类名,一般写到类之后的*代表所有方法
            第四个:(..)参数类型,这个符号代表所有类型
        -->
        <aop:pointcut id="pointcut" expression="execution(* yang.UserService.*.*ServiceImpl.*(..))" />
        <!--设置切入的方法, 增强类使用ref注入我们定义的advice-->
        <aop:aspect ref="advice">
            <!--前置增强,在定义的pointcut点切入-->
            <aop:before method="before" pointcut-ref="pointcut"/>
            <!--后置增强,在没有错误的情况下,在定义的pointcut点切入-->
            <aop:after-returning method="afterReturning" pointcut-ref="pointcut" />
            <!--环绕增强,会完整的执行我们既定的流程,在定义的pointcut点切入-->
            <aop:around method="aroundMethod" pointcut-ref="pointcut" />
            <!--出现错误增强,在定义的pointcut点切入-->
            <aop:after-throwing method="afterException" pointcut-ref="pointcut" />
            <!--最终增强,不管有没有错误,最终都会走这个方法,在定义的pointcut点切入-->
            <aop:after method="after" pointcut-ref="pointcut" />
        </aop:aspect>
    </aop:config>

</beans>
最终看一下我们的测试类
package yang.test;

import org.junit.Test;
import org.springframework.context.ApplicationContext;
import org.springframework.context.support.ClassPathXmlApplicationContext;
import yang.UserService.UserService;
import yang.bean.User;

public class TestUser {

    @Test
    public void test() {
        // 引入context
        ApplicationContext context = new ClassPathXmlApplicationContext("applicationContext.xml");
        UserService userService = context.getBean("userService", UserService.class);
        userService.addUser(new User(1, "ming"));
        userService.deleteUser(1);
    }
}
//
-----will do something before you---
-----will do something before you---
-----after all done ------------
-----get error-----
-----get error-----/ by zero
java.lang.ArithmeticException: / by zero
-----will do something after you-----
-----will do something before you---
-----will do something before you---
will delete user:1
-----after all done ------------
-----will do something after you-----
-----after all done ------------
-----will do something after you-----
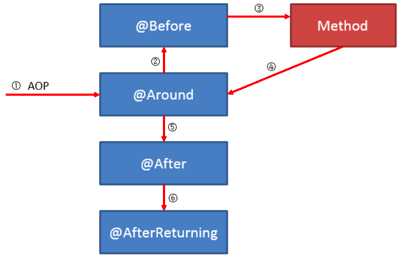
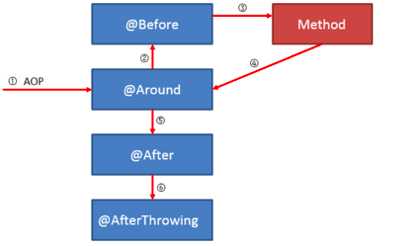
我们可以发现spring的AOP帮助我们自动实现了代理,这个时候可能有一点小小的疑问,为什么after的打印结果会跟afterException与afterReturning结果靠后呢,首先这个跟代码的顺序无关,这个只是spring这样打印的,我们来看一张图就明白了,第一张图是正常情况,第二张图是异常情况,我们可以确认after确实是先执行


接下来我们来看一下我们最终会进行使用的注解方式的AOP,注解方式就是会删除所有的bean那我们来看一下代码
UserService
package yang.UserService.Impl;

import org.springframework.stereotype.Service;
import yang.UserService.UserService;
import yang.bean.User;

// 基本业务层代码,没啥好说的
@Service
public class UserServiceImpl implements UserService {
    public void addUser(User user) {
        // 抛出异常
        System.out.println(1 / 0);
        System.out.println("will add a user" + user);
    }

    public void deleteUser(int userID) {
        System.out.println("will delete user:" + userID);
    }
}
接下来看一下applicationContext文件
    <!--这个就是扫描注解,之前用过-->
    <context:component-scan base-package="yang.*" />
    <!--配置这个,使用注解自动帮助我们加载所需-->
    <aop:aspectj-autoproxy />
我们看一下增强类的实现
package yang.Transaction;

import org.aspectj.lang.ProceedingJoinPoint;
import org.aspectj.lang.annotation.*;
import org.springframework.stereotype.Component;

// 这个就是我们的事务类
@Component
@Aspect // 声明这是一个切片类
public class Transaction {
    // 使用这个可以声明一个切入点,这样后续就可以直接引用
    @Pointcut(value = "execution(* yang.UserService.Impl.*.*(..))")
    public void pointcut() {
    }

    // 定义在方法之前调用的,也就是AOP中的前置通知
    @Before("Transaction.pointcut()")
    public void before() {
        System.out.println("-----will do something before you---");
    }

    // 定义一个在方法之后调用的增强功能,也就是AOP中后置通知,如果出现错误不执行
    @AfterReturning(value = "Transaction.pointcut()", returning = "val")
    public void afterReturning(Object val) {
        System.out.println("-----will do something after you-----" + val);
    }

    // 环绕增强,point就是切入点,可以让程序按照我们既定方针执行
    @Around("Transaction.pointcut()")
    public Object aroundMethod(ProceedingJoinPoint point) {
        Object o = null;
        try {
            System.out.println("-----will do something before you---");
            o = point.proceed();
            System.out.println("-----will do something after you-----");
        } catch (Throwable e) {
            System.out.println("-----get error-----" + e.getMessage());
            e.printStackTrace();
        } finally {
            System.out.println("-----after all done ------------");
        }
        return o;
    }

    // 这个是出现错误执行的
    @AfterThrowing(value = "Transaction.pointcut()", throwing = "ex")
    public void afterException(Exception ex) {
        System.out.println("-----get error-----" + ex.getMessage());
    }

    // 这个是最终执行的,也就是相当于finally的方法
    @After("Transaction.pointcut()")
    public void after() {
        System.out.println("-----after all done ------------");
    }
}
最终看一下测试类以及测试结果
package com.yang.test;

import org.junit.Test;
import org.junit.runner.RunWith;
import org.springframework.beans.factory.annotation.Autowired;
import org.springframework.test.context.ContextConfiguration;
import org.springframework.test.context.junit4.SpringJUnit4ClassRunner;
import yang.UserService.UserService;
import yang.bean.User;

@RunWith(SpringJUnit4ClassRunner.class)
@ContextConfiguration("classpath:applicationContext.xml")
public class TestUser {

    @Autowired
    UserService userService;

    @Test
    public void test() {
        userService.addUser(new User(1, "ming"));
        userService.deleteUser(1);
    }
}
//
-----will do something before you---
-----will do something before you---
-----get error-----/ by zero
java.lang.ArithmeticException: / by zero
-----after all done ------------
-----after all done ------------
-----will do something after you-----null
-----will do something before you---
-----will do something before you---
will delete user:1
-----will do something after you-----
-----after all done ------------
-----after all done ------------
-----will do something after you-----null
可以发现注解的方法简单快速,而且Spring封装之后,我们不用再去写代理类,简单很多,我们要记得aop的实现原理就是动态代理,默认会使用jdk代理,如果没有接口,才会使用cglib代理。
标签:简单 private autowire sse null 如何 schema getc interface
原文地址:https://www.cnblogs.com/yangshixiong/p/12194540.html