标签:操作 xxxx res erp 根据 loader 代码 sde pat
Webpack介绍Webpack是什么
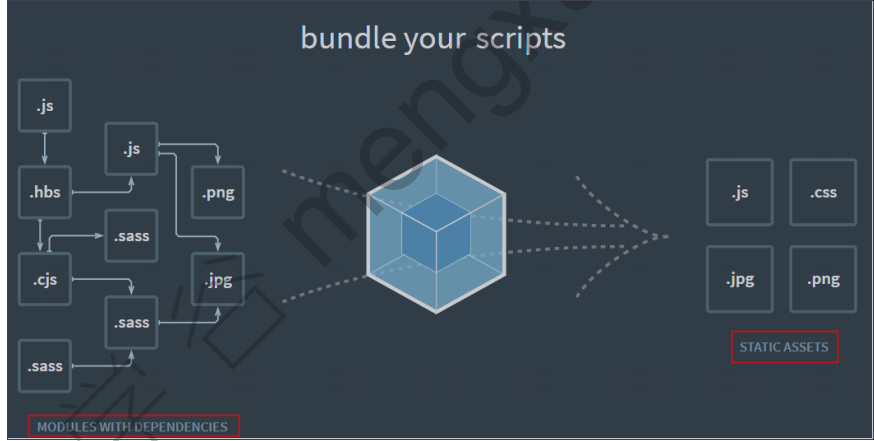
webpack是前端方面的静态资源打包工具,能够让浏览器也支持模块化,他会根据模块的依赖关系进行静态分析,然后按照某种规则生成静态资源
WebPack的作用webpack的核心主要是进行JavaScript资源打包png,sass,less,css,js等多个文件打包成一个文件,减少页面的请求http 服务器babel工具,实现ECMAScript6和5的转换,解决兼容问题
Webpack安装和案例Webpack 全局安装安装webpack
安装webpack
npm install -g webpack
或者 安装最新版webpack
npm install -g webpack@<version>如果安装的是web pack4 以上的版本,还需要安装Webpack-Cli
npm install -g webpack-cli 可以通过npm root -g 查看全局安装目录
Webpack快速入门VSCode中安装node Snippets有代码提示Webpack模块webpack xxx -o yyyyyy文件yyy文件,就不会出现 require is not define 这个问题webpack.confifig.js每当修改js文件,都要webpack重新打包,打包时还要指定入口和出口,都非常麻烦,通过配置文件进行修改
编写webpack.config.js
//引入path是为了解决路径的小工具
const path=require("path");

module.export={
    //入口文件
    entry:"./src/main.js",
    //出口  出口是一个对象
    output:{
      path:path.join(__dirname,'./dist/'),
        filename:'build.js'
  }
}编写package.json
{
    "script": {
        "show": "webpack -v",
        "start": "node xxx",
        "build": "webpack"
    }
}EcmaScript6行为规范module.exports )require )webpack 本身具有打包JavaScript文件的能力,如果需要打包其他类型文件,则需要使用插件,这些插件被称为加载器( Loader )require和import 来引入不同的文件类型了CSS文件安装 style-loader 和 css-loader依赖
npm install -D style-loader css-loader
修改webpack.config.js
const path = require("path");

module.exports = {
    mode: "none",
    entry: "xxx", //入口文件
    output: {
     path: path.join(__dirname,"xx") //输出文件路径
        filename: "xxxx.yy"  //输出文件的名字
 },
    module: {
        rules: [
            {
                test: /\.css$/,  //匹配后缀名为css的文件
                use: [
                    "style-loader",
                    "css-loader"
                ]
            }
        ]
    }
}Images资源文件安装file-loader依赖
npm install -D file-loader
修改webpack.config.js
const path = require("path");

module.exports = {
    mode: "none",
    entry: "xxx",
    output: {
        path: path.join(__dirname,"xxx"),
        filename: "name"
    },
    module: {
        rules: [
            {
                test: /\.css$/,
                use: [
                    "style-less",
                    "css-less"
                ]
            },
            {
                test: /\.(png|jpg|svg|fig)$/,
                use: [
                    "file-loader"
                ]
            }
        ]
    }
}HtmlWebpackPlugin插件index.html 打包到build.js所在的目录当中安装插件
npm install -D html-webpack-plugin
修改webpack.config.js
plugins: [
    new HtmlWebpackPlugin({
        template:'./index.html'
    })
]修改index.html文件
//不需要再引入<srcipt src="xxxx.js">问题:
每一次手动打包很麻烦,打包之后还需要手动刷新浏览器
解决:
采用webpack提供的工具: webpack-dev-server , 他无需打包和手动刷新浏览器,会自动打包,提高开发效率
安装依赖:
npm install -D webpack-dev-server修改webpack.config.js:
const path = require("path");
const htmlWebPackPlugin = require("html-webpack-plugin");

module.exports = {
    mode: "none",
    entry: "xxx",  //入口文件
    output: {
        path: path.join(__dirname,xxx),
        filename: xxxx
    },
    //实现重新加载
    devServer:{
        contentBase: './dist'
    }
}修改package.json
{
    "scripts":{
        "show": "webpac -v",
        "dev": "webapck-dev-server --open"
    }
}npm install -D babel-loader @babel/core @babel/preset-env
Webpack.config.jsmodule: {
rules: [
{
test: /\.m?js$/,
exclude: /(node_modules|bower_components)/, //排除的目录
use: {
loader: "babel-loader",
options: {
presets: ["@babel/preset-env"] //内置好的转译工具
}
}
}
]
}Main.js代码const a=1;
const arr = [1,2,3];
arr.foreach(item=>{
console.log(item)
})Vue-loader打包Vue单文件组件安装vue-loader和vue-template-compiler依赖
npm install -D vue-loader vue-template-compiler
修改webpack.config.js配置:
const VueLoaderPlugin = require("vue-loader/lib/plugin")

module.exports = {
    //解析完整的Vue
    resolve: {
      alias: {
          'vue$': 'vue/dist/vue.js'
      }
    },
    module: {
        rules: [
            {
                test: /\.vue$/,
                loader: 'vue-loader'
            }
        ]
    },
    plugin: [
        //引入并且使用这个插件
        new VueLoaderPlugin()
    ]
}修改webpack.config.js的代码
const path = require("path");
const webpack = require("webpack");
const htmlWebpackPlugin = require("html-webpack-plugin");
const VueLoaderPlugin = require("vue-loader/lib/plugin");

module.exports={
    mode:"none",
    entry: "" ,
    output: {
        path: path.join(__dirname,xx),
        filename:xxx
    },
    devServer: {
        contentBase: 'xxx',
        hot: true
    },
    plugins: [
        //模块热替换
        new webpack.HotModuleReplacementPlugin(),
        //引入vue模块
        new VueLoaderPlugin(),
        new htmlWebpackPlugin({
            template: 'xxx'
        })
    ],
    modules: {
        rules: [
            {
                test: /\.css$/,
                use: [
                    'style.loader',
                    'css-loader'
                ]
            },
            {
              test: /\.(png|svg|jpg|gif)$/,
              use: [
                    'file-loader'
                ]
            },
            {
                test: /\.vue$/,
                use: [
                    'vue-loader'
                ]
            }
        ]
    }
}package.json的配置proxy 字段这个字段主要是用来解决跨域的问题
设置
"proxy": "http://localhost:9093"使用
axios.get('/data').then((res)=>{
  console.log(res);
})
用来运行npm脚本
"scripts": {
    "preinstall": "echo here it comes!",
    "postinstall": "echo there it goes!",
    "start": "node index.js",
    "test": "tap test/*.js"
}
使用的时候运行 npm run xxx对应上面的具体命令
用来指定内部可以执行文件的位置
{
    "bin":{
        "xxx": "xxx/xxx/xxx.js"
    }
}
```“repository”: {
“repository”: {
“type”: “git”,
“url”: “git+https://github.com/XXXX”
},
“author”: “mayuan”,
“license”: “ISC”,
“bugs”: {
“url”: “https://github.com/XXXX”
}
```
标签:操作 xxxx res erp 根据 loader 代码 sde pat
原文地址:https://www.cnblogs.com/sunhang32/p/12202546.html