标签:alt blog connect onclick wired executor button extends www
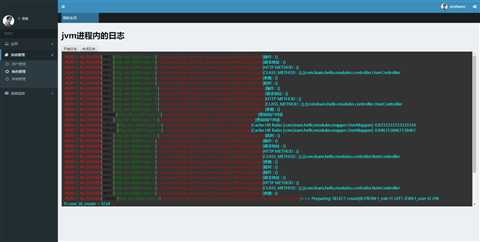
以前面的博客为基础,最近一篇为Spring Boot 入门(十):集成Redis哨兵模式,实现Mybatis二级缓存。本篇博客主要介绍了Spring Boot集成 Web Socket进行日志的推送,并实时显示在页面上。
第一个jar包是websocket的,第二个jar包是关于环形队列的jar包,本案例是通过本地队列存储日志。有条件的话,最好通过中间件存储(eg:redis,mq……)。通过本地队列存储日志会存在日志丢失的情况,且日志量太大,会把页面卡死。
 1  <!--begin web socket-->
 2         <dependency>
 3             <groupId>org.springframework.boot</groupId>
 4             <artifactId>spring-boot-starter-websocket</artifactId>
 5         </dependency>
 6         <dependency>
 7             <groupId>com.lmax</groupId>
 8             <artifactId>disruptor</artifactId>
 9             <version>3.4.2</version>
10         </dependency>
11         <!--end web socket-->
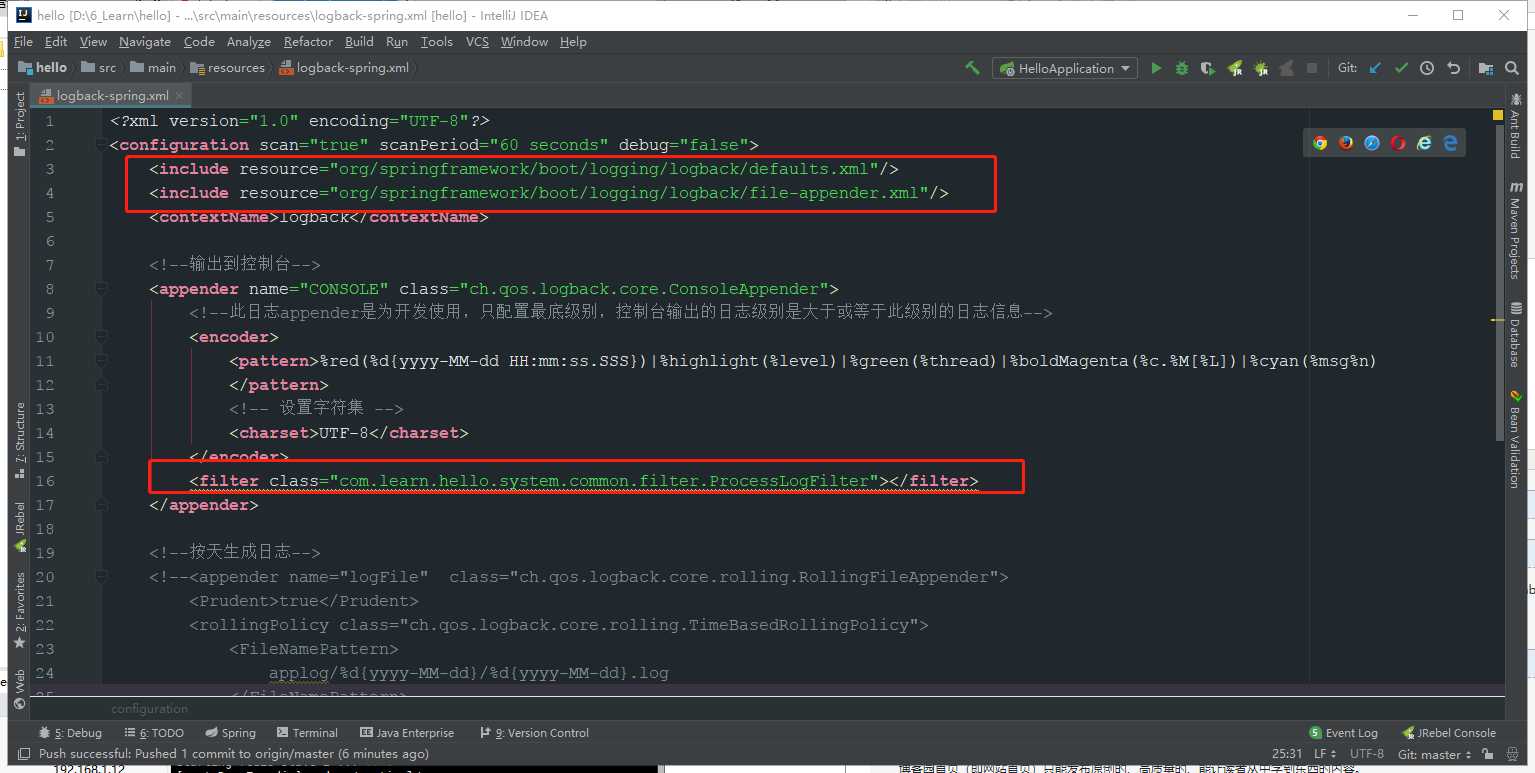
(1).在logback中增加监听器

并根据logback编写相应的监听器ProcessLogFilter
 1 @Service
 2 public class ProcessLogFilter extends Filter<ILoggingEvent> {
 3
 4     @Override
 5     public FilterReply decide(ILoggingEvent event) {
 6         LoggerMessage loggerMessage = new LoggerMessage(
 7                 event.getMessage()
 8                 , DateFormat.getDateTimeInstance().format(new Date(event.getTimeStamp())),
 9                 event.getThreadName(),
10                 event.getLoggerName(),
11                 event.getLevel().levelStr
12         );
13         LoggerDisruptorQueue.publishEvent(loggerMessage);
14         return FilterReply.ACCEPT;
15     }
16 }
该监听器将监听的日志消息推送到本地消息队列中,然后页面通过 Web Socket 去此队列获取日志信息,从而在页面显示
(2).编写日志处理器
1 //进程日志事件内容载体
2 @Data
3 @NoArgsConstructor
4 @AllArgsConstructor
5 public class LoggerEvent {
6     private LoggerMessage log;
7 }
1 /**
2  * Content :进程日志事件工厂类
3  */
4 public class LoggerEventFactory implements EventFactory<LoggerEvent> {
5     @Override
6     public LoggerEvent newInstance() {
7         return new LoggerEvent();
8     }
9 }
 1 /**
 2  * Content :进程日志事件处理器
 3  */
 4 @Component
 5 public class LoggerEventHandler implements EventHandler<LoggerEvent> {
 6
 7     @Autowired
 8     private SimpMessagingTemplate messagingTemplate;
 9
10     @Override
11     public void onEvent(LoggerEvent stringEvent, long l, boolean b) {
12         messagingTemplate.convertAndSend("/topic/pullLogger", stringEvent.getLog());
13     }
14 }
日志事件处理器的作用是监听本地环形队列中的消息,如果有消息,就会将这些消息推送到 Socket 管道中
(3).编写页面
 1 <!DOCTYPE html>
 2 <html>
 3 <head>
 4     <meta charset="utf-8">
 5     <meta http-equiv="X-UA-Compatible" content="IE=edge">
 6     <title>欢迎页</title>
 7     <meta content="width=device-width, initial-scale=1, maximum-scale=1, user-scalable=no" name="viewport">
 8     <script src="plugins/jQuery/jquery-2.2.3.min.js"></script>
 9     <script src="js/websocket/sockjs.min.js"></script>
10     <script src="js/websocket/stomp.min.js"></script>
11 </head>
12 <body>
13 <div class="panel panel-default">
14     <h1>jvm进程内的日志</h1>
15     <button onclick="openSocket()">开启日志</button>
16     <button onclick="closeSocket()">关闭日志</button>
17     <div id="log-container" style="height: 600px; overflow-y: scroll; background: #333; color: #aaa; padding: 10px;">
18         <div></div>
19     </div>
20 </div>
21 <script>
22     var stompClient = null;
23     $(document).ready(function () {
24         openSocket();
25     });
26
27     function openSocket() {
28         if (stompClient == null) {
29             var socket = new SockJS(‘http://localhost:8080/websocket?token=kl‘);
30             stompClient = Stomp.over(socket);
31             stompClient.connect({token: "kl"}, function (frame) {
32                 stompClient.subscribe(‘/topic/pullLogger‘, function (event) {
33                     var content = JSON.parse(event.body);
34                     $("#log-container div").append("<font color=‘red‘>" + content.timestamp + "</font>|<font color=‘highlight‘>" + content.level + "</font> |<font color=‘green‘>" + content.threadName + "</font>| <font color=‘boldMagenta‘>" + content.className + "</font>|<font color=‘cyan‘>" + content.body + "</font>").append("<br/>");
35                     $("#log-container").scrollTop($("#log-container div").height() - $("#log-container").height());
36                 }, {
37                     token: "kltoen"
38                 });
39             });
40         }
41     }
42
43     function closeSocket() {
44         if (stompClient != null) {
45             stompClient.disconnect();
46             stompClient = null;
47         }
48     }
49 </script>
50 </body>
51 </html>
页面链接web Socket服务器,如果有消息,就能获取
(4).其他辅助类
环形本地队列类
 1 package com.learn.hello.system.common.queue;
 2
 3 import com.learn.hello.modules.entity.LoggerMessage;
 4 import com.learn.hello.system.common.event.LoggerEvent;
 5 import com.learn.hello.system.common.event.LoggerEventFactory;
 6 import com.learn.hello.system.common.event.LoggerEventHandler;
 7 import com.lmax.disruptor.RingBuffer;
 8 import com.lmax.disruptor.dsl.Disruptor;
 9 import org.springframework.beans.factory.annotation.Autowired;
10 import org.springframework.stereotype.Component;
11
12 import java.util.concurrent.Executor;
13 import java.util.concurrent.Executors;
14
15 /**
16  * Content :Disruptor 环形队列
17  */
18 @Component
19 public class LoggerDisruptorQueue {
20
21     private Executor executor = Executors.newCachedThreadPool();
22
23     // The factory for the event
24     private LoggerEventFactory factory = new LoggerEventFactory();
25
26
27     // Specify the size of the ring buffer, must be power of 2.
28     private int bufferSize = 2 * 1024;
29
30     // Construct the Disruptor
31     private Disruptor<LoggerEvent> disruptor = new Disruptor<>(factory, bufferSize, executor);
32     ;
33
34
35     private static RingBuffer<LoggerEvent> ringBuffer;
36
37
38     @Autowired
39     LoggerDisruptorQueue(LoggerEventHandler eventHandler) {
40         disruptor.handleEventsWith(eventHandler);
41         this.ringBuffer = disruptor.getRingBuffer();
42         disruptor.start();
43     }
44
45     public static void publishEvent(LoggerMessage log) {
46         long sequence = ringBuffer.next();  // Grab the next sequence
47         try {
48             LoggerEvent event = ringBuffer.get(sequence); // Get the entry in the Disruptor
49             // for the sequence
50             event.setLog(log);  // Fill with data
51         } finally {
52             ringBuffer.publish(sequence);
53         }
54     }
55
56 }
消息实体类
 1 package com.learn.hello.modules.entity;
 2
 3 import lombok.AllArgsConstructor;
 4 import lombok.Data;
 5 import lombok.NoArgsConstructor;
 6
 7 // 日志实体类
 8 @Data
 9 @AllArgsConstructor
10 @NoArgsConstructor
11 public class LoggerMessage {
12     private String body;
13     private String timestamp;
14     private String threadName;
15     private String className;
16     private String level;
17 }

页面中的颜色可以自行设置
.
Spring Boot 入门(十一):集成 WebSocket, 实时显示系统日志
标签:alt blog connect onclick wired executor button extends www
原文地址:https://www.cnblogs.com/dz-boss/p/12203735.html