标签:还需 如何使用 完成后 结果 rom creat ace width null
本章节我们为大家介绍 Java 如何使用 使用 JDBC 连接 MySQL 数据库。
Java 连接 MySQL 需要驱动包,最新版下载地址为:http://dev.mysql.com/downloads/connector/j/,解压后得到jar库文件,然后在对应的项目中导入该库文件。
你可以下载本站提供的 jar 包:mysql-connector-java-5.1.39-bin.jar
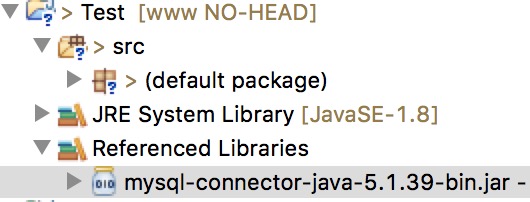
本实例使用的是 Eclipse,导入 jar 包:

MySQL 8.0 以上版本的数据库连接有所不同:
1、MySQL 8.0 以上版本驱动包版本 mysql-connector-java-8.0.16.jar。
2、com.mysql.jdbc.Driver 更换为 com.mysql.cj.jdbc.Driver。
MySQL 8.0 以上版本不需要建立 SSL 连接的,需要显示关闭。
最后还需要设置 CST。
加载驱动与连接数据库方式如下:
Class.forName("com.mysql.cj.jdbc.Driver");
conn = DriverManager.getConnection("jdbc:mysql://localhost:3306/test_demo?useSSL=false&serverTimezone=UTC","root","password");
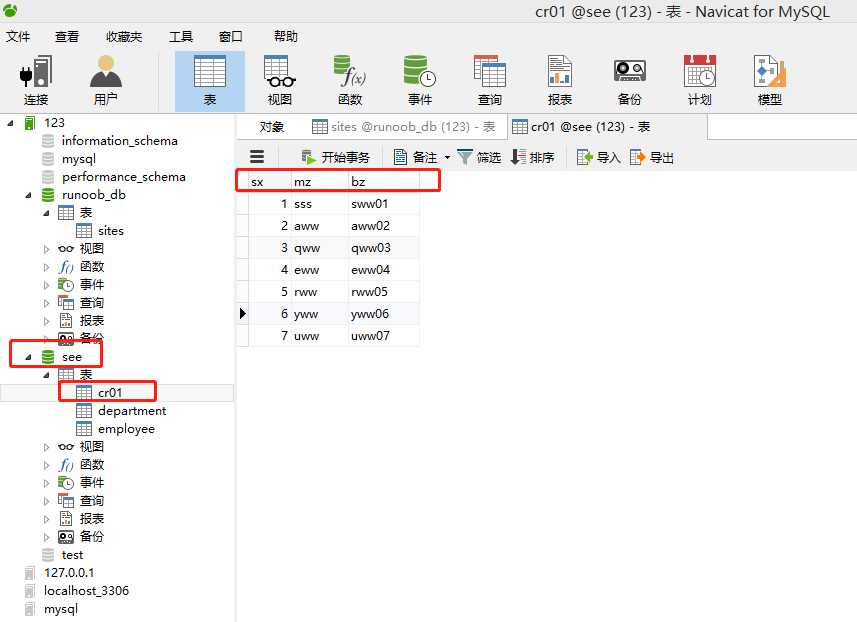
数据库数据

以下实例使用了 JDBC 连接 MySQL 数据库,注意一些数据如用户名,密码需要根据你的开发环境来配置:
package rjcs;
import java.sql.*;
public class lianjmysql
{

     // MySQL 8.0 以下版本 - JDBC 驱动名及数据库 URL
    static final String JDBC_DRIVER = "com.mysql.jdbc.Driver";
    static final String DB_URL = "jdbc:mysql://localhost:3306/see";

    // MySQL 8.0 以上版本 - JDBC 驱动名及数据库 URL
    //static final String JDBC_DRIVER = "com.mysql.cj.jdbc.Driver";
    //static final String DB_URL = "jdbc:mysql://localhost:3306/RUNOOB?useSSL=false&serverTimezone=UTC";


    // 数据库的用户名与密码,需要根据自己的设置
    static final String USER = "root";
    static final String PASS = "123";

    public static void main(String[] args) {
        Connection conn = null;
        Statement stmt = null;
        try{

            Class.forName(JDBC_DRIVER);                               // 注册 JDBC 驱动


            System.out.println("连接数据库...");                       // 打开链接
            conn = DriverManager.getConnection(DB_URL,USER,PASS);


            System.out.println(" 实例化Statement对象...");       // 执行查询
            stmt = conn.createStatement();
            String sql;
            sql = "SELECT sx, mz, bz FROM cr01";
            ResultSet rs = stmt.executeQuery(sql);

            // 展开结果集数据库
            while(rs.next()){
                // 通过字段检索
                int sx  = rs.getInt("sx");
                String mz = rs.getString("mz");
                String bz = rs.getString("bz");

                // 输出数据
                System.out.print("ID: " + sx);
                System.out.print("  ,  名字: " + mz);
                System.out.print("  , 不知: " + bz);
                System.out.print("\n");
            }
            // 完成后关闭
            rs.close();
            stmt.close();
            conn.close();

        }catch(SQLException se)
        {
            // 处理 JDBC 错误
            se.printStackTrace();
        }catch(Exception e)
        {
            // 处理 Class.forName 错误
            e.printStackTrace();
        }finally

         {
            // 关闭资源
            try{
                if(stmt!=null) stmt.close();
            }catch(SQLException se2){
            }// 什么都不做
            try{
                if(conn!=null) conn.close();
            }catch(SQLException se){
                se.printStackTrace();
            }
        }
        System.out.println("Goodbye!");
    }


}
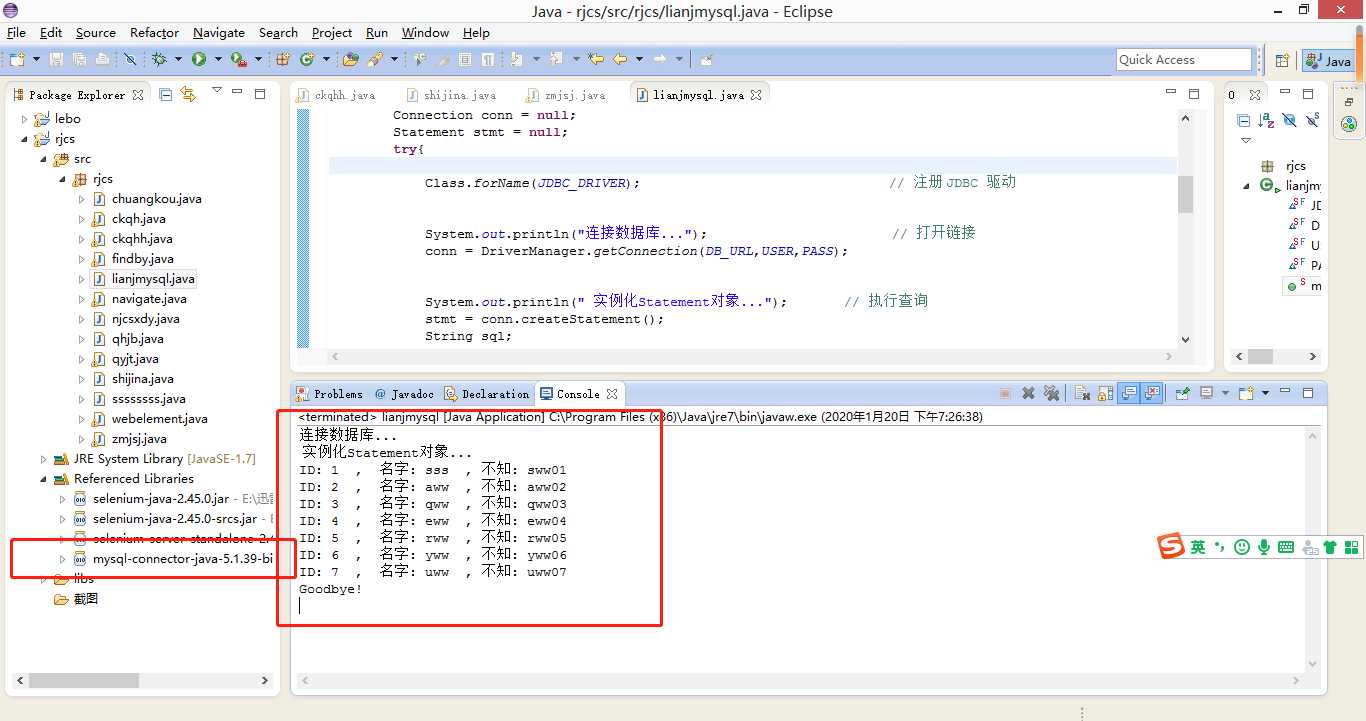
执行结果:
连接数据库...
实例化Statement对象...
ID: 1 , 名字: sss , 不知: sww01
ID: 2 , 名字: aww , 不知: aww02
ID: 3 , 名字: qww , 不知: qww03
ID: 4 , 名字: eww , 不知: eww04
ID: 5 , 名字: rww , 不知: rww05
ID: 6 , 名字: yww , 不知: yww06
ID: 7 , 名字: uww , 不知: uww07
Goodbye!

package rjcs;
import java.sql.*;
public class lianjmysql
{

     // MySQL 8.0 以下版本 - JDBC 驱动名及数据库 URL
    static final String JDBC_DRIVER = "com.mysql.jdbc.Driver";
    static final String DB_URL = "jdbc:mysql://localhost:3306/see";

    // MySQL 8.0 以上版本 - JDBC 驱动名及数据库 URL
    //static final String JDBC_DRIVER = "com.mysql.cj.jdbc.Driver";
    //static final String DB_URL = "jdbc:mysql://localhost:3306/RUNOOB?useSSL=false&serverTimezone=UTC";


    // 数据库的用户名与密码,需要根据自己的设置
    static final String USER = "root";
    static final String PASS = "123";

    public static void main(String[] args) {
        Connection conn = null;
        Statement stmt = null;
        try{

            Class.forName(JDBC_DRIVER);                               // 注册 JDBC 驱动


            System.out.println("连接数据库...");                       // 打开链接
            conn = DriverManager.getConnection(DB_URL,USER,PASS);


            System.out.println(" 实例化Statement对象...");       // 执行查询
            stmt = conn.createStatement();
            String sql;
            sql = "SELECT sx, mz, bz FROM cr01";
            ResultSet rs = stmt.executeQuery(sql);

            // 展开结果集数据库
            while(rs.next()){
                // 通过字段检索
                int sx  = rs.getInt("sx");
                String mz = rs.getString("mz");
                String bz = rs.getString("bz");

                // 输出数据
                System.out.print("ID: " + sx);
                System.out.print("  ,  名字: " + mz);
                System.out.print("  , 不知: " + bz);
                System.out.print("\n");
            }
            // 完成后关闭
            rs.close();
            stmt.close();
            conn.close();

        }catch(SQLException se){
            // 处理 JDBC 错误
            se.printStackTrace();
        }catch(Exception e){
            // 处理 Class.forName 错误
            e.printStackTrace();
        }finally{
            // 关闭资源
            try{
                if(stmt!=null) stmt.close();
            }catch(SQLException se2){
            }// 什么都不做
            try{
                if(conn!=null) conn.close();
            }catch(SQLException se){
                se.printStackTrace();
            }
        }
        System.out.println("Goodbye!");
    }


}
java下连接mysql数据库 ——查询语句——select
标签:还需 如何使用 完成后 结果 rom creat ace width null
原文地址:https://www.cnblogs.com/xiaobaibailongma/p/12219191.html