标签:ber 打开 create 默认 pac result resources each 启用
Spring Boot 是令人兴奋的新项目,它提供了四个主要的特性,能够改变开发Spring应用程序的方式。
1、Spring Boot Starter: 他将常用的依赖分组进行了整合,将其合并到一个依赖中,这样就可以一次性添加到项目的Maven或Gradle构建中。
2、自动配置: Spring Boot 的自动配置特性利用了Spring 4对条件化配置的支持,合理地推测应用所需的bean 并自动化配置它们。
3、命令行接口: Spring 的 CLI 发挥了Groovy 编程语言的优势,并结合自动配置进一步简化 Spring 应用的开发。
4、Actuator: 它为Spring Boot 应用添加了一定的管理特性。
我们要从头开始编写一个新的 Spring 应用。这是一个 Web 项目,所以需要 Spring MVC 。同时还要有 REST API 将资源暴露为 JSON ,所以在构建中需要包含Jackson JSON 库
首先让我们从添加依赖开始,新建一个 Gradle 项目,在 build.gradle dependency 添加以下内容:
    compile("org.springframework.boot:spring-boot-starter-web:1.1.4.RELEASE")
    compile("org.springframework.boot:spring-boot-starter-jdbc:1.1.4.RELEASE")
    compile("org.thymeleaf:thymeleaf-spring4:2.1.2.RELEASE")
    compile("com.h2database:h2:1.3.174")
Spring Boot 的 Starter 减少了构建中的依赖列表的长度,而 Spring Boot 的自动配置功能则缩减了 Spring 配置的数量。它在实现时,会考虑应用中的其他因素并推断你所需要的 Spring 配置。
Spring Boot Starter 也会触发自动配置。例如在 Spring Boot 应用中,如果我们想使用 Spring MVC 的话,所需要做的仅仅是将 Web Starter 作为依赖放入到构建中。将 Web Starter 放入到构建中以后,它会自动添加 Spring MVC 依赖。如果 Spring Boot 的 Web 自动配置探测到 Spring MVC 位于类路径下,它将会自动配置支持 Spring MVC 的多个 bean,包括视图解析器、资源处理器、以及消息转换器等等。
Spring Boot CLI 充分利用了Spring Boot Starter 和自动配置的魔力,并添加了一些 Groovy 的功能,它简化了 Spring 的开发流程,通过 CLI ,我们能够运行一个或多个 Groovy 脚本,并查看它是如何运行的。在应用的运行过程中,CLI 能够自动导入 Spring 类型并解析依赖。
Spring Boot Actuator 为 Spring Boot 项目带来了很多有用的特性,包括:
1、管理端点;
2、合理的异常处理以及默认的“/error”映射端点;
3、获取应用信息的“Info”端点;
4、当启用Spring Security 时,会有一个审计事件框架。
这里我们开发一个 Contacts 应用。
ContactController 为 Contacts 应用处理基本的 Web 请求。
package contacts;

import org.springframework.beans.factory.annotation.Autowired;
import org.springframework.stereotype.Controller;
import org.springframework.web.bind.annotation.RequestMapping;
import org.springframework.web.bind.annotation.RequestMethod;

import java.util.List;
import java.util.Map;

@Controller
@RequestMapping("/")
public class ContactController {

    private ContactRepository contactRepo;

    @Autowired
    public ContactController(ContactRepository contactRepo) {
        this.contactRepo = contactRepo;
    }

    @RequestMapping(method = RequestMethod.GET)
    public String home(Map<String,Object> model){
        List<Contact> contacts = contactRepo.findAll();
        model.put("contacts",contacts);
        return "home";
    }

    @RequestMapping(method = RequestMethod.POST)
    public String submit(Contact contact){
        contactRepo.save(contact);
        return "redirect:/";
    }


}
home()方法使用注入的 ContactRepository 来获取所有 Contact 对象的列表,并将它们放到模型当中,然后把请求转交给home视图。这个视图将会展现联系人的列表以及添加新的Contact 表单。submit()方法将会处理表单提交的POST请求,保存Contact,并重定向到首页。
Contact 是一个简单的POJO
package contacts;

public class Contact {
    private Long id;
    private String firstName;
    private String lastName;
    private String phoneNumber;
    private String emailAddress;

    public Long getId() {
        return id;
    }

    public void setId(Long id) {
        this.id = id;
    }

    public String getFirstName() {
        return firstName;
    }

    public void setFirstName(String firstName) {
        this.firstName = firstName;
    }

    public String getLastName() {
        return lastName;
    }

    public void setLastName(String lastName) {
        this.lastName = lastName;
    }

    public String getPhoneNumber() {
        return phoneNumber;
    }

    public void setPhoneNumber(String phoneNumber) {
        this.phoneNumber = phoneNumber;
    }

    public String getEmailAddress() {
        return emailAddress;
    }

    public void setEmailAddress(String emailAddress) {
        this.emailAddress = emailAddress;
    }
}
按照传统的方式,Java Web 应用会使用JSP作为视图层的技术。但是,Thymeleaf 的原生模板比 JSP 更加便于使用,而且它能够让我们以 HTML 的形式编写模板。鉴于此,我们会使用Thymeleaf 来定义 Contacts 应用的home视图。
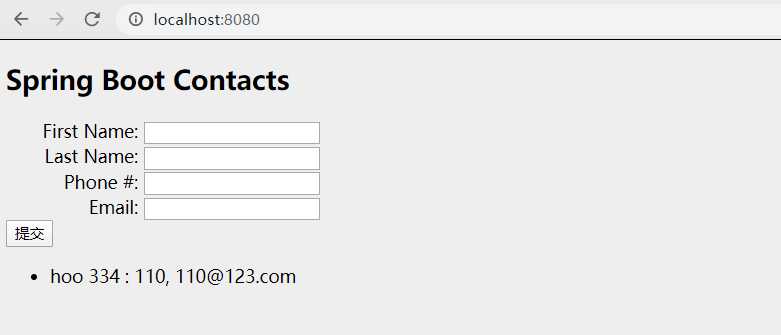
<!DOCTYPE html>
<html xmlns:th="http://www.thymeleaf.org">
  <head>
    <title>Spring Boot Contacts</title>
    <link rel="stylesheet" th:href="@{/style.css}" />
  </head>

  <body>
    <h2>Spring Boot Contacts</h2>
    <form method="POST">
      <label for="firstName">First Name:</label>
      <input type="text" name="firstName"></input><br/>
      <label for="lastName">Last Name:</label>
      <input type="text" name="lastName"></input><br/>
      <label for="phoneNumber">Phone #:</label>
      <input type="text" name="phoneNumber"></input><br/>
      <label for="emailAddress">Email:</label>
      <input type="text" name="emailAddress"></input><br/>
      <input type="submit"></input>
    </form>

    <ul th:each="contact : ${contacts}">
      <li>
        <span th:text="${contact.firstName}">First</span>
        <span th:text="${contact.lastName}">Last</span> :
        <span th:text="${contact.phoneNumber}">phoneNumber</span>,
        <span th:text="${contact.emailAddress}">emailAddress</span>
      </li>
    </ul>
  </body>
</html>
只要我们将 Thymeleaf 添加到项目的类路径下,就启用了 Spring Boot 的自动配置。当应用运行时,Spring Boot 将会探测到类路径中的Thymeleaf,然后会自动配置视图解析器,模板解析器以及模板引擎,这些都是在 Spring MVC 中使用 Thymeleaf所需要的。因此,在我们的应用中,不需要使用显示 Spring 配置的方式来定义 Thymeleaf。
ContactController 中 home() 方法返回的逻辑视图名为 home ,因此模板文件名为 home.html,自动配置的模板解析器会在指定的目录下查找Thymeleaf模板,这个目录也就是相对根类目录下的templates目录下 ,所以在Maven或Gradle项目中,我们需要将home.html放到“src / main / resources / templates” 中。这个模板中使用了style.css文件,我们倾向于将静态资源放入“src / main / resources / public”目录下。
style.css
body {
  background-color: #eeeeee;
  font-family: sans-serif;
}

label {
  display: inline-block;
  width: 120px;
  text-align: right;
}
持久化数据
ContactRepository 能够从数据库中存取 Contact
package contacts;

import org.springframework.beans.factory.annotation.Autowired;
import org.springframework.jdbc.core.JdbcTemplate;
import org.springframework.jdbc.core.RowMapper;
import org.springframework.stereotype.Repository;

import java.sql.ResultSet;
import java.sql.SQLException;
import java.util.List;

@Repository
public class ContactRepository {


    private JdbcTemplate jdbc;

    @Autowired
    public ContactRepository(JdbcTemplate jdbc) {
        this.jdbc = jdbc;
    }

    public List<Contact> findAll(){
        return jdbc.query("select id, firstName, lastName, phoneNumber, emailAddress from contacts order by lastName",
                new RowMapper<Contact>() {
                    @Override
                    public Contact mapRow(ResultSet rs, int rowNum) throws SQLException {
                        Contact c = new Contact();
                        c.setId(rs.getLong(1));
                        c.setFirstName(rs.getString(2));
                        c.setLastName(rs.getString(3));
                        c.setPhoneNumber(rs.getString(4));
                        c.setEmailAddress(rs.getString(5));
                        return c;
                    }
                });
    }

    public void save(Contact contact){
        jdbc.update("insert into contacts(firstName,lastName,phoneNumber,emailAddress) values(?,?,?,?)",
                contact.getFirstName(),contact.getLastName(),contact.getPhoneNumber(),contact.getEmailAddress());
    }
}
ContactRepository使用了@Repository注解,在组件扫描的时候他会被发现并创建为 Spring 应用上下文中的 bean。
JdbcTemplate 呢?我们难道不用再Spring应用上下文中声明JdbcTemplate bean 吗?为了声明它, 我们是不是需要声明一个H2 DataSource?
一切都不需要!!当 Spring Boot 嗅探到 Spring 的 JDBC 模块和H2 在类路径下的时候,自动配置就会发挥作用,将会自动配置 JdbcTemplate bean 和 H2 DataSource bean。
我们需要自己创建contacts表的模式,Spring Boot 可不会知道 contacts 表会是什么样子。
我们将一个名为schema.sql的脚本文件放入类路径根下,也就是Maven或Gradle项目目录下的”src/main/resources“目录下。
create table contacts (
    id identity,
    firstName varchar(30) not null,
    lastName varchar(50) not null,
    phoneNumber varchar(13),
    emailAddress varchar(30)
);
我们需要一个特定的类来启动Spring Boot 项目。
package contacts;

import org.springframework.boot.SpringApplication;
import org.springframework.boot.autoconfigure.EnableAutoConfiguration;
import org.springframework.context.annotation.ComponentScan;

@ComponentScan
@EnableAutoConfiguration
public class Application {
    public static void main(String[] args) {
        SpringApplication.run(Application.class,args);
    }
}
点击运行,打开浏览器输入localhost:8080就能进入Contacts应用。
标签:ber 打开 create 默认 pac result resources each 启用
原文地址:https://www.cnblogs.com/hoo334/p/12227155.html