标签:style blog http io color ar os 使用 for
iOS开发UI篇—多控制器和导航控制器简单介绍
一、多控制器
一个iOS的app很少只由一个控制器组成,除非这个app极其简单。当app中有多个控制器的时候,我们就需要对这些控制器进行管理
有多个view时,可以用一个大的view去管理1个或者多个小view,控制器也是如此,用1个控制器去管理其他多个控制器
比如,用一个控制器A去管理3个控制器B、C、D。控制器A被称为控制器B、C、D的“父控制器”;控制器B、C、D的被称为控制器A的“子控制器”
为了便于管理控制器,iOS提供了2个比较特殊的控制器
UINavigationController
UITabBarController
二、导航控制器
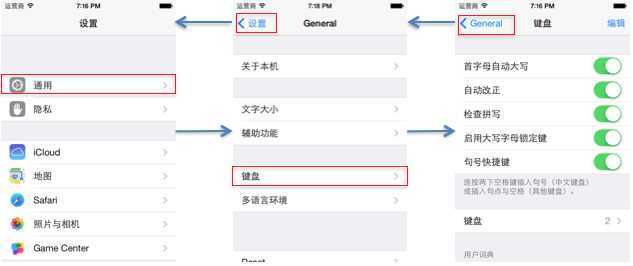
利用UINavigationController,可以轻松地管理多个控制器,轻松完成控制器之间的切换,典型例子就是系统自带的“设置”应用
如图:

三、UINavigationController的使用步骤
(1)初始化UINavigationController
(2)设置UIWindow的rootViewController为UINavigationController
(3)根据具体情况,通过push方法添加对应个数的子控制器
 1 #import "TXAppDelegate.h"
 2 #import "TXOneViewController.h"
 3
 4 @implementation TXAppDelegate
 5
 6 - (BOOL)application:(UIApplication *)application didFinishLaunchingWithOptions:(NSDictionary *)launchOptions
 7 {
 8     self.window = [[UIWindow alloc] initWithFrame:[[UIScreen mainScreen] bounds]];
 9     self.window.backgroundColor = [UIColor whiteColor];
10
11     //1.创建一个导航控制器
12     UINavigationController *nav=[[UINavigationController alloc]init];
13     //2.设置导航控制器为window的根视图
14     self.window.rootViewController=nav;
15
16
17     //3.添加子控制器到导航控制器中
18     //创建一些控制器
19     UIViewController *c1=[[UIViewController alloc]init];
20     //设置c1这个控制器的视图颜色
21     c1.view.backgroundColor=[UIColor redColor];
22
23     UIViewController *c2=[[UIViewController alloc]init];
24     c2.view.backgroundColor=[UIColor purpleColor];
25
26     UIViewController *c3=[[UIViewController alloc]init];
27     c3.view.backgroundColor=[UIColor brownColor];
28
29 //把这些控制器添加到导航控制器中
30     [nav pushViewController:c1 animated:YES];
31     [nav pushViewController:c2 animated:YES];
32     [nav pushViewController:c3 animated:YES];
33
34     [self.window makeKeyAndVisible];
35     return YES;
36 }
运行模拟器,可以看到一个简陋的有着三个子控制器管理着页面。
但呈现在我们眼前的只能有一个界面,我们没有必要一次性创建三个控制器在这里等着。
要求:创建三个子控制器,每个子控制器view的界面上放一个按钮,点击可以跳转到下一个界面。
实现(完成三个页面间通过按钮进行简单的跳转):
说明:这里把第一个子控制器的创建等代码写在了代理方法中。
TXAppDelegate.m文件代码
 1 //  TXAppDelegate.m
 2 //  20-导航控制器(代码)
 3 //
 4 //  Created by 鑫 on 14-10-16.
 5 //  Copyright (c) 2014年 梁镋鑫. All rights reserved.
 6 //
 7
 8 #import "TXAppDelegate.h"
 9 #import "TXOneViewController.h"
10 @implementation TXAppDelegate
11 //    UIViewController *vc1 = [[UIViewController alloc] init];
12 //    vc1.view.backgroundColor = [UIColor redColor];
13 //    [nav pushViewController:vc1 animated:YES];
14
15 //    UIViewController *vc2 = [[UIViewController alloc] init];
16 //    vc2.view.backgroundColor = [UIColor greenColor];
17 //    [nav pushViewController:vc2 animated:YES];
18 //
19 //    UIViewController *vc3 = [[UIViewController alloc] init];
20 //    vc3.view.backgroundColor = [UIColor blueColor];
21 //    [nav pushViewController:vc3 animated:YES];
22
23 - (BOOL)application:(UIApplication *)application didFinishLaunchingWithOptions:(NSDictionary *)launchOptions
24 {
25     self.window = [[UIWindow alloc] initWithFrame:[[UIScreen mainScreen] bounds]];
26     // Override point for customization after application launch.
27     self.window.backgroundColor = [UIColor whiteColor];
28
29     //1.创建导航条控制器
30     TXOneViewController *one = [[TXOneViewController alloc] init];
31     UINavigationController *nav = [[UINavigationController alloc]initWithRootViewController:one];
32
33     // 存放所有子控制器的栈
34     //    nav.viewControllers
35     // 这个数组也存放子控制器
36     //    nav.childViewControllers
37     // 2.添加子控制器
38     //    TXOneViewController *one = [[TXOneViewController alloc] init];
39     //    [nav addChildViewController:one];
40     //    [nav pushViewController:one animated:YES];
41     //    nav.viewControllers = @[one];
42
43     //3.设置为窗口的跟控制器
44
45
46     self.window.rootViewController = nav;
47
48
49
50
51     [self.window makeKeyAndVisible];
52     return YES;
53 }
创建三个子控件类及对应的xib文件
TXOneViewController.m文件
 1 //
 2 //  Created by 鑫 on 14-10-16.
 3 //  Copyright (c) 2014年 梁镋鑫. All rights reserved.
 4 //
 5
 6 #import "TXOneViewController.h"
 7 #import "TXTwoViewController.h"
 8 @interface TXOneViewController ()
 9 - (IBAction)jumpTwo;
10
11 @end
12
13 @implementation TXOneViewController
14
15 - (id)initWithNibName:(NSString *)nibNameOrNil bundle:(NSBundle *)nibBundleOrNil
16 {
17     self = [super initWithNibName:nibNameOrNil bundle:nibBundleOrNil];
18     if (self) {
19         // Custom initialization
20     }
21     return self;
22 }
23
24 - (void)viewDidLoad
25 {
26     [super viewDidLoad];
27     // 修改下一个界面返回按钮的文字
28     self.navigationItem.backBarButtonItem = [[UIBarButtonItem alloc] initWithTitle:@"返回" style:UIBarButtonItemStyleDone target:nil action:nil];
29     self.navigationItem.leftBarButtonItem = [[UIBarButtonItem alloc] initWithBarButtonSystemItem:UIBarButtonSystemItemCamera target:nil action:nil];
30
31
32
33 }
34
35 - (void)didReceiveMemoryWarning
36 {
37     [super didReceiveMemoryWarning];
38     // Dispose of any resources that can be recreated.
39 }
40
41 - (IBAction)jumpTwo {
42     TXTwoViewController *two = [[TXTwoViewController alloc]init];
43     [self.navigationController pushViewController:two animated:YES];
44
45 }
46 @end
TXTwoViewController.m文件
 1 //  Created by 鑫 on 14-10-16.
 2 //  Copyright (c) 2014年 梁镋鑫. All rights reserved.
 3 //
 4
 5 #import "TXTwoViewController.h"
 6 #import "TXThreeViewController.h"
 7 @interface TXTwoViewController ()
 8 - (IBAction)jumpThree;
 9
10 @end
11
12 @implementation TXTwoViewController
13
14 - (id)initWithNibName:(NSString *)nibNameOrNil bundle:(NSBundle *)nibBundleOrNil
15 {
16     self = [super initWithNibName:nibNameOrNil bundle:nibBundleOrNil];
17     if (self) {
18         // Custom initialization
19     }
20     return self;
21 }
22
23 - (void)viewDidLoad
24 {
25     [super viewDidLoad];
26     self.navigationItem.titleView = [UIButton buttonWithType:UIButtonTypeContactAdd];
27     self.navigationItem.rightBarButtonItem = [[UIBarButtonItem alloc] initWithBarButtonSystemItem:UIBarButtonSystemItemTrash target:nil action:nil];
28
29 }
30
31 - (void)didReceiveMemoryWarning
32 {
33     [super didReceiveMemoryWarning];
34     // Dispose of any resources that can be recreated.
35 }
36
37 - (IBAction)jumpThree {
38     TXThreeViewController *three = [[TXThreeViewController alloc]init];
39     [self.navigationController pushViewController:three animated:YES];
40
41 }
42 @end
TXThreeViewController.m文件
 1 #import "TXThreeViewController.h"
 2
 3 @interface TXThreeViewController ()
 4 - (IBAction)backTwo;
 5
 6 - (IBAction)backOne;
 7
 8 @end
 9
10 @implementation TXThreeViewController
11
12 - (id)initWithNibName:(NSString *)nibNameOrNil bundle:(NSBundle *)nibBundleOrNil
13 {
14     self = [super initWithNibName:nibNameOrNil bundle:nibBundleOrNil];
15     if (self) {
16         // Custom initialization
17     }
18     return self;
19 }
20
21 - (void)viewDidLoad
22 {
23     [super viewDidLoad];
24     self.navigationItem.title = @"第3个控制器";
25
26
27     UIBarButtonItem *item1 = [[UIBarButtonItem alloc] initWithBarButtonSystemItem:UIBarButtonSystemItemTrash target:nil action:nil];
28
29     UIBarButtonItem *item2 = [[UIBarButtonItem alloc] initWithBarButtonSystemItem:UIBarButtonSystemItemCompose target:nil action:nil];
30
31     self.navigationItem.rightBarButtonItems = @[item1, item2];
32
33 }
34
35 - (void)didReceiveMemoryWarning
36 {
37     [super didReceiveMemoryWarning];
38     // Dispose of any resources that can be recreated.
39 }
40
41 - (IBAction)backTwo {
42     // 移除栈顶控制器即可
43     [self.navigationController popViewControllerAnimated:YES];
44     //    [self.navigationController popToViewController:two animated:ye];
45 }
46
47 - (IBAction)backOne {
48     [self.navigationController popToRootViewControllerAnimated:YES];
49     //    [self.navigationController popToViewController:one animated:<#(BOOL)#>];
50
51
52 }
53 @end
提示:只要当前控制器是导航控制器的子控制器,那么就可以通过self.navigationController属性直接获取到当前控制器所在的导航控制器
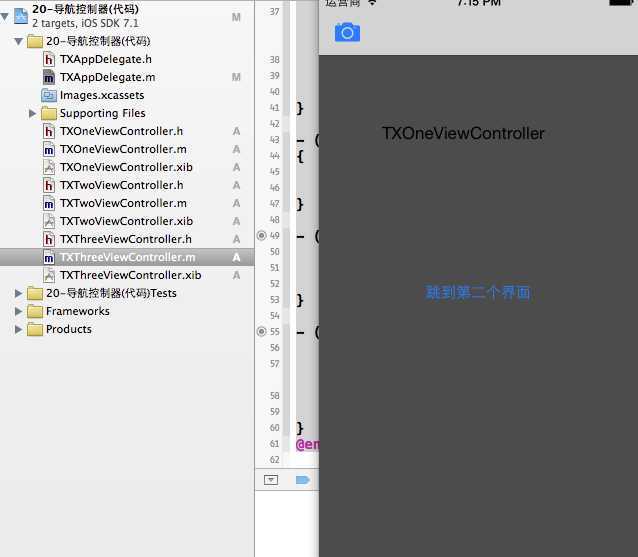
项目文件结构和运行效果:

标签:style blog http io color ar os 使用 for
原文地址:http://www.cnblogs.com/asd5551680/p/4069755.html