标签:存在 runtime 链路 exce add nbsp base 数据 beans
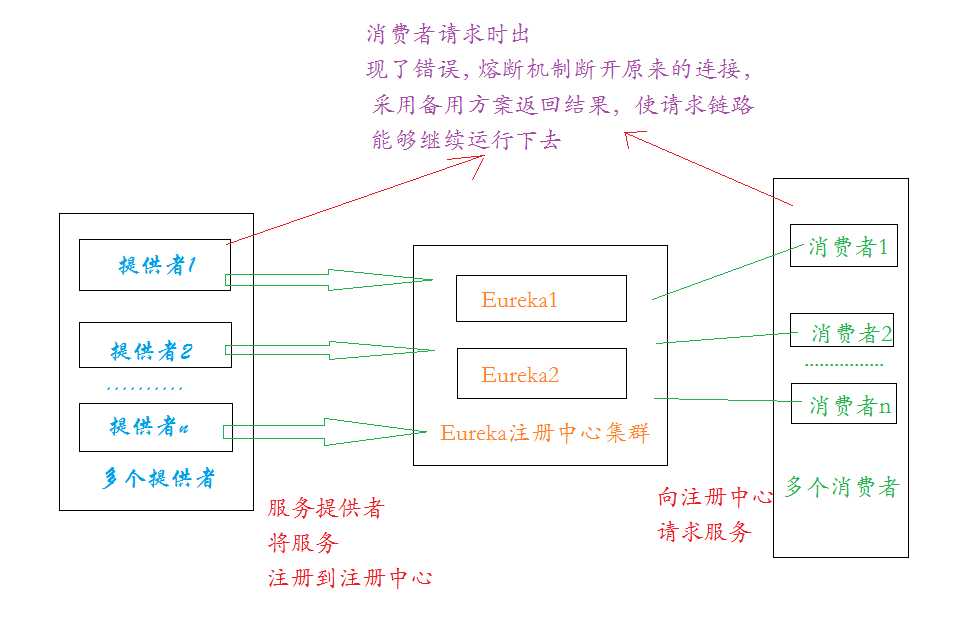
Hystrix是一个用于处理分布式系统的延迟和容错和开源库,在分布式系统里,许多依赖不可避免的会调用失败,比如超时,异常等,Hystrix能保证在一个依赖出现问题的情况下,不会导致整体服务失败,避免级联故障,以提高分布式系统的弹性;
“断路器”本身是一种开关装置,当某个服务单元发生故障之后,通过断路器的故障 监控(类似熔断保险丝),向调用方返回一个符合预期的,可处理的备选响应(FallBack),而不是长时间的等待或者抛出调用方无法处理的异常,这样就保证了服务调用的线程不会被长时间,不必要的占用,从而避免了故障在分布式系统中的蔓延,乃至雪崩。
服务熔断
熔断机制是应对雪崩效应的一种微服务 链路保护机制;
当扇出链路的某个服务不可用或者响应时间太长时,会进行服务的降级,进而熔断该节点微服务的调用,快速返回“错误”的响应信息,当检测到该节点微服务调用响应正常后 恢复调用链路,在springcloud框架里熔断机制通过Hystrix实现,Hystrix会监控微服务间调用的状况,当失败的调用到一定阈值,缺省是5秒20次调用失败就会启动熔断机制,熔断机制的注解是@HystrixCommand
① 导入pom依赖
<project xmlns="http://maven.apache.org/POM/4.0.0"
    xmlns:xsi="http://www.w3.org/2001/XMLSchema-instance"
    xsi:schemaLocation="http://maven.apache.org/POM/4.0.0 http://maven.apache.org/xsd/maven-4.0.0.xsd">
    <modelVersion>4.0.0</modelVersion>
    <parent>
        <groupId>com.yt.springcloud</groupId>
        <artifactId>microservicecloud</artifactId>
        <version>0.0.1-SNAPSHOT</version>
    </parent>
    <artifactId>microservicecloud-provider-dept-hystrix-8001</artifactId>

    <dependencies>
        <!-- hystrix -->
        <dependency>
            <groupId>org.springframework.cloud</groupId>
            <artifactId>spring-cloud-starter-hystrix</artifactId>
        </dependency>
        <!-- 将微服务provider侧注册进eureka -->
        <dependency>
            <groupId>org.springframework.cloud</groupId>
            <artifactId>spring-cloud-starter-eureka</artifactId>
        </dependency>
         <!-- 引入自己已定义的api通用包,可以使用Dept部门Entity -->
          <dependency>
              <groupId>com.yt.springcloud</groupId>
              <artifactId>microservicecloud-api</artifactId>
              <version>${project.version}</version>
          </dependency>
        <dependency>
            <groupId>org.springframework.cloud</groupId>
            <artifactId>spring-cloud-starter-config</artifactId>
        </dependency>
        <!-- actuator监控信息完善 -->
        <dependency>
            <groupId>org.springframework.boot</groupId>
            <artifactId>spring-boot-starter-actuator</artifactId>
        </dependency>
        <dependency>
            <groupId>junit</groupId>
            <artifactId>junit</artifactId>
        </dependency>
        <dependency>
            <groupId>mysql</groupId>
            <artifactId>mysql-connector-java</artifactId>
        </dependency>
        <dependency>
            <groupId>com.alibaba</groupId>
            <artifactId>druid</artifactId>
        </dependency>
        <dependency>
            <groupId>ch.qos.logback</groupId>
            <artifactId>logback-core</artifactId>
        </dependency>
        <dependency>
            <groupId>org.mybatis.spring.boot</groupId>
            <artifactId>mybatis-spring-boot-starter</artifactId>
        </dependency>
        <dependency>
            <groupId>org.springframework.boot</groupId>
            <artifactId>spring-boot-starter-jetty</artifactId>
        </dependency>
        <dependency>
            <groupId>org.springframework.boot</groupId>
            <artifactId>spring-boot-starter-web</artifactId>
        </dependency>
        <dependency>
            <groupId>org.springframework.boot</groupId>
            <artifactId>spring-boot-starter-test</artifactId>
        </dependency>
        <!-- 修改后立即生效,热部署 -->
        <dependency>
            <groupId>org.springframework</groupId>
            <artifactId>springloaded</artifactId>
        </dependency>
        <dependency>
            <groupId>org.springframework.boot</groupId>
            <artifactId>spring-boot-devtools</artifactId>
        </dependency>
    </dependencies>

</project>
② 编写application.ym配置文件
server:
  port: 8001                                         # 当前微服务的端口

mybatis:
  config-location: classpath:mybatis/mybatis.cfg.xml # mybatis配置文件所在路径
  type-aliases-package: com.yt.springcloud.entity    # 所有饿entity实体类所在包
  mapper-locations:
  - classpath:mybatis/mapper/**/*.xml                # mapper映射文件

spring:
  application:
   name: microservicecloud-dept                      # 对外暴露的微服务的名字(很重要)
  datasource:
   type: com.alibaba.druid.pool.DruidDataSource      # 当前数据源操作类型
   driver-class-name: org.gjt.mm.mysql.Driver        # mysql驱动包
   url: jdbc:mysql://localhost:3306/cloudDB01        # 数据库名称
   username: root
   password: hannong
   dbcp2:
    min-idle: 5                                      # 数据库连接池的最小维持连接数
    initial-size: 5                                  # 初始化连接数
    max-total: 5                                     # 最大连接数
    max-wait-millis: 200                             # 等待连接获取的最大超时时间

eureka:
   client:   #客户端注册进eureka服务列表内
    service-url:
      defaultZone: http://eureka7001.com:7001/eureka/,http://eureka7002.com:7002/eureka/,http://eureka7003.com:7003/eureka/      #去注册中心的地址
      #defaultZone:7001,7002,7003 去注册中心的地址
   instance:
      instance-id: microservicecloud-dept8001-hystrix #自定义hystrix相关的服务名称信息
      prefer-ip-address: true                         #访问路径可以显示ip地址

info:
   app.name: yt-microservicecloud                     #
   company.name: www.yt.com                           #
   build.artifactId: $project.artifactId$             #
   build.version: $project.version$                   #
③ 在相关类添加注解
Controller类
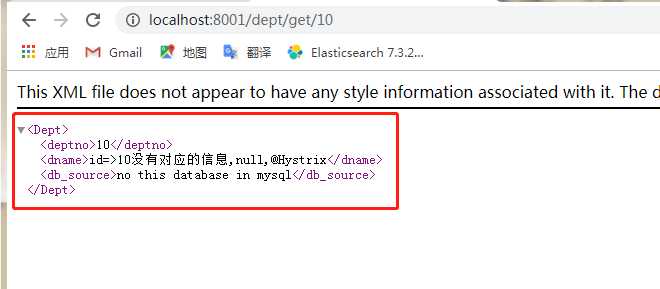
package com.yt.springcloud.controller;
import java.util.List;
import org.springframework.beans.factory.annotation.Autowired;
import org.springframework.cloud.client.ServiceInstance;
import org.springframework.cloud.client.discovery.DiscoveryClient;
import org.springframework.web.bind.annotation.PathVariable;
import org.springframework.web.bind.annotation.RequestBody;
import org.springframework.web.bind.annotation.RequestMapping;
import org.springframework.web.bind.annotation.RequestMethod;
import org.springframework.web.bind.annotation.RestController;
import com.netflix.hystrix.contrib.javanica.annotation.HystrixCommand;
import com.yt.springcloud.entity.Dept;
import com.yt.springcloud.service.impl.DeptService;

@RestController//整合了responceBody+Controller
public class DeptController {

    @Autowired
    private DeptService service = null;

    @RequestMapping(value = "/dept/get/{id}", method = RequestMethod.GET)
    //一旦调用服务方法失败并抛出了错误信息后,会自动调用@HystrixCommand标注好的fallbackMethod调用类中的指定方法
    @HystrixCommand(fallbackMethod = "processHystrix_Get")//发生异常的时候,会调用这个fallbackmethod方法,去处理
    public Dept get(@PathVariable("id") Long id){

        Dept dept = this.service.get(id);

        if (null == dept) {
            throw new RuntimeException("该ID:" + id + "没有没有对应的信息");
        }

        return dept;
    }

    /**
     * 发生异常的时候,会调用这个方法来处理,还是返回一个dept对象,但是里面的信息是我们自定义的
    * 下面的链路赋值形式:new ObjectTest().setXX().setXX().....; 需要导入lombok依赖即可
     * @param id
     * @return
     */
    public Dept processHystrix_Get(@PathVariable("id") Long id){
        return new Dept().setDeptno(id).setDname("该ID:" + id + "没有没有对应的信息,null--@HystrixCommand")
                .setDb_source("no this database in MySQL");
    }
}
ApplicationBoot启动类
package com.yt.springcloud;

import org.springframework.boot.SpringApplication;
import org.springframework.boot.autoconfigure.SpringBootApplication;
import org.springframework.cloud.client.circuitbreaker.EnableCircuitBreaker;
import org.springframework.cloud.client.discovery.EnableDiscoveryClient;
import org.springframework.cloud.netflix.eureka.EnableEurekaClient;

@SpringBootApplication
@EnableEurekaClient //本服务启动后会自动注册进eureka服务中
@EnableDiscoveryClient //服务发现
@EnableCircuitBreaker//对hystrixR熔断机制的支持!!!
public class DeptProvider8001_Hystrix_App
{
    public static void main(String[] args)
    {
        SpringApplication.run(DeptProvider8001_Hystrix_App.class, args);
    }
}
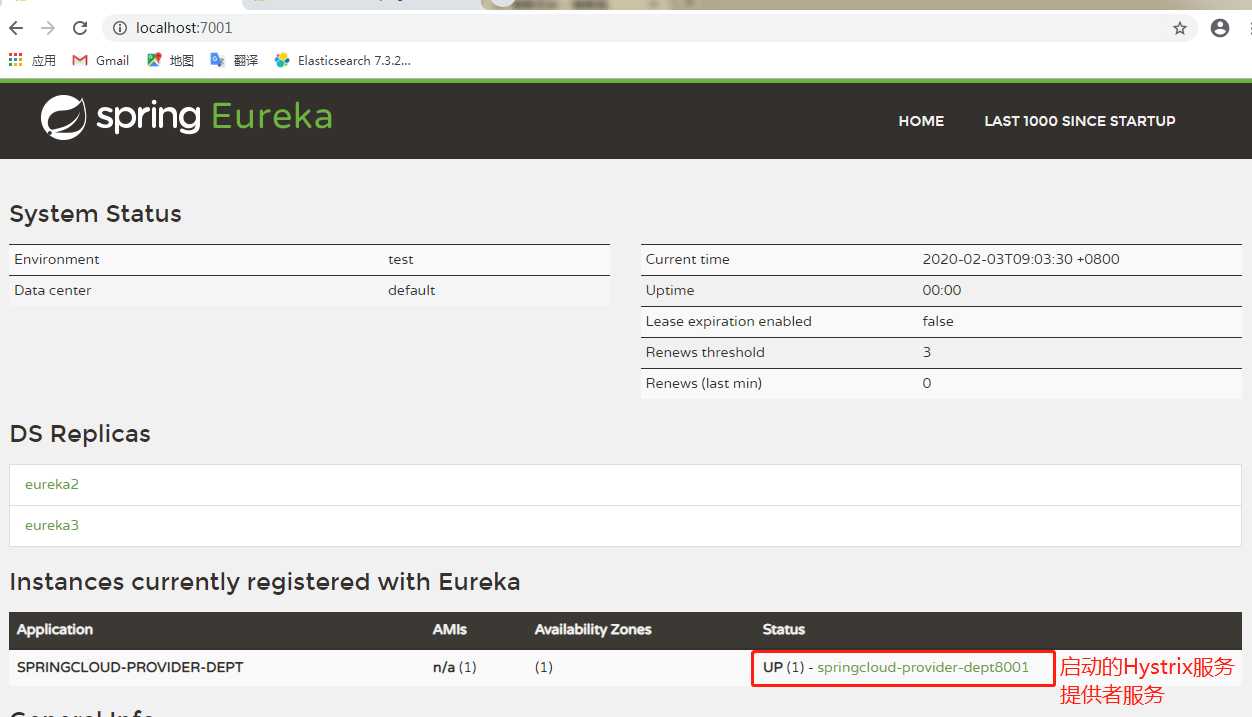
启动Eureka服务注册服务,如果搭建了集群,全部启动也可。
启动Hystrix服务提供者服务
启动服务消费者
打开注册Eureka页面:http://localhost:7001/ #打开自己设置URL即可
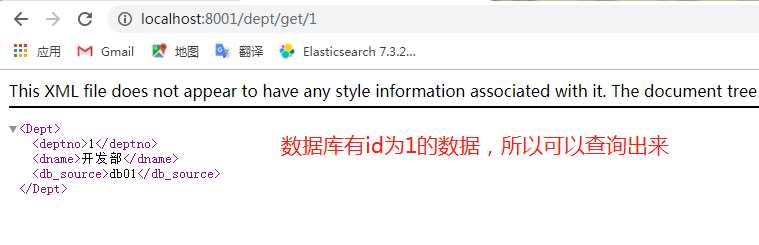
进行接口调用
标签:存在 runtime 链路 exce add nbsp base 数据 beans
原文地址:https://www.cnblogs.com/FondWang/p/12254764.html