标签:dap 修改 需要 simple ada person listen you list
1.ListView
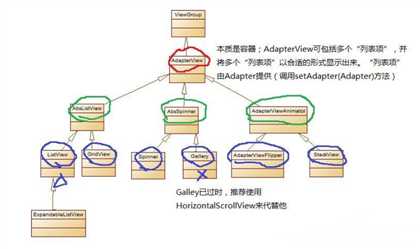
ListView 是 Android 系统为我们提供的一种列表显示的一种控件,使用它可以用来显示我们常见的列表形式。继承自抽象类 AdapterView。继承图如下所示:
以微信好友列表为例:

里面的每个好友就是由一个个 item 组成的,而每个item都存在Adapter适配器类中(负责数据处理),然后通过ListView显示出来.
2.ListView显示原理
ListView显示数据原理实际就是MVC设计模式,如下图所示:

BaseAdapter比较简单,主要是通过继承此类来实现BaseAdapter的四个方法:
public int getCount();
//设置适配器中数据集的数据个数(ListView要显示的所有数据行);

public Object getItem(int position):
//获取数据集中与索引对应的数据项;

public long getItemId(int position);
//获取指定行对应的ID,一般都是直接返回position

public View getView(int position,View convertView,ViewGroup parent);
//获取每一行Item的显示内容。
// position:表示当前获取的Item是哪一行,开头从0开始
// convertView:旧视图复用,如果convertView不为空则表示可以用来复用.无需再次new一个view来使用.
// ViewGroup:只有LinearLayout或者RelativeLayout,如果viewGroup传入一个具体的对象,那么这个方法创建出来的view对象将作为这个viewGroup的childView来显示.
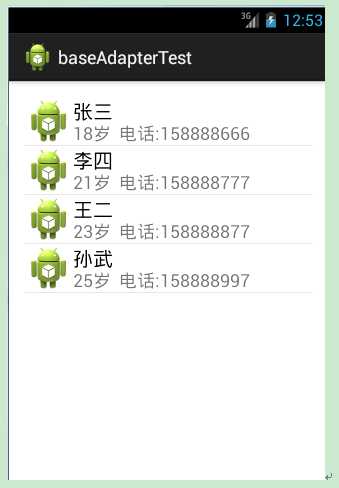
示例效果如下所示:
3.1写activity_main.xml
只是添加了一个ListView:
<RelativeLayout xmlns:android="http://schemas.android.com/apk/res/android"
    xmlns:tools="http://schemas.android.com/tools"
    android:layout_width="match_parent"
    android:layout_height="match_parent"
    android:paddingBottom="@dimen/activity_vertical_margin"
    android:paddingLeft="@dimen/activity_horizontal_margin"
    android:paddingRight="@dimen/activity_horizontal_margin"
    android:paddingTop="@dimen/activity_vertical_margin"
    tools:context=".MainActivity" >

    <ListView
        android:id="@+id/lv_list"
        android:layout_width="match_parent"
        android:layout_height="match_parent"
        android:layout_centerHorizontal="true"
        android:layout_centerVertical="true" >
    </ListView>

</RelativeLayout>
4.2 写item.xml
用来显示每一项item的view视图
<?xml version="1.0" encoding="utf-8"?>
<RelativeLayout xmlns:android="http://schemas.android.com/apk/res/android"
    android:layout_width="match_parent"
    android:layout_height="match_parent"
    android:layout_margin="5dp" >

    <ImageView
        android:id="@+id/imageView1"
        android:layout_width="wrap_content"
        android:layout_height="wrap_content"
        android:src="@drawable/ic_launcher" />

    <TextView
        android:id="@+id/tv_name"
        android:layout_width="wrap_content"
        android:layout_height="wrap_content"
        android:layout_toRightOf="@id/imageView1"
        android:textSize="20sp"
        android:textColor="#000000"
        android:text="name" />

    <TextView
        android:id="@+id/tv_content"
        android:layout_width="wrap_content"
        android:layout_height="wrap_content"
        android:layout_alignBottom="@+id/imageView1"
        android:layout_alignLeft="@+id/tv_name"
        android:text="content"
        android:textColor="#88000000"
        android:textSize="18sp" />

</RelativeLayout>
4.3 写MainActivity.java
package com.example.baseadaptertest;

import java.util.ArrayList;

import android.os.Bundle;
import android.app.Activity;
import android.view.LayoutInflater;
import android.view.Menu;
import android.view.View;
import android.view.ViewGroup;
import android.widget.BaseAdapter;
import android.widget.ListView;
import android.widget.TextView;


class Person {
    String name;
    String content;

    public Person(String name,String content){
        this.name = name;
        this.content = content;
    }
    public String getName() {
        return name;
    }
    public String getContent() {
        return content;
    }
}

public class MainActivity extends Activity {

    ArrayList<Person>    list;

    @Override
    protected void onCreate(Bundle savedInstanceState) {
        super.onCreate(savedInstanceState);
        setContentView(R.layout.activity_main);

        //1.添加要显示的数据
        list  = new ArrayList<Person>();
        list.add(new Person("张三","18岁  电话:158888666"));
        list.add(new Person("李四","21岁  电话:158888777"));
        list.add(new Person("王二","23岁  电话:158888877"));
        list.add(new Person("孙武","25岁  电话:158888997"));

        //2.设置Adapter
        ListView lv_list = (ListView)findViewById(R.id.lv_list);
        lv_list.setAdapter(new MyAdapter());

    }


    class MyAdapter extends BaseAdapter{

        @Override
        public int getCount() {
            return list.size();
        }

        @Override
        public Object getItem(int position) {
            return list.get(position);
        }

        @Override
        public long getItemId(int position) {
            return position;
        }

        @Override
        public View getView(int position, View convertView, ViewGroup parent) {

            View view = null;

            //如果convertView为空则需要重新创建资源视图,如果不为空则表示可以用来复用.无需再次new一个view来使用.
            if(convertView==null){
                 //通过R.layout.item 来创建一个item视图资源
                 view = LayoutInflater.from(getApplicationContext()).inflate(R.layout.item, null);
            }else{

                view = convertView;
            }

            //设置要显示的内容
            TextView  tv_name =  (TextView)view.findViewById(R.id.tv_name);
            TextView  tv_content =  (TextView)view.findViewById(R.id.tv_content);

            tv_name.setText(list.get(position).getName());
            tv_content.setText(list.get(position).getContent());


            return view;
        }
    }

    @Override
    public boolean onCreateOptionsMenu(Menu menu) {
        // Inflate the menu; this adds items to the action bar if it is present.
        getMenuInflater().inflate(R.menu.main, menu);
        return true;
    }
}
5.使用ArrayAdapter适配器
ArrayAdapter数组适配器用于绑定格式单一的数据,每个item只有一个数据需要被修改,数据源可以是集合或者数组
并且ArrayAdapter可以直接用来使用,无需再继承此类来实现.
ArrayAdapter的构造方法常用的有两种:
public ArrayAdapter(Context context, int resource, T[] objects);
//第一个参数 上下文
//第二个参数 包含且只有一个textview的布局文件id
//第三个参数 要展示的数据数组

public ArrayAdapter(Context context, int resource, int textViewResourceId, T[] objects);
//第一个参数 上下文
//第二个参数 可以包含很多内容(ImageView、textview等)的布局文件id
//第三个参数 指向resource中要显示数据的一个textView控件id
//第三个参数 要展示的数据数组
接下来,我们使用第二种构造方法来演示.
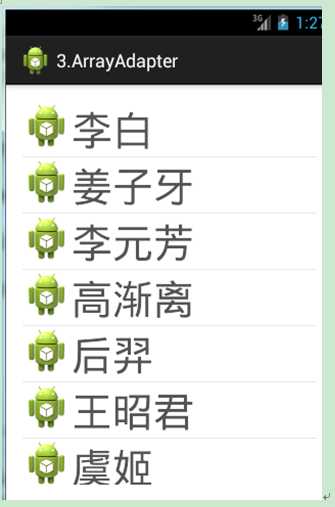
效果如下:
5.1 写activity_main.xml
只是添加了一个ListView,内容和BaseAdapter的activity_main.xml一致
5.2 写item.xml
<?xml version="1.0" encoding="utf-8"?>
<LinearLayout xmlns:android="http://schemas.android.com/apk/res/android"
    android:layout_width="match_parent"
    android:layout_height="match_parent"
    android:orientation="horizontal" >

    <ImageView
        android:id="@+id/imageView1"
        android:layout_width="wrap_content"
        android:layout_height="wrap_content"
        android:src="@drawable/ic_launcher" />

    <TextView
        android:id="@+id/tv_content"
        android:layout_width="match_parent"
        android:layout_height="wrap_content"
        android:text="name"
        android:textColor="#AA000000"
        android:textSize="40sp" />

</LinearLayout>
5.3 写MainActivity.java
package com.example.arrayadapter;

import android.os.Bundle;
import android.app.Activity;
import android.view.Menu;
import android.widget.ArrayAdapter;
import android.widget.ListView;

public class MainActivity extends Activity {

    @Override
    protected void onCreate(Bundle savedInstanceState) {
        super.onCreate(savedInstanceState);
        setContentView(R.layout.activity_main);

        //定义一个String数组
        String[] objects = {"李白","姜子牙","李元芳","高渐离","后羿","王昭君","虞姬"};

        //初始化ArrayAdapter
        ArrayAdapter<String> adapter = new ArrayAdapter<String>(getApplicationContext(), R.layout.item, R.id.tv_content, objects);

        //设置ArrayAdapter
        ListView  lv_list = (ListView)findViewById(R.id.lv_list);
        lv_list.setAdapter(adapter);

    }


    @Override
    public boolean onCreateOptionsMenu(Menu menu) {
        // Inflate the menu; this adds items to the action bar if it is present.
        getMenuInflater().inflate(R.menu.main, menu);
        return true;
    }

}
SimpleAdapter适配器适用于拥有多数据的item. 每个item通过Map集合来实现.而Map里则可以包含多个数据.
SimpleAdapter的构造方法如下所示:
public SimpleAdapter(Context context, List<? extends Map<String, ?>> data,

            int resource, String[] from, int[] to);

//context: 上下文,填入getApplicationContext()即可
//data:包含了Map(String ,Object)的List数组,每个Map表示每个item数据。
//resource:要加载item的xml布局文件Id
//from:string数组, 用来标识一个item需要设置哪些key.而key对应的value则是要显示的数据
//to:int数组,填入item xml布局文件里的要更改的控件内容ID号 ,用来对应from中的key值,表示设置的key值最终是更改哪些控件内容
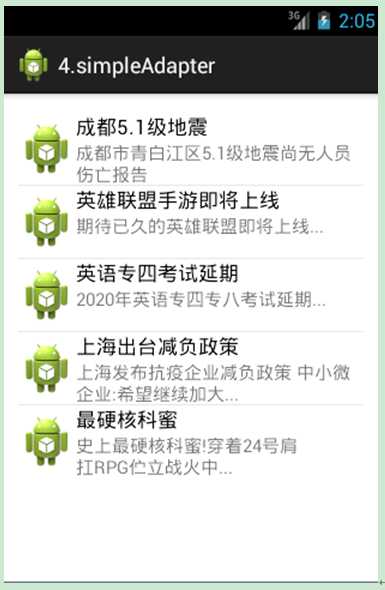
效果如下:
6.1 写activity_main.xml
只是添加了一个ListView,内容和BaseAdapter的activity_main.xml一致
6.2 写item.xml
<?xml version="1.0" encoding="utf-8"?>
<RelativeLayout xmlns:android="http://schemas.android.com/apk/res/android"
    android:layout_width="match_parent"
    android:layout_height="match_parent"
    android:layout_margin="5dp" >

    <ImageView
        android:id="@+id/imageView1"
        android:layout_width="wrap_content"
        android:layout_height="60dp"
        android:src="@drawable/ic_launcher" />

    <TextView
        android:id="@+id/tv_title"
        android:layout_width="wrap_content"
        android:layout_height="wrap_content"
        android:layout_toRightOf="@id/imageView1"
        android:textSize="17sp"
        android:textColor="#000000"
        android:text="name" />

    <TextView
        android:id="@+id/tv_content"
        android:layout_width="wrap_content"
        android:layout_height="wrap_content"
        android:layout_alignBottom="@+id/imageView1"
        android:layout_alignLeft="@+id/tv_title"
        android:layout_alignParentRight="true"
        android:layout_below="@+id/tv_title"
        android:text="content"
        android:textColor="#88000000"
        android:textSize="15sp" />

</RelativeLayout>
6.3 写MainActivity.java
package com.example.simpleadapter;

import java.util.ArrayList;
import java.util.HashMap;
import java.util.List;
import java.util.Map;

import android.os.Bundle;
import android.app.Activity;
import android.view.Menu;
import android.widget.ListView;
import android.widget.SimpleAdapter;

public class MainActivity extends Activity {

    @Override
    protected void onCreate(Bundle savedInstanceState) {
        super.onCreate(savedInstanceState);
        setContentView(R.layout.activity_main);


        List<Map<String, String>> data = new ArrayList<Map<String,String>>();
        String[] from = {"title","content"};//用来标识一个item需要设置哪些key.而key对应的value则是要显示的数据,这里设置了2个key
        int[] to={R.id.tv_title,R.id.tv_content}; //填入要更改的控件内容ID号 ,用来对应from中的两个key值,


        //添加内容
        Map<String, String>  map1 = new HashMap<String, String>();
        map1.put("title", "成都5.1级地震");
        map1.put("content", "成都市青白江区5.1级地震尚无人员伤亡报告");
        data.add(map1);

        Map<String, String>  map2 = new HashMap<String, String>();
        map2.put("title", "英雄联盟手游即将上线");
        map2.put("content", "期待已久的英雄联盟即将上线...");
        data.add(map2);

        Map<String, String>  map3 = new HashMap<String, String>();
        map3.put("title", "英语专四考试延期");
        map3.put("content", "2020年英语专四专八考试延期...");
        data.add(map3);

        Map<String, String>  map4 = new HashMap<String, String>();
        map4.put("title", "上海出台减负政策");
        map4.put("content", "上海发布抗疫企业减负政策 中小微企业:希望继续加大...");
        data.add(map4);

        Map<String, String>  map5 = new HashMap<String, String>();
        map5.put("title", "最硬核科蜜");
        map5.put("content", "史上最硬核科蜜!穿着24号肩扛RPG伫立战火中...");
        data.add(map5);

        //初始化SimpleAdapter
        SimpleAdapter adapter = new SimpleAdapter(getApplicationContext(), data, R.layout.item, from, to);


        //设置SimpleAdapter
        ListView  lv_list = (ListView)findViewById(R.id.lv_list);
        lv_list.setAdapter(adapter);

    }


    @Override
    public boolean onCreateOptionsMenu(Menu menu) {
        // Inflate the menu; this adds items to the action bar if it is present.
        getMenuInflater().inflate(R.menu.main, menu);
        return true;
    }

}
Ps:如果要设置Item点击事件,则通过下面方法设置即可
listView.setOnItemClickListener(new AdapterView.OnItemClickListener() {

            @Override
            public void onItemClick(AdapterView<?> parent, View view, int position, long id) {

               //写要实现的事
            }
 });
13.Android-ListView使用、BaseAdapter/ArrayAdapter/SimpleAdapter适配器使用
标签:dap 修改 需要 simple ada person listen you list
原文地址:https://www.cnblogs.com/lifexy/p/12261805.html