标签:获取网页 image 分隔符 file 步骤 处理 页面 灵活 开始
日期:2020.02.09
博客期:148
星期日
按照要求,我来制作 Python 对外爬取类的固定部分的封装,以后在用 Python 做爬取的时候,可以直接使用此类并定义一个新函数来处理CSS选择部分的动态选择。
好了,先说一下设计初衷!我在之前两次的爬取任务中发现我用到的爬取仅仅就是 requests 爬取和 selenium 爬取,而且呢~这两部分的爬取都是按照一定的步骤来做的,第一步,网页加载;第二步,获取 HTML 内容;第三步,使用 CSS 选择器进行筛选;第四步,处理数据打包保存到文件。所以我就先把除了第三步以外的其余部分封装起来了(第三步 CSS 选择部分实在是太灵活了,封装的话要满足灵活性工作量太大,相当于我第一次做的那个连接数据库的Jar包,挺失败的【不过,代码到可以用】)。打包保存文件的部分可以使用 StringWriter (之前也说过了),也可以直接使用 基础 Bean 类的 toFile 方法,这里就直接封装 Bean 类了!
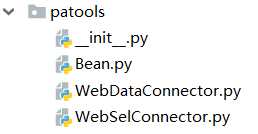
先说目录结构,如下图。分为三个 py 文件,分别对应的是 Bean 、WebDataConnector、WebSelConnector。

Bean 类,这是对之前的基础 Bean 类的封装,内部保存了基础类在爬取过程中的实际用到的各种方法。
WebDataConnector 类,这是 requests 的爬取方法的前两步的封装,具体实现需要自己定义一个方法。
WebSelConnector 类,这是 selenium 的爬取方法的前两步的封装,具体实现需要自己定义一个方法。
【代码仅供参考】

 1 import codecs
 2
 3
 4 class Bean:
 5     group = {}
 6
 7     def __init__(self):
 8         pass
 9
10     # 重新初始化为实例化阶段
11     def __reset__(self):
12         self.group.clear()
13
14     # 转为字符串类型
15     def __toString__(self):
16         num = self.group.__len__()
17         str_ret = ""
18         for i in range(0,num):
19             poi = str(list(dict(self.group).values())[i])
20             str_ret = str_ret + poi
21             if i != num - 1:
22                 str_ret = str_ret + "\t"
23         return str_ret
24
25     # 转为字符串类型 (带)
26     def __toStrS__(self,fgf):
27         num = self.group.__len__()
28         str_ret = ""
29         for i in range(0, num):
30             poi = str(list(dict(self.group).values())[i])
31             str_ret = str_ret + poi
32             if i == num - 1:
33                 str_ret = str_ret + str(fgf)
34         return str_ret
35
36     # 以追加形式追加到数据文件
37     def __toFile__(self,filepath):
38         f = codecs.open(filepath, "a+", ‘utf-8‘)
39         f.write(self.__toString__() + "\n")
40         f.close()

 1 from urllib import request
 2
 3 import parsel
 4
 5
 6 class WebDataConnector:
 7     # 网页地址
 8     web_url = ""
 9     # 固定 header 内容
10     headers = {
11         ‘User-Agent‘: ‘Mozilla/5.0 (Windows NT 10.0; WOW64) AppleWebKit/537.36 (KHTML, like Gecko) Chrome/55.0.2883.75 Safari/537.36‘
12     }
13
14     # 初始化
15     def __init__(self,weburl):
16         self.__reset__(weburl)
17
18     # 初始化为 最初状态
19     def __reset__(self,url):
20         self.web_url = url
21
22     # 获取网页 HTML 内容
23     def __getHTML__(self):
24         req = request.Request(url=self.web_url, headers=self.headers)
25         r = request.urlopen(req).read().decode()
26         return r
27
28     # 获取 CSS选择器的开始工具
29     def getNercol(self):
30         index_html = self.__getHTML__()
31         index_sel = parsel.Selector(index_html)
32         return index_sel

 1 import time
 2
 3 import parsel
 4 from selenium import webdriver
 5
 6
 7 # Selenium 爬取工具
 8 class WebSelConnector:
 9     # 启动器
10     run_tag = ""
11
12     # 初始化
13     def __init__(self):
14         run_tag = webdriver.Firefox()
15
16     # 把 页面 切到 url 对应网页
17     def __pageToURL__(self,url):
18         self.run_tag.get(str(url))
19
20     # 人工设置 线程停滞秒数
21     def __timeStop__(self,s):
22         time.sleep(s)
23
24     # 获取 url 的内部 HTML 代码
25     def __getHTML__(self):
26         a = self.run_tag.page_source
27         return a
28
29     # 定义释放方法
30     def __close__(self):
31         self.run_tag.quit()
32
33     # 获取 CSS选择器的开始工具
34     def getNercol(self):
35         index_html = self.__getHTML__()
36         index_sel = parsel.Selector(index_html)
37         return index_sel
【附加可作为基本类的过去用到的类】(以往博客的网页的代码将会被删除)

 1 import codecs
 2
 3
 4 # [ 封装一行文件写入的方法 ]
 5 class StringWriter:
 6     # 文件 路径
 7     filePath = ""
 8
 9     # 初始化
10     def __init__(self, str):
11         self.filePath = str
12         pass
13
14     # 将 文件 清空
15     def makeFileNull(self):
16         f = codecs.open(self.filePath, "w+", ‘utf-8‘)
17         f.write("")
18         f.close()
19
20     # 在 文件 后 追加 一行 字符串 数据
21     def write(self, stri):
22         f = codecs.open(self.filePath, "a+", ‘utf-8‘)
23         f.write(stri + "\n")
24         f.close()

 1 # [ 对字符串的特殊处理方法-集合 ]
 2
 3
 4 class StrSpecialDealer:
 5     # 取得 当前 标签内的 文本
 6     @staticmethod
 7     def getReaction(stri):
 8         strs = StrSpecialDealer.simpleDeal(str(stri))
 9         strs = strs[strs.find(‘>‘)+1:strs.rfind(‘<‘)]
10         return  strs
11
12     # 去除 基本的 分隔符
13     @staticmethod
14     def simpleDeal(stri):
15         strs = str(stri).replace(" ", "")
16         strs = strs.replace("\t", "")
17         strs = strs.replace("\r", "")
18         strs = strs.replace("\n", "")
19         return strs
20
21     # 删除 所有 标签 标记
22     @staticmethod
23     def deleteRe(stri):
24         strs = str(stri)
25         st = strs.find(‘<‘)
26         while(st!=-1):
27             str_delete = strs[strs.find(‘<‘):strs.find(‘>‘)+1]
28             strs = strs.replace(str_delete,"")
29             st = strs.find(‘<‘)
30
31         return strs
32
33     # 删除带有 日期 的句子
34     @staticmethod
35     def de_date(stri):
36         lines = str(stri).split("。")
37         strs = ""
38         num = lines.__len__()
39         for i in range(0,num):
40             st = str(lines[i])
41             if (st.__contains__("年") | st.__contains__("月")):
42                 pass
43             else:
44                 strs += st + "。"
45         strs = strs.replace("。。", "。")
46         return strs
47
48     # 取得带有 日期 的句子之前的句子
49     @staticmethod
50     def ut_date(stri):
51         lines = str(stri).split("。")
52         strs = ""
53         num = lines.__len__()
54         for i in range(0, num):
55             st = str(lines[i])
56             if (st.__contains__("年")| st.__contains__("月")):
57                 break
58             else:
59                 strs += st + "。"
60         strs = strs.replace("。。","。")
61         return strs
62
63     # 去除 文件中 [1] 类型的 标识
64     @staticmethod
65     def beat(stri,num):
66         strs = str(stri)
67         for i in range(0,num):
68             strs = strs.replace("["+str(i)+"]","")
69
70         return  strs
71
72     # 去除 字符串内的指定标签 针对 <></> 型标签 (innerHTML不去除)
73     @staticmethod
74     def del_label(stri,label):
75         s = ""
76         label = str(label)
77         strs = str(stri).replace("</"+label+">","")
78         num = strs.find(‘<‘+label)
79         while num != -1:
80             num_s = strs.find(‘>‘,num)
81             str_s = strs[num:num_s+1]
82             strs = strs.replace(str_s,"")
83             num = strs.find(‘<‘ + label)
84         return strs
【更新内容】
//------------------------------------------------------------[目前没有更新内容]
Python 爬取的类封装【将来可能会改造,持续更新...】(2020年寒假小目标09)
标签:获取网页 image 分隔符 file 步骤 处理 页面 灵活 开始
原文地址:https://www.cnblogs.com/onepersonwholive/p/12286463.html