标签:curl 防火墙 tor version stream default 错误 firewalld 实验
这是kubernetes二进制部署的第三篇
如果没有看过前面第一篇的朋友可以看看下面的:
Kubernetes二进制部署(一)单节点部署
kubernetes二进制部署(二)多节点部署
负载均衡
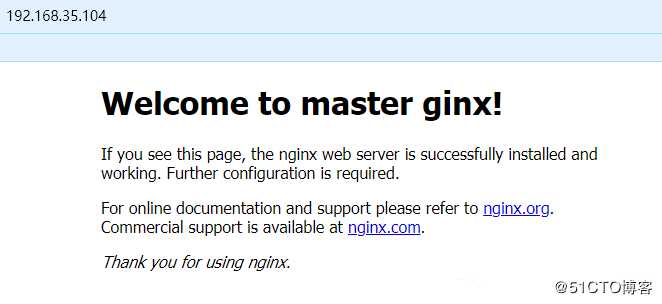
Nginx1:192.168.35.104/24
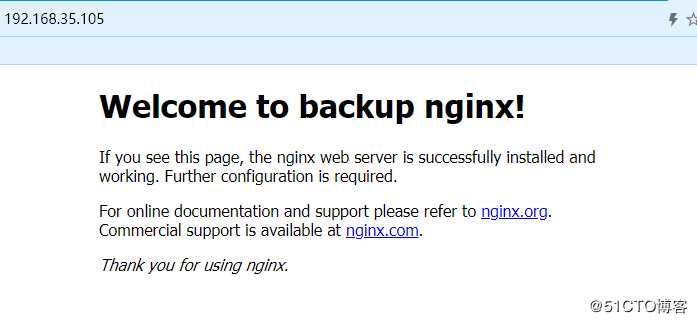
Nginx2:192.168.35.105/24
Master节点
master1:192.168.35.100/24
master2:192.168.35.103/24
Node节点
node1:192.168.35.101/24
node2:192.168.35.102/24[root@localhost ~]# systemctl stop firewalld.service?
[root@localhost ~]# setenforce 0[root@localhost ~]# ls
anaconda-ks.cfg ? ? ? keepalived.conf ?公共 ?视频 ?文档 ?音乐
initial-setup-ks.cfg ?nginx.sh ? ? ? ? 模板 ?图片 ?下载 ?桌面[root@localhost ~]# vim nginx.sh
cat > /etc/yum.repos.d/nginx.repo << EOF
[nginx]
name=nginx repo
baseurl=http://nginx.org/packages/centos/7/$basearch/
gpgcheck=0? ? ? ? ? ? ? ? ? ? ? ? ? ? ? ? ? ? #复制四行内容
EOF
stream {
? ?log_format ?main ?‘$remote_addr $upstream_addr - [$time_local] $status $upstream_bytes_sent‘;
? ? access_log ?/var/log/nginx/k8s-access.log ?main;
? ? upstream k8s-apiserver {
? ? ? ? server 10.0.0.3:6443;
? ? ? ? server 10.0.0.8:6443;
? ? }
? ? server {
? ? ? ? ? ? ? ? listen 6443;
? ? ? ? ? ? ? ? proxy_pass k8s-apiserver;
? ? }
? ? }[root@localhost ~]# vim /etc/yum.repos.d/nginx.repo
[nginx]
name=nginx repo
baseurl=http://nginx.org/packages/centos/7/$basearch/
gpgcheck=0
[root@localhost ~]# yum list
[root@localhost ~]#?yum install nginx -y[root@localhost ~]# vim nginx.sh
cat > /etc/yum.repos.d/nginx.repo << EOF
[nginx]
name=nginx repo
baseurl=http://nginx.org/packages/centos/7/$basearch/
gpgcheck=0? ? ? ? ? ? ? ? ? ? ? ? ? ? ? ? ? ?
EOF
stream {
? ?log_format ?main ?‘$remote_addr $upstream_addr - [$time_local] $status $upstream_bytes_sent‘;
? ? access_log ?/var/log/nginx/k8s-access.log ?main;
? ? upstream k8s-apiserver {
? ? ? ? server 10.0.0.3:6443;
? ? ? ? server 10.0.0.8:6443;
? ? }
? ? server {
? ? ? ? ? ? ? ? listen 6443;
? ? ? ? ? ? ? ? proxy_pass k8s-apiserver;
? ? }
? ? }? ? ? ? ? ? ? ? ? ? ? ? ? #复制此段内容[root@localhost ~]# vim /etc/nginx/nginx.conf
user ?nginx;
worker_processes ?1;
error_log ?/var/log/nginx/error.log warn;
pid ? ? ? ?/var/run/nginx.pid;
events {
? ? worker_connections ?1024;
}
stream {
? ?log_format ?main ?‘$remote_addr $upstream_addr - [$time_local] $status $upstream_bytes_sent‘;
? ? access_log ?/var/log/nginx/k8s-access.log ?main;
? ? upstream k8s-apiserver {
? ? ? ? server 192.168.35.100:6443;
? ? ? ? server 192.168.35.103:6443;? ? ? ? ? ? ? ? ? #只需修改IP为master1和master2的地址? ? ??
? ? }
? ? server {
? ? ? ? ? ? ? ? listen 6443;
? ? ? ? ? ? ? ? proxy_pass k8s-apiserver;
? ? }
? ? }
http {
? ? include ? ? ? /etc/nginx/mime.types;
? ? default_type ?application/octet-stream;
? ? log_format ?main ?‘$remote_addr - $remote_user [$time_local] "$request" ‘
? ? ? ? ? ? ? ? ? ? ? ‘$status $body_bytes_sent "$http_referer" ‘
? ? ? ? ? ? ? ? ? ? ? ‘"$http_user_agent" "$http_x_forwarded_for"‘;
? ? access_log ?/var/log/nginx/access.log ?main;
? ? sendfile ? ? ? ?on;
? ? #tcp_nopush ? ? on;
? ? keepalive_timeout ?65;
? ? #gzip ?on;
? ? include /etc/nginx/conf.d/*.conf;
}[root@localhost ~]# nginx -t
nginx: the configuration file /etc/nginx/nginx.conf syntax is ok
nginx: configuration file /etc/nginx/nginx.conf test is successful[root@localhost ~]# cd /usr/share/nginx/html/
[root@localhost html]# ls
50x.html ?index.html
[root@localhost html]# vim index.html?
/14 <h1>Welcome to master ginx!</h1>[root@localhost ~]# cd /usr/share/nginx/html/
[root@localhost html]# ls
50x.html ?index.html
[root@localhost html]# vim index.html?
/14 <h1>Welcome to backup?ginx!</h1>[root@localhost ~]# systemctl start nginx
[root@localhost ~]# systemctl start nginx
[root@localhost ~]# yum install keepalived -y
[root@localhost ~]# ls
anaconda-ks.cfg ? ? ? keepalived.conf ?公共 ?视频 ?文档 ?音乐
initial-setup-ks.cfg ?nginx.sh ? ? ? ? 模板 ?图片 ?下载 ?桌面
[root@localhost ~]# cp keepalived.conf /etc/keepalived/keepalived.conf
cp:是否覆盖"/etc/keepalived/keepalived.conf"? yes
[root@localhost ~]# vim /etc/keepalived/keepalived.conf?! Configuration File for keepalived
global_defs {
? ?# 接收邮件地址
? ?notification_email {
? ? ?acassen@firewall.loc
? ? ?failover@firewall.loc
? ? ?sysadmin@firewall.loc
? ?}
? ?# 邮件发送地址
? ?notification_email_from Alexandre.Cassen@firewall.loc
? ?smtp_server 127.0.0.1
? ?smtp_connect_timeout 30
? ?router_id NGINX_MASTER
}
vrrp_script check_nginx {
? ? script "/etc/nginx/check_nginx.sh"
}
vrrp_instance VI_1 {
? ? state MASTER?
? ? interface ens33
? ? virtual_router_id 51 # VRRP 路由 ID实例,每个实例是唯一的
? ? priority 100 ? ?# 优先级,备服务器设置 90 ?
? ? advert_int 1 ? ?# 指定VRRP 心跳包通告间隔时间,默认1秒
? ? authentication { ?
? ? ? ? auth_type PASS
? ? ? ? auth_pass 1111
? ? } ??
? ? virtual_ipaddress {
? ? ? ? 192.168.35.200/24
? ? }
? ? track_script {
? ? ? ? check_nginx
? ? }
}! Configuration File for keepalived
global_defs {
? ?# 接收邮件地址
? ?notification_email {
? ? ?acassen@firewall.loc
? ? ?failover@firewall.loc
? ? ?sysadmin@firewall.loc
? ?}
? ?# 邮件发送地址
? ?notification_email_from Alexandre.Cassen@firewall.loc
? ?smtp_server 127.0.0.1
? ?smtp_connect_timeout 30
? ?router_id NGINX_MASTER
}
vrrp_script check_nginx {
? ? script "/etc/nginx/check_nginx.sh"
}
vrrp_instance VI_1 {
? ? state?BACKUP?
? ? interface ens33
? ? virtual_router_id 51 # VRRP 路由 ID实例,每个实例是唯一的
? ? priority 90 ? ?# 优先级,备服务器设置 90 ?
? ? advert_int 1 ? ?# 指定VRRP 心跳包通告间隔时间,默认1秒
? ? authentication { ?
? ? ? ? auth_type PASS
? ? ? ? auth_pass 1111
? ? } ??
? ? virtual_ipaddress {
? ? ? ? 192.168.35.200/24
? ? }
? ? track_script {
? ? ? ? check_nginx
? ? }
}[root@localhost ~]# vim /etc/nginx/check_nginx.sh
count=$(ps -ef |grep nginx |egrep -cv "grep|$$")
if [ "$count" -eq 0 ];then
? ? ? ? systemctl stop keepalived
fi[root@localhost ~]# chmod +x /etc/nginx/check_nginx.sh
[root@localhost ~]# systemctl start keepalived[root@localhost ~]# ip a
1: lo: <LOOPBACK,UP,LOWER_UP> mtu 65536 qdisc noqueue state UNKNOWN qlen 1
? ? link/loopback 00:00:00:00:00:00 brd 00:00:00:00:00:00
? ? inet 127.0.0.1/8 scope host lo
? ? ? ?valid_lft forever preferred_lft forever
? ? inet6 ::1/128 scope host?
? ? ? ?valid_lft forever preferred_lft forever
2: ens33: <BROADCAST,MULTICAST,UP,LOWER_UP> mtu 1500 qdisc pfifo_fast state UP qlen 1000
? ? link/ether 00:0c:29:ba:e6:18 brd ff:ff:ff:ff:ff:ff
? ? inet 192.168.35.104/24 brd 192.168.35.255 scope global ens33
? ? ? ?valid_lft forever preferred_lft forever
? ? inet 192.168.35.200/24 scope global secondary ens33? ? ? ? ? ? ?#漂移地址在lb01中?
? ? ? ?valid_lft forever preferred_lft forever
? ? inet6 fe80::6ec5:6d7:1b18:466e/64 scope link tentative dadfailed?
? ? ? ?valid_lft forever preferred_lft forever
? ? inet6 fe80::2a3:b621:ca01:463e/64 scope link tentative dadfailed?
? ? ? ?valid_lft forever preferred_lft forever
? ? inet6 fe80::d4e2:ef9e:6820:145a/64 scope link tentative dadfailed?
? ? ? ?valid_lft forever preferred_lft forever
3: virbr0: <NO-CARRIER,BROADCAST,MULTICAST,UP> mtu 1500 qdisc noqueue state DOWN qlen 1000
? ? link/ether 52:54:00:14:39:99 brd ff:ff:ff:ff:ff:ff
? ? inet 192.168.122.1/24 brd 192.168.122.255 scope global virbr0
? ? ? ?valid_lft forever preferred_lft forever
4: virbr0-nic: <BROADCAST,MULTICAST> mtu 1500 qdisc pfifo_fast master virbr0 state DOWN qlen 1000
? ? link/ether 52:54:00:14:39:99 brd ff:ff:ff:ff:ff:ff[root@localhost ~]# ip a
1: lo: <LOOPBACK,UP,LOWER_UP> mtu 65536 qdisc noqueue state UNKNOWN qlen 1
? ? link/loopback 00:00:00:00:00:00 brd 00:00:00:00:00:00
? ? inet 127.0.0.1/8 scope host lo
? ? ? ?valid_lft forever preferred_lft forever
? ? inet6 ::1/128 scope host?
? ? ? ?valid_lft forever preferred_lft forever
2: ens33: <BROADCAST,MULTICAST,UP,LOWER_UP> mtu 1500 qdisc pfifo_fast state UP qlen 1000
? ? link/ether 00:0c:29:1d:ec:b0 brd ff:ff:ff:ff:ff:ff
? ? inet 192.168.35.105/24 brd 192.168.35.255 scope global ens33
? ? ? ?valid_lft forever preferred_lft forever
? ? inet6 fe80::6ec5:6d7:1b18:466e/64 scope link tentative dadfailed?
? ? ? ?valid_lft forever preferred_lft forever
? ? inet6 fe80::2a3:b621:ca01:463e/64 scope link tentative dadfailed?
? ? ? ?valid_lft forever preferred_lft forever
? ? inet6 fe80::d4e2:ef9e:6820:145a/64 scope link tentative dadfailed?
? ? ? ?valid_lft forever preferred_lft forever
3: virbr0: <NO-CARRIER,BROADCAST,MULTICAST,UP> mtu 1500 qdisc noqueue state DOWN qlen 1000
? ? link/ether 52:54:00:14:39:99 brd ff:ff:ff:ff:ff:ff
? ? inet 192.168.122.1/24 brd 192.168.122.255 scope global virbr0
? ? ? ?valid_lft forever preferred_lft forever
4: virbr0-nic: <BROADCAST,MULTICAST> mtu 1500 qdisc pfifo_fast master virbr0 state DOWN qlen 1000
? ? link/ether 52:54:00:14:39:99 brd ff:ff:ff:ff:ff:ff[root@localhost ~]# pkill nginx
[root@localhost ~]# systemctl status nginx
● nginx.service - nginx - high performance web server
? ?Loaded: loaded (/usr/lib/systemd/system/nginx.service; disabled; vendor preset: disabled)
? ?Active: failed (Result: exit-code) since 六 2020-02-08 16:54:45 CST; 11s ago
? ? ?Docs: http://nginx.org/en/docs/
? Process: 13156 ExecStop=/bin/kill -s TERM $MAINPID (code=exited, status=1/FAILURE)
?Main PID: 6930 (code=exited, status=0/SUCCESS)
2月 08 16:54:45 localhost.localdomain kill[13156]: -q, --queue <信号> ? …2)
2月 08 16:54:45 localhost.localdomain kill[13156]: -p, --pid ? ? ? ? ? ?…号
2月 08 16:54:45 localhost.localdomain kill[13156]: -l, --list [=<信号>] …称
2月 08 16:54:45 localhost.localdomain kill[13156]: -L, --table ? ? ? ? ?…值
2月 08 16:54:45 localhost.localdomain kill[13156]: -h, --help ? ? 显示此…出
2月 08 16:54:45 localhost.localdomain kill[13156]: -V, --version ?输出版…出
2月 08 16:54:45 localhost.localdomain kill[13156]: 更多信息请参阅 kill(1)。
2月 08 16:54:45 localhost.localdomain systemd[1]: nginx.service: control...
2月 08 16:54:45 localhost.localdomain systemd[1]: Unit nginx.service ent...
2月 08 16:54:45 localhost.localdomain systemd[1]: nginx.service failed.
Hint: Some lines were ellipsized, use -l to show in full.
[root@localhost ~]# systemctl status keepalived.service? ? ? ? ? ? ?#keepalived服务也随之关闭,说明nginx中的check_nginx.sh生效
● keepalived.service - LVS and VRRP High Availability Monitor
? ?Loaded: loaded (/usr/lib/systemd/system/keepalived.service; disabled; vendor preset: disabled)
? ?Active: inactive (dead)
2月 08 16:39:26 localhost.localdomain Keepalived_vrrp[7319]: VRRP_Instan...
2月 08 16:39:26 localhost.localdomain Keepalived_vrrp[7319]: Sending gra...
2月 08 16:39:26 localhost.localdomain Keepalived_vrrp[7319]: Sending gra...
2月 08 16:39:26 localhost.localdomain Keepalived_vrrp[7319]: Sending gra...
2月 08 16:39:26 localhost.localdomain Keepalived_vrrp[7319]: Sending gra...
2月 08 16:54:46 localhost.localdomain Keepalived[7317]: Stopping
2月 08 16:54:46 localhost.localdomain systemd[1]: Stopping LVS and VRRP ...
2月 08 16:54:46 localhost.localdomain Keepalived_vrrp[7319]: VRRP_Instan...
2月 08 16:54:46 localhost.localdomain Keepalived_vrrp[7319]: VRRP_Instan...
2月 08 16:54:47 localhost.localdomain systemd[1]: Stopped LVS and VRRP H...
Hint: Some lines were ellipsized, use -l to show in full.[root@localhost ~]# ip a
1: lo: <LOOPBACK,UP,LOWER_UP> mtu 65536 qdisc noqueue state UNKNOWN qlen 1
? ? link/loopback 00:00:00:00:00:00 brd 00:00:00:00:00:00
? ? inet 127.0.0.1/8 scope host lo
? ? ? ?valid_lft forever preferred_lft forever
? ? inet6 ::1/128 scope host?
? ? ? ?valid_lft forever preferred_lft forever
2: ens33: <BROADCAST,MULTICAST,UP,LOWER_UP> mtu 1500 qdisc pfifo_fast state UP qlen 1000
? ? link/ether 00:0c:29:ba:e6:18 brd ff:ff:ff:ff:ff:ff
? ? inet 192.168.35.104/24 brd 192.168.35.255 scope global ens33
? ? ? ?valid_lft forever preferred_lft forever
? ? inet6 fe80::6ec5:6d7:1b18:466e/64 scope link tentative dadfailed?
? ? ? ?valid_lft forever preferred_lft forever
? ? inet6 fe80::2a3:b621:ca01:463e/64 scope link tentative dadfailed?
? ? ? ?valid_lft forever preferred_lft forever
? ? inet6 fe80::d4e2:ef9e:6820:145a/64 scope link tentative dadfailed?
? ? ? ?valid_lft forever preferred_lft forever
3: virbr0: <NO-CARRIER,BROADCAST,MULTICAST,UP> mtu 1500 qdisc noqueue state DOWN qlen 1000
? ? link/ether 52:54:00:14:39:99 brd ff:ff:ff:ff:ff:ff
? ? inet 192.168.122.1/24 brd 192.168.122.255 scope global virbr0
? ? ? ?valid_lft forever preferred_lft forever
4: virbr0-nic: <BROADCAST,MULTICAST> mtu 1500 qdisc pfifo_fast master virbr0 state DOWN qlen 1000
? ? link/ether 52:54:00:14:39:99 brd ff:ff:ff:ff:ff:ff[root@localhost ~]# ip a
1: lo: <LOOPBACK,UP,LOWER_UP> mtu 65536 qdisc noqueue state UNKNOWN qlen 1
? ? link/loopback 00:00:00:00:00:00 brd 00:00:00:00:00:00
? ? inet 127.0.0.1/8 scope host lo
? ? ? ?valid_lft forever preferred_lft forever
? ? inet6 ::1/128 scope host?
? ? ? ?valid_lft forever preferred_lft forever
2: ens33: <BROADCAST,MULTICAST,UP,LOWER_UP> mtu 1500 qdisc pfifo_fast state UP qlen 1000
? ? link/ether 00:0c:29:1d:ec:b0 brd ff:ff:ff:ff:ff:ff
? ? inet 192.168.35.105/24 brd 192.168.35.255 scope global ens33
? ? ? ?valid_lft forever preferred_lft forever
? ? inet 192.168.35.200/24 scope global secondary ens33? ? ? ? ? ? ? ? #漂移地址转移到lb02中
? ? ? ?valid_lft forever preferred_lft forever
? ? inet6 fe80::6ec5:6d7:1b18:466e/64 scope link tentative dadfailed?
? ? ? ?valid_lft forever preferred_lft forever
? ? inet6 fe80::2a3:b621:ca01:463e/64 scope link tentative dadfailed?
? ? ? ?valid_lft forever preferred_lft forever
? ? inet6 fe80::d4e2:ef9e:6820:145a/64 scope link tentative dadfailed?
? ? ? ?valid_lft forever preferred_lft forever
3: virbr0: <NO-CARRIER,BROADCAST,MULTICAST,UP> mtu 1500 qdisc noqueue state DOWN qlen 1000
? ? link/ether 52:54:00:14:39:99 brd ff:ff:ff:ff:ff:ff
? ? inet 192.168.122.1/24 brd 192.168.122.255 scope global virbr0
? ? ? ?valid_lft forever preferred_lft forever
4: virbr0-nic: <BROADCAST,MULTICAST> mtu 1500 qdisc pfifo_fast master virbr0 state DOWN qlen 1000
? ? link/ether 52:54:00:14:39:99 brd ff:ff:ff:ff:ff:ff[root@localhost ~]# systemctl start nginx
[root@localhost ~]# systemctl start keepalived.service?
[root@localhost ~]# ip a
1: lo: <LOOPBACK,UP,LOWER_UP> mtu 65536 qdisc noqueue state UNKNOWN qlen 1
? ? link/loopback 00:00:00:00:00:00 brd 00:00:00:00:00:00
? ? inet 127.0.0.1/8 scope host lo
? ? ? ?valid_lft forever preferred_lft forever
? ? inet6 ::1/128 scope host?
? ? ? ?valid_lft forever preferred_lft forever
2: ens33: <BROADCAST,MULTICAST,UP,LOWER_UP> mtu 1500 qdisc pfifo_fast state UP qlen 1000
? ? link/ether 00:0c:29:ba:e6:18 brd ff:ff:ff:ff:ff:ff
? ? inet 192.168.35.104/24 brd 192.168.35.255 scope global ens33
? ? ? ?valid_lft forever preferred_lft forever
? ? inet 192.168.35.200/24 scope global secondary ens33? ? ? ? ? ? ?? #漂移地址又转移回lb01中
? ? ? ?valid_lft forever preferred_lft forever
? ? inet6 fe80::6ec5:6d7:1b18:466e/64 scope link tentative dadfailed?
? ? ? ?valid_lft forever preferred_lft forever
? ? inet6 fe80::2a3:b621:ca01:463e/64 scope link tentative dadfailed?
? ? ? ?valid_lft forever preferred_lft forever
? ? inet6 fe80::d4e2:ef9e:6820:145a/64 scope link tentative dadfailed?
? ? ? ?valid_lft forever preferred_lft forever
3: virbr0: <NO-CARRIER,BROADCAST,MULTICAST,UP> mtu 1500 qdisc noqueue state DOWN qlen 1000
? ? link/ether 52:54:00:14:39:99 brd ff:ff:ff:ff:ff:ff
? ? inet 192.168.122.1/24 brd 192.168.122.255 scope global virbr0
? ? ? ?valid_lft forever preferred_lft forever
4: virbr0-nic: <BROADCAST,MULTICAST> mtu 1500 qdisc pfifo_fast master virbr0 state DOWN qlen 1000
? ? link/ether 52:54:00:14:39:99 brd ff:ff:ff:ff:ff:ff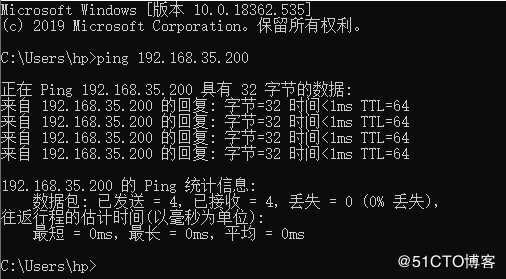
[root@localhost ~]# cat /usr/share/nginx/html/index.html?
<!DOCTYPE html>
<html>
<head>
<title>Welcome to nginx!</title>
<style>
? ? body {
? ? ? ? width: 35em;
? ? ? ? margin: 0 auto;
? ? ? ? font-family: Tahoma, Verdana, Arial, sans-serif;
? ? }
</style>
</head>
<body>
<h1>Welcome to master ginx!</h1>
<p>If you see this page, the nginx web server is successfully installed and
working. Further configuration is required.</p>

<p>For online documentation and support please refer to
<a href="http://nginx.org/">nginx.org</a>.<br/>
Commercial support is available at
<a href="http://nginx.com/">nginx.com</a>.</p>

<p><em>Thank you for using nginx.</em></p>
</body>
</html>

在lb01查看index.html

[root@localhost ~]# cat /usr/share/nginx/html/index.html?
<!DOCTYPE html>
<html>
<head>
<title>Welcome to nginx!</title>
<style>
? ? body {
? ? ? ? width: 35em;
? ? ? ? margin: 0 auto;
? ? ? ? font-family: Tahoma, Verdana, Arial, sans-serif;
? ? }
</style>
</head>
<body>
<h1>Welcome to backup nginx!</h1>
<p>If you see this page, the nginx web server is successfully installed and
working. Further configuration is required.</p>

<p>For online documentation and support please refer to
<a href="http://nginx.org/">nginx.org</a>.<br/>
Commercial support is available at
<a href="http://nginx.com/">nginx.com</a>.</p>

<p><em>Thank you for using nginx.</em></p>
</body>
</html>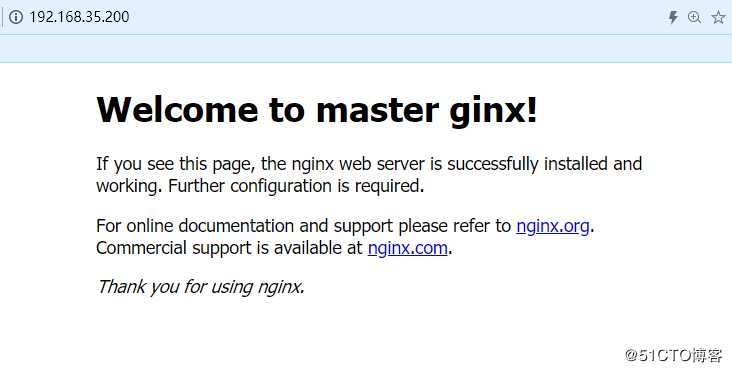
[root@localhost ~]# vim /opt/kubernetes/cfg/bootstrap.kubeconfig
[root@localhost ~]# vim /opt/kubernetes/cfg/kubelet.kubeconfig
[root@localhost ~]# vim /opt/kubernetes/cfg/kube-proxy.kubeconfig

#全部都改为VIP地址

server: https://192.168.35.200:6443[root@localhost ~]# cd /opt/kubernetes/cfg/
[root@localhost cfg]# grep 200 *
bootstrap.kubeconfig: ? ?server: https://192.168.35.200:6443
kubelet.kubeconfig: ? ?server: https://192.168.35.200:6443
kube-proxy.kubeconfig: ? ?server: https://192.168.35.200:6443[root@localhost cfg]# systemctl restart kubelet.service?
[root@localhost cfg]# systemctl restart kube-proxy.service?[root@localhost ~]# tail /var/log/nginx/k8s-access.log
192.168.35.102 192.168.35.100:6443 - [08/Feb/2020:17:42:00 +0800] 200 1119
192.168.35.102 192.168.35.103:6443 - [08/Feb/2020:17:42:00 +0800] 200 1121
192.168.35.101 192.168.35.100:6443 - [08/Feb/2020:17:42:14 +0800] 200 1121
192.168.35.101 192.168.35.100:6443 - [08/Feb/2020:17:42:14 +0800] 200 1121[root@localhost k8s]# kubectl run nginx --image=nginx
kubectl run --generator=deployment/apps.v1beta1 is DEPRECATED and will be removed in a future version. Use kubectl create instead.
deployment.apps/nginx created[root@localhost k8s]# kubectl get pods
NAME ? ? ? ? ? ? ? ? ? ?READY ? STATUS ? ?RESTARTS ? AGE
nginx-dbddb74b8-cfggf ? 1/1? ? ? ? 0 ? ? ContainerCreating? ? ?64s? ? ? ? ? ? ? ? #正在创建中
[root@localhost k8s]# kubectl get pods
NAME ? ? ? ? ? ? ? ? ? ?READY ? STATUS ? ?RESTARTS ? AGE
nginx-dbddb74b8-cfggf ? 1/1 ? ? Running ? 0 ? ? ? ? ?74s? ? ? ? ? ? ? ? ? ?#创建完成,运行中[root@localhost k8s]# kubectl logs nginx-dbddb74b8-cfggf
Error from server (Forbidden): Forbidden (user=system:anonymous, verb=get, resource=nodes, subresource=proxy) ( pods/log nginx-dbddb74b8-cfggf)[root@localhost k8s]# kubectl create clusterrolebinding cluster-system-anonymous --clusterrole=cluster-admin --user=system:anonymous
clusterrolebinding.rbac.authorization.k8s.io/cluster-system-anonymous created[root@localhost k8s]# kubectl logs nginx-dbddb74b8-cfggf
//并不会出现报错,只是因为没有去访问,所以没有产生日志[root@localhost k8s]# kubectl get pods -o wide
NAME ? ? ? ? ? ? ? ? ? ?READY ? STATUS ? ?RESTARTS ? AGE ? IP ? ? ? ? ? ?NODE ? ? ? ? ? ? NOMINATED NODE
nginx-dbddb74b8-cfggf ? 1/1 ? ? Running ? 0 ? ? ? ? ?14m ? 172.17.45.2 ? 192.168.35.101 ? <none>[root@localhost cfg]# curl 172.17.45.2
<!DOCTYPE html>
<html>
<head>
<title>Welcome to nginx!</title>
<style>
? ? body {
? ? ? ? width: 35em;
? ? ? ? margin: 0 auto;
? ? ? ? font-family: Tahoma, Verdana, Arial, sans-serif;
? ? }
</style>
</head>
<body>
<h1>Welcome to nginx!</h1>
<p>If you see this page, the nginx web server is successfully installed and
working. Further configuration is required.</p>
<p>For online documentation and support please refer to
<a href="http://nginx.org/">nginx.org</a>.<br/>
Commercial support is available at
<a href="http://nginx.com/">nginx.com</a>.</p>
<p><em>Thank you for using nginx.</em></p>
</body>
</html>[root@localhost k8s]# kubectl logs nginx-dbddb74b8-cfggf
172.17.45.1 - - [08/Feb/2020:10:10:29 +0000] "GET / HTTP/1.1" 200 612 "-" "curl/7.29.0" "-"标签:curl 防火墙 tor version stream default 错误 firewalld 实验
原文地址:https://blog.51cto.com/14449541/2470021